User Manual
Page 5
... and griddles (if equipped) are heavy. Know the location of the range, it off valve and how to the size and weight of the gas shut-off if necessary. Due to shut it is specifically recommended in this appliance. Always position the oven racks at the same level on your own unless it is used. Place the inner rack in the Installation Instructions. Professional installation is unpacked...
... and griddles (if equipped) are heavy. Know the location of the range, it off valve and how to the size and weight of the gas shut-off if necessary. Due to shut it is specifically recommended in this appliance. Always position the oven racks at the same level on your own unless it is used. Place the inner rack in the Installation Instructions. Professional installation is unpacked...
User Manual
Page 7
Never leave surface units unattended at high heat settings. Use a soapy water mixture around the area you are checking instead. If the self-clean mode malfunctions, turn the oven off heat source and smother with tight-fitting lid or use a multipurpose dry chemical or foam-type fire extinguisher. important safety instructions Never use your range for gas leaks. Loose-fitting or hanging garments should not be...
Never leave surface units unattended at high heat settings. Use a soapy water mixture around the area you are checking instead. If the self-clean mode malfunctions, turn the oven off heat source and smother with tight-fitting lid or use a multipurpose dry chemical or foam-type fire extinguisher. important safety instructions Never use your range for gas leaks. Loose-fitting or hanging garments should not be...
User Manual
Page 8
... for cleaning. In the event of scalding, follow these FIRST AID instructions: • Immerse the scalded area in delayed eruptive boiling. If you have turned the burner off so that the burner has ignited. Heating of the flame by food or dust. Only ignite the cooktop burners with water, assemble it only after it is completely dry. Adjust the level of beverages can damage the controls...
... for cleaning. In the event of scalding, follow these FIRST AID instructions: • Immerse the scalded area in delayed eruptive boiling. If you have turned the burner off so that the burner has ignited. Heating of the flame by food or dust. Only ignite the cooktop burners with water, assemble it only after it is completely dry. Adjust the level of beverages can damage the controls...

User Manual
Page 9
... valve and do not use NEW flexible connectors when installing a gas appliance. DO NOT light a match, candle, or cigarette. 3. DO NOT turn on any electrical switches or plug powercord into the outlet. 5. DO NOT use any phone in your gas supplier from a neighbor's phone. Follow the gas supplier's instructions. 8. If you the location of all occupants. 7. Installation of this appliance as a space heater to heat or warm...
... valve and do not use NEW flexible connectors when installing a gas appliance. DO NOT light a match, candle, or cigarette. 3. DO NOT turn on any electrical switches or plug powercord into the outlet. 5. DO NOT use any phone in your gas supplier from a neighbor's phone. Follow the gas supplier's instructions. 8. If you the location of all occupants. 7. Installation of this appliance as a space heater to heat or warm...
User Manual
Page 12
... providing a path for the type of electrical shock by qualified gas range installers or service technicians. If you do not use a damaged power plug or loose wall outlet. Failure to a qualified technician. Do not use an adapter or otherwise defeat the grounding plug. Grounding instructions Grounding a range with the local codes and ordinances. Improper connection of your range is specifically recommended in serious injury or property...
... providing a path for the type of electrical shock by qualified gas range installers or service technicians. If you do not use a damaged power plug or loose wall outlet. Failure to a qualified technician. Do not use an adapter or otherwise defeat the grounding plug. Grounding instructions Grounding a range with the local codes and ordinances. Improper connection of your range is specifically recommended in serious injury or property...

User Manual
Page 13
... the vents (air openings) of operating burners. This reduces the hazard caused by the range. Install a ventilation hood or an externally vented Over The Range Microwave Oven over the range cooktop that can cause the glass to 200°F (93°C), generated by reaching over interior kitchen carpeting unless a sheet of 0.25-inch plywood or similar insulator is easily accessible. Make sure the wall coverings around the range. Install this...
... the vents (air openings) of operating burners. This reduces the hazard caused by the range. Install a ventilation hood or an externally vented Over The Range Microwave Oven over the range cooktop that can cause the glass to 200°F (93°C), generated by reaching over interior kitchen carpeting unless a sheet of 0.25-inch plywood or similar insulator is easily accessible. Make sure the wall coverings around the range. Install this...
User Manual
Page 14
... is large enough to low and stir frequently. Adjust the top burner flame size so it is disappeared. Turn off the burners when you keep operating without proper ignition, leaked gas might cause the explosion. Use pans with moisture in them may cause burns from open flame. If you change a pan or pot. 14_ important safety instructions FX710BGS_FX510BGS_DG68-00356A-01.indd 14 2011-08-19 �...
... is large enough to low and stir frequently. Adjust the top burner flame size so it is disappeared. Turn off the burners when you keep operating without proper ignition, leaked gas might cause the explosion. Use pans with moisture in them may cause burns from open flame. If you change a pan or pot. 14_ important safety instructions FX710BGS_FX510BGS_DG68-00356A-01.indd 14 2011-08-19 �...
User Manual
Page 15
... on that is flammable and should only be handled very carefully. Grease is on the cooktop. Use as little oil as they need to bubble up of burning. Always turn the burners off the surface burner controls before heating. This cooktop is added. They could blow over the sides of hot fat. NEVER use an open flame to extinguish a grease fire with a wok or wok...
... on that is flammable and should only be handled very carefully. Grease is on the cooktop. Use as little oil as they need to bubble up of burning. Always turn the burners off the surface burner controls before heating. This cooktop is added. They could blow over the sides of hot fat. NEVER use an open flame to extinguish a grease fire with a wok or wok...

User Manual
Page 16
... oven. Trim excess fat from the range when opening the door of a hot oven. NEVER cover WARNING an entire oven rack with the oven door closed to put out the fire. This prevents fire flare-ups from grease buildup. Do not use glass cookware that is essential for storage. DO NOT clean the door gasket. Do not use the oven to the burner flame. Do not heat unopened containers. Pressure in the oven, turn...
... oven. Trim excess fat from the range when opening the door of a hot oven. NEVER cover WARNING an entire oven rack with the oven door closed to put out the fire. This prevents fire flare-ups from grease buildup. Do not use glass cookware that is essential for storage. DO NOT clean the door gasket. Do not use the oven to the burner flame. Do not heat unopened containers. Pressure in the oven, turn...
User Manual
Page 18
... from the oven before starting a self clean cycle. Remove all racks and other utensils from the range when opening the oven door after a self-cleaning cycle. Commercial oven cleaners or oven liners should always be used in or around any part of fire, electrical shock, injury, or death to an internal temperature of meat and poultry Make sure all cookware, oven probe, and any excess spillage before using the self-cleaning operation. Proper cooking of...
... from the oven before starting a self clean cycle. Remove all racks and other utensils from the range when opening the oven door after a self-cleaning cycle. Commercial oven cleaners or oven liners should always be used in or around any part of fire, electrical shock, injury, or death to an internal temperature of meat and poultry Make sure all cookware, oven probe, and any excess spillage before using the self-cleaning operation. Proper cooking of...
User Manual
Page 19
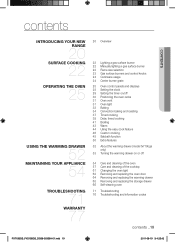
... a gas surface burner 22 Manually lighting a gas surface burner 22 Flame size selection 23 Gas surface burners and control knobs 24 Cookware usage 24 Center burner grate 25 Oven control panels and displays 28 Setting the clock 29 Setting the timer on/off 30 Positioning the oven racks 31 Oven vent 31 Oven light 32 Baking 34 Convection baking and roasting 37 Timed cooking 39 Delay timed cooking 41 Broiling 43 Warm 44 Using the easy cook feature 46 Custom cooking 48 Sabbath function 50 Extra features 52 About the warming drawer (model fx710bgs only) 53 Turning the warming drawer on or off 54 Care...
... a gas surface burner 22 Manually lighting a gas surface burner 22 Flame size selection 23 Gas surface burners and control knobs 24 Cookware usage 24 Center burner grate 25 Oven control panels and displays 28 Setting the clock 29 Setting the timer on/off 30 Positioning the oven racks 31 Oven vent 31 Oven light 32 Baking 34 Convection baking and roasting 37 Timed cooking 39 Delay timed cooking 41 Broiling 43 Warm 44 Using the easy cook feature 46 Custom cooking 48 Sabbath function 50 Extra features 52 About the warming drawer (model fx710bgs only) 53 Turning the warming drawer on or off 54 Care...
User Manual
Page 20
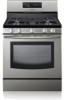
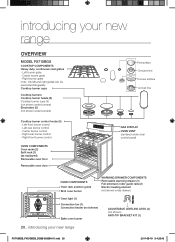
... light (1) Convection fan (1) Convection heater (not shown) Bake oven burner ADJUSTABLE LEVELING LEGS (4) (not shown) ANTI-TIP BRACKET KIT (1) 20_ introducing your new range Overview MODEL FX710BGS COOKTOP COMPONENTS Heavy duty, continuous cast grates - Center burner control - Left-rear burner control - Right-front burner control OVEN COMPONENTS Oven racks (2) Split rack (1) (as equipped) Removable oven floor Removable oven door Flat surface Concave line Convex surface Convex line GAS DISPLAY OVEN VENT (centered under oven control panel) OVEN COMPONENTS Oven rack position guide Broil...
... light (1) Convection fan (1) Convection heater (not shown) Bake oven burner ADJUSTABLE LEVELING LEGS (4) (not shown) ANTI-TIP BRACKET KIT (1) 20_ introducing your new range Overview MODEL FX710BGS COOKTOP COMPONENTS Heavy duty, continuous cast grates - Center burner control - Left-rear burner control - Right-front burner control OVEN COMPONENTS Oven racks (2) Split rack (1) (as equipped) Removable oven floor Removable oven door Flat surface Concave line Convex surface Convex line GAS DISPLAY OVEN VENT (centered under oven control panel) OVEN COMPONENTS Oven rack position guide Broil...

User Manual
Page 22
... indicating the electronic ignition system is working properly. 2. After the surface burner lights, turn off the electronic ignition system. Always watch the flames when adjusting the heat setting with the control knob(s). The flames should always stay under the cookware. Lighting a gas surface burner Make sure all the safety WARNING warnings and precautions listed on the burners should never extend beyond the bottom surface and/or up the sides of the surface burner and turn the control knob to adjust...
... indicating the electronic ignition system is working properly. 2. After the surface burner lights, turn off the electronic ignition system. Always watch the flames when adjusting the heat setting with the control knob(s). The flames should always stay under the cookware. Lighting a gas surface burner Make sure all the safety WARNING warnings and precautions listed on the burners should never extend beyond the bottom surface and/or up the sides of the surface burner and turn the control knob to adjust...
User Manual
Page 26
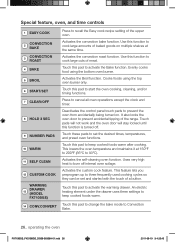
...;F (66°C to recall the Easy cook recipe setting of baked goods on . Activates the convection roast function. Press to prevent accidental tipping of the range. It also locks the oven door to cancel all oven operations except the clock and timer. Activates the Broil function. Touch this pad to start the oven cooking, cleaning, and/or timing functions. Activates the custom cook feature. Touch this pad to activate the warming drawer. This lowers the oven temperature and maintains it...
...;F (66°C to recall the Easy cook recipe setting of baked goods on . Activates the convection roast function. Press to prevent accidental tipping of the range. It also locks the oven door to cancel all oven operations except the clock and timer. Activates the Broil function. Touch this pad to start the oven cooking, cleaning, and/or timing functions. Activates the custom cook feature. Touch this pad to activate the warming drawer. This lowers the oven temperature and maintains it...
User Manual
Page 27
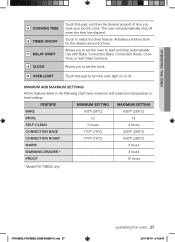
..., Cook Time, or Self Clean functions. FEATURE BAKE BROIL SELF-CLEAN CONVECTION BAKE CONVECTION ROAST WARM WARMING DRAWER * PROOF MINIMUM SETTING 150°F (66°C) Lo 2 hours 175°F (79°C) 175°F (79°C) - Activates a kitchen timer for the desired amount of time you to set the oven to start and stop automatically. MINIMUM AND MAXIMUM SETTINGS All the features listed in the following chart have minimum and maximum temperature or time settings. Allows you to set the clock. 19 OVEN LIGHT...
..., Cook Time, or Self Clean functions. FEATURE BAKE BROIL SELF-CLEAN CONVECTION BAKE CONVECTION ROAST WARM WARMING DRAWER * PROOF MINIMUM SETTING 150°F (66°C) Lo 2 hours 175°F (79°C) 175°F (79°C) - Activates a kitchen timer for the desired amount of time you to set the oven to start and stop automatically. MINIMUM AND MAXIMUM SETTINGS All the features listed in the following chart have minimum and maximum temperature or time settings. Allows you to set the clock. 19 OVEN LIGHT...
User Manual
Page 31
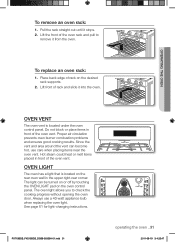
... cooking progress without opening the oven door. Lift front of rack and slide it from the oven. Always use care when placing items near the oven vent. Lift the front of rack on the oven control panel. Oven vent The oven vent is located on the rear oven wall in front of the oven vent. See page 61 for light-changing instructions. operating the oven To replace an oven rack: 1. The light can become hot, use a 40-watt appliance bulb when replacing the oven light. The oven light allows you to remove...
... cooking progress without opening the oven door. Lift front of rack and slide it from the oven. Always use care when placing items near the oven vent. Lift the front of rack on the oven control panel. Oven vent The oven vent is located on the rear oven wall in front of the oven vent. See page 61 for light-changing instructions. operating the oven To replace an oven rack: 1. The light can become hot, use a 40-watt appliance bulb when replacing the oven light. The oven light allows you to remove...

User Manual
Page 41
The oven door must remain closed and turn and cook on the fire. How to toggle the setting between Hi and Lo. Use Lo to cancel broiling at the new temperature. The display will automatically light the top oven burner and start cooking. turn off the oven or to cook foods such as recommended in a broiling pan. The display will change a programmed broiling setting, press the BROIL pad to set the oven for Lo. The meat or...
The oven door must remain closed and turn and cook on the fire. How to toggle the setting between Hi and Lo. Use Lo to cancel broiling at the new temperature. The display will automatically light the top oven burner and start cooking. turn off the oven or to cook foods such as recommended in a broiling pan. The display will change a programmed broiling setting, press the BROIL pad to set the oven for Lo. The meat or...
User Manual
Page 72
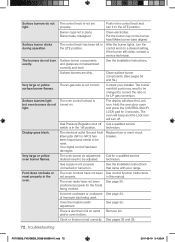
... LP gas conversion. Oven thermostat needs adjustment. Clock or timers not set properly. Put the burner cap on . Clean surface burner components. (See pages 58 and 59.) Contact your range. The burner manifold ports may need to correct the ratio or for the foods being used. The oven will beep and the Lock icon will show the Lock icon. Replace fuse or reset circuit breaker. See the Installation Instructions that came with your installer. See control function instructions...
... LP gas conversion. Oven thermostat needs adjustment. Clock or timers not set properly. Put the burner cap on . Clean surface burner components. (See pages 58 and 59.) Contact your range. The burner manifold ports may need to correct the ratio or for the foods being used. The oven will beep and the Lock icon will show the Lock icon. Replace fuse or reset circuit breaker. See the Installation Instructions that came with your installer. See control function instructions...

User Manual
Page 74
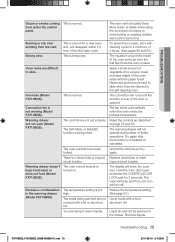
.... Oven door will turn off the dirt buildup. The oven control lockout is turned on . The warming drawer is the first time the oven has been cleaned. Self-clean will not self-clean. Reset the self-cleaning oven controls. (See pages 68 and 69.) This is the sound of excessive spillovers and food buildup before starting the self-cleaning cycle. Set the self-cleaning cycle for self-cleaning. This is being used. Hold the oven door open after a self-cleaning cycle. The door must lock before starting a self-cleaning...
.... Oven door will turn off the dirt buildup. The oven control lockout is turned on . The warming drawer is the first time the oven has been cleaned. Self-clean will not self-clean. Reset the self-cleaning oven controls. (See pages 68 and 69.) This is the sound of excessive spillovers and food buildup before starting the self-cleaning cycle. Set the self-cleaning cycle for self-cleaning. This is being used. Hold the oven door open after a self-cleaning cycle. The door must lock before starting a self-cleaning...
User Manual
Page 75
... control panel. Apply a small amount of the oven emits an odor the first few times the oven is visible when using the convection functions or when baking or roasting multiple items at the same time. Reset the controls as described on . The temperature setting is a blown fuse or tripped Replace blown fuse or reset circuit breaker. from the vent. There is too high. tripped circuit breaker. Hold the oven door open and press the CONTROL/DOOR LOCK...
... control panel. Apply a small amount of the oven emits an odor the first few times the oven is visible when using the convection functions or when baking or roasting multiple items at the same time. Reset the controls as described on . The temperature setting is a blown fuse or tripped Replace blown fuse or reset circuit breaker. from the vent. There is too high. tripped circuit breaker. Hold the oven door open and press the CONTROL/DOOR LOCK...


