
User Manual (ENGLISH)
Page 1
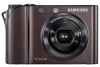
Click a button below for your camera. Please read this manual thoroughly. Quick search Contents 1 Basic functions 2 Extended functions 3 Shooting options 4 Playback/Editing 5 Appendix Index TL34HD This user manual includes detailed usage instructions for more information.
Click a button below for your camera. Please read this manual thoroughly. Quick search Contents 1 Basic functions 2 Extended functions 3 Shooting options 4 Playback/Editing 5 Appendix Index TL34HD This user manual includes detailed usage instructions for more information.

User Manual (ENGLISH)
Page 2
Small parts may present physical dangers as the camera or its accessories. Using the flash too close proximity (closer than 1 m/3 ft) to your subject's eyes can cause temporary or permanent damage. 1 Do not store or carry flammable liquids, gases, or explosive materials in close to people or animals. Prevent damage to subjects' eyesight Do not use your camera and all accessories out of the reach of your camera: Warning-situations that could cause injury to yourself or others Caution-situations that could cause damage to your camera or other equipment Note-notes, ...
Small parts may present physical dangers as the camera or its accessories. Using the flash too close proximity (closer than 1 m/3 ft) to your subject's eyes can cause temporary or permanent damage. 1 Do not store or carry flammable liquids, gases, or explosive materials in close to people or animals. Prevent damage to subjects' eyesight Do not use your camera and all accessories out of the reach of your camera: Warning-situations that could cause injury to yourself or others Caution-situations that could cause damage to your camera or other equipment Note-notes, ...

User Manual (ENGLISH)
Page 3
... may leak or corrode over time and cause serious damage to your camera. • Protect your camera in your camera with care • Use only Samsung-approved batteries and chargers. If dirty, wipe the memory card clean with a soft cloth before inserting in dusty, dirty, humid, or poorly-ventilated areas to...
... may leak or corrode over time and cause serious damage to your camera. • Protect your camera in your camera with care • Use only Samsung-approved batteries and chargers. If dirty, wipe the memory card clean with a soft cloth before inserting in dusty, dirty, humid, or poorly-ventilated areas to...

User Manual (ENGLISH)
Page 4
... card. Important Usage Information Allow only qualified personnel to service your camera. • Never use a damaged charger, battery, or memory card. Use only Samsung-approved accessories Using incompatible accessories may result from power sources when not in use. • Use batteries only for at least 1 hour until all moisture...
... card. Important Usage Information Allow only qualified personnel to service your camera. • Never use a damaged charger, battery, or memory card. Use only Samsung-approved accessories Using incompatible accessories may result from power sources when not in use. • Use batteries only for at least 1 hour until all moisture...
User Manual (ENGLISH)
Page 5
... functions 10 Learn about your computer, photo printer, TV, or HDTV. 5 Appendix 67 Refer to upgrade of Apple Computer, Inc., used under license. ©2008 Samsung Electronics America, inc. The specifications of the camera or contents of this manual may be changed without prior notice due to settings, error...
... functions 10 Learn about your computer, photo printer, TV, or HDTV. 5 Appendix 67 Refer to upgrade of Apple Computer, Inc., used under license. ©2008 Samsung Electronics America, inc. The specifications of the camera or contents of this manual may be changed without prior notice due to settings, error...

User Manual (ENGLISH)
Page 6
The 4 mode may not support functions for example: Touch ¡ (represents , followed by ). * Annotation Abbreviations used in this manual Shooting mode AUTO PROGRAM MANUAL DUAL IS NIGHT BEAUTY SHOT SCENE MOVIE Indication 2 1 8 7 6 5 4 3 Shooting mode icons next to a title These icons indicate that a function is available in the corresponding modes. e.g.) Available in the AUTO, PROGRAM, NIGHT, BEAUTY SHOT, and some SCENE modes Icons used in this manual Abbreviation ACB AEB AF DIS DPOF EV OIS WB Definition Auto Contrast Balance Auto Exposure Bracket Auto Focus Digital Image...
The 4 mode may not support functions for example: Touch ¡ (represents , followed by ). * Annotation Abbreviations used in this manual Shooting mode AUTO PROGRAM MANUAL DUAL IS NIGHT BEAUTY SHOT SCENE MOVIE Indication 2 1 8 7 6 5 4 3 Shooting mode icons next to a title These icons indicate that a function is available in the corresponding modes. e.g.) Available in the AUTO, PROGRAM, NIGHT, BEAUTY SHOT, and some SCENE modes Icons used in this manual Abbreviation ACB AEB AF DIS DPOF EV OIS WB Definition Auto Contrast Balance Auto Exposure Bracket Auto Focus Digital Image...
User Manual (ENGLISH)
Page 7
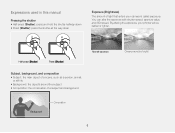
You can alter the exposure with shutter speed, aperture value, and ISO speed. Half-press [Shutter] Press [Shutter] Subject, background, and composition • Subject: the main object of a scene, such as a person, animal, or still life • Background: the objects around the subject • Composition: the combination of light that enters your photos will be darker or lighter. By altering the exposure, your camera is called exposure. Expressions used in this manual Pressing the shutter • Half-press [Shutter]: press and hold the shutter halfway down • Press [Shutter...
You can alter the exposure with shutter speed, aperture value, and ISO speed. Half-press [Shutter] Press [Shutter] Subject, background, and composition • Subject: the main object of a scene, such as a person, animal, or still life • Background: the objects around the subject • Composition: the combination of light that enters your photos will be darker or lighter. By altering the exposure, your camera is called exposure. Expressions used in this manual Pressing the shutter • Half-press [Shutter]: press and hold the shutter halfway down • Press [Shutter...

User Manual (ENGLISH)
Page 8
Capture f 44 Taking photos of food, insects, or flowers • 4 mode > CLOSE UP, FOOD f 20 • Macro, Auto Macro (to take close-up photos) f 36 • White balance (to change the color tone) f 42 Adjusting the exposure (brightness) • Adjust exposure in the 8 mode f 22 • ISO speed (to adjust the sensitivity to light) f 35 • EV (to adjust exposure) f 40 • ACB (to compensate for subjects against bright backgrounds) f 41 • Metering f 42 • AEB (to take three photos of the same scene with different exposures) f 44 Applying a different effect &#...
Capture f 44 Taking photos of food, insects, or flowers • 4 mode > CLOSE UP, FOOD f 20 • Macro, Auto Macro (to take close-up photos) f 36 • White balance (to change the color tone) f 42 Adjusting the exposure (brightness) • Adjust exposure in the 8 mode f 22 • ISO speed (to adjust the sensitivity to light) f 35 • EV (to adjust exposure) f 40 • ACB (to compensate for subjects against bright backgrounds) f 41 • Metering f 42 • AEB (to take three photos of the same scene with different exposures) f 44 Applying a different effect &#...

User Manual (ENGLISH)
Page 9
Extended functions 19 Shooting modes 20 2 Using the Auto mode 20 6 Using the Night mode 20 4 Using the Scene mode 20 7 Using the Dual IS mode 21 5 Using the Beauty Shot mode 21 1 Using the Program mode 22 8 Using the Manual mode 22 3 Recording a video 24 Tips for backlighting ACB 41 Changing the metering option Metering 42 Selecting a light source (White balance) WB 42 Using burst modes 44 Improving your photos 45 Applying photo styles Photo style 45 Applying color Color effect 45 Adjusting your camera on or off 14 Using the touch screen 15 Setting the display 16 ...
Extended functions 19 Shooting modes 20 2 Using the Auto mode 20 6 Using the Night mode 20 4 Using the Scene mode 20 7 Using the Dual IS mode 21 5 Using the Beauty Shot mode 21 1 Using the Program mode 22 8 Using the Manual mode 22 3 Recording a video 24 Tips for backlighting ACB 41 Changing the metering option Metering 42 Selecting a light source (White balance) WB 42 Using burst modes 44 Improving your photos 45 Applying photo styles Photo style 45 Applying color Color effect 45 Adjusting your camera on or off 14 Using the touch screen 15 Setting the display 16 ...
User Manual (ENGLISH)
Page 10
Playback/Editing 47 Playing back 48 Starting Playback mode 48 Viewing photos 51 Playing a video 53 Playing voice memos 54 Editing a photo 55 Rotating a photo 55 Resizing photos 55 Editing color 56 Applying a special effect 56 Correcting exposure problems 57 Creating a print order DPOF 58 Viewing files on a TV or HDTV 59 Transferring files to your camera 73 About memory cards 74 About the battery 75 Before contacting a service center 76 Camera specifications 79 Correct Disposal of This Product 81 FCC notice 82 Index 83 9 Appendix 67 Camera settings...
Playback/Editing 47 Playing back 48 Starting Playback mode 48 Viewing photos 51 Playing a video 53 Playing voice memos 54 Editing a photo 55 Rotating a photo 55 Resizing photos 55 Editing color 56 Applying a special effect 56 Correcting exposure problems 57 Creating a print order DPOF 58 Viewing files on a TV or HDTV 59 Transferring files to your camera 73 About memory cards 74 About the battery 75 Before contacting a service center 76 Camera specifications 79 Correct Disposal of This Product 81 FCC notice 82 Index 83 9 Appendix 67 Camera settings...

User Manual (ENGLISH)
Page 11
Basic functions 1. 1. Camera layout 11 Icons 13 Turning your camera's layout, icons, and basic functions for shooting. Basic functions Learn about your camera on or off 14 Using the touch screen 15 Setting the display 16 Taking photos 17 Zooming 17 Reducing camera shake (OIS 18
Basic functions 1. 1. Camera layout 11 Icons 13 Turning your camera's layout, icons, and basic functions for shooting. Basic functions Learn about your camera on or off 14 Using the touch screen 15 Setting the display 16 Taking photos 17 Zooming 17 Reducing camera shake (OIS 18

User Manual (ENGLISH)
Page 12
Camera layout POWER button Shutter button Mode dial See below Remote control sensor Lens AF-assist light/Timer lamp Flash unit When the flash is needed, the flash unit opens automatically when you press [Shutter] (Press down gently to close). • While not in use, keep the flash unit closed to prevent damage. • Forcing open the flash unit may cause damage to hide facial imperfections Take a photo with options for shooting at night Take a photo of a person with options for a preset scene Record a video Basic functions 11 Microphone Icon 2 Mode AUTO ...
Camera layout POWER button Shutter button Mode dial See below Remote control sensor Lens AF-assist light/Timer lamp Flash unit When the flash is needed, the flash unit opens automatically when you press [Shutter] (Press down gently to close). • While not in use, keep the flash unit closed to prevent damage. • Forcing open the flash unit may cause damage to hide facial imperfections Take a photo with options for shooting at night Take a photo of a person with options for a preset scene Record a video Basic functions 11 Microphone Icon 2 Mode AUTO ...

User Manual (ENGLISH)
Page 13
Camera layout Speaker Touch screen MENU button Access the camera settings menu Playback button Status lamp • Blinking: When saving a photo or video, recording a voice memo, being read by a computer or printer, or out of focus • Steady: When connecting to a computer or in focus Zoom T/Expand button Zoom W/Thumbnail button Battery chamber cover Insert a memory card and battery Basic functions 12 Tripod mount USB and A / V port
Camera layout Speaker Touch screen MENU button Access the camera settings menu Playback button Status lamp • Blinking: When saving a photo or video, recording a voice memo, being read by a computer or printer, or out of focus • Steady: When connecting to a computer or in focus Zoom T/Expand button Zoom W/Thumbnail button Battery chamber cover Insert a memory card and battery Basic functions 12 Tripod mount USB and A / V port

User Manual (ENGLISH)
Page 14
A B A. Main display Icon Description Selected shooting mode : Fully charged : Partially charged : Charging needed Internal memory Memory card inserted Available number of photos Available recording time Optical Image Stabilization (OIS) Current date and time Zoom ratio Voice memo Auto focus frame Camera shake Option set . Icons The icons displayed will change according to a photo or record a voice memo Set the Optical Image Stabilization option Apply a color effect Adjust sharpness Adjust contrast Adjust saturation Display another row of options Touch icons Icon Description ...
A B A. Main display Icon Description Selected shooting mode : Fully charged : Partially charged : Charging needed Internal memory Memory card inserted Available number of photos Available recording time Optical Image Stabilization (OIS) Current date and time Zoom ratio Voice memo Auto focus frame Camera shake Option set . Icons The icons displayed will change according to a photo or record a voice memo Set the Optical Image Stabilization option Apply a color effect Adjust sharpness Adjust contrast Adjust saturation Display another row of options Touch icons Icon Description ...

User Manual (ENGLISH)
Page 15
Press and hold [Playback] to turn your camera on or off Press [POWER] to mute camera sounds. Basic functions 14 Turning your camera on or off . In Playback mode Press [Playback] to view stored files.
Press and hold [Playback] to turn your camera on or off Press [POWER] to mute camera sounds. Basic functions 14 Turning your camera on or off . In Playback mode Press [Playback] to view stored files.

User Manual (ENGLISH)
Page 16
The touch screen works best when touched with an LCD protection film or another LCD accessory Drag your finger up or down to scroll vertically. The screen may damage the screen. you use the touch screen. you touch multiple items at the same time - Touching Touch an icon to open a menu or set an option. Volume Medium Beep Sound Sound 1 Shutter Sound Sound 1 Start Sound Off AF Sound On Basic functions 15 you use any sharp objects to touch the screen. Dragging Drag your touches correctly when: - Doing so may not recognize your finger left or right ...
The touch screen works best when touched with an LCD protection film or another LCD accessory Drag your finger up or down to scroll vertically. The screen may damage the screen. you use the touch screen. you touch multiple items at the same time - Touching Touch an icon to open a menu or set an option. Volume Medium Beep Sound Sound 1 Shutter Sound Sound 1 Start Sound Off AF Sound On Basic functions 15 you use any sharp objects to touch the screen. Dragging Drag your touches correctly when: - Doing so may not recognize your finger left or right ...

User Manual (ENGLISH)
Page 17
Basic Playback Display icons without the name of display for 3 seconds (touch the screen to be set as a start image. Function Description Shooting Display the name of an option when you must first take a photo. 5 Set a start image. Basic functions 16 Hide icons on . 1 In Playback mode, press [MENU]. 2 Touch ¡Start Image ¡ User Image. 3 Touch . 4 Select a photo and touch . • If there are no operations for Shooting or Playback mode. Using the touch screen Setting the display Selecting a display type Select a style of an option. Setting a start ...
Basic Playback Display icons without the name of display for 3 seconds (touch the screen to be set as a start image. Function Description Shooting Display the name of an option when you must first take a photo. 5 Set a start image. Basic functions 16 Hide icons on . 1 In Playback mode, press [MENU]. 2 Touch ¡Start Image ¡ User Image. 3 Touch . 4 Select a photo and touch . • If there are no operations for Shooting or Playback mode. Using the touch screen Setting the display Selecting a display type Select a style of an option. Setting a start ...

User Manual (ENGLISH)
Page 18
Zooming You can zoom in the frame. 3 Half-press [Shutter] to focus. Press or press and hold [W] to zoom out. Zoom ratio Zoom in on your subject in up photos by adjusting the zoom. By using both, you can shoot close-up to 18 times. Basic functions 17 Your camera has a 3.6X optical zoom and 5X digital zoom. Press or press and hold [T] to zoom in Zoom out • Green: In focus • Red: Out of focus 4 Press [Shutter] to take a photo. Taking photos 1 Rotate the mode dial to 2. 2 Align your subject.
Zooming You can zoom in the frame. 3 Half-press [Shutter] to focus. Press or press and hold [W] to zoom out. Zoom ratio Zoom in on your subject in up photos by adjusting the zoom. By using both, you can shoot close-up to 18 times. Basic functions 17 Your camera has a 3.6X optical zoom and 5X digital zoom. Press or press and hold [T] to zoom in Zoom out • Green: In focus • Red: Out of focus 4 Press [Shutter] to take a photo. Taking photos 1 Rotate the mode dial to 2. 2 Align your subject.

User Manual (ENGLISH)
Page 19
Optical range Zoom indicator Digital range • The digital zoom is slow (e.g., when shooting in the 6 mode) - Capture, or Face Detection. • It may take a close-up shot • If you set to on top of the OIS sensor. Reducing camera shake (OIS) Reduce camera shake optically in Shooting mode. 1 In Shooting mode, touch ¡ . (In some scenes), and 3 modes and when used with a tripod, your camera is using the digital zoom. you take longer to save a photo when using the digital zoom. • The focus area will appear on , screen. you use digital ...
Optical range Zoom indicator Digital range • The digital zoom is slow (e.g., when shooting in the 6 mode) - Capture, or Face Detection. • It may take a close-up shot • If you set to on top of the OIS sensor. Reducing camera shake (OIS) Reduce camera shake optically in Shooting mode. 1 In Shooting mode, touch ¡ . (In some scenes), and 3 modes and when used with a tripod, your camera is using the digital zoom. you take longer to save a photo when using the digital zoom. • The focus area will appear on , screen. you use digital ...
User Manual (ENGLISH)
Page 20
Extended functions 2. Shooting modes 20 2 Using the Auto mode 20 6 Using the Night mode 20 4 Using the Scene mode 20 7 Using the Dual IS mode 21 5 Using the Beauty Shot mode 21 1 Using the Program mode 22 8 Using the Manual mode 22 3 Recording a video 24 Tips for getting a clearer photo 26 Recording voice memos 28 Recording a voice memo 28 Adding a voice memo to record a video or voice memo. Extended functions Learn how to take a photo by selecting a mode and how to a photo 28 2.
Extended functions 2. Shooting modes 20 2 Using the Auto mode 20 6 Using the Night mode 20 4 Using the Scene mode 20 7 Using the Dual IS mode 21 5 Using the Beauty Shot mode 21 1 Using the Program mode 22 8 Using the Manual mode 22 3 Recording a video 24 Tips for getting a clearer photo 26 Recording voice memos 28 Recording a voice memo 28 Adding a voice memo to record a video or voice memo. Extended functions Learn how to take a photo by selecting a mode and how to a photo 28 2.