
User Manual
Page 1
User Manual SL202 Thank you learn to capture images, share or print your photos, and edit photos with the accompanying software. Please read this manual thoroughly. This manual will help you for buying a Samsung Camera.
User Manual SL202 Thank you learn to capture images, share or print your photos, and edit photos with the accompanying software. Please read this manual thoroughly. This manual will help you for buying a Samsung Camera.
User Manual
Page 2
... in the camera can be moved to the PC and can be damaged. After this manual are subject to change without prior notice for buying a Samsung Digital Camera. å Prior to using this camera, please read the user manual thoroughly. å If you require After Sales service, please bring the ...are either trademarks or registered trademarks in the United States and/or other countries. Ä All brand and product names appearing in the following order. Samsung takes no responsibility for a trip or an important event) to avoid disappointment. Instructions Getting to Know your PC.
... in the camera can be moved to the PC and can be damaged. After this manual are subject to change without prior notice for buying a Samsung Digital Camera. å Prior to using this camera, please read the user manual thoroughly. å If you require After Sales service, please bring the ...are either trademarks or registered trademarks in the United States and/or other countries. Ä All brand and product names appearing in the following order. Samsung takes no responsibility for a trip or an important event) to avoid disappointment. Instructions Getting to Know your PC.

User Manual
Page 3
..., and then disconnect the power source. You must contact your subject's eyes may result in temperature. Do not continue to you or your dealer or Samsung Camera Service centre. å Please do so may cause a fire or electric shock. å Do not operate this product and accessories out of reach... in close to build up and distort the camera body or cause a fire. Exposure to extreme temperatures may cause heat to your dealer or Samsung Camera Service centre.
..., and then disconnect the power source. You must contact your subject's eyes may result in temperature. Do not continue to you or your dealer or Samsung Camera Service centre. å Please do so may cause a fire or electric shock. å Do not operate this product and accessories out of reach... in close to build up and distort the camera body or cause a fire. Exposure to extreme temperatures may cause heat to your dealer or Samsung Camera Service centre.

User Manual
Page 4
Then make sure that any connector cords or cables to use the Scene modes 003 Caution Contents CAUTION indicates a potentially hazardous situation which, if not avoided, may differ from the wall socket. Otherwise the battery may leak corrosive electrolyte and permanently damage the camera's components. å Do not fire the flash while it continuously. This carries a high risk of a PC. Do not insert the battery with the polarities reversed. å Remove the battery when not planning to do so may be demagnetized if left near the case. å Never connect the 20 ...
Then make sure that any connector cords or cables to use the Scene modes 003 Caution Contents CAUTION indicates a potentially hazardous situation which, if not avoided, may differ from the wall socket. Otherwise the battery may leak corrosive electrolyte and permanently damage the camera's components. å Do not fire the flash while it continuously. This carries a high risk of a PC. Do not insert the battery with the polarities reversed. å Remove the battery when not planning to do so may be demagnetized if left near the case. å Never connect the 20 ...
User Manual
Page 5
Contents 004 025 How to use the Movie clip mode 025 Recording the movie clip without sound 025 Pausing while recording a movie clip (Successive Recording) 026 How to use the Smart Auto mode 027 Things to Watch Out for When Taking Pictures 028 Using the camera buttons to set the camera 028 POWER button 028 SHUTTER button 028 ZOOM button 030 Info (DISP) / Up button 030 Macro / Down button 032 Focus lock 032 Flash / Left button 034 Self-timer / Right button 036 MENU button 036 OK button 036 Functions 037 How to Enable Functions Using the MENU Button 037 Exposure ...
Contents 004 025 How to use the Movie clip mode 025 Recording the movie clip without sound 025 Pausing while recording a movie clip (Successive Recording) 026 How to use the Smart Auto mode 027 Things to Watch Out for When Taking Pictures 028 Using the camera buttons to set the camera 028 POWER button 028 SHUTTER button 028 ZOOM button 030 Info (DISP) / Up button 030 Macro / Down button 032 Focus lock 032 Flash / Left button 034 Self-timer / Right button 036 MENU button 036 OK button 036 Functions 037 How to Enable Functions Using the MENU Button 037 Exposure ...
User Manual
Page 6
Contents 053 Setting up the Date / Time / Date type 053 Time Zone 053 File name 054 Imprinting the recording date 054 Auto power off 055 Selecting Video out type 056 Auto Focus lamp 056 Setting the USB PLAY 057 Starting play mode 057 Playing back a still image 057 Playing back a movie clip 058 Movie clip capture function 058 Playing back a recorded voice 058 Playing back a voice memo 059 LCD monitor Indicator 060 Using the camera buttons to set the camera 060 Thumbnail / Enlargement button 060 Smart Album 062 Info (DISP) / Up button 062 Play & Pause / OK button 063 Left / Right / Down / MENU ...
Contents 053 Setting up the Date / Time / Date type 053 Time Zone 053 File name 054 Imprinting the recording date 054 Auto power off 055 Selecting Video out type 056 Auto Focus lamp 056 Setting the USB PLAY 057 Starting play mode 057 Playing back a still image 057 Playing back a movie clip 058 Movie clip capture function 058 Playing back a recorded voice 058 Playing back a voice memo 059 LCD monitor Indicator 060 Using the camera buttons to set the camera 060 Thumbnail / Enlargement button 060 Smart Album 062 Info (DISP) / Up button 062 Play & Pause / OK button 063 Left / Right / Down / MENU ...

User Manual
Page 7
Contents SOFTWARE 087 Software Notes 087 System Requirements 088 About the software 089 Setting up the application software 091 Starting PC mode 094 Removing the removable disk 095 Samsung Master 098 Setting up the USB Driver for MAC 098 Using the USB Driver for MAC 099 FAQ 006
Contents SOFTWARE 087 Software Notes 087 System Requirements 088 About the software 089 Setting up the application software 091 Starting PC mode 094 Removing the removable disk 095 Samsung Master 098 Setting up the USB Driver for MAC 098 Using the USB Driver for MAC 099 FAQ 006
User Manual
Page 8
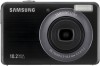
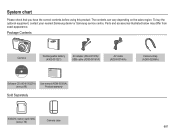
... the correct contents before using this product. The contents can vary depending on the sales region. To buy the optional equipment, contact your nearest Samsung dealer or Samsung service centre. Package Contents Camera Rechargeable battery (4302-001221) AC adapter (AD44-00131A) / USB cable (AD39-00161A) AV cable (AD39-00146A) Camera strap (AD63...
... the correct contents before using this product. The contents can vary depending on the sales region. To buy the optional equipment, contact your nearest Samsung dealer or Samsung service centre. Package Contents Camera Rechargeable battery (4302-001221) AC adapter (AD44-00131A) / USB cable (AD39-00161A) AV cable (AD39-00146A) Camera strap (AD63...

User Manual
Page 11
Identification of features Bottom Battery chamber 5 Function button Information / Up button Memory card slot Battery chamber cover Battery holder Tripod socket Flash / Left button Self-timer / Right button OK / Play & Pause button Macro / Down button 010
Identification of features Bottom Battery chamber 5 Function button Information / Up button Memory card slot Battery chamber cover Battery holder Tripod socket Flash / Left button Self-timer / Right button OK / Play & Pause button Macro / Down button 010

User Manual
Page 12
Identification of features Self-timer lamp Icon Status Description - For the final 2 seconds, the lamp blinks quickly at 0.25-second intervals. Blinking A picture will be taken. MODE Auto Program DIS Photo Help Guide ICON MODE Beauty Shot Scene Movie Smart Auto ICON MODE Frame Guide SCENE Night Portrait Children ICON MODE Landscape Close up inserted to a PC (LCD monitor turns off after about the camera mode setting. Blinking For the 2 seconds, the lamp blinks quickly at 0.25-second intervals. Blinking After pressing the Shutter button, the ...
Identification of features Self-timer lamp Icon Status Description - For the final 2 seconds, the lamp blinks quickly at 0.25-second intervals. Blinking A picture will be taken. MODE Auto Program DIS Photo Help Guide ICON MODE Beauty Shot Scene Movie Smart Auto ICON MODE Frame Guide SCENE Night Portrait Children ICON MODE Landscape Close up inserted to a PC (LCD monitor turns off after about the camera mode setting. Blinking For the 2 seconds, the lamp blinks quickly at 0.25-second intervals. Blinking After pressing the Shutter button, the ...

User Manual
Page 13
... to shot interval: 30Sec. Connecting to a Power Source You should use of the battery and you can lose power over time and are measured under Samsung's standard conditions and shooting conditions and may become warm. It can be used as an AC cable, and you may experience reduced battery life. å...
... to shot interval: 30Sec. Connecting to a Power Source You should use of the battery and you can lose power over time and are measured under Samsung's standard conditions and shooting conditions and may become warm. It can be used as an AC cable, and you may experience reduced battery life. å...

User Manual
Page 14
The camera may not be detected using the camera. å Do not use the back side USB port of computer. å If the USB port of the AC Charger does not turn on the camera at the same time : remove other devices are connected to the PC at the same time. It may be turned off or blinking Being discharged (Using the AC adapter) Orange coloured LED is connected to the PC through a USB hub : connect the camera directly to the PC. å If the camera and other device. å Camera can not be charged. Ê How to charge the rechargeable battery å Before inserting any ...
The camera may not be detected using the camera. å Do not use the back side USB port of computer. å If the USB port of the AC Charger does not turn on the camera at the same time : remove other devices are connected to the PC at the same time. It may be turned off or blinking Being discharged (Using the AC adapter) Orange coloured LED is connected to the PC through a USB hub : connect the camera directly to the PC. å If the camera and other device. å Camera can not be charged. Ê How to charge the rechargeable battery å Before inserting any ...

User Manual
Page 15
If the camera does not turn on the LCD monitor. Have the front of the memory card facing toward the back of the camera (LCD monitor) and the card pins toward the front of the camera (lens). - When the battery chamber cover is excessively cold or hot, the battery status on the LCD may be different from the actual battery status. 014 Inserting the memory card Ê Insert the memory card as shown - Doing so may damage it. Turn off the camera's power before inserting the memory card. - Do not insert the memory card the wrong way round. tery) Ä When using the camera...
If the camera does not turn on the LCD monitor. Have the front of the memory card facing toward the back of the camera (LCD monitor) and the card pins toward the front of the camera (lens). - When the battery chamber cover is excessively cold or hot, the battery status on the LCD may be different from the actual battery status. 014 Inserting the memory card Ê Insert the memory card as shown - Doing so may damage it. Turn off the camera's power before inserting the memory card. - Do not insert the memory card the wrong way round. tery) Ä When using the camera...

User Manual
Page 16
... in an environment where there are using this camera. å Do not use a memory card formatted by the Samsung warranty. å The memory card is removed while recording, deleting (formatting) or reading. å Samsung cannot be the case, you will not operate. Should this be held responsible for the first time...
... in an environment where there are using this camera. å Do not use a memory card formatted by the Samsung warranty. å The memory card is removed while recording, deleting (formatting) or reading. å Samsung cannot be the case, you will not operate. Should this be held responsible for the first time...

User Manual
Page 17
About 251 About 440 About 611 - - Recorded image Super size Fine Fine Normal 30 FPS 15 FPS About 182 About 333 About 471 - - About 199 About 361 About 510 - - About 7'06" About 13'55" - - - About 26'25" About 49'24" å The zoom button doesn't function during the movie recording. å The recording times can be as subject matter and memory card type. By sliding the switch to the bottom of the SD/SDHC memory card, the data will be changed by variables such as follows. These figures are approximate as image capacities can be protected. ...
About 251 About 440 About 611 - - Recorded image Super size Fine Fine Normal 30 FPS 15 FPS About 182 About 333 About 471 - - About 199 About 361 About 510 - - About 7'06" About 13'55" - - - About 26'25" About 49'24" å The zoom button doesn't function during the movie recording. å The recording times can be as subject matter and memory card type. By sliding the switch to the bottom of the SD/SDHC memory card, the data will be changed by variables such as follows. These figures are approximate as image capacities can be protected. ...

User Manual
Page 18
This menu will be displayed again after setting up the date, time and language. Language Date & Time Back :English English 䚐ạ:㛨09/01/01 Français Deutsch Español Italiano Set Ê Setting up the language 1. When using the camera for the first time, a menu will not be displayed in the LCD monitor to the page 53. 017 Select the [Language] menu by pressing the Up/Down button and press the Right button. 2. Select the [Date&Time] menu by pressing the Up/Down button and press the Right button. 2. Set up the date, time and language before ...
This menu will be displayed again after setting up the date, time and language. Language Date & Time Back :English English 䚐ạ:㛨09/01/01 Français Deutsch Español Italiano Set Ê Setting up the language 1. When using the camera for the first time, a menu will not be displayed in the LCD monitor to the page 53. 017 Select the [Language] menu by pressing the Up/Down button and press the Right button. 2. Select the [Date&Time] menu by pressing the Up/Down button and press the Right button. 2. Set up the date, time and language before ...

User Manual
Page 19
p.14 p.32 p.34 p.30 p.45 p.39 p.41 p.41/ 46/48 p.53 p.27 p.44 p.44 p.43/ 24 p.42 p.42 p.39 p.38 p.37 LCD monitor indicator Ê The LCD monitor displays information about the shooting functions and selections. [Image & Full Status] No. Description Icons 1 Recording mode 2 Optical / Digital Zoom bar / Digital Zoom rate 3 Voice Memo Number of available shots 4 remaining Remaining time 018 00001 00:00:00 Page p.20 p.28 p.47 p.16 p.16 No. Description 5 Memory card icon / Internal memory icon 6 Battery 7 Flash 8 Self-timer 9 Macro 10 Photo Style Selector 11 Face...
p.14 p.32 p.34 p.30 p.45 p.39 p.41 p.41/ 46/48 p.53 p.27 p.44 p.44 p.43/ 24 p.42 p.42 p.39 p.38 p.37 LCD monitor indicator Ê The LCD monitor displays information about the shooting functions and selections. [Image & Full Status] No. Description Icons 1 Recording mode 2 Optical / Digital Zoom bar / Digital Zoom rate 3 Voice Memo Number of available shots 4 remaining Remaining time 018 00001 00:00:00 Page p.20 p.28 p.47 p.16 p.16 No. Description 5 Memory card icon / Internal memory icon 6 Battery 7 Flash 8 Self-timer 9 Macro 10 Photo Style Selector 11 Face...

User Manual
Page 20
A menu for each camera mode appears. 2. Use the left or right buttons to use the menu 1. Functions Sound Display Settings Exit Volume Start Sound Shutter Sound Beep Sound AF Sound Self-Portrait Change Press the UP or DOWN button. Volume Start Sound Shutter Sound Beep Sound AF Sound Self-Portrait Exit :Medium :Off :1 :1 :On :On Back Press the LEFT or RIGHT button. 4. Functions Sound Display Settings Exit Language Function Description Start Image Display Brightness Quick View Power Save Change Functions Sound Display Settings Exit Volume Start Sound Shutter Sound Beep ...
A menu for each camera mode appears. 2. Use the left or right buttons to use the menu 1. Functions Sound Display Settings Exit Volume Start Sound Shutter Sound Beep Sound AF Sound Self-Portrait Change Press the UP or DOWN button. Volume Start Sound Shutter Sound Beep Sound AF Sound Self-Portrait Exit :Medium :Off :1 :1 :On :On Back Press the LEFT or RIGHT button. 4. Functions Sound Display Settings Exit Language Function Description Start Image Display Brightness Quick View Power Save Change Functions Sound Display Settings Exit Volume Start Sound Shutter Sound Beep ...

User Manual
Page 21
Insert the batteries taking with minimal user interaction. 1. Insert the memory card (p.14). If the memory card is not inserted, an image will be the case, the camera is unable to the selection point. Press the power button to use the mode dial Select the shooting mode by turning the mode dial to capture an image clearly. å Avoid obstructing the lens or the flash when you press the shutter button down half way, it means that the camera cannot focus on the memory card. 3. Should this be stored on the subject. Insert the batteries (p.14). Select the Auto mode by...
Insert the batteries taking with minimal user interaction. 1. Insert the memory card (p.14). If the memory card is not inserted, an image will be the case, the camera is unable to the selection point. Press the power button to use the mode dial Select the shooting mode by turning the mode dial to capture an image clearly. å Avoid obstructing the lens or the flash when you press the shutter button down half way, it means that the camera cannot focus on the memory card. 3. Should this be stored on the subject. Insert the batteries (p.14). Select the Auto mode by...
User Manual
Page 22
Select the DIS mode by using the Mode dial. (p.20) 2. If the lighting condition is darker than fluorescent lighting condi- If the lighting condition is brighter than in the DIS mode. 2. Press the Menu button to configure advanced functions. Point the camera towards the subject and compose the image by using the LCD monitor. 3. For best results only take a little longer for using the Mode dial. (p.20) 2. ditions, camera shake warning indicator ( Ã ) will not operate in fluorescent lighting con- How to use the Program mode ( ) Selecting the ...
Select the DIS mode by using the Mode dial. (p.20) 2. If the lighting condition is darker than fluorescent lighting condi- If the lighting condition is brighter than in the DIS mode. 2. Press the Menu button to configure advanced functions. Point the camera towards the subject and compose the image by using the LCD monitor. 3. For best results only take a little longer for using the Mode dial. (p.20) 2. ditions, camera shake warning indicator ( Ã ) will not operate in fluorescent lighting con- How to use the Program mode ( ) Selecting the ...