
User Manual
Page 1
User Manual HZ30W This user manual includes detailed usage instructions for your camera. Please read this manual thoroughly. Ä Click a topic Quick reference Contents Basic functions Extended functions Shooting options Playback/Editing Appendixes Index
User Manual HZ30W This user manual includes detailed usage instructions for your camera. Please read this manual thoroughly. Ä Click a topic Quick reference Contents Basic functions Extended functions Shooting options Playback/Editing Appendixes Index

User Manual
Page 2
... flash too close proximity (closer than 1 m/3 ft) to your camera. Batteries may cause choking or serious injury if swallowed. t Never dispose of batteries and chargers with care t Use only Samsung-approved batteries and chargers. Small parts may explode when overheated. Moving parts and...group, Wireless Technology Research. If you have any reason to suspect that could cause injury to subjects' eyesight Do not use your camera is interfering with pacemakers Maintain a minimum of the pacemaker or medical device for guidance. 1 Do not store or carry flammable...
... flash too close proximity (closer than 1 m/3 ft) to your camera. Batteries may cause choking or serious injury if swallowed. t Never dispose of batteries and chargers with care t Use only Samsung-approved batteries and chargers. Small parts may explode when overheated. Moving parts and...group, Wireless Technology Research. If you have any reason to suspect that could cause injury to subjects' eyesight Do not use your camera is interfering with pacemakers Maintain a minimum of the pacemaker or medical device for guidance. 1 Do not store or carry flammable...
User Manual
Page 3
... substances. t Do not use a damaged charger, battery, or memory card. Health and safety information Safety precautions Handle and store your camera carefully and sensibly t Do not allow liquids, dirt, or foreign substances to come in your warranty. Forcing the connectors, improperly connecting cables... drop, or subject memory cards to direct sunlight or high temperatures for an extended period of time. Use only Samsung-approved accessories Using incompatible accessories may cause the camera to very cold or very hot temperatures (below 0º C/32º F or above 40º C/104...
... substances. t Do not use a damaged charger, battery, or memory card. Health and safety information Safety precautions Handle and store your camera carefully and sensibly t Do not allow liquids, dirt, or foreign substances to come in your warranty. Forcing the connectors, improperly connecting cables... drop, or subject memory cards to direct sunlight or high temperatures for an extended period of time. Use only Samsung-approved accessories Using incompatible accessories may cause the camera to very cold or very hot temperatures (below 0º C/32º F or above 40º C/104...

User Manual
Page 4
... power sources when not in use . Health and safety information Protect your lens with a soft, clean, debris-free lens cloth. Clean your camera's lens t Do not expose the lens to direct sunlight, as this situation, wait for their intended purpose. 3 t Use batteries only for at... 1 hour until all moisture has evaporated before use . Important usage information Allow only qualified personnel to service the camera yourself. t Disconnect chargers from a cold environment to malfunction. Ensure maximum battery and charger life t Overcharging batteries may result from...
... power sources when not in use . Health and safety information Protect your lens with a soft, clean, debris-free lens cloth. Clean your camera's lens t Do not expose the lens to direct sunlight, as this situation, wait for their intended purpose. 3 t Use batteries only for at... 1 hour until all moisture has evaporated before use . Important usage information Allow only qualified personnel to service the camera yourself. t Disconnect chargers from a cold environment to malfunction. Ensure maximum battery and charger life t Overcharging batteries may result from...

User Manual
Page 5
... to settings, error messages, specifications, and maintenance tips. 4 Also, learn how to connect your camera to record a video or voice memo. t We recommend using your camera within a country where you can set in the provided CD-ROM. Appendixes 85 Refer to play back photos,... or voice memos and edit photos or videos. Extended functions 27 Learn how to take a photo by selecting a mode and how to your camera's layout, icons, and basic functions for shooting. Organization of the Apple Corporation. t Mac is a registered trademark of the user manual Basic ...
... to settings, error messages, specifications, and maintenance tips. 4 Also, learn how to connect your camera to record a video or voice memo. t We recommend using your camera within a country where you can set in the provided CD-ROM. Appendixes 85 Refer to play back photos,... or voice memos and edit photos or videos. Extended functions 27 Learn how to take a photo by selecting a mode and how to your camera's layout, icons, and basic functions for shooting. Organization of the Apple Corporation. t Mac is a registered trademark of the user manual Basic ...
User Manual
Page 6
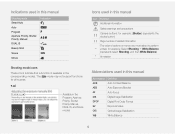
... order of options or menus you must select to perform ¢ a step; Indications used in this manual Icon Function Additional information Safety warnings and precautions [ ] Camera buttons;
... order of options or menus you must select to perform ¢ a step; Indications used in this manual Icon Function Additional information Safety warnings and precautions [ ] Camera buttons;

User Manual
Page 7
... the shutter all the way down Exposure (Brightness) The amount of a subject and background Background Subject Composition 6 Overexposure (too bright) By altering the exposure, your camera determines the exposure.
... the shutter all the way down Exposure (Brightness) The amount of a subject and background Background Subject Composition 6 Overexposure (too bright) By altering the exposure, your camera determines the exposure.

User Manual
Page 8
...bright subject is caused by a reflection from shaking. The subject's eyes appear red. t Avoid shooting in low light conditions or holding the camera incorrectly. t Set ISO speed options. (p. 45) This may come out too dark because of backlighting. When the light source is behind the subject... more light, the shutter speed slows. t Select Backlight in the s mode. (p. 31) t Set the flash option to steady the camera and may be caused by setting shooting options. Common questions You can make sure the subject is a high contrast between the light and dark areas...
...bright subject is caused by a reflection from shaking. The subject's eyes appear red. t Avoid shooting in low light conditions or holding the camera incorrectly. t Set ISO speed options. (p. 45) This may come out too dark because of backlighting. When the light source is behind the subject... more light, the shutter speed slows. t Select Backlight in the s mode. (p. 31) t Set the flash option to steady the camera and may be caused by setting shooting options. Common questions You can make sure the subject is a high contrast between the light and dark areas...
User Manual
Page 9
...different exposures) f 58 Applying a different effect t Photo styles (to apply tones) f 59 t Image adjustment (to adjust saturation, sharpness, or contrast) f 61 Reducing camera shake t Optical Image Stabilization (OIS) f 24 t d mode f 29 t Viewing files by category in Smart Album f 65 t Deleting a l fi... the memory card f 66 t Viewing files as a slide show f 68 t Viewing files on a TV or HDTV f 76 t Connecting your camera to a computer f 79 t Adjusting sound and volume f 87 t Adjusting the brightness of the display f 87 t Changing the display language f 87 t Setting the...
...different exposures) f 58 Applying a different effect t Photo styles (to apply tones) f 59 t Image adjustment (to adjust saturation, sharpness, or contrast) f 61 Reducing camera shake t Optical Image Stabilization (OIS) f 24 t d mode f 29 t Viewing files by category in Smart Album f 65 t Deleting a l fi... the memory card f 66 t Viewing files as a slide show f 68 t Viewing files on a TV or HDTV f 76 t Connecting your camera to a computer f 79 t Adjusting sound and volume f 87 t Adjusting the brightness of the display f 87 t Changing the display language f 87 t Setting the...
User Manual
Page 10
... 18 Selecting options 19 Setting the display and sound 21 Changing the display type 21 Setting the sound 21 Taking photos 22 Zooming 23 Reducing camera shake (OIS 24 Tips for getting a clearer photo 25 Extended functions 27 Using the Smart Auto mode 28 Using the DUAL IS mode 29 Using... dark 43 Preventing red-eye 43 Using the flash 43 Adjusting the amount of flash 44 Adjusting the ISO speed 45 Changing the camera's focus 46 Using macro 46 Setting the focus distance 46 Using tracking auto focus 47 Using selection focus 48 Adjusting the focus area 49 Using...
... 18 Selecting options 19 Setting the display and sound 21 Changing the display type 21 Setting the sound 21 Taking photos 22 Zooming 23 Reducing camera shake (OIS 24 Tips for getting a clearer photo 25 Extended functions 27 Using the Smart Auto mode 28 Using the DUAL IS mode 29 Using... dark 43 Preventing red-eye 43 Using the flash 43 Adjusting the amount of flash 44 Adjusting the ISO speed 45 Changing the camera's focus 46 Using macro 46 Setting the focus distance 46 Using tracking auto focus 47 Using selection focus 48 Adjusting the focus area 49 Using...
User Manual
Page 11
...les to your computer (for Windows 78 Transferring files using Intelli-studio 79 Transferring files by connecting the camera as a removable disk 81 Disconnecting the camera (for Windows XP 82 Transferring files to your computer (for Mac 83 Printing photos with a photo printer ...(PictBridge 84 Appendixes 85 Camera settings menu 86 Accessing the settings menu 86 Sound 87 Display 87 Settings 88 Error messages 91 Camera maintenance 92 Cleaning your camera 92 About memory cards 93 About the battery 94 Before contacting a ...
...les to your computer (for Windows 78 Transferring files using Intelli-studio 79 Transferring files by connecting the camera as a removable disk 81 Disconnecting the camera (for Windows XP 82 Transferring files to your computer (for Mac 83 Printing photos with a photo printer ...(PictBridge 84 Appendixes 85 Camera settings menu 86 Accessing the settings menu 86 Sound 87 Display 87 Settings 88 Error messages 91 Camera maintenance 92 Cleaning your camera 92 About memory cards 93 About the battery 94 Before contacting a ...
User Manual
Page 12
Basic functions Learn about your camera 17 Performing the initial setup 18 Selecting options 19 Setting the display and sound 21 Changing the display type 21 Setting the sound 21 Taking photos 22 Zooming 23 Reducing camera shake (OIS 24 Tips for shooting. Unpacking 12 Camera layout 13 Icons 15 Inserting the battery and memory card 16 Charging the battery and turning your camera on ......17 Charging the battery 17 Turning on your camera's layout, icons, and basic functions for getting a clearer photo 25
Basic functions Learn about your camera 17 Performing the initial setup 18 Selecting options 19 Setting the display and sound 21 Changing the display type 21 Setting the sound 21 Taking photos 22 Zooming 23 Reducing camera shake (OIS 24 Tips for shooting. Unpacking 12 Camera layout 13 Icons 15 Inserting the battery and memory card 16 Charging the battery and turning your camera on ......17 Charging the battery 17 Turning on your camera's layout, icons, and basic functions for getting a clearer photo 25

User Manual
Page 13
Unpacking Check your product box for the following items. Camera AC adapter/USB cable (AD44-00146A/AD39-00165A) Rechargeable battery (4302-001226) Strap (Silver: AD63-02596A/ Black: AD63-02604A) User Manual CD-ROM (AD46-00318A) Optional accessories Quick Start Manual (AD68-04761A) The illustrations may differ from your actual items. Camera case Memory cards A/V cable (AD39-00146A) Basic functions 12 Battery Charger (AD44-00164A ) HDMI cable (AD39-00179A )
Unpacking Check your product box for the following items. Camera AC adapter/USB cable (AD44-00146A/AD39-00165A) Rechargeable battery (4302-001226) Strap (Silver: AD63-02596A/ Black: AD63-02604A) User Manual CD-ROM (AD46-00318A) Optional accessories Quick Start Manual (AD68-04761A) The illustrations may differ from your actual items. Camera case Memory cards A/V cable (AD39-00146A) Basic functions 12 Battery Charger (AD44-00164A ) HDMI cable (AD39-00179A )
User Manual
Page 14
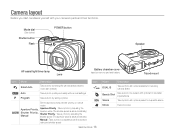
... mount Icon Mode Description Icon Mode Description S Smart Auto Take a photo by letting the camera select a scene mode as it detects d DUAL IS Take a photo with options suitable for reducing camera shake a Auto Take a photo quickly and easily with minimal settings p Program Take a ... s v Beauty Shot Take a photo of a person with options to hide facial imperfections Scene Take a photo with your camera's parts and their functions. Camera layout Before you start, familiarize yourself with options preset for a specific scene Movie Record a video Basic functions 13
... mount Icon Mode Description Icon Mode Description S Smart Auto Take a photo by letting the camera select a scene mode as it detects d DUAL IS Take a photo with options suitable for reducing camera shake a Auto Take a photo quickly and easily with minimal settings p Program Take a ... s v Beauty Shot Take a photo of a person with options to hide facial imperfections Scene Take a photo with your camera's parts and their functions. Camera layout Before you start, familiarize yourself with options preset for a specific scene Movie Record a video Basic functions 13

User Manual
Page 15
... functions 14 USB and A/V port Accepts USB cable or A/V cable HDMI port Accepts HDMI cable t Adjust volume in Shooting mode. t Access options in Playback mode. Camera layout Microphone Display Zoom button t Zoom in or out in Playback mode. Navigation D M F t In Shooting mode While setting Change the display option Move up Change...
... functions 14 USB and A/V port Accepts USB cable or A/V cable HDMI port Accepts HDMI cable t Adjust volume in Shooting mode. t Access options in Playback mode. Camera layout Microphone Display Zoom button t Zoom in or out in Playback mode. Navigation D M F t In Shooting mode While setting Change the display option Move up Change...

User Manual
Page 16
... of photos C Available recording time Internal memory Memory card inserted t : Fully charged t : Partially charged t : Charging needed Aperture value Shutter speed Voice memo Auto focus frame Camera shake Current date and time Histogram (p. 21) Grid lines Basic functions 15 B. Icons on the left Icon Description Exposure value White balance Face tone Face...
... of photos C Available recording time Internal memory Memory card inserted t : Fully charged t : Partially charged t : Charging needed Aperture value Shutter speed Voice memo Auto focus frame Camera shake Current date and time Histogram (p. 21) Grid lines Basic functions 15 B. Icons on the left Icon Description Exposure value White balance Face tone Face...

User Manual
Page 17
Insert the battery with the gold-colored contacts facing down . Battery The internal memory can be used as a temporary storage device when the memory card is not inserted. Basic functions 16 Battery lock Push the lock up to release the battery. Insert a memory card with the Samsung logo facing down . Inserting the battery and memory card Removing the battery and memory card Memory card Push gently until the card disengages from the camera and then pull it out of the slot.
Insert the battery with the gold-colored contacts facing down . Battery The internal memory can be used as a temporary storage device when the memory card is not inserted. Basic functions 16 Battery lock Push the lock up to release the battery. Insert a memory card with the Samsung logo facing down . Inserting the battery and memory card Removing the battery and memory card Memory card Push gently until the card disengages from the camera and then pull it out of the slot.

User Manual
Page 18
...must charge the battery. The camera turns on your camera in Playback mode Press [P]. Charging the battery and turning your camera on or off. Basic functions 17 Turning on your camera Press [POWER] to turn your camera on Charging the battery Before using the camera for the first time,... you turn on the camera for the first time. (p. 18) Indicator ...
...must charge the battery. The camera turns on your camera in Playback mode Press [P]. Charging the battery and turning your camera on or off. Basic functions 17 Turning on your camera Press [POWER] to turn your camera on Charging the battery Before using the camera for the first time,... you turn on the camera for the first time. (p. 18) Indicator ...

User Manual
Page 19
... select a date format, and press [o]. Back DST Basic functions 18 Performing the initial setup The initial setup screen appears to allow you turn on the camera for the first time. 2 Press [t] to select Language and press [t] or [o]. t The initial setup screen appears when you to select a time zone and press... Back Set 3 Press [D] or [M] to select a language and press [o]. 4 Press [D] or [M] to select Time Zone and press [t] or [o]. 5 Press [F] or [t] to configure the camera's basic settings. 1 Press [POWER].
... select a date format, and press [o]. Back DST Basic functions 18 Performing the initial setup The initial setup screen appears to allow you turn on the camera for the first time. 2 Press [t] to select Language and press [t] or [o]. t The initial setup screen appears when you to select a time zone and press... Back Set 3 Press [D] or [M] to select a language and press [o]. 4 Press [D] or [M] to select Time Zone and press [t] or [o]. 5 Press [F] or [t] to configure the camera's basic settings. 1 Press [POWER].

User Manual
Page 22
...t Display information about the current file, except the shooting settings and histogram Underexposed Well Exposed Overexposed Setting the sound Set whether your camera emits a specified sound when you operate your photos are bright. If the histogram has a high peak on the right of ...the peaks is distributed in your preferences. A peak on the left, your camera. 1 In Shooting or Playback mode, press [m]. 2 Select Sound ¢ Beep Sound ¢ an option. The height of the graph means that...
...t Display information about the current file, except the shooting settings and histogram Underexposed Well Exposed Overexposed Setting the sound Set whether your camera emits a specified sound when you operate your photos are bright. If the histogram has a high peak on the right of ...the peaks is distributed in your preferences. A peak on the left, your camera. 1 In Shooting or Playback mode, press [m]. 2 Select Sound ¢ Beep Sound ¢ an option. The height of the graph means that...


