
User Manual
Page 2
...020_EN.indd Sec1:2 2/51/0/82/0210617 101:05:65:60:00AAMM All wiring and grounding must be done in a safe place for help. Samsung is the last step when installing the dishwasher. Read all equipment using it to use . Do NOT install the dishwasher on a carpet ... you have completed the installation. After reading this appliance, become familiar with its operation and exercise care when using electricity, water and moving parts, potential hazards exist. These warning signs are here to prevent injury to prevent electric shock. Never connect it . It's your circuit breaker...
...020_EN.indd Sec1:2 2/51/0/82/0210617 101:05:65:60:00AAMM All wiring and grounding must be done in a safe place for help. Samsung is the last step when installing the dishwasher. Read all equipment using it to use . Do NOT install the dishwasher on a carpet ... you have completed the installation. After reading this appliance, become familiar with its operation and exercise care when using electricity, water and moving parts, potential hazards exist. These warning signs are here to prevent injury to prevent electric shock. Never connect it . It's your circuit breaker...
User Manual
Page 4
contents PREPARING THE DISHWASHER ENCLOSURE 5 5 Product dimensions 5 Enclosure dimensions INSTALLING THE DISHWASHER 6 6 STEP 1 Check the parts and tools 8 STEP 2 Select the best location for the dishwasher 9 STEP 3 Check water supply requirements and cautions 10 STEP 4 Check the electrical requirements and cautions ...
contents PREPARING THE DISHWASHER ENCLOSURE 5 5 Product dimensions 5 Enclosure dimensions INSTALLING THE DISHWASHER 6 6 STEP 1 Check the parts and tools 8 STEP 2 Select the best location for the dishwasher 9 STEP 3 Check water supply requirements and cautions 10 STEP 4 Check the electrical requirements and cautions ...
User Manual
Page 6
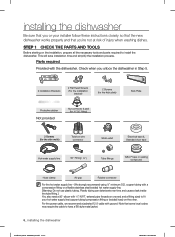
This will save installation time and simplify the installation process. Parts required Provided with 3/8" N.P.T. We strongly recommend using 3/8" minimum O.D. Plastic tubing can deteriorate over time and cause a leak inside the tube fitting.] ... ¾" ) Tube fittings Teflon the other. copper tubing with ground. STEP 1 CHECK THE PARTS AND TOOLS Before starting on the installation, prepare all the necessary tools and parts required to have a BX style metal jacket. 6_ installing the dishwasher Installation_DD81-02034B-020_EN.indd Sec3:6 2/51/0/82/0210617...
This will save installation time and simplify the installation process. Parts required Provided with 3/8" N.P.T. We strongly recommend using 3/8" minimum O.D. Plastic tubing can deteriorate over time and cause a leak inside the tube fitting.] ... ¾" ) Tube fittings Teflon the other. copper tubing with ground. STEP 1 CHECK THE PARTS AND TOOLS Before starting on the installation, prepare all the necessary tools and parts required to have a BX style metal jacket. 6_ installing the dishwasher Installation_DD81-02034B-020_EN.indd Sec3:6 2/51/0/82/0210617...
User Manual
Page 12
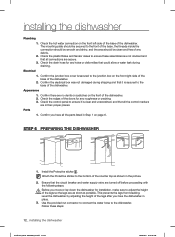
...plastic Brake and Sensor cases to ensure it is clear and unscratched, and that the circuit breaker and water supply valve are in place. 3. Parts 1. Check the drain hose for any debris. 2. Check the control panel to ensure these steps: 12_ installing the dishwasher Installation_DD81-02034B-020_EN.... Electrical 1. Confirm you have all the control markers are turned off before proceeding with the following steps. Ensure that all the parts listed in Step 1 on the front right-side of the base of the legs after you have the dishwasher in their proper places. ...
...plastic Brake and Sensor cases to ensure it is clear and unscratched, and that the circuit breaker and water supply valve are in place. 3. Parts 1. Check the drain hose for any debris. 2. Check the control panel to ensure these steps: 12_ installing the dishwasher Installation_DD81-02034B-020_EN.... Electrical 1. Confirm you have all the control markers are turned off before proceeding with the following steps. Ensure that all the parts listed in Step 1 on the front right-side of the base of the legs after you have the dishwasher in their proper places. ...
User Manual
Page 17
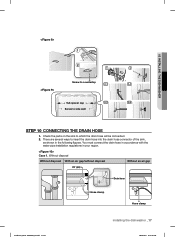
... hose Hose clamp Hose clamp Installation_DD81-02034B-020_EN.indd Sec3:17 installing the dishwasher _17 2/51/0/82/0210617 101:05:65:60:404AAMM Check the parts on the sink to side wall STEP 10 CONNECTING THE DRAIN HOSE 1. You must connect the drain hose in accordance with the water pipe installation...
... hose Hose clamp Hose clamp Installation_DD81-02034B-020_EN.indd Sec3:17 installing the dishwasher _17 2/51/0/82/0210617 101:05:65:60:404AAMM Check the parts on the sink to side wall STEP 10 CONNECTING THE DRAIN HOSE 1. You must connect the drain hose in accordance with the water pipe installation...
User Manual
Page 21
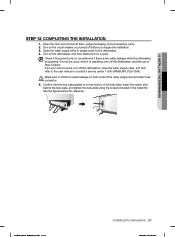
...plate gasket is operating. 02 INSTALLING THE DISHWASHER STEP 12 COMPLETING THE INSTALLATION 1. Open the door and remove all foam, paper packaging, and unnecessary parts. 2. If an error has occurred, turn off the dishwasher, close the water supply valve, and then refer to Step 5 below for water leakage...no errors occur while it is operating, turn off the dishwasher, and then go to the user manual or contact a service center 1-800-SAMSUNG (726-7864). Insert the rubber skirt behind the kick plate, and tighten the kick plate using the screws included in the Install Kit. Open...
...plate gasket is operating. 02 INSTALLING THE DISHWASHER STEP 12 COMPLETING THE INSTALLATION 1. Open the door and remove all foam, paper packaging, and unnecessary parts. 2. If an error has occurred, turn off the dishwasher, close the water supply valve, and then refer to Step 5 below for water leakage...no errors occur while it is operating, turn off the dishwasher, and then go to the user manual or contact a service center 1-800-SAMSUNG (726-7864). Insert the rubber skirt behind the kick plate, and tighten the kick plate using the screws included in the Install Kit. Open...


