Installation Guide Ver.1.0 (English, French, Spanish)
Page 2
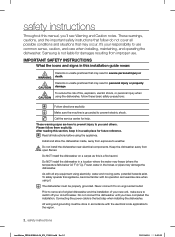
...electrical components. Frozen water in a safe place for future reference. It's your circuit breaker. Read all instructions before using electricity, water and moving parts, potential hazards exist. Do NOT install the dishwasher on a carpet as this is not liable for help. Prior to the region. 2_ safety... What the icons and signs in this manual, you'll see Warning and Caution notes. Keep the dishwasher away from exposure to use . Samsung is a fire hazard. To reduce the risk of your new unit, make sure to switch off your responsibility to weather. Connecting ...
...electrical components. Frozen water in a safe place for future reference. It's your circuit breaker. Read all instructions before using electricity, water and moving parts, potential hazards exist. Do NOT install the dishwasher on a carpet as this is not liable for help. Prior to the region. 2_ safety... What the icons and signs in this manual, you'll see Warning and Caution notes. Keep the dishwasher away from exposure to use . Samsung is a fire hazard. To reduce the risk of your new unit, make sure to switch off your responsibility to weather. Connecting ...

Installation Guide Ver.1.0 (English, French, Spanish)
Page 4
contents PREPARING THE DISHWASHER ENCLOSURE 5 5 Product dimensions 5 Enclosure dimensions INSTALLING THE DISHWASHER 6 6 STEP 1 Check the parts and tools 8 STEP 2 Select the best location for the dishwasher 9 STEP 3 Check water supply requirements and cautions 10 STEP 4 Check the electrical requirements and cautions ...
contents PREPARING THE DISHWASHER ENCLOSURE 5 5 Product dimensions 5 Enclosure dimensions INSTALLING THE DISHWASHER 6 6 STEP 1 Check the parts and tools 8 STEP 2 Select the best location for the dishwasher 9 STEP 3 Check water supply requirements and cautions 10 STEP 4 Check the electrical requirements and cautions ...
Installation Guide Ver.1.0 (English, French, Spanish)
Page 6
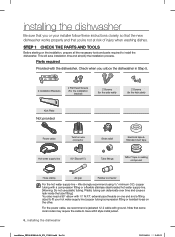
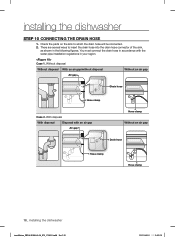
...fitting or braided hose) on ® tape or sealing compound Hose clamp Air gap Rubber connector For the hot water supply line - Parts required Provided with a compression fitting or a flexible stainless steel braided hot water supply line. [Warning: Do not use plastic tubing.... Note that you're not at risk of injury when washing dishes. STEP 1 CHECK THE PARTS AND TOOLS Before starting on the installation, prepare all the necessary tools and parts required to have a BX style metal jacket. 6_ installing the dishwasher installation_DD68-00046A-06_EN_130401.indd Sec3...
...fitting or braided hose) on ® tape or sealing compound Hose clamp Air gap Rubber connector For the hot water supply line - Parts required Provided with a compression fitting or a flexible stainless steel braided hot water supply line. [Warning: Do not use plastic tubing.... Note that you're not at risk of injury when washing dishes. STEP 1 CHECK THE PARTS AND TOOLS Before starting on the installation, prepare all the necessary tools and parts required to have a BX style metal jacket. 6_ installing the dishwasher installation_DD68-00046A-06_EN_130401.indd Sec3...
Installation Guide Ver.1.0 (English, French, Spanish)
Page 12
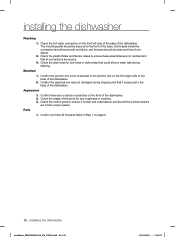
Check the drain hose for any roughness or cracking 3. Parts 1. Confirm the electrical box was not damaged during draining. Confirm there are in Step 1 on the front of the dishwasher. Check ...the edges of any holes or deformities that could allow a water leak during shipping and that all the parts listed in their proper places. Check the hot water connection on the front right-side of the base of the dishwasher. Confirm the...
Check the drain hose for any roughness or cracking 3. Parts 1. Confirm the electrical box was not damaged during draining. Confirm there are in Step 1 on the front of the dishwasher. Check ...the edges of any holes or deformities that could allow a water leak during shipping and that all the parts listed in their proper places. Check the hot water connection on the front right-side of the base of the dishwasher. Confirm the...
Installation Guide Ver.1.0 (English, French, Spanish)
Page 18
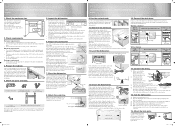
... installation_DD68-00046A-06_EN_130401.indd Sec3:18 2013-04-01 5:05:24 There are several ways to which the drain hose will be connected. 2. Check the parts on the sink to insert the drain hose into the drain hose connector of the sink, as shown in your region. With disposal With disposal...
... installation_DD68-00046A-06_EN_130401.indd Sec3:18 2013-04-01 5:05:24 There are several ways to which the drain hose will be connected. 2. Check the parts on the sink to insert the drain hose into the drain hose connector of the sink, as shown in your region. With disposal With disposal...
Installation Guide Ver.1.0 (English, French, Spanish)
Page 21
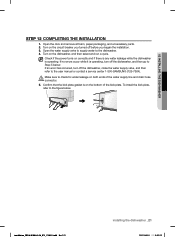
... plate gasket is operating. To install the kick plate, refer to Step 5 below . Open the door and remove all foam, paper packaging, and unnecessary parts. 2. Turn on both ends of the kick plate. Make sure to check for water leakage on the circuit breaker you turned off the dishwasher, and...the dishwasher, and then select and run a cycle. Open the water supply valve to supply water to the user manual or contact a service center 1-800-SAMSUNG (726-7864). If no errors occur while it is operating, turn off the dishwasher, close the water supply valve, and then refer to the dishwasher...
... plate gasket is operating. To install the kick plate, refer to Step 5 below . Open the door and remove all foam, paper packaging, and unnecessary parts. 2. Turn on both ends of the kick plate. Make sure to check for water leakage on the circuit breaker you turned off the dishwasher, and...the dishwasher, and then select and run a cycle. Open the water supply valve to supply water to the user manual or contact a service center 1-800-SAMSUNG (726-7864). If no errors occur while it is operating, turn off the dishwasher, close the water supply valve, and then refer to the dishwasher...
Quick Guide Installation Requirements And Pointers Ver.1.0 (English, French, Spanish)
Page 1
... drilling, secure the dishwasher by removing the tub spacer caps, carefully passing a drill bit through the holes in the Installation Guide. Check the parts and tools. 2 installation brackets 2 flat head screws (for the installation bracket) 2 screws (for leaks. Place the dishwasher so that can... high. 24" (610 mm) minimum 24" (610 mm) minimum 2. Open the dishwasher door and remove all foam, paper packaging, and unnecessary parts. 3. Make sure the power comes on the dishwasher, and then select and run a cycle. 6. Remove the junction box cover located at the front...
... drilling, secure the dishwasher by removing the tub spacer caps, carefully passing a drill bit through the holes in the Installation Guide. Check the parts and tools. 2 installation brackets 2 flat head screws (for the installation bracket) 2 screws (for leaks. Place the dishwasher so that can... high. 24" (610 mm) minimum 24" (610 mm) minimum 2. Open the dishwasher door and remove all foam, paper packaging, and unnecessary parts. 3. Make sure the power comes on the dishwasher, and then select and run a cycle. 6. Remove the junction box cover located at the front...
User Manual Ver.1.0 (English, French, Spanish)
Page 3
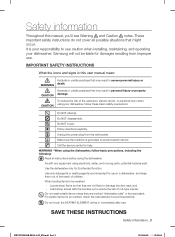
...electric shock. These important safety instructions do not cover all instructions before using electricity, water, and moving parts, potential hazards exist. Use only detergents or wetting agents recommended for damages resulting from the wall socket.... user manual mean: Hazards or unsafe practices that may result in severe personal injury or WARNING death. Samsung will not be washed: - IMPORTANT SAFETY INSTRUCTIONS What the icons and signs in this manual, you'...or the equivalent. SAVE THESE INSTRUCTIONS Safety information _3 DW7933LRASR-00141A-02_EN.indd Sec1:3 2012-09-05 12:09:04
...electric shock. These important safety instructions do not cover all instructions before using electricity, water, and moving parts, potential hazards exist. Use only detergents or wetting agents recommended for damages resulting from the wall socket.... user manual mean: Hazards or unsafe practices that may result in severe personal injury or WARNING death. Samsung will not be washed: - IMPORTANT SAFETY INSTRUCTIONS What the icons and signs in this manual, you'...or the equivalent. SAVE THESE INSTRUCTIONS Safety information _3 DW7933LRASR-00141A-02_EN.indd Sec1:3 2012-09-05 12:09:04
User Manual Ver.1.0 (English, French, Spanish)
Page 5
... or the door latch so that children or small animals do not get trapped inside. Do not repair, replace, or service any part of the substances listed, including benzene, formaldehyde, and carbon monoxide. Connect the ground wire to the green ground connector in death, ...and requires businesses to warn of your warranty. Before disposing of potential exposure to such substances. SAVE THESE INSTRUCTIONS Safety information _5 DW7933LRASR-00141A-02_EN.indd Sec1:5 2012-09-05 12:09:04 BEFORE USING YOUR DISHWASHER WARNING WARNING Tip-Over Hazard - Do not allow...
... or the door latch so that children or small animals do not get trapped inside. Do not repair, replace, or service any part of the substances listed, including benzene, formaldehyde, and carbon monoxide. Connect the ground wire to the green ground connector in death, ...and requires businesses to warn of your warranty. Before disposing of potential exposure to such substances. SAVE THESE INSTRUCTIONS Safety information _5 DW7933LRASR-00141A-02_EN.indd Sec1:5 2012-09-05 12:09:04 BEFORE USING YOUR DISHWASHER WARNING WARNING Tip-Over Hazard - Do not allow...

User Manual Ver.1.0 (English, French, Spanish)
Page 6
Contents SETTING UP YOUR DISHWASHER 7 7 Unpacking your dishwasher 7 Checking parts 8 Meeting installation requirements USING YOUR DISHWASHER 9 9 Control panel 11 Progress lights 11 Display 11 Cycle selector 12 Basic guidelines 14 Removing the plate support 14 ... chart TROUBLESHOOTING 23 23 Check these points if your dishwasher... 26 Information codes 6_ Contents APPENDIX 27 27 Helping the environment 27 Specifications DW7933LRASR-00141A-02_EN.indd Sec2:6 2012-09-05 12:09:04
Contents SETTING UP YOUR DISHWASHER 7 7 Unpacking your dishwasher 7 Checking parts 8 Meeting installation requirements USING YOUR DISHWASHER 9 9 Control panel 11 Progress lights 11 Display 11 Cycle selector 12 Basic guidelines 14 Removing the plate support 14 ... chart TROUBLESHOOTING 23 23 Check these points if your dishwasher... 26 Information codes 6_ Contents APPENDIX 27 27 Helping the environment 27 Specifications DW7933LRASR-00141A-02_EN.indd Sec2:6 2012-09-05 12:09:04
User Manual Ver.1.0 (English, French, Spanish)
Page 7
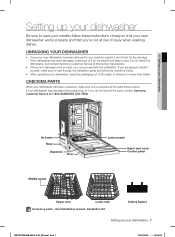
... during shipping, or if you 've received all the parts, contact Samsung Customer Service at 1-800-SAMSUNG (726-7864) Air brake Base Dispenser Door Lower nozzle Vapor vent cover Control panel Middle nozzle Upper rack Lower rack Accessory parts - 01 Setting up your dishwasher Setting up your new...through the installation guide and follow these instructions closely so that your dishwasher _7 DW7933LRASR-00141A-02_EN.indd Sec3:7 2012-09-05 12:09:04 Do not install the dishwasher, and contact Samsung Customer Service at risk of it and check for any damage. Cutlery basket ...
... during shipping, or if you 've received all the parts, contact Samsung Customer Service at 1-800-SAMSUNG (726-7864) Air brake Base Dispenser Door Lower nozzle Vapor vent cover Control panel Middle nozzle Upper rack Lower rack Accessory parts - 01 Setting up your dishwasher Setting up your new...through the installation guide and follow these instructions closely so that your dishwasher _7 DW7933LRASR-00141A-02_EN.indd Sec3:7 2012-09-05 12:09:04 Do not install the dishwasher, and contact Samsung Customer Service at risk of it and check for any damage. Cutlery basket ...
User Manual Ver.1.0 (English, French, Spanish)
Page 20
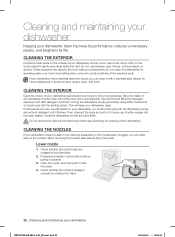
..., or alcohol. CLEANING THE INTERIOR Clean the interior of the door with a wet dishcloth. Wipe the inside of the dishwasher and the inner part of your dishwasher DW7933LRASR-00141A-02_EN.indd Sec5:20 2012-09-05 12:09:10 Close the dishwasher and let the cycle finish. Lower nozzle 1. Check whether... cleaning is engaged correctly by rotating it upwards. 3. Do not remove the Seal tub front (the long rubber seal enclosing the opening of the electrical parts. CLEANING THE EXTERIOR It's best to gently wipe away spills and dust.
..., or alcohol. CLEANING THE INTERIOR Clean the interior of the door with a wet dishcloth. Wipe the inside of the dishwasher and the inner part of your dishwasher DW7933LRASR-00141A-02_EN.indd Sec5:20 2012-09-05 12:09:10 Close the dishwasher and let the cycle finish. Lower nozzle 1. Check whether... cleaning is engaged correctly by rotating it upwards. 3. Do not remove the Seal tub front (the long rubber seal enclosing the opening of the electrical parts. CLEANING THE EXTERIOR It's best to gently wipe away spills and dust.
User Manual Ver.1.0 (English, French, Spanish)
Page 28
...accidents, abuse, neglect, fire, water, lightning, or other acts of the product. 28_ Warranty DW7933LRASR-00141A-02_EN.indd Sec10:28 2012-09-05 12:09:13 SAMSUNG will provide in-home service during the limited warranty period specified above. altered product or serial... United States/Canada. The original dated bill of a service call for leakage. In home service is longer. SAMSUNG will replace your unit with new or reconditioned parts or products if found to be returned to the service agent. product removal and reinstallation; All replaced...
...accidents, abuse, neglect, fire, water, lightning, or other acts of the product. 28_ Warranty DW7933LRASR-00141A-02_EN.indd Sec10:28 2012-09-05 12:09:13 SAMSUNG will provide in-home service during the limited warranty period specified above. altered product or serial... United States/Canada. The original dated bill of a service call for leakage. In home service is longer. SAMSUNG will replace your unit with new or reconditioned parts or products if found to be returned to the service agent. product removal and reinstallation; All replaced...


