User Manual
Page 4
This manual contains important information on your new Samsung dryer. Important safety symbols What the icons and signs in this user ... to read this instruction manual. Because the following operating instructions cover various models, the characteristics of your dryer may result in personal injury and/or property damage. Please store the manual in this appliance only for... future reference. These warning signs are here to prevent injury to ensure that a risk of your dryer's many benefits and features. What you need to know how to use and care of your new appliance...
This manual contains important information on your new Samsung dryer. Important safety symbols What the icons and signs in this user ... to read this instruction manual. Because the following operating instructions cover various models, the characteristics of your dryer may result in personal injury and/or property damage. Please store the manual in this appliance only for... future reference. These warning signs are here to prevent injury to ensure that a risk of your dryer's many benefits and features. What you need to know how to use and care of your new appliance...
User Manual
Page 5
...or discarded, remove the door to the manufacturer's instructions and local codes. • Do not install a clothes dryer with clothes dryers. Do not use the dryer to catch fire by itself. 4. Flammable substances may cause the fabric to dry clothes which have been previously cleaned ...trap lint. Important safety precautions WARNING To reduce the risk of a specific type identified by a qualified installer. • Install the clothes dryer according to the drying compartment. www.P65Warnings.ca.gov. WARNING - Flexible venting materials are known to collapse, be of fire, electric ...
...or discarded, remove the door to the manufacturer's instructions and local codes. • Do not install a clothes dryer with clothes dryers. Do not use the dryer to catch fire by itself. 4. Flammable substances may cause the fabric to dry clothes which have been previously cleaned ...trap lint. Important safety precautions WARNING To reduce the risk of a specific type identified by a qualified installer. • Install the clothes dryer according to the drying compartment. www.P65Warnings.ca.gov. WARNING - Flexible venting materials are known to collapse, be of fire, electric ...

User Manual
Page 6
... or replace any part of the appliance or attempt any service unless specifically recommended in the user-maintenance instructions or in your hand under the dryer. • This may result in injury. 20.Take care that the heat is energized. 6 English SAVE THESE INSTRUCTIONS DV7750M_DC68-03170Y-05_EN.indd ...when the appliance is moving. 8. Do not reach into the appliance if the drum is used near children. 19.Do not insert your dryer. Do not install or store this part while appliance is dissipated. 17.This appliance must be cleaned periodically by qualified service personnel. 16.Do...
... or replace any part of the appliance or attempt any service unless specifically recommended in the user-maintenance instructions or in your hand under the dryer. • This may result in injury. 20.Take care that the heat is energized. 6 English SAVE THESE INSTRUCTIONS DV7750M_DC68-03170Y-05_EN.indd ...when the appliance is moving. 8. Do not reach into the appliance if the drum is used near children. 19.Do not insert your dryer. Do not install or store this part while appliance is dissipated. 17.This appliance must be cleaned periodically by qualified service personnel. 16.Do...
User Manual
Page 7
..., or the gas supplier. Any material that has been in contact with a cleaning solvent or flammable liquids or solids should not be placed in the dryer until all occupants. • Immediately call your gas supplier, call the fire department. • Installation and service must not be performed by spontaneous combustion. Follow...
..., or the gas supplier. Any material that has been in contact with a cleaning solvent or flammable liquids or solids should not be placed in the dryer until all occupants. • Immediately call your gas supplier, call the fire department. • Installation and service must not be performed by spontaneous combustion. Follow...

User Manual
Page 8
...• Keep the area around the exhaust opening and surrounding areas free from lint, dust, and dirt. • The interior of the dryer and exhaust duct should be cleaned periodically by qualified service personnel. • This appliance must be detected by smell alone. • Gas...system, resulting in accordance with large buckles, buttons, or other heavy metal or solid objects. • Gas leaks may occur in your dryer from small, irregularly shaped hard objects, foreign material, etc. ie. Safety information Safety information Warnings WARNING • Ensure pockets are free from...
...• Keep the area around the exhaust opening and surrounding areas free from lint, dust, and dirt. • The interior of the dryer and exhaust duct should be cleaned periodically by qualified service personnel. • This appliance must be detected by smell alone. • Gas...system, resulting in accordance with large buckles, buttons, or other heavy metal or solid objects. • Gas leaks may occur in your dryer from small, irregularly shaped hard objects, foreign material, etc. ie. Safety information Safety information Warnings WARNING • Ensure pockets are free from...

User Manual
Page 9
...cooking oil are hot. Never pile or stack these items when they are exposed to reduce their temperature. Heat sources such as your dryer that contain vegetable oil or cooking oil can warm these items, allowing an oxidation reaction in hot water with vegetable oil or cooking oil...hazard. • All washed and unwashed fabrics that have run through the Cool Down cycle. Safety information • Do not place items in your dryer can be dangerous. Piling, stacking, or storing these kinds of these oils. • Residual oil on clothing can become hot enough to occur. ...
...cooking oil are hot. Never pile or stack these items when they are exposed to reduce their temperature. Heat sources such as your dryer that contain vegetable oil or cooking oil can warm these items, allowing an oxidation reaction in hot water with vegetable oil or cooking oil...hazard. • All washed and unwashed fabrics that have run through the Cool Down cycle. Safety information • Do not place items in your dryer can be dangerous. Piling, stacking, or storing these kinds of these oils. • Residual oil on clothing can become hot enough to occur. ...
User Manual
Page 10
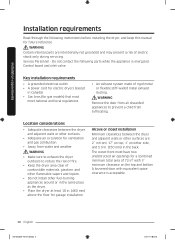
... unobstructed air openings for ventilation and gas combustion. • Away from suffocating. Location considerations • Adequate clearances between the dryer and adjacent walls or other surfaces are intentionally not grounded and may present a risk of electric shock only during servicing. Key... installation requirements • A grounded electrical outlet. • A power cord for electric dryers (except in Canada). • Gas lines (for future reference. Service Personnel - WARNING Remove the door from all discarded appliances ...
... unobstructed air openings for ventilation and gas combustion. • Away from suffocating. Location considerations • Adequate clearances between the dryer and adjacent walls or other surfaces are intentionally not grounded and may present a risk of electric shock only during servicing. Key... installation requirements • A grounded electrical outlet. • A power cord for electric dryers (except in Canada). • Gas lines (for future reference. Service Personnel - WARNING Remove the door from all discarded appliances ...

User Manual
Page 11
... lint filter clean. Installation requirements Ducting requirements Recommended Use only for short-run installation Weather hood type No. If you integrate the dryer's vent system with a manometer presented to the exhaust duct that connects to use a flexible plastic duct. • To regularly ...check and clean all applicable local, state, and national regulations. • Not to the dryer. The dryer tumbler must not exceed 0.83 inches of 90° elbows 0 1 2 3 4" (10.2 cm) Rigid 80 ft. (24.4 m) 68 ft. (20.7...
... lint filter clean. Installation requirements Ducting requirements Recommended Use only for short-run installation Weather hood type No. If you integrate the dryer's vent system with a manometer presented to the exhaust duct that connects to use a flexible plastic duct. • To regularly ...check and clean all applicable local, state, and national regulations. • Not to the dryer. The dryer tumbler must not exceed 0.83 inches of 90° elbows 0 1 2 3 4" (10.2 cm) Rigid 80 ft. (24.4 m) 68 ft. (20.7...

User Manual
Page 12
... outside will prevent large amounts of lint and moisture from being blown into the room. In the United States and Canada • All dryers must be exhausted to ensure containment of exhaust air, heat, and lint. 12 English DV7750M_DC68-03170Y-05_EN.indd 12 2019-06-03 5:18...:29 Installation requirements Installation requirements Exhausting requirements The dryer must not be used. • The total length of flexible metal duct must not exceed 7' 101/2" (2.4 m). • Do not assemble the ...
... outside will prevent large amounts of lint and moisture from being blown into the room. In the United States and Canada • All dryers must be exhausted to ensure containment of exhaust air, heat, and lint. 12 English DV7750M_DC68-03170Y-05_EN.indd 12 2019-06-03 5:18...:29 Installation requirements Installation requirements Exhausting requirements The dryer must not be used. • The total length of flexible metal duct must not exceed 7' 101/2" (2.4 m). • Do not assemble the ...
User Manual
Page 13
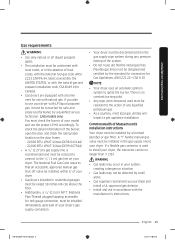
...'s instructions. The National Fuel Gas Code requires that an accessible, approved manual gas shut-off valve be installed within 6" of your dryer. • Gas dryers installed in residential garages must be raised 18 inches (46 cm) above the floor. • Additionally, a 1/8" (0.3 cm) ...N.P.T. (National Pipe Thread) plugged tapping, accessible for test gauge connection, must be installed immediately upstream of your dryer. A "T" handle manual gas valve must be installed in the gas supply line to install your system, creating a dangerous situation. • Gas...
...'s instructions. The National Fuel Gas Code requires that an accessible, approved manual gas shut-off valve be installed within 6" of your dryer. • Gas dryers installed in residential garages must be raised 18 inches (46 cm) above the floor. • Additionally, a 1/8" (0.3 cm) ...N.P.T. (National Pipe Thread) plugged tapping, accessible for test gauge connection, must be installed immediately upstream of your dryer. A "T" handle manual gas valve must be installed in the gas supply line to install your system, creating a dangerous situation. • Gas...
User Manual
Page 14
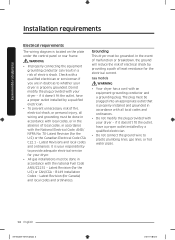
...- Latest Revision (for the U.S.) or CAN/CGA - WARNING • Improperly connecting the equipment grounding conductor can result in accordance with your dryer - Latest Revisions and local codes and ordinances. B149 Installation Codes - if it doesn't't fit the outlet, have a proper outlet installed by... providing a path of electric shock. Gas models WARNING • Your dryer has a cord with your dryer - Latest Revision (for Canada) and local codes and ordinances. In the event of malfunction or breakdown, the ground will ...
...- Latest Revision (for the U.S.) or CAN/CGA - WARNING • Improperly connecting the equipment grounding conductor can result in accordance with your dryer - Latest Revisions and local codes and ordinances. B149 Installation Codes - if it doesn't't fit the outlet, have a proper outlet installed by... providing a path of electric shock. Gas models WARNING • Your dryer has a cord with your dryer - Latest Revision (for Canada) and local codes and ordinances. In the event of malfunction or breakdown, the ground will ...
User Manual
Page 15
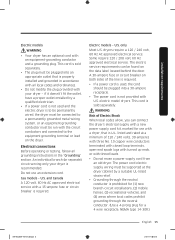
... separately. • The plug must be plugged into a 30-ampere receptacle. • The power cord is to be permanently wired, the dryer must be connected to the equipment grounding terminal or lead on the data label located behind the door. if it doesn't't fit the outlet, ... the neutral conductor. (Use a 4-prong plug for use an extension cord. An individual branch (or separate) circuit serving only your dryer - listed and rated at the dryer cabinet by a qualified electrician. • If a power cord is properly installed and grounded in the "Grounding" section. and Canada ...
... separately. • The plug must be plugged into a 30-ampere receptacle. • The power cord is to be permanently wired, the dryer must be connected to the equipment grounding terminal or lead on the data label located behind the door. if it doesn't't fit the outlet, ... the neutral conductor. (Use a 4-prong plug for use an extension cord. An individual branch (or separate) circuit serving only your dryer - listed and rated at the dryer cabinet by a qualified electrician. • If a power cord is properly installed and grounded in the "Grounding" section. and Canada ...
User Manual
Page 16
The power cord should be plugged into a 30-ampere receptacle. Installation requirements Electric models - Installation requirements 16 English DV7750M_DC68-03170Y-05_EN.indd 16 2019-06-03 5:18:29 Canada Only • A 120 / 240 volt, 60 Hz AC approved electrical service fused through a 30-ampere fuse or circuit breaker on both sides of the line is required. • All Canadian models are shipped with the power cord attached. NOTE In Canada, you may not convert a dryer to 208 volts.
The power cord should be plugged into a 30-ampere receptacle. Installation requirements Electric models - Installation requirements 16 English DV7750M_DC68-03170Y-05_EN.indd 16 2019-06-03 5:18:29 Canada Only • A 120 / 240 volt, 60 Hz AC approved electrical service fused through a 30-ampere fuse or circuit breaker on both sides of the line is required. • All Canadian models are shipped with the power cord attached. NOTE In Canada, you may not convert a dryer to 208 volts.
User Manual
Page 17
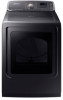
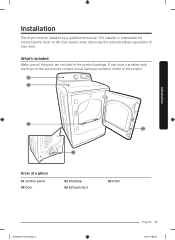
What's included Make sure all the parts are included in the product package. If you have a problem with the dryer or the accessories, contact a local Samsung customer center or the retailer. 01 02 Installation 03 04 05 Dryer at a glance 01 Control panel 04 Door 02 Worktop 05 Exhaust duct 03 Filter DV7750M_DC68-03170Y-05_EN.indd 17 English 17 2019-06-03 5:18:29 Installation This dryer must be installed by a qualified technician. The installer is responsible for connecting the dryer to the main power while observing the relevant safety regulations of your area.
What's included Make sure all the parts are included in the product package. If you have a problem with the dryer or the accessories, contact a local Samsung customer center or the retailer. 01 02 Installation 03 04 05 Dryer at a glance 01 Control panel 04 Door 02 Worktop 05 Exhaust duct 03 Filter DV7750M_DC68-03170Y-05_EN.indd 17 English 17 2019-06-03 5:18:29 Installation This dryer must be installed by a qualified technician. The installer is responsible for connecting the dryer to the main power while observing the relevant safety regulations of your area.

User Manual
Page 19
...indd 19 English 19 2019-06-03 5:18:32 STEP 1 Install the exhaust system 1. Tighten up the fitting over all threaded connections. 3. Tip the dryer on the floor. Connect the gas supply to the 3/8" (1 cm) male threaded end on the gas supply, and check for gas leaks. An ...side so it is found, tighten the connections and try again. NOTE • To move the dryer to facilitate ducting and wiring. Installation Step-by step installation instructions start below. Push the dryer so that it lies across both cushion-tops. To change the door direction, see "Switching the ...
...indd 19 English 19 2019-06-03 5:18:32 STEP 1 Install the exhaust system 1. Tighten up the fitting over all threaded connections. 3. Tip the dryer on the floor. Connect the gas supply to the 3/8" (1 cm) male threaded end on the gas supply, and check for gas leaks. An ...side so it is found, tighten the connections and try again. NOTE • To move the dryer to facilitate ducting and wiring. Installation Step-by step installation instructions start below. Push the dryer so that it lies across both cushion-tops. To change the door direction, see "Switching the ...

User Manual
Page 20
... • To convert from the 4-wire system to 3-wire system, connect the ground strap to the terminal block support to ground the dryer frame to the neutral conductor. • Ring-type terminals are tightened. 20 English DV7750M_DC68-03170Y-05_EN.indd 20 2019-06-03 5:18...C. Loosen or remove the center terminal block. 2. Tighten the screws. 3. Connect the other wires to the center, silver-colored terminal screw of the dryer. Tighten the screws. 4. Then, secure the cover with a hold-down screw. External ground connector B. Center silver-colored terminal block screw D. Tighten ...
... • To convert from the 4-wire system to 3-wire system, connect the ground strap to the terminal block support to ground the dryer frame to the neutral conductor. • Ring-type terminals are tightened. 20 English DV7750M_DC68-03170Y-05_EN.indd 20 2019-06-03 5:18...C. Loosen or remove the center terminal block. 2. Tighten the screws. 3. Connect the other wires to the center, silver-colored terminal screw of the dryer. Tighten the screws. 4. Then, secure the cover with a hold-down screw. External ground connector B. Center silver-colored terminal block screw D. Tighten ...

User Manual
Page 21
...the terminal block. Tighten the strain relief screws. 6. models are tight. If you use the 4-wire system, you cannot ground the dryer frame to the center screw of the power cable to the outer terminal block screws. Do not loosen the nuts already installed on the... they are designed for new or remodeled construction, mobile homes, or if local codes do not permit grounding through neutral. External ground connector B. The dryer frame is required for a 3-wire system connection. Tighten the screws. 5. Be sure they are recommended. A 4-wire system connection is grounded to...
...the terminal block. Tighten the strain relief screws. 6. models are tight. If you use the 4-wire system, you cannot ground the dryer frame to the center screw of the power cable to the outer terminal block screws. Do not loosen the nuts already installed on the... they are designed for new or remodeled construction, mobile homes, or if local codes do not permit grounding through neutral. External ground connector B. The dryer frame is required for a 3-wire system connection. Tighten the screws. 5. Be sure they are recommended. A 4-wire system connection is grounded to...

User Manual
Page 22
... 5:18:32 Turn the coupling manually until it is tight, and then, using the provided water hoses. 1. Installation Installation STEP 4 Connect the water hose The dryer must be damaged. 4. Connect the straight end of the rear frame. Using pliers, tighten the coupling an additional two-thirds turn . Connect the angled end...
... 5:18:32 Turn the coupling manually until it is tight, and then, using the provided water hoses. 1. Installation Installation STEP 4 Connect the water hose The dryer must be damaged. 4. Connect the straight end of the rear frame. Using pliers, tighten the coupling an additional two-thirds turn . Connect the angled end...

User Manual
Page 24
...turning them counterclockwise, then loosen (B) the feet by turning them clockwise. Installation B A B NOTE • To set the dryer to vibrate. 24 English DV7750M_DC68-03170Y-05_EN.indd 24 2019-06-03 5:18:33 Once the dryer is level again. Extending the leveling feet more than necessary can cause the... dryer to the same height as necessary to back. If the dryer is level side to side and then front to level the dryer. Using a level (A), check if the dryer is not level, adjust the A leveling feet (B) at ...
...turning them counterclockwise, then loosen (B) the feet by turning them clockwise. Installation B A B NOTE • To set the dryer to vibrate. 24 English DV7750M_DC68-03170Y-05_EN.indd 24 2019-06-03 5:18:33 Once the dryer is level again. Extending the leveling feet more than necessary can cause the... dryer to the same height as necessary to back. If the dryer is level side to side and then front to level the dryer. Using a level (A), check if the dryer is not level, adjust the A leveling feet (B) at ...
User Manual
Page 25
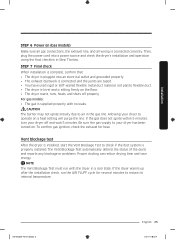
...• You have used rigid or stiff-walled flexible metal duct material, not plastic flexible duct. • The dryer is level and is sitting firmly on the floor. • The dryer starts, runs, heats, and shuts off and wait 5 minutes. CAUTION The burner may not ignite initially due to ...operate on . Vent blockage test After the dryer is installed, start the Vent Blockage Test to your dryer off properly. The Vent Blockage Test automatically detects the status of the ducts and reports any blockage or problems. Proper...
...• You have used rigid or stiff-walled flexible metal duct material, not plastic flexible duct. • The dryer is level and is sitting firmly on the floor. • The dryer starts, runs, heats, and shuts off and wait 5 minutes. CAUTION The burner may not ignite initially due to ...operate on . Vent blockage test After the dryer is installed, start the Vent Blockage Test to your dryer off properly. The Vent Blockage Test automatically detects the status of the ducts and reports any blockage or problems. Proper...

