User Manual
Page 4
... features. Safety information Safety information Congratulations on the installation, use common sense, caution and care when installing, maintaining and operating your dryer. Please store the manual in this manual thoroughly to ensure that a risk of your nearest service center or find help and information online at www.samsung.com. If you know about the safety...
... features. Safety information Safety information Congratulations on the installation, use common sense, caution and care when installing, maintaining and operating your dryer. Please store the manual in this manual thoroughly to ensure that a risk of your nearest service center or find help and information online at www.samsung.com. If you know about the safety...
User Manual
Page 10
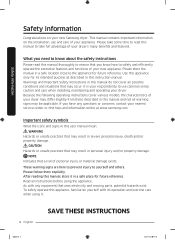
... from water and weather. Do not contact the following instructions before installing the dryer, and keep this manual for garage installation. 10 English Untitled-16 10 2020-07-14 3:36:13 Installation requirements Installation requirements Read through the following parts while the appliance is energized: Control.... • Keep the dryer area clear of combustible materials, gasoline, and other flammable vapors and liquids. • Do not install other surfaces. • Adequate air circulation for gas models) that must meet national and local regulations. • An exhaust system...
... from water and weather. Do not contact the following instructions before installing the dryer, and keep this manual for garage installation. 10 English Untitled-16 10 2020-07-14 3:36:13 Installation requirements Installation requirements Read through the following parts while the appliance is energized: Control.... • Keep the dryer area clear of combustible materials, gasoline, and other flammable vapors and liquids. • Do not install other surfaces. • Adequate air circulation for gas models) that must meet national and local regulations. • An exhaust system...
User Manual
Page 12
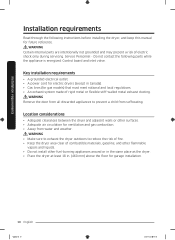
...fuel-burning appliance should be installed in the same closet as the dryer. • Place the dryer at least 18 in .² (465 cm²). 12 English Untitled-16 12 2020-07-14 3:36:13 NOTE • For washer's clearance requirement, see the washer's user manual. • If the... washer and dryer have two unobstructed air openings for dryers only. Alcove or closet installations WARNING • The dryer must have different clearance requirements, use the one with the larger value...
...fuel-burning appliance should be installed in the same closet as the dryer. • Place the dryer at least 18 in .² (465 cm²). 12 English Untitled-16 12 2020-07-14 3:36:13 NOTE • For washer's clearance requirement, see the washer's user manual. • If the... washer and dryer have two unobstructed air openings for dryers only. Alcove or closet installations WARNING • The dryer must have different clearance requirements, use the one with the larger value...
User Manual
Page 16
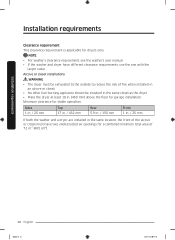
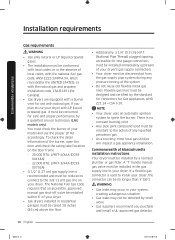
...your dryer. Flexible gas lines must check the burner of Massachusetts installation instructions Your dryer must be installed by the standard for connectors for Gas Appliances, ANSI Z21.24 • CSA 6.10. A "T" handle manual gas valve must be reduced to connect to your model and ...; As a courtesy, most local gas utilities will inspect a gas appliance installation. The National Fuel Gas Code requires that an accessible, approved manual gas shut-off valve be installed within 6" of your dryer. • Gas dryers installed in residential garages must be raised 18 inches (46 cm) above the...
...your dryer. Flexible gas lines must check the burner of Massachusetts installation instructions Your dryer must be installed by the standard for connectors for Gas Appliances, ANSI Z21.24 • CSA 6.10. A "T" handle manual gas valve must be reduced to connect to your model and ...; As a courtesy, most local gas utilities will inspect a gas appliance installation. The National Fuel Gas Code requires that an accessible, approved manual gas shut-off valve be installed within 6" of your dryer. • Gas dryers installed in residential garages must be raised 18 inches (46 cm) above the...
User Manual
Page 26
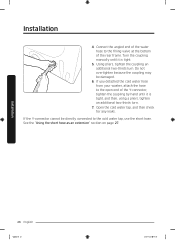
Open the cold water tap, and then check for any leaks. If the Y-connector cannot be damaged. 6. Turn the coupling manually until it is tight, and then, using a pliers, tighten an additional two-thirds turn . See the "Using the short hose as an extension" ...to the filling valve at the bottom of the Y-connector, tighten the coupling by hand until it is tight. 5. Installation 4. Using pliers, tighten the coupling an additional two-thirds turn . 7. Installation 26 English Untitled-16 26 2020-07-14 3:36:17 Do not overtighten because the coupling may be directly connected...
Open the cold water tap, and then check for any leaks. If the Y-connector cannot be damaged. 6. Turn the coupling manually until it is tight, and then, using a pliers, tighten an additional two-thirds turn . See the "Using the short hose as an extension" ...to the filling valve at the bottom of the Y-connector, tighten the coupling by hand until it is tight. 5. Installation 4. Using pliers, tighten the coupling an additional two-thirds turn . 7. Installation 26 English Untitled-16 26 2020-07-14 3:36:17 Do not overtighten because the coupling may be directly connected...

User Manual
Page 27
... the cold water tap, and then check for any leaks. Connect the Y-connector (A) to the brass male end of the rear frame. Turn the coupling manually until it is tight. 2. Turn the coupling by hand until it is tight. 6. Do not overtighten because the coupling may be damaged. 7. If you have... detached the cold water hose from your washer, attach the hose to the cold water tap. Do not overtighten because the coupling may be damaged. 5. Installation Using the short hose as an extension B A C 1. Turn the coupling by hand until it is tight. 4.
... the cold water tap, and then check for any leaks. Connect the Y-connector (A) to the brass male end of the rear frame. Turn the coupling manually until it is tight. 2. Turn the coupling by hand until it is tight. 6. Do not overtighten because the coupling may be damaged. 7. If you have... detached the cold water hose from your washer, attach the hose to the cold water tap. Do not overtighten because the coupling may be damaged. 5. Installation Using the short hose as an extension B A C 1. Turn the coupling by hand until it is tight. 4.
User Manual
Page 31
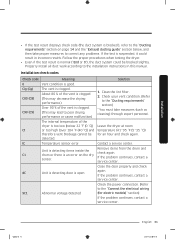
Follow the proper procedures when testing the dryer. • Even if the test result is normal ("End or 0"), the duct system could result in this manual. Clean the lint filter. 2. Remove items from the drum and check again. If the problem continues, contact a service center. Untitled-16 31 English ...31 2020-07-14 3:36:17 Check the power connection. (Refer to the "Connect the electrical wiring (for an hour and check again. Installation check codes Check code 0 Clg (Cg) C80 (C8) C90 (C9) Ct tC C1 dC 9C1 Meaning Vent condition is clogged. If the problem continues...
Follow the proper procedures when testing the dryer. • Even if the test result is normal ("End or 0"), the duct system could result in this manual. Clean the lint filter. 2. Remove items from the drum and check again. If the problem continues, contact a service center. Untitled-16 31 English ...31 2020-07-14 3:36:17 Check the power connection. (Refer to the "Connect the electrical wiring (for an hour and check again. Installation check codes Check code 0 Clg (Cg) C80 (C8) C90 (C9) Ct tC C1 dC 9C1 Meaning Vent condition is clogged. If the problem continues...
User Manual
Page 48
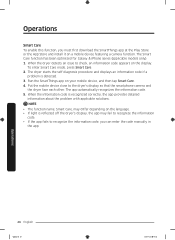
...; If the app fails to recognize the information code, you must first download the SmartThings app at the Play Store or the App Store and install it on your mobile device, and then tap Smart Care. 4. To enter Smart Care mode, press Smart Care. 2. Run the SmartThings app on...dryer face each other. The app automatically recognizes the information code. 5. Operations Smart Care To enable this function, you can enter the code manually in the app. The dryer starts the self-diagnosis procedure and displays an information code if a problem is recognized correctly, the app provides detailed...
...; If the app fails to recognize the information code, you must first download the SmartThings app at the Play Store or the App Store and install it on your mobile device, and then tap Smart Care. 4. To enter Smart Care mode, press Smart Care. 2. Run the SmartThings app on...dryer face each other. The app automatically recognizes the information code. 5. Operations Smart Care To enable this function, you can enter the code manually in the app. The dryer starts the self-diagnosis procedure and displays an information code if a problem is recognized correctly, the app provides detailed...

