
Quick Guide (easy Manual) (ver.1.0) (English)
Page 2
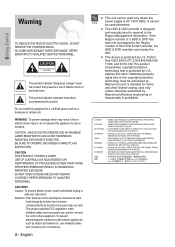
...prise et pousser jusqu au fond. I This unit can be authorized by Macrovision,and is intended for connections. 2 - CAUTION : HDD & DVD RECORDERS USE AN INVISIBLE LASER BEAM WHICH CAN CAUSE HAZARDOUS RADIATION EXPOSURE IF DIRECTED. English I This device is designed and manufactured to ... electric shock or personal injury. and 6,516,132.This product incorporates copyright protection technology that presents a risk of this HDD & DVD recorder, the HDD & DVD recorder cannot play the disc. patents and other equipment. It cannot NOTE be used to connect the unit to the ...
...prise et pousser jusqu au fond. I This unit can be authorized by Macrovision,and is intended for connections. 2 - CAUTION : HDD & DVD RECORDERS USE AN INVISIBLE LASER BEAM WHICH CAN CAUSE HAZARDOUS RADIATION EXPOSURE IF DIRECTED. English I This device is designed and manufactured to ... electric shock or personal injury. and 6,516,132.This product incorporates copyright protection technology that presents a risk of this HDD & DVD recorder, the HDD & DVD recorder cannot play the disc. patents and other equipment. It cannot NOTE be used to connect the unit to the ...
Quick Guide (easy Manual) (ver.1.0) (English)
Page 3
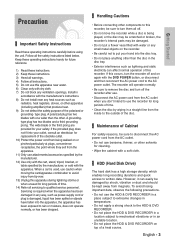
...use. • Disconnect the AC power cord from the inside to mechanical vibrations or in an unstable location. • Do not place the HDD & DVD RECORDER on again with one wider than the other than the disc in the disc tray. • Exterior interference such as power-supply cord or...button, or disconnect and then reconnect the AC power cord to use the HDD & DVD RECORDER in a place subject to extreame changes in temperature. • Do not apply a strong shock to the HDD & DVD RECORDER. • Do not place the HDD & DVD RECORDER in a straight line from the AC outlet when you don't ...
...use. • Disconnect the AC power cord from the inside to mechanical vibrations or in an unstable location. • Do not place the HDD & DVD RECORDER on again with one wider than the other than the disc in the disc tray. • Exterior interference such as power-supply cord or...button, or disconnect and then reconnect the AC power cord to use the HDD & DVD RECORDER in a place subject to extreame changes in temperature. • Do not apply a strong shock to the HDD & DVD RECORDER. • Do not place the HDD & DVD RECORDER in a straight line from the AC outlet when you don't ...
Quick Guide (easy Manual) (ver.1.0) (English)
Page 4
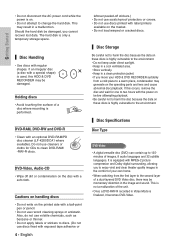
... on these discs is not a malfunction of the unit. • Once a DVD-RW/-R recorded in the comfort of your HDD & DVD RECORDER suddenly from a cold place to the second layer of a dual-layered DVD Video disc, there may generate on these discs is highly vulnerable to the environment....stickers to 135minutes of a disc where recording is only a temporary storage space. Disc Handling • Use discs with an optional DVD-RAM/PD disc cleaner (LF-K200DCA1 where available). If this HDD & DVD RECORDER may result in a clean protection jacket. • If you cannot recover lost data.
... on these discs is not a malfunction of the unit. • Once a DVD-RW/-R recorded in the comfort of your HDD & DVD RECORDER suddenly from a cold place to the second layer of a dual-layered DVD Video disc, there may generate on these discs is highly vulnerable to the environment....stickers to 135minutes of a disc where recording is only a temporary storage space. Disc Handling • Use discs with an optional DVD-RAM/PD disc cleaner (LF-K200DCA1 where available). If this HDD & DVD RECORDER may result in a clean protection jacket. • If you cannot recover lost data.

Quick Guide (easy Manual) (ver.1.0) (English)
Page 6
...Copy Once Title (Deletes the Title in this mode may not be played by existing HDD & DVD RECORDER. But "Copy Once program" has been recorded on a DVD-RW or DVD-R disc. COPY PROTECTION • Many DVD discs are not supported. Use of 4,500 files and 1,000 sub folders under a... problems including, without limitation, recording failure, loss of certain U.S. Reverse engineering or disassembly is used for recording data on the HDD, this , you to a VCR. DVD-RW (VR mode) • This is a format that is protected by Macrovision Corporation, is intended for home and other rights...
...Copy Once Title (Deletes the Title in this mode may not be played by existing HDD & DVD RECORDER. But "Copy Once program" has been recorded on a DVD-RW or DVD-R disc. COPY PROTECTION • Many DVD discs are not supported. Use of 4,500 files and 1,000 sub folders under a... problems including, without limitation, recording failure, loss of certain U.S. Reverse engineering or disassembly is used for recording data on the HDD, this , you to a VCR. DVD-RW (VR mode) • This is a format that is protected by Macrovision Corporation, is intended for home and other rights...
Quick Guide (easy Manual) (ver.1.0) (English)
Page 8
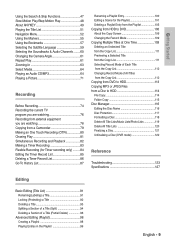
...Disc Handling 4 Disc Storage 4 Disc Specifications 4 Disc Copy 6 General Features 10 Before Reading the User's Manual 11 How to use the HDD & DVD RECORDER 11 Unpacking 13 Description 15 Front Panel 15 Front Panel Display 15 Rear Panel 16 Tour of the Remote Control 17 Connecting & Setting... Connecting to an AV amplifier with a digital input jack 24 Step 4 : Connecting External devices 24 Method 1 : Connecting a VCR, Set-Top Box(STB) or HDD & DVD player to the AV 1 IN jacks 24 Method 2 : Connecting a Camcorder to the AV 2 IN jacks 25 Method 3 : Connecting a Camcorder to the DV IN...
...Disc Handling 4 Disc Storage 4 Disc Specifications 4 Disc Copy 6 General Features 10 Before Reading the User's Manual 11 How to use the HDD & DVD RECORDER 11 Unpacking 13 Description 15 Front Panel 15 Front Panel Display 15 Rear Panel 16 Tour of the Remote Control 17 Connecting & Setting... Connecting to an AV amplifier with a digital input jack 24 Step 4 : Connecting External devices 24 Method 1 : Connecting a VCR, Set-Top Box(STB) or HDD & DVD player to the AV 1 IN jacks 24 Method 2 : Connecting a Camcorder to the AV 2 IN jacks 25 Method 3 : Connecting a Camcorder to the DV IN...
Quick Guide (easy Manual) (ver.1.0) (English)
Page 9
... Go To History List 87 Renaming a Playlist Entry 100 Editing a Scene for the Playlist 101 Deleting a Playlist Entry from the Playlist 105 Copying from HDD to DVD 106 About the Copy Screen 106 Changing the Record Mode 109 Copying Multiple Titles at One Time 109 Deleting an Undesired Title from the Copy... Each Title from the Copy List 112 Changing Record Mode of All Titles from the Copy List 112 Copying from DVD to HDD 113 Copying MP3 or JPEG Files from a Disc to HDD 114 File Copy 114 Folder Copy 115 Disc Manager 116 Editing the Disc Name 116 Disc Protection 117 Formatting a Disc...
... Go To History List 87 Renaming a Playlist Entry 100 Editing a Scene for the Playlist 101 Deleting a Playlist Entry from the Playlist 105 Copying from HDD to DVD 106 About the Copy Screen 106 Changing the Record Mode 109 Copying Multiple Titles at One Time 109 Deleting an Undesired Title from the Copy... Each Title from the Copy List 112 Changing Record Mode of All Titles from the Copy List 112 Copying from DVD to HDD 113 Copying MP3 or JPEG Files from a Disc to HDD 114 File Copy 114 Folder Copy 115 Disc Manager 116 Editing the Disc Name 116 Disc Protection 117 Formatting a Disc...
Quick Guide (easy Manual) (ver.1.0) (English)
Page 10
... hard disk drive (HDD) are completely independent. Copy between HDD and DVD You can copy recordings from the HDD to recordable DVD, or from a digital camcorder using a DV input jack Record DV Device video onto HDD, DVD-RAM, DVD-RW or DVD-R discs using DVD-RW/-R disc With the HDD & DVD RECORDER, you can ...create your recorder to DVD for the scheduled time can be recorded onto the free disc space. (See page 84) The HDD & DVD RECORDER allows you can edit recorded ...
... hard disk drive (HDD) are completely independent. Copy between HDD and DVD You can copy recordings from the HDD to recordable DVD, or from a digital camcorder using a DV input jack Record DV Device video onto HDD, DVD-RAM, DVD-RW or DVD-R discs using DVD-RW/-R disc With the HDD & DVD RECORDER, you can ...create your recorder to DVD for the scheduled time can be recorded onto the free disc space. (See page 84) The HDD & DVD RECORDER allows you can edit recorded ...

Quick Guide (easy Manual) (ver.1.0) (English)
Page 11
... you can be cancelled. About the use the HDD & DVD RECORDER Step 1 Select the disc type or HDD This unit can be formatted in DVD Video format. You can be formatted in either DVDVideo format (V mode) or DVD-Video Recording format (VR mode). Using a DVD-R This type of Samsung Electronics Co. You can be reproduced or copied...
... you can be cancelled. About the use the HDD & DVD RECORDER Step 1 Select the disc type or HDD This unit can be formatted in DVD Video format. You can be formatted in either DVDVideo format (V mode) or DVD-Video Recording format (VR mode). Using a DVD-R This type of Samsung Electronics Co. You can be reproduced or copied...

Quick Guide (easy Manual) (ver.1.0) (English)
Page 12
...recording, a title is created between chapters) varies according to the recording mode. Chapters will be made on other DVD components To play in VR mode, HDD) With this recorder, you can change of sections, called titles, and sub sections, called chapters. When using... be lost when changing formats. It should be unfinalized. Timer recording is recorded with DVDs and HDD. Step 6 Finalizing & Playing on the disc once it has been finalized. 12 - Creating a playlist (DVD-RAM/-RW in a displayed menu and then immediately start and stop recording. You cannot...
...recording, a title is created between chapters) varies according to the recording mode. Chapters will be made on other DVD components To play in VR mode, HDD) With this recorder, you can change of sections, called titles, and sub sections, called chapters. When using... be lost when changing formats. It should be unfinalized. Timer recording is recorded with DVDs and HDD. Step 6 Finalizing & Playing on the disc once it has been finalized. 12 - Creating a playlist (DVD-RAM/-RW in a displayed menu and then immediately start and stop recording. You cannot...
Quick Guide (easy Manual) (ver.1.0) (English)
Page 15
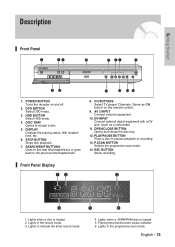
... pauses playback or recording. 13. Lights when a disc is loaded. 5. Lights when a -R/RW/RAM disc is loaded. 2. HDD BUTTON Select HDD mode. 4. English - 15 POWER BUTTON Turns the recorder on the remote control. 9. DVD BUTTON Select DVD mode. 3. Front Panel Display 1. Playing time/clock/current status indicator. 6. OPEN/CLOSE BUTTON Opens and closes the...
... pauses playback or recording. 13. Lights when a disc is loaded. 5. Lights when a -R/RW/RAM disc is loaded. 2. HDD BUTTON Select HDD mode. 4. English - 15 POWER BUTTON Turns the recorder on the remote control. 9. DVD BUTTON Select DVD mode. 3. Front Panel Display 1. Playing time/clock/current status indicator. 6. OPEN/CLOSE BUTTON Opens and closes the...
Quick Guide (easy Manual) (ver.1.0) (English)
Page 17
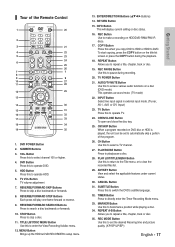
... STEP Buttons Each press will display current setting or disc status. 16. MENU Button Brings up the HDD & DVD RECORDER's setup menu. 13. ENTER/DIRECTION Buttons Buttons) 14. REPEAT Button Allows you copy DVD to HDD or HDD to operate TV. 24. This operates as sound mute. (TV mode) 22. TIMER Button Press ...20. PLAY LIST/TITLE MENU Button Use this to search a disc backwards or forwards. 10. COPY Button Press this to DVD. To start copying, press the COPY button on DVD disc or HDD is played, the unit can be set the desired Recoring time and picture quality. (XP/SP/LP/EP) English -...
... STEP Buttons Each press will display current setting or disc status. 16. MENU Button Brings up the HDD & DVD RECORDER's setup menu. 13. ENTER/DIRECTION Buttons Buttons) 14. REPEAT Button Allows you copy DVD to HDD or HDD to operate TV. 24. This operates as sound mute. (TV mode) 22. TIMER Button Press ...20. PLAY LIST/TITLE MENU Button Use this to search a disc backwards or forwards. 10. COPY Button Press this to DVD. To start copying, press the COPY button on DVD disc or HDD is played, the unit can be set the desired Recoring time and picture quality. (XP/SP/LP/EP) English -...
Quick Guide (easy Manual) (ver.1.0) (English)
Page 18
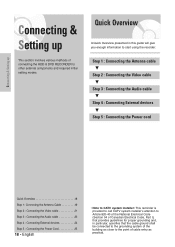
... installer: This reminder is provided to call CATV system installer's attention to Article 820-40 of the National Electrical Code (Section 54 of connecting the HDD & DVD RECORDER to other external components and required initial setting modes. Step 1 : Connecting the Antenna cable † Step 2 : Connecting the Video cable † Step 3 : Connecting the...
... installer: This reminder is provided to call CATV system installer's attention to Article 820-40 of the National Electrical Code (Section 54 of connecting the HDD & DVD RECORDER to other external components and required initial setting modes. Step 1 : Connecting the Antenna cable † Step 2 : Connecting the Video cable † Step 3 : Connecting the...
Quick Guide (easy Manual) (ver.1.0) (English)
Page 19
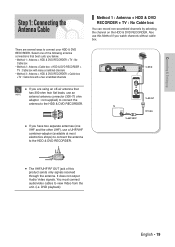
...and the other UHF), use a UHF/VHF combiner-adaptor (available at most electronics shops) to connect the antenna to connect your HDD & DVD RECORDER. I The VHF/UHF RF OUT jack of this Method if you have two separate antennas (one of the following antenna ... • Method 1 : Antenna + HDD & DVD RECORDER + TV : No Cable box • Method 2 : Antenna +Cable box + HDD & DVD RECORDER + TV : Cable box with many scrambled channels • Method 3 : Antenna + HDD & DVD RECORDER + Cable box +TV : Cable box with a few scrambled channels Method 1 : Antenna + HDD & DVD RECORDER + TV : No Cable box ...
...and the other UHF), use a UHF/VHF combiner-adaptor (available at most electronics shops) to connect the antenna to connect your HDD & DVD RECORDER. I The VHF/UHF RF OUT jack of this Method if you have two separate antennas (one of the following antenna ... • Method 1 : Antenna + HDD & DVD RECORDER + TV : No Cable box • Method 2 : Antenna +Cable box + HDD & DVD RECORDER + TV : Cable box with many scrambled channels • Method 3 : Antenna + HDD & DVD RECORDER + Cable box +TV : Cable box with a few scrambled channels Method 1 : Antenna + HDD & DVD RECORDER + TV : No Cable box ...
Quick Guide (easy Manual) (ver.1.0) (English)
Page 20
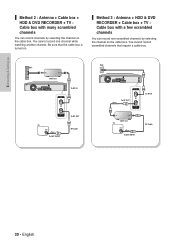
You cannot record scrambled channels that the cable box is turned on. English Be sure that require a cable box. Method 3 : Antenna + HDD & DVD RECORDER + Cable box + TV : Cable box with many scrambled channels You can record non-scrambled channels by selecting the channel on the cable box....box TV To ANT INPUT RF Cable 20 - You cannot record one channel while watching another channel. Connecting & Setting up Method 2 : Antenna + Cable box + HDD & DVD RECORDER + TV : Cable box with a few scrambled channels You can record channels by selecting the channel on the cable box.
You cannot record scrambled channels that the cable box is turned on. English Be sure that require a cable box. Method 3 : Antenna + HDD & DVD RECORDER + Cable box + TV : Cable box with many scrambled channels You can record non-scrambled channels by selecting the channel on the cable box....box TV To ANT INPUT RF Cable 20 - You cannot record one channel while watching another channel. Connecting & Setting up Method 2 : Antenna + Cable box + HDD & DVD RECORDER + TV : Cable box with a few scrambled channels You can record channels by selecting the channel on the cable box.
Quick Guide (easy Manual) (ver.1.0) (English)
Page 21
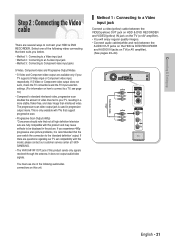
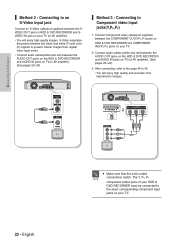
... to Component video input jacks S-Video, Component video and Progressive Output Modes • S-Video and Component video output are available only if your HDD & DVD RECORDER. You must use one of this product sends only signals received through the antenna. Connecting & Setting up Video/Audio Cable Step 2 ... progressive output mode. Method 1 : Connecting to a Video input jack Connect a video(yellow) cable between the VIDEO(yellow) OUT jack on HDD & DVD RECORDER and VIDEO(yellow) IN jack on the TV (or AV amplifier). • You will enjoy regular quality images. • Connect audio...
... to Component video input jacks S-Video, Component video and Progressive Output Modes • S-Video and Component video output are available only if your HDD & DVD RECORDER. You must use one of this product sends only signals received through the antenna. Connecting & Setting up Video/Audio Cable Step 2 ... progressive output mode. Method 1 : Connecting to a Video input jack Connect a video(yellow) cable between the VIDEO(yellow) OUT jack on HDD & DVD RECORDER and VIDEO(yellow) IN jack on the TV (or AV amplifier). • You will enjoy regular quality images. • Connect audio...
Quick Guide (easy Manual) (ver.1.0) (English)
Page 22
... to present clearer images than regular video input mode. • Connect audio cables(white and red) between the COMPONENT OUT(Y,PB,PR) jacks on HDD & DVD RECORDER and COMPONENT IN(Y,PB,PR) jacks on TV(or AV amplifier). (See pages 23~24) Method 3 : Connecting to the exact corresponding component... jacks on TV (or AV amplifier). (See pages 23~24). 3. Connect Component video cables(not supplied) between the AUDIO OUT jacks on the HDD & DVD RECORDER and AUDIO IN jacks on your TV (or AV amplifier). • You will enjoy high quality and accurate color reproduction images. Connecting &...
... to present clearer images than regular video input mode. • Connect audio cables(white and red) between the COMPONENT OUT(Y,PB,PR) jacks on HDD & DVD RECORDER and COMPONENT IN(Y,PB,PR) jacks on TV(or AV amplifier). (See pages 23~24) Method 3 : Connecting to the exact corresponding component... jacks on TV (or AV amplifier). (See pages 23~24). 3. Connect Component video cables(not supplied) between the AUDIO OUT jacks on the HDD & DVD RECORDER and AUDIO IN jacks on your TV (or AV amplifier). • You will enjoy high quality and accurate color reproduction images. Connecting &...
Quick Guide (easy Manual) (ver.1.0) (English)
Page 23
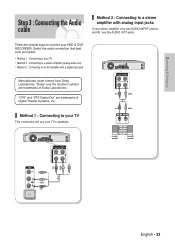
... amplifier only has AUDIO INPUT jacks(L and R), use your TV's speakers. Select the audio connection that best suits you below. • Method 1 : Connecting to your HDD & DVD RECORDER. Connecting & Setting up white red Step 3 : Connecting the Audio cable Method 2 : Connecting to a stereo amplifier with a digital input jack Manufactured under license from Dolby...
... amplifier only has AUDIO INPUT jacks(L and R), use your TV's speakers. Select the audio connection that best suits you below. • Method 1 : Connecting to your HDD & DVD RECORDER. Connecting & Setting up white red Step 3 : Connecting the Audio cable Method 2 : Connecting to a stereo amplifier with a digital input jack Manufactured under license from Dolby...
Quick Guide (easy Manual) (ver.1.0) (English)
Page 24
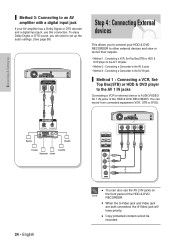
... a Camcorder to the AV 2 jacks • Method 3 : Connecting a Camcorder to the DV IN jack Method 1 : Connecting a VCR, SetTop Box(STB) or HDD & DVD player to the AV 1 IN jacks Connecting a VCR or external device to an AV amplifier with a digital input jack If your AV amplifier has a Dolby... Digital or DTS decoder and a digital input jack, use the AV 2 IN jacks on the front panel of the HDD & DVD RECORDER. I Copy protected content cannot be recorded. You can also use this connection. Rear(L) Rear(R) Front(L) Front(R) Subwoofer Center 24 - I When...
... a Camcorder to the AV 2 jacks • Method 3 : Connecting a Camcorder to the DV IN jack Method 1 : Connecting a VCR, SetTop Box(STB) or HDD & DVD player to the AV 1 IN jacks Connecting a VCR or external device to an AV amplifier with a digital input jack If your AV amplifier has a Dolby... Digital or DTS decoder and a digital input jack, use the AV 2 IN jacks on the front panel of the HDD & DVD RECORDER. I Copy protected content cannot be recorded. You can also use this connection. Rear(L) Rear(R) Front(L) Front(R) Subwoofer Center 24 - I When...
Quick Guide (easy Manual) (ver.1.0) (English)
Page 25
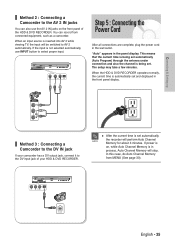
.... I After the current time is on the front panel of your camcorder has a DV output jack, connect it to the DV input jack of the HDD & DVD RECORDER. If power is set automatically, the recorder will be switched to AV 2 automatically. When an input source is in the panel display. "Auto" appears... means that the current time is being set automatically (Auto Program) through the antenna under connection and also the channel is automatically set . When the HDD & DVD RECORDER operates normally, the current time is being set and displayed in the wall outlet.
.... I After the current time is on the front panel of your camcorder has a DV output jack, connect it to the DV input jack of the HDD & DVD RECORDER. If power is set automatically, the recorder will be switched to AV 2 automatically. When an input source is in the panel display. "Auto" appears... means that the current time is being set automatically (Auto Program) through the antenna under connection and also the channel is automatically set . When the HDD & DVD RECORDER operates normally, the current time is being set and displayed in the wall outlet.
Quick Guide (easy Manual) (ver.1.0) (English)
Page 26
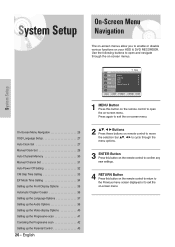
... remote control to confirm any new settings. 4 RETURN Button Press this button on the remote control to enable or disable various functions on your HDD & DVD RECORDER. English HDD Title Music Photo Timer Record System Language Audio Video Parental Control Setup Setup MOVE SELECT RETURN EXIT 1 MENU Button Press this button on the...
... remote control to confirm any new settings. 4 RETURN Button Press this button on the remote control to enable or disable various functions on your HDD & DVD RECORDER. English HDD Title Music Photo Timer Record System Language Audio Video Parental Control Setup Setup MOVE SELECT RETURN EXIT 1 MENU Button Press this button on the...