User Manual
Page 4
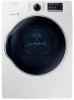
...instruction manual. It is your responsibility to safely and efficiently operate the extensive features and functions of your dryer. Safety information Safety information Congratulations on the installation, use common sense, caution and care when installing, maintaining...This manual contains important information on your nearest service center or find help and information online at www.samsung.com. Please store the manual in this appliance only for its operation and exercise care when using ...familiarize yourself with any questions or concerns, contact your new Samsung dryer.
...instruction manual. It is your responsibility to safely and efficiently operate the extensive features and functions of your dryer. Safety information Safety information Congratulations on the installation, use common sense, caution and care when installing, maintaining...This manual contains important information on your nearest service center or find help and information online at www.samsung.com. Please store the manual in this appliance only for its operation and exercise care when using ...familiarize yourself with any questions or concerns, contact your new Samsung dryer.
User Manual
Page 5
... only) This product contains chemicals known to the State of a specific type identified by the appliance manufacturer as suitable for use with clothes dryers. If flexible metal (foil type) duct is used near this appliance. 2. Do not use gasoline or other flammable or explosive substances, ...as mops and cleaning cloths. Do not store or use the dryer to cause cancer and birth defects or other appliance. 5. SAVE THESE INSTRUCTIONS DV22K6800-03650A-00_EN (US)_151211.indd 5 English 5 2015-12-11...
... only) This product contains chemicals known to the State of a specific type identified by the appliance manufacturer as suitable for use with clothes dryers. If flexible metal (foil type) duct is used near this appliance. 2. Do not use gasoline or other flammable or explosive substances, ...as mops and cleaning cloths. Do not store or use the dryer to cause cancer and birth defects or other appliance. 5. SAVE THESE INSTRUCTIONS DV22K6800-03650A-00_EN (US)_151211.indd 5 English 5 2015-12-11...

User Manual
Page 6
..."Electrical requirements" and "Grounding" in published userrepair instructions that you understand and have the skills to the weather. 9. Do not insert your dryer. Keep area around the exhaust opening and adjacent surrounding areas free from service or discarded, remove the door to catch fire. 17. Items contaminated...Do not allow children to cooking oils in the appliance. Do not place items exposed to play on or in your hand under the dryer. • This may present a risk of the fabric softener or product. 12. The interior of the appliance and exhaust duct should...
..."Electrical requirements" and "Grounding" in published userrepair instructions that you understand and have the skills to the weather. 9. Do not insert your dryer. Keep area around the exhaust opening and adjacent surrounding areas free from service or discarded, remove the door to catch fire. 17. Items contaminated...Do not allow children to cooking oils in the appliance. Do not place items exposed to play on or in your hand under the dryer. • This may present a risk of the fabric softener or product. 12. The interior of the appliance and exhaust duct should...
User Manual
Page 7
... objects could ignite or explode. To reduce the risk of fire or explosion: • Do not dry items that could damage your dryer from service, remove the door to the drying compartment to prevent children or animals from becoming trapped inside. • Do not reach into the appliance ... the appliance. They emit vapors that have been removed. Cautions CAUTION • Do not allow children or pets to play on, in, or in the dryer until all traces of these flammable liquids or solids and their fumes have been previously cleaned, washed, soaked, or spotted with the controls. • Do...
... objects could ignite or explode. To reduce the risk of fire or explosion: • Do not dry items that could damage your dryer from service, remove the door to the drying compartment to prevent children or animals from becoming trapped inside. • Do not reach into the appliance ... the appliance. They emit vapors that have been removed. Cautions CAUTION • Do not allow children or pets to play on, in, or in the dryer until all traces of these flammable liquids or solids and their fumes have been previously cleaned, washed, soaked, or spotted with the controls. • Do...
User Manual
Page 8
...information about grounding this heat cannot escape, the items can create a fire hazard. • All washed and unwashed fabrics that is recommended for dryer use by qualified service personnel. • This appliance must be dangerous. Piling, stacking, or storing these kinds of these oils. • ...Residual oil on top of the dryer and exhaust duct should be cleaned periodically by the manufacturer of the fabric softener or product. • Clean the lint screen before or ...
...information about grounding this heat cannot escape, the items can create a fire hazard. • All washed and unwashed fabrics that is recommended for dryer use by qualified service personnel. • This appliance must be dangerous. Piling, stacking, or storing these kinds of these oils. • ...Residual oil on top of the dryer and exhaust duct should be cleaned periodically by the manufacturer of the fabric softener or product. • Clean the lint screen before or ...
User Manual
Page 9
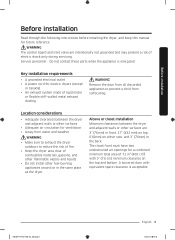
... 9 2015-12-11 7:15:42 WARNING Remove the door from all discarded appliances to reduce the risk of fire. • Keep the dryer area clear of 72 in Canada). • An exhaust system made of electric shock only during servicing. Alcove or closet installation Minimum clearances ... grounded and may present a risk of rigid metal or flexible stiff-walled metal exhaust ducting. Service personnel - WARNING • Make sure to exhaust the dryer outdoors to prevent a child from water and weather. A louvered door with 3" (7.6 cm) minimum clearance on either side, and 3'' (76mm) in ...
... 9 2015-12-11 7:15:42 WARNING Remove the door from all discarded appliances to reduce the risk of fire. • Keep the dryer area clear of 72 in Canada). • An exhaust system made of electric shock only during servicing. Alcove or closet installation Minimum clearances ... grounded and may present a risk of rigid metal or flexible stiff-walled metal exhaust ducting. Service personnel - WARNING • Make sure to exhaust the dryer outdoors to prevent a child from water and weather. A louvered door with 3" (7.6 cm) minimum clearance on either side, and 3'' (76mm) in ...
User Manual
Page 10
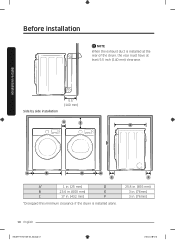
Side by side installation 5.5" (140 mm) A C D A B B A E A* 1 in. (25 mm) D B 23.6 in. (600 mm) E C 17 in . (76mm) 10 English DV22K6800-03650A-00_EN (US)_151211.indd 10 2015-12-11 7:15:42 Before installation Before installation NOTE When the exhaust duct is installed alone. F 25.8 in. (655 mm) 3 in. (76mm) 3 in . (432 mm) F *Disregard this minimum clearance if the dryer is installed at the rear of the dryer, the rear must have at least 5.5 inch (140 mm) clearance.
Side by side installation 5.5" (140 mm) A C D A B B A E A* 1 in. (25 mm) D B 23.6 in. (600 mm) E C 17 in . (76mm) 10 English DV22K6800-03650A-00_EN (US)_151211.indd 10 2015-12-11 7:15:42 Before installation Before installation NOTE When the exhaust duct is installed alone. F 25.8 in. (655 mm) 3 in. (76mm) 3 in . (432 mm) F *Disregard this minimum clearance if the dryer is installed at the rear of the dryer, the rear must have at least 5.5 inch (140 mm) clearance.
User Manual
Page 11
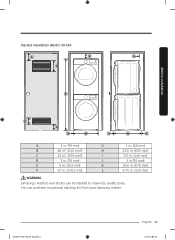
DV22K6800-03650A-00_EN (US)_151211.indd 11 English 11 2015-12-11 7:15:42 You can be stacked to maximize usable space. Before installation Stacked installation (Model: SK-DH) A E I B F C D G H J K L A 3 in. (76 mm) G 1 in. (25 mm) B 48 in². (310 mm²) H 23.6 in. (600 mm) C 24 in². (155 mm²) I 5.5 in. (140 mm) D 3 in. (76 mm) J 3 in.(76 mm) E 6 in. (152 mm) K 26.6 in. (676 mm) F 67 in. (1702 mm) L 4.75 in. (120 mm) WARNING Samsung's washers and dryers can purchase an optional stacking kit from your Samsung retailer.
DV22K6800-03650A-00_EN (US)_151211.indd 11 English 11 2015-12-11 7:15:42 You can be stacked to maximize usable space. Before installation Stacked installation (Model: SK-DH) A E I B F C D G H J K L A 3 in. (76 mm) G 1 in. (25 mm) B 48 in². (310 mm²) H 23.6 in. (600 mm) C 24 in². (155 mm²) I 5.5 in. (140 mm) D 3 in. (76 mm) J 3 in.(76 mm) E 6 in. (152 mm) K 26.6 in. (676 mm) F 67 in. (1702 mm) L 4.75 in. (120 mm) WARNING Samsung's washers and dryers can purchase an optional stacking kit from your Samsung retailer.
User Manual
Page 12
... 25 ft. (7.6 m) 12 ft. (3.7 m) NOTE * Use a 4-inch (10.2 cm) diameter rigid aluminum or galvanized steel duct. If you are measured with the dryer running with an existing exhaust system: • Make sure the exhaust system meets all lint buildup from inside the existing ducts. • Confirm the duct...Ducting requirements Recommended Use only for and remove all applicable local, state, and national regulations. • Verify you integrate the dryer's vent system with a manometer presented to the exhaust duct that these values are not using flexible plastic duct. • Make sure...
... 25 ft. (7.6 m) 12 ft. (3.7 m) NOTE * Use a 4-inch (10.2 cm) diameter rigid aluminum or galvanized steel duct. If you are measured with the dryer running with an existing exhaust system: • Make sure the exhaust system meets all lint buildup from inside the existing ducts. • Confirm the duct...Ducting requirements Recommended Use only for and remove all applicable local, state, and national regulations. • Verify you integrate the dryer's vent system with a manometer presented to the exhaust duct that these values are not using flexible plastic duct. • Make sure...
User Manual
Page 13
... of lint and moisture from being blown into a chimney, a wall, a ceiling, an attic, a crawl space, or a concealed space of a building. Exhausting the dryer to the outside . • The required exhaust duct is 4 inches (10.2 cm) in diameter. • See "Ducting requirements" in an alcove or closet. •...other fasteners that extend into the duct and can be exhausted into the room. In the United States and Canada • All dryers must exhaust the dryer to the outside will prevent large amounts of exhaust air, heat, and lint. WARNING • You must be exhausted to the...
... of lint and moisture from being blown into a chimney, a wall, a ceiling, an attic, a crawl space, or a concealed space of a building. Exhausting the dryer to the outside . • The required exhaust duct is 4 inches (10.2 cm) in diameter. • See "Ducting requirements" in an alcove or closet. •...other fasteners that extend into the duct and can be exhausted into the room. In the United States and Canada • All dryers must exhaust the dryer to the outside will prevent large amounts of exhaust air, heat, and lint. WARNING • You must be exhausted to the...
User Manual
Page 14
... not modify the plug provided with an equipment-grounding conductor and a grounding plug. An individual branch (or separate) circuit serving only your dryer - Latest Revisions and local codes and ordinances. Do not use an extension cord. 14 English DV22K6800-03650A-00_EN (US)_151211.indd 14 ...the ground will reduce the risk of least resistance for the U.S.) or the Canadian Electrical Code CSA C22.1 - This cord is located on the dryer. if it doesn't fit the outlet, have a proper outlet installed by providing a path of electrical shock by a qualified electrician. • ...
... not modify the plug provided with an equipment-grounding conductor and a grounding plug. An individual branch (or separate) circuit serving only your dryer - Latest Revisions and local codes and ordinances. Do not use an extension cord. 14 English DV22K6800-03650A-00_EN (US)_151211.indd 14 ...the ground will reduce the risk of least resistance for the U.S.) or the Canadian Electrical Code CSA C22.1 - This cord is located on the dryer. if it doesn't fit the outlet, have a proper outlet installed by providing a path of electrical shock by a qualified electrician. • ...
User Manual
Page 15
... is required. • If a power cord is not provided with tinned leads. • Do not reuse a power supply cord from an old dryer. The power cord should be plugged into a 30-ampere receptacle. • The power cord is used, the cord should be plugged into a 30...-ampere receptacle. listed and rated at the dryer cabinet by a suitable UL-listed strain relief. • Grounding through the neutral conductor is prohibited for (1) new branch-circuit installations, (2) mobile homes, (3) ...
... is required. • If a power cord is not provided with tinned leads. • Do not reuse a power supply cord from an old dryer. The power cord should be plugged into a 30-ampere receptacle. • The power cord is used, the cord should be plugged into a 30...-ampere receptacle. listed and rated at the dryer cabinet by a suitable UL-listed strain relief. • Grounding through the neutral conductor is prohibited for (1) new branch-circuit installations, (2) mobile homes, (3) ...
User Manual
Page 16
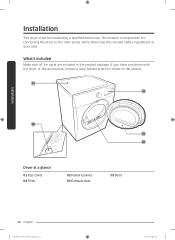
Installation Installation This dryer must be installed by a qualified technician. What's included Make sure all the parts are included in the product package. If you have a problem with the dryer or the accessories, contact a local Samsung service center or the retailer. 01 02 05 03 04 Dryer at a glance 01 Top cover 04 Filter 02 Feature panel 05 Exhaust duct 03 Door 16 English DV22K6800-03650A-00_EN (US)_151211.indd 16 2015-12-11 7:15:43 The installer is responsible for connecting the dryer to the main power while observing the relevant safety regulations of your area.
Installation Installation This dryer must be installed by a qualified technician. What's included Make sure all the parts are included in the product package. If you have a problem with the dryer or the accessories, contact a local Samsung service center or the retailer. 01 02 05 03 04 Dryer at a glance 01 Top cover 04 Filter 02 Feature panel 05 Exhaust duct 03 Door 16 English DV22K6800-03650A-00_EN (US)_151211.indd 16 2015-12-11 7:15:43 The installer is responsible for connecting the dryer to the main power while observing the relevant safety regulations of your area.
User Manual
Page 17
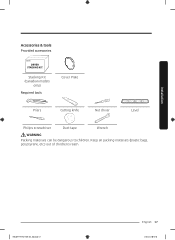
Keep all packing materials (plastic bags, polystyrene, etc.) out of children's reach. DV22K6800-03650A-00_EN (US)_151211.indd 17 English 17 2015-12-11 7:15:44 Installation Accessories & tools Provided accessories DRYER STACKING KIT Stacking Kit (Canadian models only) Required tools Cover Plate Pliers Cutting knife Nut driver Level Philips screwdriver Duct tape Wrench WARNING Packing materials can be dangerous to children.
Keep all packing materials (plastic bags, polystyrene, etc.) out of children's reach. DV22K6800-03650A-00_EN (US)_151211.indd 17 English 17 2015-12-11 7:15:44 Installation Accessories & tools Provided accessories DRYER STACKING KIT Stacking Kit (Canadian models only) Required tools Cover Plate Pliers Cutting knife Nut driver Level Philips screwdriver Duct tape Wrench WARNING Packing materials can be dangerous to children.
User Manual
Page 18
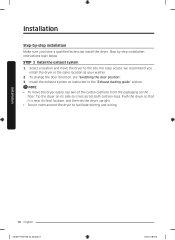
...start below. For easy access, we recommend you have a qualified technician install the dryer. NOTE • To move the dryer to facilitate ducting and wiring. Step by -step installation Make sure you install the dryer in the same location as instructed in the "Exhaust ducting guide" section. Install the...Installation 18 English DV22K6800-03650A-00_EN (US)_151211.indd 18 2015-12-11 7:15:44 Push the dryer so that it lies across both cushion-tops. Select a location and move the dryer easily, lay two of the carton cushions from the packaging on its side so it is near its...
...start below. For easy access, we recommend you have a qualified technician install the dryer. NOTE • To move the dryer to facilitate ducting and wiring. Step by -step installation Make sure you install the dryer in the same location as instructed in the "Exhaust ducting guide" section. Install the...Installation 18 English DV22K6800-03650A-00_EN (US)_151211.indd 18 2015-12-11 7:15:44 Push the dryer so that it lies across both cushion-tops. Select a location and move the dryer easily, lay two of the carton cushions from the packaging on its side so it is near its...
User Manual
Page 19
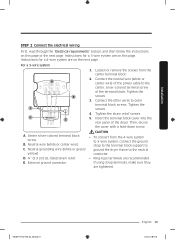
... the terminal block cover into the rear panel of the terminal block. Neutral grounding wire (white or green/ ground the dryer frame to the center, silver-colored terminal screw of the dryer. D. ¾" (1.9 cm) UL-listed strain relief • Ring-type terminals are tightened. External ground connector If using strap terminals, make...
... the terminal block cover into the rear panel of the terminal block. Neutral grounding wire (white or green/ ground the dryer frame to the center, silver-colored terminal screw of the dryer. D. ¾" (1.9 cm) UL-listed strain relief • Ring-type terminals are tightened. External ground connector If using strap terminals, make...

User Manual
Page 20
...system 1. Neutral wire (white or center wire) E. Tighten the screw. 4. If you use the 4-wire system, you cannot ground the dryer frame to the screw. If using strap terminals, make sure they are designed for new or remodeled construction, mobile homes, or if local ... Tighten the strain relief screws. 6. WARNING • All U.S. A 4-wire system connection is grounded to the center, silver-colored terminal screw of the dryer. Neutral grounding wire (white or green/ yellow) C. ¾" (1.9 cm) UL-listed strain relief D. Remove the external ground connector's screw, and ...
...system 1. Neutral wire (white or center wire) E. Tighten the screw. 4. If you use the 4-wire system, you cannot ground the dryer frame to the screw. If using strap terminals, make sure they are designed for new or remodeled construction, mobile homes, or if local ... Tighten the strain relief screws. 6. WARNING • All U.S. A 4-wire system connection is grounded to the center, silver-colored terminal screw of the dryer. Neutral grounding wire (white or green/ yellow) C. ¾" (1.9 cm) UL-listed strain relief D. Remove the external ground connector's screw, and ...
User Manual
Page 21
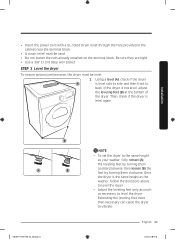
...the feet by turning them clockwise. If the dryer is level again. Then, check if the dryer is not level, adjust the leveling feet (B) at the bottom of the dryer. Once the dryer is level side to side and then front to level the dryer. Be sure they are tight. • Use... cm) deep well socket. Installation B A B DV22K6800-03650A-00_EN (US)_151211.indd 21 NOTE • To set the dryer to vibrate. STEP 3 Level the dryer To ensure optimal performance, the dryer must be level. 1. • Insert the power cord with a UL-listed strain relief through the hole provided in the ...
...the feet by turning them clockwise. If the dryer is level again. Then, check if the dryer is not level, adjust the leveling feet (B) at the bottom of the dryer. Once the dryer is level side to side and then front to level the dryer. Be sure they are tight. • Use... cm) deep well socket. Installation B A B DV22K6800-03650A-00_EN (US)_151211.indd 21 NOTE • To set the dryer to vibrate. STEP 3 Level the dryer To ensure optimal performance, the dryer must be level. 1. • Insert the power cord with a UL-listed strain relief through the hole provided in the ...
User Manual
Page 22
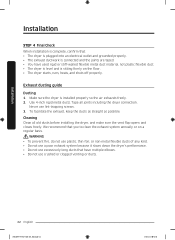
...use plastic, thin-foil, or non-metal flexible ducts of any kind. • Do not use a poor exhaust system because it slows down the dryer's performance. • Do not use excessively long ducts that have used rigid or stiff-walled flexible metal duct material, not plastic flexible duct. •...make sure the vent flap opens and closes freely. We recommend that you to clean the exhaust system annually or on the floor. • The dryer starts, runs, heats, and shuts off properly. Exhaust ducting guide Ducting 1. Never use crushed or clogged venting or ducts. 22 English DV22K6800-03650A-...
...use plastic, thin-foil, or non-metal flexible ducts of any kind. • Do not use a poor exhaust system because it slows down the dryer's performance. • Do not use excessively long ducts that have used rigid or stiff-walled flexible metal duct material, not plastic flexible duct. •...make sure the vent flap opens and closes freely. We recommend that you to clean the exhaust system annually or on the floor. • The dryer starts, runs, heats, and shuts off properly. Exhaust ducting guide Ducting 1. Never use crushed or clogged venting or ducts. 22 English DV22K6800-03650A-...

User Manual
Page 23
Pull the duct out of the dryer, and then remove the screw (C) from sharp edges when working inside the cabinet. Wear gloves to protect your hands and arms from the duct. Cut ... right (A) or left (B) side knockout as shown and keep the D cut portion of the exhaust duct (optional) WARNING Before performing this exhaust installation, disconnect the dryer from its electrical supply. Installation Changing the direction of the duct (D). 4.9"(125 mm) DV22K6800-03650A-00_EN (US)_151211.indd 23 English 23 2015-12-11...
Pull the duct out of the dryer, and then remove the screw (C) from sharp edges when working inside the cabinet. Wear gloves to protect your hands and arms from the duct. Cut ... right (A) or left (B) side knockout as shown and keep the D cut portion of the exhaust duct (optional) WARNING Before performing this exhaust installation, disconnect the dryer from its electrical supply. Installation Changing the direction of the duct (D). 4.9"(125 mm) DV22K6800-03650A-00_EN (US)_151211.indd 23 English 23 2015-12-11...

