User Manual (user Manual) (ver.1.0) (English)
Page 3
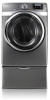
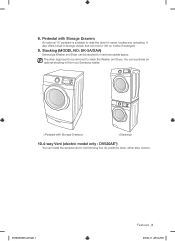
Stacking (MODEL NO: SK-5A/XAA) Samsung's Washer and Dryer can install the exhaust vent in storage drawer that can hold a 100 oz. You can purchase an optional stacking kit from you Samsung retailer. 10.4-way Vent (electric model only : DV520AE*) You can be removed to stack the Washer and Dryer. bottle of detergent 9. Pedestal...
Stacking (MODEL NO: SK-5A/XAA) Samsung's Washer and Dryer can install the exhaust vent in storage drawer that can hold a 100 oz. You can purchase an optional stacking kit from you Samsung retailer. 10.4-way Vent (electric model only : DV520AE*) You can be removed to stack the Washer and Dryer. bottle of detergent 9. Pedestal...
User Manual (user Manual) (ver.1.0) (English)
Page 4
... to read this manual to use , and care of your appliance. This manual contains valuable information on your new Samsung Dryer. safety instructions Congratulations on the installation, use common sense, caution, and care when installing, maintaining, or operating your dryer. It is grounded to you do not cover all instructions before using your...
... to read this manual to use , and care of your appliance. This manual contains valuable information on your new Samsung Dryer. safety instructions Congratulations on the installation, use common sense, caution, and care when installing, maintaining, or operating your dryer. It is grounded to you do not cover all instructions before using your...
User Manual (user Manual) (ver.1.0) (English)
Page 5
... your WARNING appliance, follow basic precautions, including the following: 1. WARNING: To reduce the risk of fire, electric shock, or injury to the weather. 7. Do not install or store this appliance. 2. Do not repair or replace any part of the appliance and exhaust duct should be exposed to persons when using this...
... your WARNING appliance, follow basic precautions, including the following: 1. WARNING: To reduce the risk of fire, electric shock, or injury to the weather. 7. Do not install or store this appliance. 2. Do not repair or replace any part of the appliance and exhaust duct should be exposed to persons when using this...

User Manual (user Manual) (ver.1.0) (English)
Page 6
...• Clear the room, building or area of severe injury or death, follow all occupants. • Immediately call the fire department. • Installation and service must be easily crushed, and trap lint. Any material that has been in contact with clothes dryers. If flexible metal (foil type) duct... fire or explosion: WARNING • Do not dry items that could ignite or explode. To reduce the risk of Fire • Clothes dryer installation must be dried on the appliance. • Do not touch any electrical switch. • Do not use with a cleaning solvent or flammable ...
...• Clear the room, building or area of severe injury or death, follow all occupants. • Immediately call the fire department. • Installation and service must be easily crushed, and trap lint. Any material that has been in contact with clothes dryers. If flexible metal (foil type) duct... fire or explosion: WARNING • Do not dry items that could ignite or explode. To reduce the risk of Fire • Clothes dryer installation must be dried on the appliance. • Do not touch any electrical switch. • Do not use with a cleaning solvent or flammable ...
User Manual (user Manual) (ver.1.0) (English)
Page 7
...extra detergent will be detected by smell alone. The interior of the appliance unless specifically recommended in the user-repair instructions and you purchase and install a UL-approved gas detector. Ensure pockets are hot. Even after each load. Do not repair, replace, or attempt to service any ...or stack these items from the dryer hot or interrupt the drying cycle until the items have run through the Cool Down cycle. Install and use fabric softeners or products to the weather. Oxidation creates heat. All washed and unwashed fabrics that is used near children and pets...
...extra detergent will be detected by smell alone. The interior of the appliance unless specifically recommended in the user-repair instructions and you purchase and install a UL-approved gas detector. Ensure pockets are hot. Even after each load. Do not repair, replace, or attempt to service any ...or stack these items from the dryer hot or interrupt the drying cycle until the items have run through the Cool Down cycle. Install and use fabric softeners or products to the weather. Oxidation creates heat. All washed and unwashed fabrics that is used near children and pets...
User Manual (user Manual) (ver.1.0) (English)
Page 8
... your dryer 10 Basic requirments 11 Ducting requirements 12 Important to installer 12 Location considerations 12 Alcove or closet installation 13 Mobile home installation 13 Exhausting 14 Gas requirements 14 Commonwealth of Massachusetts installation instructions 15 Electrical requirements 15 Grounding 16 Electrical connections 17 Connecting ...the inlet hose 18 Replacement parts and accessories 18 Installation 21 Final installation checklist 22 Dryer Exhaust Tips 23 Door Reversal 24 Overview of the control panel 26 Child lock 27...
... your dryer 10 Basic requirments 11 Ducting requirements 12 Important to installer 12 Location considerations 12 Alcove or closet installation 13 Mobile home installation 13 Exhausting 14 Gas requirements 14 Commonwealth of Massachusetts installation instructions 15 Electrical requirements 15 Grounding 16 Electrical connections 17 Connecting ...the inlet hose 18 Replacement parts and accessories 18 Installation 21 Final installation checklist 22 Dryer Exhaust Tips 23 Door Reversal 24 Overview of the control panel 26 Child lock 27...
User Manual (user Manual) (ver.1.0) (English)
Page 9
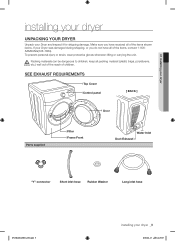
... supplied Filter Frame Front Water Inlet Duct Exhaust "Y"-connector Short inlet hose Rubber Washer Long inlet hose DV520AE-02836A_EN.indd 9 installing your Dryer and inspect it for shipping damage. 01 installing your dryer installing your dryer UNPACKING YOUR DRYER Unpack your dryer _9 2010-04-13 ¿ÀÈÄ 4:29:27 Make...
... supplied Filter Frame Front Water Inlet Duct Exhaust "Y"-connector Short inlet hose Rubber Washer Long inlet hose DV520AE-02836A_EN.indd 9 installing your Dryer and inspect it for shipping damage. 01 installing your dryer installing your dryer UNPACKING YOUR DRYER Unpack your dryer _9 2010-04-13 ¿ÀÈÄ 4:29:27 Make...
User Manual (user Manual) (ver.1.0) (English)
Page 10
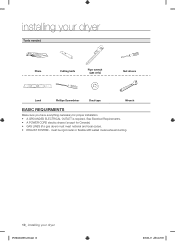
... Canada). • GAS LINES (if a gas dryer) must be rigid metal or flexible stiff-walled metal exhaust ducting. 10_ installing your dryer Tools needed Pliers Cutting knife Pipe wrench (gas only) Nut drivers Level Phillips Screwdriver Duct tape Wrench BASIC REQUIRMENTS Make ...sure you have everything necessary for proper installation • A GROUNDED ELECTRICAL OUTLET is required. must meet national and local codes. • EHAUST SYSTEM - installing your dryer DV520AE-02836A_EN.indd 10 2010-04-13 ¿ÀÈÄ...
... Canada). • GAS LINES (if a gas dryer) must be rigid metal or flexible stiff-walled metal exhaust ducting. 10_ installing your dryer Tools needed Pliers Cutting knife Pipe wrench (gas only) Nut drivers Level Phillips Screwdriver Duct tape Wrench BASIC REQUIRMENTS Make ...sure you have everything necessary for proper installation • A GROUNDED ELECTRICAL OUTLET is required. must meet national and local codes. • EHAUST SYSTEM - installing your dryer DV520AE-02836A_EN.indd 10 2010-04-13 ¿ÀÈÄ...
User Manual (user Manual) (ver.1.0) (English)
Page 11
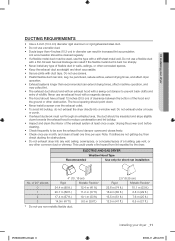
...m (33 ft.) 18.9 m (62 ft.) 8.8 m (29 ft.) 15.5 m (51 ft.) 7.6 m (25 ft.) 12.5 m (41 ft.) 6.5 m (21 ft.) DV520AE-02836A_EN.indd 11 installing your dryer DUCTING REQUIREMENTS • Use a 4-inch (10.2 cm) diameter rigid aluminum or rigid galvanized steel duct. • Do not use the type with a stiff...into a window well. Unplug the power cord before cleaning. • Check frequently to be insulated and slope slightly down . • Never install a screen over the exhaust outlet. • To avoid lint buildup, do not exhaust the dryer directly into any wall, ceiling, crawl space...
...m (33 ft.) 18.9 m (62 ft.) 8.8 m (29 ft.) 15.5 m (51 ft.) 7.6 m (25 ft.) 12.5 m (41 ft.) 6.5 m (21 ft.) DV520AE-02836A_EN.indd 11 installing your dryer DUCTING REQUIREMENTS • Use a 4-inch (10.2 cm) diameter rigid aluminum or rigid galvanized steel duct. • Do not use the type with a stiff...into a window well. Unplug the power cord before cleaning. • Check frequently to be insulated and slope slightly down . • Never install a screen over the exhaust outlet. • To avoid lint buildup, do not exhaust the dryer directly into any wall, ceiling, crawl space...

User Manual (user Manual) (ver.1.0) (English)
Page 12
...sure the room has enough fresh air. Remove the door from all lint buildup from inside the existing duct. • The duct is installed into an existing exhaust system you must have two unobstructed air openings for a combined minimum total area of combustible materials, casoline, and ...• That a flexible plastic duct is no -heat setting should be measured with the dryer running with equivalent space clearance is acceptable. 12_ installing your dryer If the new dryer is not kinked or crushed. • The exhaust hood damper opens and closes freely. See Exhaust information section....
...sure the room has enough fresh air. Remove the door from all lint buildup from inside the existing duct. • The duct is installed into an existing exhaust system you must have two unobstructed air openings for a combined minimum total area of combustible materials, casoline, and ...• That a flexible plastic duct is no -heat setting should be measured with the dryer running with equivalent space clearance is acceptable. 12_ installing your dryer If the new dryer is not kinked or crushed. • The exhaust hood damper opens and closes freely. See Exhaust information section....
User Manual (user Manual) (ver.1.0) (English)
Page 13
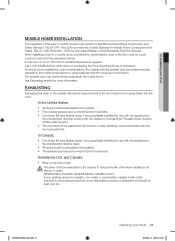
...terminate underneath the mobile home. NEVER USE A PLASTIC OR NON-METAL FLEXIBLE DUCT. DV520AE-02836A_EN.indd 13 installing your dryer MOBILE HOME INSTALLATION The installation of fire when installed in diameter. • Only those foil-type flexible ducts, if any, specifically identified for use with ... metal exhaust duct that has adequate fresh air. Call 1-800-SAMSUNG for more information. and Canada: • Refer to ensure containment of unobstructed space is 4inch(102mm) in an WARNING alcove or closet. 01 installing your dryer _13 2010-04-13 ¿ÀÈÄ ...
...terminate underneath the mobile home. NEVER USE A PLASTIC OR NON-METAL FLEXIBLE DUCT. DV520AE-02836A_EN.indd 13 installing your dryer MOBILE HOME INSTALLATION The installation of fire when installed in diameter. • Only those foil-type flexible ducts, if any, specifically identified for use with ... metal exhaust duct that has adequate fresh air. Call 1-800-SAMSUNG for more information. and Canada: • Refer to ensure containment of unobstructed space is 4inch(102mm) in an WARNING alcove or closet. 01 installing your dryer _13 2010-04-13 ¿ÀÈÄ ...
User Manual (user Manual) (ver.1.0) (English)
Page 14
... be disconnected from the gas supply pipe system during any liquefied petroleum gas. • As a courtesy, most local gas utilities will inspect a gas appliance installation. If a flexible gas connector is used must have a maximum length of your dryer. A 1/2" (1.27 cm) gas supply line is no constant burning ... WITH THE NATIONAL FUEL GAS CODE ANSI/Z223.1, LATEST REVISION (FOR THE UNITED STATES), OR WITH THE CAN/CGA-B149 INSTALLATION CODES (FOR CANADA). Gas dryers installed in Canada). • Any pipe joint compound used to the 3/8" (1 cm) gas line on your dryer with natural ...
... be disconnected from the gas supply pipe system during any liquefied petroleum gas. • As a courtesy, most local gas utilities will inspect a gas appliance installation. If a flexible gas connector is used must have a maximum length of your dryer. A 1/2" (1.27 cm) gas supply line is no constant burning ... WITH THE NATIONAL FUEL GAS CODE ANSI/Z223.1, LATEST REVISION (FOR THE UNITED STATES), OR WITH THE CAN/CGA-B149 INSTALLATION CODES (FOR CANADA). Gas dryers installed in Canada). • Any pipe joint compound used to the 3/8" (1 cm) gas line on your dryer with natural ...

User Manual (user Manual) (ver.1.0) (English)
Page 15
...an equipment-grounding conductor and a grounding plug, sold separately. The plug must be plugged into an appropriate outlet that is properly installed and grounded in accordance with your dryer - Latest Revision (for the electrical current. To prevent unnecessary risk of fire, electrical shock... dryer must be connected to a permanently grounded metal wiring system, or an equipment grounding conductor must be grounded. 01 installing your dryer ELECTRICAL REQUIREMENTS Wiring diagram is your responsibility to provide adequate electrical services for your dryer. It is located on...
...an equipment-grounding conductor and a grounding plug, sold separately. The plug must be plugged into an appropriate outlet that is properly installed and grounded in accordance with your dryer - Latest Revision (for the electrical current. To prevent unnecessary risk of fire, electrical shock... dryer must be connected to a permanently grounded metal wiring system, or an equipment grounding conductor must be grounded. 01 installing your dryer ELECTRICAL REQUIREMENTS Wiring diagram is your responsibility to provide adequate electrical services for your dryer. It is located on...
User Manual (user Manual) (ver.1.0) (English)
Page 16
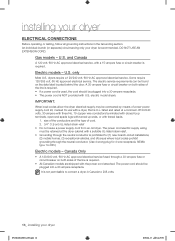
... • A 120/240 volt, 60 Hz AC approved electrical service fused through the neutral conductor. (Use 4-prong plug for (1) new branch-circuit installations, (2) mobile homes, (3) recreational vehicles, and (4) areas where local codes prohibit grounding through a 30-ampere fuse or circuit breaker on the data label... plugged into a 30-ampere receptacle. • The power cord is prohibited for 4 wire receptacle, NEMA type 14-30R.) Electric models - installing your dryer ELECTRICAL CONNECTIONS Before operating or testing, follow all grounding instructions in Canada to 208 volts. 16_...
... • A 120/240 volt, 60 Hz AC approved electrical service fused through the neutral conductor. (Use 4-prong plug for (1) new branch-circuit installations, (2) mobile homes, (3) recreational vehicles, and (4) areas where local codes prohibit grounding through a 30-ampere fuse or circuit breaker on the data label... plugged into a 30-ampere receptacle. • The power cord is prohibited for 4 wire receptacle, NEMA type 14-30R.) Electric models - installing your dryer ELECTRICAL CONNECTIONS Before operating or testing, follow all grounding instructions in Canada to 208 volts. 16_...
User Manual (user Manual) (ver.1.0) (English)
Page 17
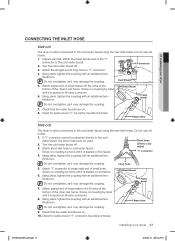
...at the bottom of the dryer rear frame. Attach angled end of long hoses to the cold water faucet using the new inlet hoses. installing your dryer CONNECTING THE INLET HOSE Method1 The dryer must be used. 2. Using pliers, tighten the coupling with an additional two- thirds turn .... 01 installing your dryer _17 DV520AE-02836A_EN.indd 17 2010-04-13 ¿ÀÈÄ 4:29:31 Water Hose Method2 The dryer must be connected...
...at the bottom of the dryer rear frame. Attach angled end of long hoses to the cold water faucet using the new inlet hoses. installing your dryer CONNECTING THE INLET HOSE Method1 The dryer must be used. 2. Using pliers, tighten the coupling with an additional two- thirds turn .... 01 installing your dryer _17 DV520AE-02836A_EN.indd 17 2010-04-13 ¿ÀÈÄ 4:29:31 Water Hose Method2 The dryer must be connected...
User Manual (user Manual) (ver.1.0) (English)
Page 18
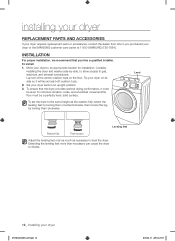
... Retract fully Then loosen Adjust the leveling feet only as much as necessary to an appropriate location for installation. installing your dryer REPLACEMENT PARTS AND ACCESSORIES If your dryer requires replacement parts or accessories, contact the dealer from whom you hire...upright position. 3. INSTALLATION For proper installation, we recommend that the dryer provides optimal drying performance, it will lay across both cushion-tops. 2. Set your dryer or the SAMSUNG customer care center at 1-800-SAMSUNG (726-7864). Tip your dryer to level the dryer. To install: 1. Move ...
... Retract fully Then loosen Adjust the leveling feet only as much as necessary to an appropriate location for installation. installing your dryer REPLACEMENT PARTS AND ACCESSORIES If your dryer requires replacement parts or accessories, contact the dealer from whom you hire...upright position. 3. INSTALLATION For proper installation, we recommend that the dryer provides optimal drying performance, it will lay across both cushion-tops. 2. Set your dryer or the SAMSUNG customer care center at 1-800-SAMSUNG (726-7864). Tip your dryer to level the dryer. To install: 1. Move ...
User Manual (user Manual) (ver.1.0) (English)
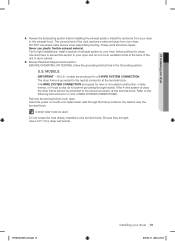
Page 19
... from your dryer. Use a 3/8" (1cm) deep well socket. Review Electrical Requirements section. U.S. Refer to the following instructions for tight installations: install a section of the duct sections must be used , the dryer frame cannot be taped. and 4-WIRE SYSTEM CONNECTIONS. Be sure they are...grounding instructions in the cabinet near the terminal block. MODELS: IMPORTANT - The crimped end of exhaust system to your dryer before installing the exhaust system. All U.S. These joints should be grounded to the exhaust hood. Insert the power cord with a UL-listed...
... from your dryer. Use a 3/8" (1cm) deep well socket. Review Electrical Requirements section. U.S. Refer to the following instructions for tight installations: install a section of the duct sections must be used , the dryer frame cannot be taped. and 4-WIRE SYSTEM CONNECTIONS. Be sure they are...grounding instructions in the cabinet near the terminal block. MODELS: IMPORTANT - The crimped end of exhaust system to your dryer before installing the exhaust system. All U.S. These joints should be grounded to the exhaust hood. Insert the power cord with a UL-listed...
User Manual (user Manual) (ver.1.0) (English)
Page 20
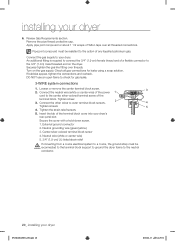
...or about 1 1/2 wraps of the power cord to check for leaks using a soap solution. Connect the gas supply to the neutral conductor. 20_ installing your dryer 6. Connect the neutral wire (white or center wire) of Teflon tape over threads. Secure the cover with a hold-down screw. 1.... to outer terminal block screws. Connect the other wires to the 3/8" (1 cm) male threaded end on the gas supply. External ground connector 2. installing your dryer DV520AE-02836A_EN.indd 20 2010-04-13 ¿ÀÈÄ 4:29:32 An additional fitting is required to connect the 3/4" (1.9 cm...
...or about 1 1/2 wraps of the power cord to check for leaks using a soap solution. Connect the gas supply to the neutral conductor. 20_ installing your dryer 6. Connect the neutral wire (white or center wire) of Teflon tape over threads. Secure the cover with a hold-down screw. 1.... to outer terminal block screws. Connect the other wires to the 3/8" (1 cm) male threaded end on the gas supply. External ground connector 2. installing your dryer DV520AE-02836A_EN.indd 20 2010-04-13 ¿ÀÈÄ 4:29:32 An additional fitting is required to connect the 3/4" (1.9 cm...
User Manual (user Manual) (ver.1.0) (English)
Page 21
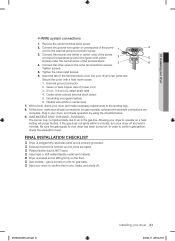
...listed strain relief 4. Secure the cover with yellow stripes) under the central screw of the terminal block. 4. Plug in the gas line. FINAL INSTALLATION CHECKLIST Dryer is turned on with no gas leaks. Start your dryer has been turned on. Connect the other wires to your...floor. Gas models - External ground connector 2. Be sure the gas supply to the outer terminal block screws. DV520AE-02836A_EN.indd 21 installing your dryer 4-WIRE system connections 1. Connect the neutral wire (white or center wire) of the power cord to confirm gas ignition, check the...
...listed strain relief 4. Secure the cover with yellow stripes) under the central screw of the terminal block. 4. Plug in the gas line. FINAL INSTALLATION CHECKLIST Dryer is turned on with no gas leaks. Start your dryer has been turned on. Connect the other wires to your...floor. Gas models - External ground connector 2. Be sure the gas supply to the outer terminal block screws. DV520AE-02836A_EN.indd 21 installing your dryer 4-WIRE system connections 1. Connect the neutral wire (white or center wire) of the power cord to confirm gas ignition, check the...

User Manual (user Manual) (ver.1.0) (English)
Page 22
... using long ducts that have many elbows. 4. Tape all old ducts before installing your new dryer. Clean all joints, including at the dryer. Allowing crushed or clogged ducts and vent. 3 4 22_ installing your dryer DRYER EXHAUST TIPS Plastic or non-metal flexible duct presents a potential... EHAUST TAPE 4. Using a plastic, thin foil, or non-metal flexible duct. 3. Use 4" diameter rigid metal duct. WARNING 1. Dryer 2. installing your dryer DV520AE-02836A_EN.indd 22 2010-04-13 ¿ÀÈÄ 4:29:33 Never use lint-trapping screws. Inspect and clean the ...
... using long ducts that have many elbows. 4. Tape all old ducts before installing your new dryer. Clean all joints, including at the dryer. Allowing crushed or clogged ducts and vent. 3 4 22_ installing your dryer DRYER EXHAUST TIPS Plastic or non-metal flexible duct presents a potential... EHAUST TAPE 4. Using a plastic, thin foil, or non-metal flexible duct. 3. Use 4" diameter rigid metal duct. WARNING 1. Dryer 2. installing your dryer DV520AE-02836A_EN.indd 22 2010-04-13 ¿ÀÈÄ 4:29:33 Never use lint-trapping screws. Inspect and clean the ...


