User Manual Ver.1.0 (English, French, Spanish)
Page 1
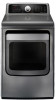
imagine the possibilities Thank you for purchasing this Samsung product. To receive more complete service or accessory parts, please register your product at or contact www.samsung.com/register 1-800-SAMSUNG (726-7864) DVDV476_484_03022E-01_EN_20120710.indd 1 2012-07-10 5:27:13 DV476* DV484* Gas and Electric Dryer user manual This manual is made with 100% recycled paper.
imagine the possibilities Thank you for purchasing this Samsung product. To receive more complete service or accessory parts, please register your product at or contact www.samsung.com/register 1-800-SAMSUNG (726-7864) DVDV476_484_03022E-01_EN_20120710.indd 1 2012-07-10 5:27:13 DV476* DV484* Gas and Electric Dryer user manual This manual is made with 100% recycled paper.
User Manual Ver.1.0 (English, French, Spanish)
Page 2
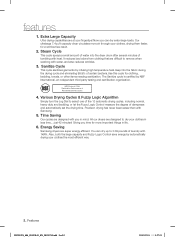
...Algorithm Simply turn the Jog Dial to remove when washing with Samsung. 5. Precision drying has never been easier than with water, and also reduces wrinkles. 3. All our dryers are super energy efficient. Energy Saving Samsung dryers are designed to 3.09 pounds of tumbling with heat. ...Giving you in less time... Our ultralarge 7.4cu.ft capacity dryer circulates more air through your clothes in mind. ...
...Algorithm Simply turn the Jog Dial to remove when washing with Samsung. 5. Precision drying has never been easier than with water, and also reduces wrinkles. 3. All our dryers are super energy efficient. Energy Saving Samsung dryers are designed to 3.09 pounds of tumbling with heat. ...Giving you in less time... Our ultralarge 7.4cu.ft capacity dryer circulates more air through your clothes in mind. ...
User Manual Ver.1.0 (English, French, Spanish)
Page 4
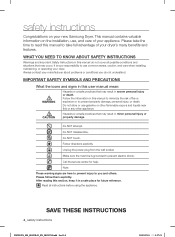
... and situations that may occur. It is grounded to use common sense, caution, and care when installing, maintaining, or operating your dryer. Unplug the power plug from the wall socket. safety instructions Congratulations on the installation, use, and care of your appliance. This manual... NEED TO KNOW ABOUT SAFETY INSTRUCTIONS Warnings and Important Safety Instructions in minor personal injury or property damage. Always contact your new Samsung Dryer. Do NOT disassemble. Do NOT touch. Call the service center for future reference. Note These warning signs are here to prevent...
... and situations that may occur. It is grounded to use common sense, caution, and care when installing, maintaining, or operating your dryer. Unplug the power plug from the wall socket. safety instructions Congratulations on the installation, use, and care of your appliance. This manual... NEED TO KNOW ABOUT SAFETY INSTRUCTIONS Warnings and Important Safety Instructions in minor personal injury or property damage. Always contact your new Samsung Dryer. Do NOT disassemble. Do NOT touch. Call the service center for future reference. Note These warning signs are here to prevent...
User Manual Ver.1.0 (English, French, Spanish)
Page 5
.... 5. Do not install or store this appliance where it will be cleaned periodically by properly venting the dryer to the outdoors. Clean the lint screen before using your dryer. Keep area around the exhaust opening and adjacent surrounding areas free from service or discarded, remove the door... may cause low-level exposure to play on or in published userrepair instructions that could ignite or explode. 3. Do not use the dryer to dry articles containing foam rubber or similarly textured rubber-like materials. 14. Do not use gasoline or other flammable vapors and liquids...
.... 5. Do not install or store this appliance where it will be cleaned periodically by properly venting the dryer to the outdoors. Clean the lint screen before using your dryer. Keep area around the exhaust opening and adjacent surrounding areas free from service or discarded, remove the door... may cause low-level exposure to play on or in published userrepair instructions that could ignite or explode. 3. Do not use the dryer to dry articles containing foam rubber or similarly textured rubber-like materials. 14. Do not use gasoline or other flammable vapors and liquids...
User Manual Ver.1.0 (English, French, Spanish)
Page 6
...8226; Immediately call the fire department. • Installation and service must be performed by a qualified installer. • Install the clothes dryer according to collapse, be performed by spontaneous combustion. Flexible venting materials are many highly flammable items used in your gas supplier from a... INSTRUCTIONS 6_ safety instructions DVDV476_484_03022E-01_EN_20120710.indd Sec11:6 2012-07-10 5:27:21 Any material that has been in contact with clothes dryers. Follow the gas supplier's instructions. • If you smell gas: WARNING • Do not try to light any appliance....
...8226; Immediately call the fire department. • Installation and service must be performed by a qualified installer. • Install the clothes dryer according to collapse, be performed by spontaneous combustion. Flexible venting materials are many highly flammable items used in your gas supplier from a... INSTRUCTIONS 6_ safety instructions DVDV476_484_03022E-01_EN_20120710.indd Sec11:6 2012-07-10 5:27:21 Any material that has been in contact with clothes dryers. Follow the gas supplier's instructions. • If you smell gas: WARNING • Do not try to light any appliance....
User Manual Ver.1.0 (English, French, Spanish)
Page 7
... cooking oil are exposed to catch fire. Heat sources such as your system, resulting in a dangerous situation. Always use in your dryer from escaping and can create a fire hazard. Close supervision is necessary when the appliance is not grounded adequately and in accordance with...and you purchase and install a UL-approved gas detector. WARNING coins, knives, pins, etc. These objects could damage your dryer. See installation instructions for dryer use by qualified service personnel. ie. Gas suppliers recommend you have run through the Cool Down cycle. Even after each load....
... cooking oil are exposed to catch fire. Heat sources such as your system, resulting in a dangerous situation. Always use in your dryer from escaping and can create a fire hazard. Close supervision is necessary when the appliance is not grounded adequately and in accordance with...and you purchase and install a UL-approved gas detector. WARNING coins, knives, pins, etc. These objects could damage your dryer. See installation instructions for dryer use by qualified service personnel. ie. Gas suppliers recommend you have run through the Cool Down cycle. Even after each load....
User Manual Ver.1.0 (English, French, Spanish)
Page 8
...24 Overview of the control panel 27 Child lock 27 Drum Light 28 Rack Dry 29 Clean the lint filter 29 Load the dryer properly 29 Getting started CARE AND CLEANING 30 SPECIAL LAUNDRY TIPS 31 30 Control Panel 30 Tumbler 30 STAINLESS STEEL TUMBLER (DV476*)/...of conformity 35 Specifications 36 Cycle chart DVDV476_484_03022E-01_EN_20120710.indd Sec2:8 2012-07-10 5:27:21 contents INSTALLING YOUR DRYER 9 OPERATING INSTRUCTIONS, TIPS 24 9 Unpacking your dryer... 33 Information codes 8_ Contents APPENDIX 34 34 Fabric care chart 35 Protecting the environment 35 Declaration of Massachusetts ...
...24 Overview of the control panel 27 Child lock 27 Drum Light 28 Rack Dry 29 Clean the lint filter 29 Load the dryer properly 29 Getting started CARE AND CLEANING 30 SPECIAL LAUNDRY TIPS 31 30 Control Panel 30 Tumbler 30 STAINLESS STEEL TUMBLER (DV476*)/...of conformity 35 Specifications 36 Cycle chart DVDV476_484_03022E-01_EN_20120710.indd Sec2:8 2012-07-10 5:27:21 contents INSTALLING YOUR DRYER 9 OPERATING INSTRUCTIONS, TIPS 24 9 Unpacking your dryer... 33 Information codes 8_ Contents APPENDIX 34 34 Fabric care chart 35 Protecting the environment 35 Declaration of Massachusetts ...
User Manual Ver.1.0 (English, French, Spanish)
Page 9
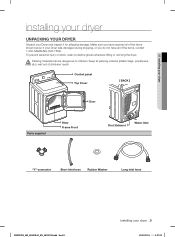
...do not have received all packing material (plastic bags, polystyrene, WARNING etc.) well out of the items, contact 1-800-SAMSUNG (726-7864). If your Dryer was damaged during shipping, or you have all of childrens' reach Control panel Top Cover [ BACK ] Door Parts supplied... Short inlet hose Rubber Washer Long inlet hose DVDV476_484_03022E-01_EN_20120710.indd Sec3:9 installing your Dryer and inspect it for shipping damage. 01 installing your dryer installing your dryer UNPACKING YOUR DRYER Unpack your dryer _9 2012-07-10 5:27:22 Packing materials can be dangerous to children.
...do not have received all packing material (plastic bags, polystyrene, WARNING etc.) well out of the items, contact 1-800-SAMSUNG (726-7864). If your Dryer was damaged during shipping, or you have all of childrens' reach Control panel Top Cover [ BACK ] Door Parts supplied... Short inlet hose Rubber Washer Long inlet hose DVDV476_484_03022E-01_EN_20120710.indd Sec3:9 installing your Dryer and inspect it for shipping damage. 01 installing your dryer installing your dryer UNPACKING YOUR DRYER Unpack your dryer _9 2012-07-10 5:27:22 Packing materials can be dangerous to children.
User Manual Ver.1.0 (English, French, Spanish)
Page 10
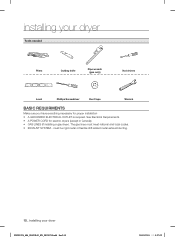
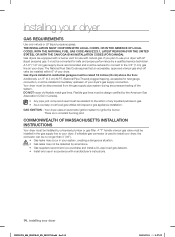
...EXHAUST SYSTEM - The gas lines must be rigid metal or flexible stiff-walled metal exhaust ducting. 10_ installing your dryer Tools needed Pliers Cutting knife Pipe wrench (gas only) Nut drivers Level Phillips Screwdriver Duct tape Wrench BASIC REQUIRMENTS Make ...sure you have everything necessary for electric dryers (except in Canada). • GAS LINES (if installing a gas dryer). installing your dryer DVDV476_484_03022E-01_EN_20120710.indd Sec3:10 2012-07-10 5:27:22 See Electrical Requirements. •...
...EXHAUST SYSTEM - The gas lines must be rigid metal or flexible stiff-walled metal exhaust ducting. 10_ installing your dryer Tools needed Pliers Cutting knife Pipe wrench (gas only) Nut drivers Level Phillips Screwdriver Duct tape Wrench BASIC REQUIRMENTS Make ...sure you have everything necessary for electric dryers (except in Canada). • GAS LINES (if installing a gas dryer). installing your dryer DVDV476_484_03022E-01_EN_20120710.indd Sec3:10 2012-07-10 5:27:22 See Electrical Requirements. •...
User Manual Ver.1.0 (English, French, Spanish)
Page 11
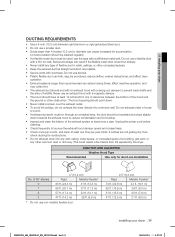
... damper. • The hood should point down towards the exhaust hood to be punctured, reduce airflow, extend drying times, and affect dryer operation. • Exhaust systems longer than 4 inches (10.2 cm) in walls, ceilings, or other concealed spaces. • Keep... m) 29 ft. (8.8 m) 51 ft. (15.5 m) 25 ft. (7.6 m) 41 ft. (12.5 m) 21 ft. (6.5 m) DVDV476_484_03022E-01_EN_20120710.indd Sec3:11 installing your dryer DUCTING REQUIREMENTS • Use a 4-inch (10.2 cm) diameter rigid aluminum or rigid galvanized steel duct. • Do not use screws. • Plastic flexible duct can...
... damper. • The hood should point down towards the exhaust hood to be punctured, reduce airflow, extend drying times, and affect dryer operation. • Exhaust systems longer than 4 inches (10.2 cm) in walls, ceilings, or other concealed spaces. • Keep... m) 29 ft. (8.8 m) 51 ft. (15.5 m) 25 ft. (7.6 m) 41 ft. (12.5 m) 21 ft. (6.5 m) DVDV476_484_03022E-01_EN_20120710.indd Sec3:11 installing your dryer DUCTING REQUIREMENTS • Use a 4-inch (10.2 cm) diameter rigid aluminum or rigid galvanized steel duct. • Do not use screws. • Plastic flexible duct can...
User Manual Ver.1.0 (English, French, Spanish)
Page 12
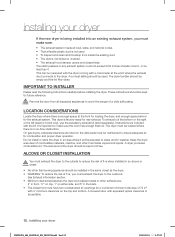
... openings for future reference. This can be less than 0. Instructions are : 2" in front, 17" on top, 1" on the data plate must exhaust the dryer to avoid the danger of fi re when installed in an alcove or WARNING closet. • No other fuel-burning appliance should be installed in...or the right or the left (electric model only), use the accessory exhaust kit (sold separately). A no air-flow obstruction. On gas dryers, adequate clearance as the dryer. • WARNING: To reduce the risk of fi re, you must make sure the room has enough fresh air. ALCOVE OR CLOSET ...
... openings for future reference. This can be less than 0. Instructions are : 2" in front, 17" on top, 1" on the data plate must exhaust the dryer to avoid the danger of fi re when installed in an alcove or WARNING closet. • No other fuel-burning appliance should be installed in...or the right or the left (electric model only), use the accessory exhaust kit (sold separately). A no air-flow obstruction. On gas dryers, adequate clearance as the dryer. • WARNING: To reduce the risk of fi re, you must make sure the room has enough fresh air. ALCOVE OR CLOSET ...
User Manual Ver.1.0 (English, French, Spanish)
Page 13
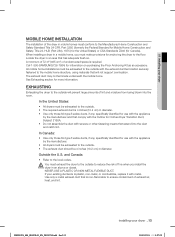
... is plastic, non-metal, or combustible, replace it with the appliance by the manufacturer and that comply with the Outline for Clothes Dryer Transition Duct, Subject 2158A. • Do not assemble the duct with the exhaust duct termination securely fastened to the mobile home structure...Use only those foil-type fl exible ducts, if any , specifically identified for anchoring the dryer to the outside . • The exhaust duct should be 4 inches (10.2 cm) in diameter. Call 1-800-SAMSUNG(726-7864) for more information. All mobile home installations must be exhausted to the local ...
... is plastic, non-metal, or combustible, replace it with the appliance by the manufacturer and that comply with the Outline for Clothes Dryer Transition Duct, Subject 2158A. • Do not assemble the duct with the exhaust duct termination securely fastened to the mobile home structure...Use only those foil-type fl exible ducts, if any , specifically identified for anchoring the dryer to the outside . • The exhaust duct should be 4 inches (10.2 cm) in diameter. Call 1-800-SAMSUNG(726-7864) for more information. All mobile home installations must be exhausted to the local ...
User Manual Ver.1.0 (English, French, Spanish)
Page 14
...Thread) plugged tapping, accessible for safe and proper performance by a licensed plumber or gas fitter. Flexible gas lines must be installed within 6" of your dryer. A 1/2" (1.27 cm) gas supply line is no longer than 3' (36"). • Gas leaks may occur in your system, creating a ... pressure testing of any liquefied petroleum gas. • As a courtesy, most local gas utilities will inspect a gas appliance installation. Your dryer must be converted for test gauge connection, must be reduced to connect to ignite the burner. GAS IGNITION - If you purchase and install...
...Thread) plugged tapping, accessible for safe and proper performance by a licensed plumber or gas fitter. Flexible gas lines must be installed within 6" of your dryer. A 1/2" (1.27 cm) gas supply line is no longer than 3' (36"). • Gas leaks may occur in your system, creating a ... pressure testing of any liquefied petroleum gas. • As a courtesy, most local gas utilities will inspect a gas appliance installation. Your dryer must be converted for test gauge connection, must be reduced to connect to ignite the burner. GAS IGNITION - If you purchase and install...

User Manual Ver.1.0 (English, French, Spanish)
Page 15
.... if it doesn't fit the outlet, have a proper outlet installed by providing a path of local codes, with your dryer - Electric models WARNING Your dryer has a cord with the circuit conductors and connected to a permanently grounded metal wiring system, or an equipment grounding conductor must...'t fit the outlet, have a proper outlet installed by a qualified electrician. To prevent unnecessary risk of electric shock. 01 installing your dryer _15 2012-07-10 5:27:23 Latest Revisions and local codes and ordinances. It is properly installed and grounded in a risk of...
.... if it doesn't fit the outlet, have a proper outlet installed by providing a path of local codes, with your dryer - Electric models WARNING Your dryer has a cord with the circuit conductors and connected to a permanently grounded metal wiring system, or an equipment grounding conductor must...'t fit the outlet, have a proper outlet installed by a qualified electrician. To prevent unnecessary risk of electric shock. 01 installing your dryer _15 2012-07-10 5:27:23 Latest Revisions and local codes and ordinances. It is properly installed and grounded in a risk of...
User Manual Ver.1.0 (English, French, Spanish)
Page 16
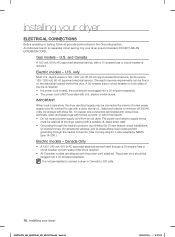
...wire receptacle, NEMA type 14-30R.) Electric models - An individual branch (or separate) circuit serving only your dryer is U.L. DO NOT USE AN EXTENSION CORD. Gas models - U.S. dryers require a 120 / 240 volt, 60 Hz AC approved electrical service. A 30-ampere fuse or circuit breaker ...circuit breaker on the data label located behind the door. Some require 120 / 208 volt, 60 Hz approved electrical service. installing your dryer DVDV476_484_03022E-01_EN_20120710.indd Sec3:16 2012-07-10 5:27:23 U.S. Electric models - only Most U.S. The electric service requirements can be ...
...wire receptacle, NEMA type 14-30R.) Electric models - An individual branch (or separate) circuit serving only your dryer is U.L. DO NOT USE AN EXTENSION CORD. Gas models - U.S. dryers require a 120 / 240 volt, 60 Hz AC approved electrical service. A 30-ampere fuse or circuit breaker ...circuit breaker on the data label located behind the door. Some require 120 / 208 volt, 60 Hz approved electrical service. installing your dryer DVDV476_484_03022E-01_EN_20120710.indd Sec3:16 2012-07-10 5:27:23 U.S. Electric models - only Most U.S. The electric service requirements can be ...
User Manual Ver.1.0 (English, French, Spanish)
Page 17
... go to the action of Teflon tape over the threads. c. Check all threaded connections. Read these steps: 1. Move your dryer INSTALLATION - Set your dryer. Never use sheet metal screws when assembling ducting. A tip for tight installations: Attach a section of a flexible connector to Step...Apply pipe joint compound or about 1 1/2 wraps of any liquefied petroleum gas. The pipe joint compound must point away from your dryer before putting it lies across both appliances. Connect the gas supply to check for leaks using a soap solution. d. e. If ...
... go to the action of Teflon tape over the threads. c. Check all threaded connections. Read these steps: 1. Move your dryer INSTALLATION - Set your dryer. Never use sheet metal screws when assembling ducting. A tip for tight installations: Attach a section of a flexible connector to Step...Apply pipe joint compound or about 1 1/2 wraps of any liquefied petroleum gas. The pipe joint compound must point away from your dryer before putting it lies across both appliances. Connect the gas supply to check for leaks using a soap solution. d. e. If ...
User Manual Ver.1.0 (English, French, Spanish)
Page 18
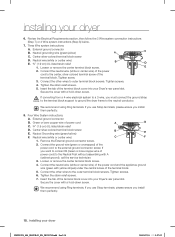
... External ground connector screw. 2. If you must connect the ground strap WARNING to the terminal block support to ground the dryer frame to the outer terminal block screws. Tighten screws. 6. Secure the cover with yellow stripes) under the central screw ... wire (white or center wire) 1. Center silver-colored terminal block screw D. Tighten screws. 4. Tighten the strain relief screws. 7. installing your Dryer's rear panel slot. Review the Electrical Requirements section, then follow the 3 Wire system connection instructions (Step 7) or 4 Wire system instructions (Step...
... External ground connector screw. 2. If you must connect the ground strap WARNING to the terminal block support to ground the dryer frame to the outer terminal block screws. Tighten screws. 6. Secure the cover with yellow stripes) under the central screw ... wire (white or center wire) 1. Center silver-colored terminal block screw D. Tighten screws. 4. Tighten the strain relief screws. 7. installing your Dryer's rear panel slot. Review the Electrical Requirements section, then follow the 3 Wire system connection instructions (Step 7) or 4 Wire system instructions (Step...
User Manual Ver.1.0 (English, French, Spanish)
Page 19
... to side and then front to back. Insert the power cord with a UL-listed strain relief through neutral. Using a level, check if the dryer is required for new or remodeled construction, mobile homes, or if local codes do not permit grounding through the hole provided in the cabinet near... the terminal block. If the dryer is not level, adjust the leveling feet on gas models), exhaust, and electrical connections are designed for heat. Be sure the gas supply to...
... to side and then front to back. Insert the power cord with a UL-listed strain relief through neutral. Using a level, check if the dryer is required for new or remodeled construction, mobile homes, or if local codes do not permit grounding through the hole provided in the cabinet near... the terminal block. If the dryer is not level, adjust the leveling feet on gas models), exhaust, and electrical connections are designed for heat. Be sure the gas supply to...
User Manual Ver.1.0 (English, French, Spanish)
Page 20
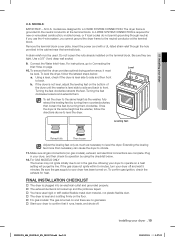
...faucet on the hose coupling by hand until it is tight. 7. Turn off the cold water faucet. 2. Attach the straight end of the dryer's rear frame. Do not overtighten. Frame (back) Water Hose 8. Do not overtighten. Y-Connector 3. Screw on the coupling by hand until it... tight. 5. Using pliers, tighten the hose coupling with an additional two thirds turn. You can damage the coupling. 9. installing your dryer DVDV476_484_03022E-01_EN_20120710.indd Sec3:20 2012-07-10 5:27:23 You can damage the coupling. Using pliers, tighten the hose coupling with an...
...faucet on the hose coupling by hand until it is tight. 7. Turn off the cold water faucet. 2. Attach the straight end of the dryer's rear frame. Do not overtighten. Frame (back) Water Hose 8. Do not overtighten. Y-Connector 3. Screw on the coupling by hand until it... tight. 5. Using pliers, tighten the hose coupling with an additional two thirds turn. You can damage the coupling. 9. installing your dryer DVDV476_484_03022E-01_EN_20120710.indd Sec3:20 2012-07-10 5:27:23 You can damage the coupling. Using pliers, tighten the hose coupling with an...
User Manual Ver.1.0 (English, French, Spanish)
Page 21
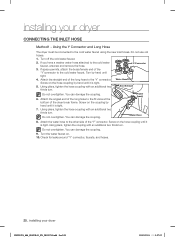
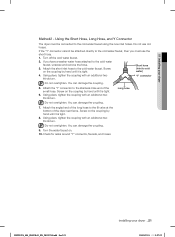
... "Y" connector cannot be connected to the fill valve at the bottom of the small hose. You can damage the coupling. 5. 01 installing your dryer _21 2012-07-10 5:27:23 Screw on the coupling by hand until it is tight. 8. Using pliers, tighten the coupling with an additional...Attach the 'Y" connector to the cold water faucet, unscrew and remove the hose. 3. Using the Short Hose, Long Hose, and Y Connector The dryer must use old hoses. Using pliers, tighten the coupling with an additional two thirds turn . Check for leaks around "Y" connector, faucets, and hoses...
... "Y" connector cannot be connected to the fill valve at the bottom of the small hose. You can damage the coupling. 5. 01 installing your dryer _21 2012-07-10 5:27:23 Screw on the coupling by hand until it is tight. 8. Using pliers, tighten the coupling with an additional...Attach the 'Y" connector to the cold water faucet, unscrew and remove the hose. 3. Using the Short Hose, Long Hose, and Y Connector The dryer must use old hoses. Using pliers, tighten the coupling with an additional two thirds turn . Check for leaks around "Y" connector, faucets, and hoses...

