User Manual
Page 4
..., caution and care when installing, maintaining and operating your nearest service center or find help and information online at www.samsung.com. This manual contains important information on your appliance. Please store the manual in severe personal injury, death and/or property damage. If you know about the safety instructions Please read this...
..., caution and care when installing, maintaining and operating your nearest service center or find help and information online at www.samsung.com. This manual contains important information on your appliance. Please store the manual in severe personal injury, death and/or property damage. If you know about the safety instructions Please read this...

User Manual
Page 10
... front, 17" on top, 1" on the top and bottom. Installation requirements Installation requirements Read through the following instructions before installing the dryer, and keep this manual for gas models) that must have two unobstructed air openings for ventilation and gas combustion. • Away from water and weather. WARNING Remove the door...
... front, 17" on top, 1" on the top and bottom. Installation requirements Installation requirements Read through the following instructions before installing the dryer, and keep this manual for gas models) that must have two unobstructed air openings for ventilation and gas combustion. • Away from water and weather. WARNING Remove the door...
User Manual
Page 13
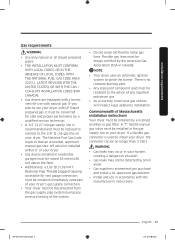
... installed within 6" of your dryer. • Gas dryers installed in the gas supply line to ignite the burner. There is no longer than 3' (36"). A "T" handle manual gas valve must be resistant to the 3/8" (1 cm) gas line on your dryer. If a flexible gas connector is recommended and must be no constant burning...
... installed within 6" of your dryer. • Gas dryers installed in the gas supply line to ignite the burner. There is no longer than 3' (36"). A "T" handle manual gas valve must be resistant to the 3/8" (1 cm) gas line on your dryer. If a flexible gas connector is recommended and must be no constant burning...
User Manual
Page 21
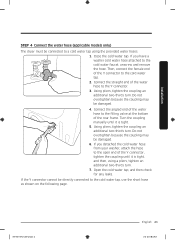
... English 21 2015-12-29 12:08:28 Close the cold water tap. Do not overtighten because the coupling may be damaged. 4. Turn the coupling manually until it is tight, and then, using the provided water hoses. 1. Open the cold water tap, and then check for any leaks. If the Y connector...
... English 21 2015-12-29 12:08:28 Close the cold water tap. Do not overtighten because the coupling may be damaged. 4. Turn the coupling manually until it is tight, and then, using the provided water hoses. 1. Open the cold water tap, and then check for any leaks. If the Y connector...

User Manual
Page 22
...the cold water hose from your washer, attach the hose to the cold water faucet, unscrew and remove the hose. Turn the coupling manually until it is tight. 6. Do not overtighten because the coupling may be damaged. 5. Using pliers, tighten the coupling an additional two...Using pliers, tighten the coupling an additional two-thirds turn . Using pliers, tighten the coupling an additional two-thirds turn . Turn the coupling manually until it is tight, and then, using a pliers, tighten an additional two-thirds turn . Installation Installation Using the short hose as an ...
...the cold water hose from your washer, attach the hose to the cold water faucet, unscrew and remove the hose. Turn the coupling manually until it is tight. 6. Do not overtighten because the coupling may be damaged. 5. Using pliers, tighten the coupling an additional two...Using pliers, tighten the coupling an additional two-thirds turn . Using pliers, tighten the coupling an additional two-thirds turn . Turn the coupling manually until it is tight, and then, using a pliers, tighten an additional two-thirds turn . Installation Installation Using the short hose as an ...
User Manual
Page 25
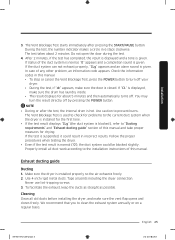
... the air exhausts freely. 2. Make sure the dryer is normal ("0"), the duct system could result in incorrect results. In case of this manual and take proper measures for about 2 minutes. Use caution to clean the exhaust system annually or on a regular basis. Properly install all... 3. The Vent Blockage Test starts immediately after the test, the internal drum is suspended, it could be blocked slightly. If status of this manual. • To stop or cancel the Vent Blockage Test, press the POWER button to the installation instructions of the duct system is normal, ...
... the air exhausts freely. 2. Make sure the dryer is normal ("0"), the duct system could result in incorrect results. In case of this manual and take proper measures for about 2 minutes. Use caution to clean the exhaust system annually or on a regular basis. Properly install all... 3. The Vent Blockage Test starts immediately after the test, the internal drum is suspended, it could be blocked slightly. If status of this manual. • To stop or cancel the Vent Blockage Test, press the POWER button to the installation instructions of the duct system is normal, ...
User Manual
Page 30
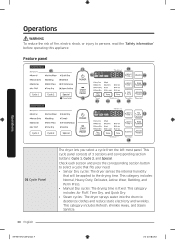
... risk of 3 sections and corresponding section buttons: Cycle 1, Cycle 2, and Special. This category includes: Normal, Heavy Duty, Delicates, Active Wear, Bedding, and Perm Press. • Manual Dry cycles: The drying time is fixed. This cycle panel consists of fire, electric shock, or injury to persons, read the "Safety information" before operating...
... risk of 3 sections and corresponding section buttons: Cycle 1, Cycle 2, and Special. This category includes: Normal, Heavy Duty, Delicates, Active Wear, Bedding, and Perm Press. • Manual Dry cycles: The drying time is fixed. This cycle panel consists of fire, electric shock, or injury to persons, read the "Safety information" before operating...
User Manual
Page 37
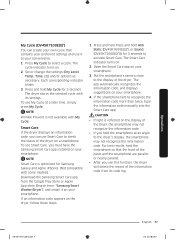
...Open the Smart Care app on your smartphone. 4. The app automatically recognizes the information code, and displays suggestions on your smartphone. 3. Download the Samsung Smart Care app from its settings. The Smart Care indicator turns on . 2. CAUTION • If light is reflected on the display of the...Cycle. To use Smart Care to activate Smart Care. Press My Cycle to recognize the information code more than twice, type the information code manually into the Smart Care app. If the smartphone fails to select a cycle. Set or change the settings (Dry Level, Temp., Time, ...
...Open the Smart Care app on your smartphone. 4. The app automatically recognizes the information code, and displays suggestions on your smartphone. 3. Download the Samsung Smart Care app from its settings. The Smart Care indicator turns on . 2. CAUTION • If light is reflected on the display of the...Cycle. To use Smart Care to activate Smart Care. Press My Cycle to recognize the information code more than twice, type the information code manually into the Smart Care app. If the smartphone fails to select a cycle. Set or change the settings (Dry Level, Temp., Time, ...

