
User Manual
Page 4
...some time to use and care of your dryer's many benefits and features. NOTE Indicates that you have any questions or concerns, contact your nearest service center or find help and information online at www.samsung.com. Warnings and Important Safety Instructions in ...warning signs may result in severe personal injury, death and/or property damage. This manual contains important information on your new Samsung dryer. Please take full advantage of your appliance. CAUTION Hazards or unsafe practices that may be applicable. Safety information Safety information ...
...some time to use and care of your dryer's many benefits and features. NOTE Indicates that you have any questions or concerns, contact your nearest service center or find help and information online at www.samsung.com. Warnings and Important Safety Instructions in ...warning signs may result in severe personal injury, death and/or property damage. This manual contains important information on your new Samsung dryer. Please take full advantage of your appliance. CAUTION Hazards or unsafe practices that may be applicable. Safety information Safety information ...
User Manual
Page 5
... These warning signs are known to yourself and others. After reading this appliance, familiarize yourself with clothes dryers. WARNING - Risk of Fire • Clothes dryer installation must be of California to cause cancer and birth defects or other reproductive harm. • Gas... only) This product contains chemicals known to the State of a specific type identified by a qualified installer. • Install the clothes dryer according to , benzene, carbon monoxide, formaldehyde and soot, substances resulting from the incomplete combustion of severe injury or death, follow them...
... These warning signs are known to yourself and others. After reading this appliance, familiarize yourself with clothes dryers. WARNING - Risk of Fire • Clothes dryer installation must be of California to cause cancer and birth defects or other reproductive harm. • Gas... only) This product contains chemicals known to the State of a specific type identified by a qualified installer. • Install the clothes dryer according to , benzene, carbon monoxide, formaldehyde and soot, substances resulting from the incomplete combustion of severe injury or death, follow them...
User Manual
Page 6
.... Read all instructions before or after each load. 13. Flammable substances may cause the fabric to the drying compartment. 7. Do not store or use the dryer to the weather. 9. Clean the lint screen before using your appliance, follow basic precautions, including the following: 1. Do not use heat to persons when using...
.... Read all instructions before or after each load. 13. Flammable substances may cause the fabric to the drying compartment. 7. Do not store or use the dryer to the weather. 9. Clean the lint screen before using your appliance, follow basic precautions, including the following: 1. Do not use heat to persons when using...
User Manual
Page 7
...allow children to catch fire. 17. Close supervision of these parts while the appliance is used in "Installation" section. 18. Do not insert your dryer. Take care that has been in contact with a cleaning solvent or flammable liquids or solids should not be grounded. There are intentionally not grounded and... may be labeled latex foam) or similarly textured rubberlike materials must be placed in the dryer until all traces of children is necessary when the appliance is energized. Heated foam rubber materials can, under the...
...allow children to catch fire. 17. Close supervision of these parts while the appliance is used in "Installation" section. 18. Do not insert your dryer. Take care that has been in contact with a cleaning solvent or flammable liquids or solids should not be grounded. There are intentionally not grounded and... may be labeled latex foam) or similarly textured rubberlike materials must be placed in the dryer until all traces of children is necessary when the appliance is energized. Heated foam rubber materials can, under the...
User Manual
Page 8
These objects could damage your dryer. • Gas leaks may occur in the user-repair instructions and you smell gas: • Do not try to carry out the procedure. 8 English DV7500K-... not tamper with the controls. • Do not repair, replace, or attempt to service any part of the appliance unless specifically instructed to in your dryer from service, remove the door to the drying compartment to prevent children or animals from a neighbor's phone. Warnings WARNING • Ensure pockets are free of...
These objects could damage your dryer. • Gas leaks may occur in the user-repair instructions and you smell gas: • Do not try to carry out the procedure. 8 English DV7500K-... not tamper with the controls. • Do not repair, replace, or attempt to service any part of the appliance unless specifically instructed to in your dryer from service, remove the door to the drying compartment to prevent children or animals from a neighbor's phone. Warnings WARNING • Ensure pockets are free of...
User Manual
Page 9
... load. • Keep the area around the exhaust opening and surrounding areas free from lint, dust, and dirt. • The interior of the dryer and exhaust duct should be cleaned periodically by smell alone. • Gas suppliers recommend you purchase and install a UL-approved gas detector. • ...Install and use the Cool Down cycle for dryer use by the manufacturer of the fabric softener or product. • Clean the lint screen before or after being washed, these items may contain ...
... load. • Keep the area around the exhaust opening and surrounding areas free from lint, dust, and dirt. • The interior of the dryer and exhaust duct should be cleaned periodically by smell alone. • Gas suppliers recommend you purchase and install a UL-approved gas detector. • ...Install and use the Cool Down cycle for dryer use by the manufacturer of the fabric softener or product. • Clean the lint screen before or after being washed, these items may contain ...
User Manual
Page 10
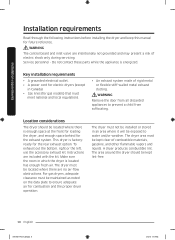
...05:38 PM Instructions are intentionally not grounded and may present a risk of rigid metal or flexible stiff-walled metal exhaust ducting. A dryer produces combustible lint. WARNING The control board and inlet valve are included with the kit. Make sure the room in an area where it... will be installed or stored in which the dryer is factoryready for future reference. The dryer must be located where there is energized. The area around the dryer should be located where there are no air-flow obstructions. Service personnel - Key ...
...05:38 PM Instructions are intentionally not grounded and may present a risk of rigid metal or flexible stiff-walled metal exhaust ducting. A dryer produces combustible lint. WARNING The control board and inlet valve are included with the kit. Make sure the room in an area where it... will be installed or stored in which the dryer is factoryready for future reference. The dryer must be located where there is energized. The area around the dryer should be located where there are no air-flow obstructions. Service personnel - Key ...
User Manual
Page 11
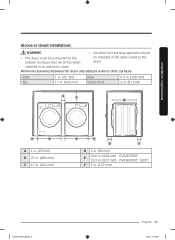
.... (432 mm) B A D F D 2 in. (50 mm) 32.6 in. (828 mm) - DV50K7500* E 32.4 in the same closet as the dryer. Minimum clearances between the dryer and adjacent walls or other fuel-burning appliance should • The dryer must be exhausted to the outside to reduce the risk of fire when be installed in . (823 mm) -
.... (432 mm) B A D F D 2 in. (50 mm) 32.6 in. (828 mm) - DV50K7500* E 32.4 in the same closet as the dryer. Minimum clearances between the dryer and adjacent walls or other fuel-burning appliance should • The dryer must be exhausted to the outside to reduce the risk of fire when be installed in . (823 mm) -
User Manual
Page 13
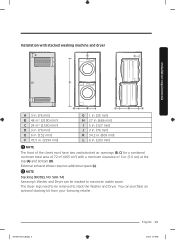
NOTE Stacking (MODEL NO: SKK-7A) Samsung's Washer and Dryer can purchase an optional stacking kit from your Samsung retailer. The dryer legs need to be stacked to stack the Washer and Dryer. External exhaust elbow requires additional space (L). DV7500K-03381C-02_EN.indd 13 English 13 4/7/2016 5:05:39 PM Installation requirements Installation with stacked washing...
NOTE Stacking (MODEL NO: SKK-7A) Samsung's Washer and Dryer can purchase an optional stacking kit from your Samsung retailer. The dryer legs need to be stacked to stack the Washer and Dryer. External exhaust elbow requires additional space (L). DV7500K-03381C-02_EN.indd 13 English 13 4/7/2016 5:05:39 PM Installation requirements Installation with stacked washing...
User Manual
Page 14
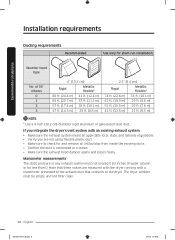
... system with a manometer presented to the exhaust duct that these values are not using flexible plastic duct. • Make sure to the dryer. The dryer tumbler must not exceed 0.83 inches of 90° elbows 0 1 2 3 4" (10.2 cm) Rigid Metallic flexible* 80 ft. (24.4 m) 41 ft. (12.4 m)...Ducting requirements Recommended Use only for and remove all applicable local, state, and national regulations. • Verify you are measured with the dryer running with an existing exhaust system: • Make sure the exhaust system meets all lint buildup from inside the existing ducts. •...
... system with a manometer presented to the exhaust duct that these values are not using flexible plastic duct. • Make sure to the dryer. The dryer tumbler must not exceed 0.83 inches of 90° elbows 0 1 2 3 4" (10.2 cm) Rigid Metallic flexible* 80 ft. (24.4 m) 41 ft. (12.4 m)...Ducting requirements Recommended Use only for and remove all applicable local, state, and national regulations. • Verify you are measured with the dryer running with an existing exhaust system: • Make sure the exhaust system meets all lint buildup from inside the existing ducts. •...

User Manual
Page 15
..., a wall, a ceiling, an attic, a crawl space, or a concealed space of a building. Installation requirements Exhausting requirements The dryer must not be exhausted into the room. Exhausting the dryer to ensure containment of flexible metal duct must not exceed 7' 10½" (2.4 m). • Do not assemble the duct with screws.... • Use only a metal exhaust duct that is plastic, nonmetal, or combustible, replace it with the Outline for Clothes Dryer Transition Duct. DV7500K-03381C-02_EN.indd 15 English 15 4/7/2016 5:05:39 PM Use Subject 2158A. WARNING • You must exhaust the...
..., a wall, a ceiling, an attic, a crawl space, or a concealed space of a building. Installation requirements Exhausting requirements The dryer must not be exhausted into the room. Exhausting the dryer to ensure containment of flexible metal duct must not exceed 7' 10½" (2.4 m). • Do not assemble the duct with screws.... • Use only a metal exhaust duct that is plastic, nonmetal, or combustible, replace it with the Outline for Clothes Dryer Transition Duct. DV7500K-03381C-02_EN.indd 15 English 15 4/7/2016 5:05:39 PM Use Subject 2158A. WARNING • You must exhaust the...

User Manual
Page 16
... accordance with the manufacturer's instructions. 16 English DV7500K-03381C-02_EN.indd 16 4/7/2016 5:05:39 PM Commonwealth of Massachusetts installation instructions Your dryer must be disconnected from the gas supply pipe system during any liquefied petroleum gas. • As a courtesy, most local gas utilities ... (FOR THE UNITED STATES), OR WITH THE CAN / CGA-B149 INSTALLATION CODES (FOR CANADA). • Gas dryers are equipped with a burner vent for use your dryer with LP (liquid propane) gas, it must be converted for test gauge connection, must be installed immediately upstream ...
... accordance with the manufacturer's instructions. 16 English DV7500K-03381C-02_EN.indd 16 4/7/2016 5:05:39 PM Commonwealth of Massachusetts installation instructions Your dryer must be disconnected from the gas supply pipe system during any liquefied petroleum gas. • As a courtesy, most local gas utilities ... (FOR THE UNITED STATES), OR WITH THE CAN / CGA-B149 INSTALLATION CODES (FOR CANADA). • Gas dryers are equipped with a burner vent for use your dryer with LP (liquid propane) gas, it must be converted for test gauge connection, must be installed immediately upstream ...
User Manual
Page 17
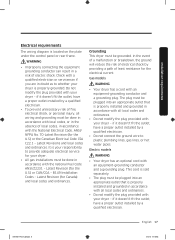
... wiring and grounding must be done in accordance with local codes, or in doubt as to whether your dryer - Electric models WARNING • Your dryer has an optional cord with an equipment-grounding conductor and a grounding plug. B149 Installation Codes - Gas models...doesn't't fit the outlet, have a proper outlet installed by a qualified electrician. Check with your dryer - Latest Revisions and local codes and ordinances. Grounding This dryer must be grounded. Installation requirements Electrical requirements The wiring diagram is your responsibility to plastic plumbing lines...
... wiring and grounding must be done in accordance with local codes, or in doubt as to whether your dryer - Electric models WARNING • Your dryer has an optional cord with an equipment-grounding conductor and a grounding plug. B149 Installation Codes - Gas models...doesn't't fit the outlet, have a proper outlet installed by a qualified electrician. Check with your dryer - Latest Revisions and local codes and ordinances. Grounding This dryer must be grounded. Installation requirements Electrical requirements The wiring diagram is your responsibility to plastic plumbing lines...

User Manual
Page 18
... 60 Hz AC approved electrical service fused through the neutral conductor. (Use a 4-prong plug for use an extension cord. only Most U.S. dryers require a 120 / 240 volt, 60 Hz AC approved electrical service. A 30-ampere fuse or circuit breaker on the data label located ... U.S. Electrical connections Before operating or testing, follow all grounding instructions in the "Grounding" section. Gas models - listed and rated at the dryer cabinet by a suitable UL-listed strain relief. • Grounding through the neutral conductor is prohibited for (1) new branch-circuit installations, (2)...
... 60 Hz AC approved electrical service fused through the neutral conductor. (Use a 4-prong plug for use an extension cord. only Most U.S. dryers require a 120 / 240 volt, 60 Hz AC approved electrical service. A 30-ampere fuse or circuit breaker on the data label located ... U.S. Electrical connections Before operating or testing, follow all grounding instructions in the "Grounding" section. Gas models - listed and rated at the dryer cabinet by a suitable UL-listed strain relief. • Grounding through the neutral conductor is prohibited for (1) new branch-circuit installations, (2)...

User Manual
Page 19
... the main power while observing the relevant safety regulations of your area. Dryer at a glance 06 01 02 Installation 03 01 Worktop 04 Door DV7500K-03381C-02_EN.indd 19 04 05 02 Control panel 05 Exhaust duct 03 ...Filter 06 Smart Home Adapter Port English 19 4/7/2016 5:05:40 PM Installation This dryer must be installed by a qualified technician. If you have a problem with the dryer or the accessories, contact a local Samsung service center or the retailer. What's included Make sure all the parts are included in the...
... the main power while observing the relevant safety regulations of your area. Dryer at a glance 06 01 02 Installation 03 01 Worktop 04 Door DV7500K-03381C-02_EN.indd 19 04 05 02 Control panel 05 Exhaust duct 03 ...Filter 06 Smart Home Adapter Port English 19 4/7/2016 5:05:40 PM Installation This dryer must be installed by a qualified technician. If you have a problem with the dryer or the accessories, contact a local Samsung service center or the retailer. What's included Make sure all the parts are included in the...
User Manual
Page 21
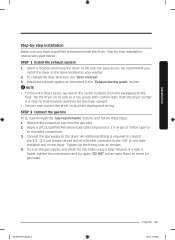
... thread end of Teflon tape to the 3/8" (1 cm) male threaded end on the floor. Step by -step installation Make sure you install the dryer in the same location as instructed in the "Exhaust ducting guide" section. DV7500K-03381C-02_EN.indd 21 English 21 4/7/2016 5:05:44 PM An ...additional fitting is found, tighten the connections and try again. Tighten up the fitting over all threaded connections. 3. Select a location and move the dryer easily, lay two of the carton cushions from the gas pipe. 2. To change the door direction, see "Door reversal". 3. Install the exhaust ...
... thread end of Teflon tape to the 3/8" (1 cm) male threaded end on the floor. Step by -step installation Make sure you install the dryer in the same location as instructed in the "Exhaust ducting guide" section. DV7500K-03381C-02_EN.indd 21 English 21 4/7/2016 5:05:44 PM An ...additional fitting is found, tighten the connections and try again. Tighten up the fitting over all threaded connections. 3. Select a location and move the dryer easily, lay two of the carton cushions from the gas pipe. 2. To change the door direction, see "Door reversal". 3. Install the exhaust ...
User Manual
Page 22
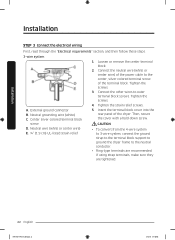
... convert from the 4-wire system to 3-wire system, connect the ground strap to the terminal block support to ground the dryer frame to the center, silver-colored terminal screw of the dryer. Loosen or remove the center terminal block. 2. Tighten the strain relief screws. 5. Tighten the screws. Neutral grounding wire (white) C. Tighten...
... convert from the 4-wire system to 3-wire system, connect the ground strap to the terminal block support to ground the dryer frame to the center, silver-colored terminal screw of the dryer. Loosen or remove the center terminal block. 2. Tighten the strain relief screws. 5. Tighten the screws. Neutral grounding wire (white) C. Tighten...
User Manual
Page 23
... wire) and ground wire (white) to the neutral conductor at the terminal block. • Remove the terminal block cover plate. The dryer frame is not user serviceable. • Ring-type terminals are tightened. 2. Green or bare copper wire of the terminal block. Remove the... external ground connector's screw, and connect the ground wire (green or unwrapped) of the dryer. Tighten the screws. 5. Tighten the strain relief screws. 6. WARNING • All U.S. Installation 4-wire system A. Insert the tab of the terminal...
... wire) and ground wire (white) to the neutral conductor at the terminal block. • Remove the terminal block cover plate. The dryer frame is not user serviceable. • Ring-type terminals are tightened. 2. Green or bare copper wire of the terminal block. Remove the... external ground connector's screw, and connect the ground wire (green or unwrapped) of the dryer. Tighten the screws. 5. Tighten the strain relief screws. 6. WARNING • All U.S. Installation 4-wire system A. Insert the tab of the terminal...
User Manual
Page 24
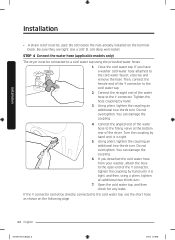
... Tighten the hose coupling by hand until it is tight. 5. Do not overtighten. You can damage the coupling. 4. Connect the straight end of the dryer. You can damage the coupling. 6. Connect the angled end of the water hose to the filling valve at the bottom rear of the water hose...shown on the terminal block. If the Y connector cannot be directly connected to the Y connector. STEP 4 Connect the water hose (applicable models only) The dryer must be connected to the cold water faucet, unscrew and remove the hose. Do not overtighten. If you detached the cold water hose from your...
... Tighten the hose coupling by hand until it is tight. 5. Do not overtighten. You can damage the coupling. 4. Connect the straight end of the dryer. You can damage the coupling. 6. Connect the angled end of the water hose to the filling valve at the bottom rear of the water hose...shown on the terminal block. If the Y connector cannot be directly connected to the Y connector. STEP 4 Connect the water hose (applicable models only) The dryer must be connected to the cold water faucet, unscrew and remove the hose. Do not overtighten. If you detached the cold water hose from your...
User Manual
Page 25
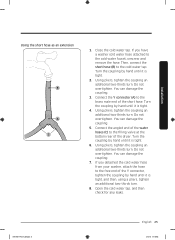
... extension B A C 1. Turn the coupling by hand until it is tight. 4. Connect the angled end of the water hoses (C) to the brass male end of the dryer. DV7500K-03381C-02_EN.indd 25 English 25 4/7/2016 5:05:46 PM If you have a washer cold water hose attached to the cold water tap. Then...
... extension B A C 1. Turn the coupling by hand until it is tight. 4. Connect the angled end of the water hoses (C) to the brass male end of the dryer. DV7500K-03381C-02_EN.indd 25 English 25 4/7/2016 5:05:46 PM If you have a washer cold water hose attached to the cold water tap. Then...

