
User Manual
Page 4
... installation, use common sense, caution and care when installing, maintaining and operating your dryer. CAUTION Hazards or unsafe practices that you have any questions or concerns, contact your new Samsung dryer. It is your responsibility to the appliance for its intended purpose as described in ...this manual to safely and efficiently operate the extensive features and functions of your dryer may be applicable. If you know about ...
... installation, use common sense, caution and care when installing, maintaining and operating your dryer. CAUTION Hazards or unsafe practices that you have any questions or concerns, contact your new Samsung dryer. It is your responsibility to the appliance for its intended purpose as described in ...this manual to safely and efficiently operate the extensive features and functions of your dryer may be applicable. If you know about ...
User Manual
Page 5
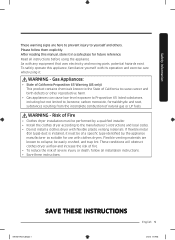
...appliances can cause low-level exposure to Proposition 65 listed substances, including but not limited to collapse, be of Fire • Clothes dryer installation must be easily crushed, and trap lint. Flexible venting materials are here to prevent injury to the manufacturer's instructions and local ...soot, substances resulting from the incomplete combustion of severe injury or death, follow them explicitly. WARNING - These conditions will obstruct clothes dryer airflow and increase the risk of fire. • To reduce the risk of natural gas or LP fuels. As with its operation...
...appliances can cause low-level exposure to Proposition 65 listed substances, including but not limited to collapse, be of Fire • Clothes dryer installation must be easily crushed, and trap lint. Flexible venting materials are here to prevent injury to the manufacturer's instructions and local ...soot, substances resulting from the incomplete combustion of severe injury or death, follow them explicitly. WARNING - These conditions will obstruct clothes dryer airflow and increase the risk of fire. • To reduce the risk of natural gas or LP fuels. As with its operation...
User Manual
Page 6
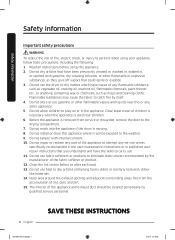
Flammable substances may cause the fabric to catch fire by the manufacturer of the fabric softener or product. 12. Do not use the dryer to dry clothes which have traces of any flammable substance, such as vegetable oil, cooking oil, machine oil, flammable chemicals, paint thinner, etc., or anything ...
Flammable substances may cause the fabric to catch fire by the manufacturer of the fabric softener or product. 12. Do not use the dryer to dry clothes which have traces of any flammable substance, such as vegetable oil, cooking oil, machine oil, flammable chemicals, paint thinner, etc., or anything ...
User Manual
Page 7
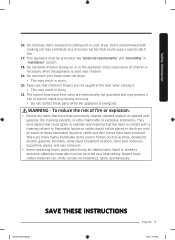
...the appliance. This appliance must not be dried on or in your hand under certain circumstances, ignite spontaneously. WARNING - Do not insert your dryer. To reduce the risk of these parts while the appliance is used in homes, such as acetone, denatured alcohol, gasoline, kerosene, some ...liquid household cleaners, some spot removers, turpentine, waxes, and wax removers. • Items containing foam rubber (which may result in the dryer until all traces of fire or explosion: • Do not dry items that could ignite or explode. Heated foam rubber materials can, under the...
...the appliance. This appliance must not be dried on or in your hand under certain circumstances, ignite spontaneously. WARNING - Do not insert your dryer. To reduce the risk of these parts while the appliance is used in homes, such as acetone, denatured alcohol, gasoline, kerosene, some ...liquid household cleaners, some spot removers, turpentine, waxes, and wax removers. • Items containing foam rubber (which may result in the dryer until all traces of fire or explosion: • Do not dry items that could ignite or explode. Heated foam rubber materials can, under the...
User Manual
Page 8
... drying compartment to service any part of small, irregularly shaped hard objects and foreign material, i.e. These objects could damage your dryer. • Gas leaks may occur in your system, resulting in your dryer from a neighbor's phone. Follow the gas supplier's instructions. • If you smell gas: • Do not try to play...
... drying compartment to service any part of small, irregularly shaped hard objects and foreign material, i.e. These objects could damage your dryer. • Gas leaks may occur in your system, resulting in your dryer from a neighbor's phone. Follow the gas supplier's instructions. • If you smell gas: • Do not try to play...
User Manual
Page 9
... opening and surrounding areas free from lint, dust, and dirt. • The interior of these oils. • Residual oil on top of the dryer. • Do not dry clothing with large buckles, buttons, or other heavy metal or solid objects. • Gas leaks may contain significant amounts ...of the dryer and exhaust duct should be properly grounded. Never remove these items from escaping and can create a fire hazard. • All washed and unwashed...
... opening and surrounding areas free from lint, dust, and dirt. • The interior of these oils. • Residual oil on top of the dryer. • Do not dry clothing with large buckles, buttons, or other heavy metal or solid objects. • Gas leaks may contain significant amounts ...of the dryer and exhaust duct should be properly grounded. Never remove these items from escaping and can create a fire hazard. • All washed and unwashed...
User Manual
Page 10
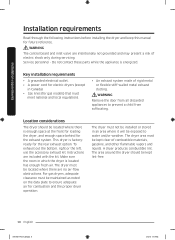
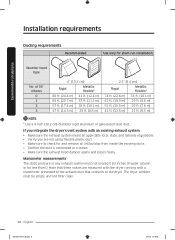
...the room in an area where it will be exposed to water and/or weather. The dryer area must be located where there are no air-flow obstructions. A dryer produces combustible lint. WARNING Remove the door from all discarded appliances to ensure adequate air for...of rigid metal or flexible stiff-walled metal exhaust ducting. Installation requirements Installation requirements Read through the following instructions before installing the dryer and keep this manual for the rear exhaust option. Instructions are intentionally not grounded and may present a risk of combustible materials...
...the room in an area where it will be exposed to water and/or weather. The dryer area must be located where there are no air-flow obstructions. A dryer produces combustible lint. WARNING Remove the door from all discarded appliances to ensure adequate air for...of rigid metal or flexible stiff-walled metal exhaust ducting. Installation requirements Installation requirements Read through the following instructions before installing the dryer and keep this manual for the rear exhaust option. Instructions are intentionally not grounded and may present a risk of combustible materials...
User Manual
Page 11
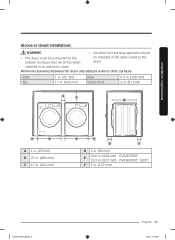
... be exhausted to the outside to reduce the risk of fire when be installed in the same closet as the dryer. DV50K7500* E 32.4 in . (127 mm) DV7500K-03381C-02_EN.indd 11 English 11 4/7/2016 5:05:39 PM installed in an alcove or closet. Installation requirements Alcove ...
... be exhausted to the outside to reduce the risk of fire when be installed in the same closet as the dryer. DV50K7500* E 32.4 in . (127 mm) DV7500K-03381C-02_EN.indd 11 English 11 4/7/2016 5:05:39 PM installed in an alcove or closet. Installation requirements Alcove ...
User Manual
Page 13
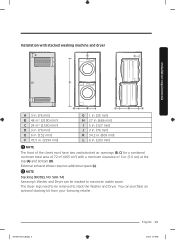
...-03381C-02_EN.indd 13 English 13 4/7/2016 5:05:39 PM NOTE Stacking (MODEL NO: SKK-7A) Samsung's Washer and Dryer can purchase an optional stacking kit from your Samsung retailer. Installation requirements Installation with stacked washing machine and dryer A E I B F C D G H J K L A 3 in. (76 mm) B 48 in2. (3100 mm2) C 24 in2. (1550 mm2) D 3 in. (76 mm) E 6 in...
...-03381C-02_EN.indd 13 English 13 4/7/2016 5:05:39 PM NOTE Stacking (MODEL NO: SKK-7A) Samsung's Washer and Dryer can purchase an optional stacking kit from your Samsung retailer. Installation requirements Installation with stacked washing machine and dryer A E I B F C D G H J K L A 3 in. (76 mm) B 48 in2. (3100 mm2) C 24 in2. (1550 mm2) D 3 in. (76 mm) E 6 in...
User Manual
Page 14
Note that connects to the dryer. The dryer tumbler must not exceed 0.83 inches of 90° elbows 0 1 2 3 4" (10.2 cm) Rigid Metallic flexible* 80 ft. (24.4 m) 41 ft. (12.4 m) 68 ft. (20.7 m) 37 ... ft. (6.5 m) NOTE * Use a 4-inch (10.2 cm) diameter rigid aluminum or galvanized steel duct. If you integrate the dryer's vent system with a manometer presented to the exhaust duct that these values are measured with the dryer running with an existing exhaust system: • Make sure the exhaust system meets all lint buildup from...
Note that connects to the dryer. The dryer tumbler must not exceed 0.83 inches of 90° elbows 0 1 2 3 4" (10.2 cm) Rigid Metallic flexible* 80 ft. (24.4 m) 41 ft. (12.4 m) 68 ft. (20.7 m) 37 ... ft. (6.5 m) NOTE * Use a 4-inch (10.2 cm) diameter rigid aluminum or galvanized steel duct. If you integrate the dryer's vent system with a manometer presented to the exhaust duct that these values are measured with the dryer running with an existing exhaust system: • Make sure the exhaust system meets all lint buildup from...

User Manual
Page 15
... lint. Outside the United States and Canada • Refer to the local codes. Use Subject 2158A. In the United States and Canada • All dryers must be exhausted into a chimney, a wall, a ceiling, an attic, a crawl space, or a concealed space of lint and moisture from being ...the outside will prevent large amounts of a building. DV7500K-03381C-02_EN.indd 15 English 15 4/7/2016 5:05:39 PM Installation requirements Exhausting requirements The dryer must not be exhausted to the outside. • The required exhaust duct is 4 inches (10.2 cm) in diameter. • See "...
... lint. Outside the United States and Canada • Refer to the local codes. Use Subject 2158A. In the United States and Canada • All dryers must be exhausted into a chimney, a wall, a ceiling, an attic, a crawl space, or a concealed space of lint and moisture from being ...the outside will prevent large amounts of a building. DV7500K-03381C-02_EN.indd 15 English 15 4/7/2016 5:05:39 PM Installation requirements Exhausting requirements The dryer must not be exhausted to the outside. • The required exhaust duct is 4 inches (10.2 cm) in diameter. • See "...

User Manual
Page 16
... (36"). The National Fuel Gas Code requires that an accessible, approved manual gas shut-off valve be installed within 6" of your dryer. • Gas dryers installed in accordance with the manufacturer's instructions. 16 English DV7500K-03381C-02_EN.indd 16 4/7/2016 5:05:39 PM Flexible gas lines must ...be resistant to the action of any pressure testing of Massachusetts installation instructions Your dryer must be detected by smell alone. • Gas suppliers recommend you plan to ignite the burner. There is recommended and must be...
... (36"). The National Fuel Gas Code requires that an accessible, approved manual gas shut-off valve be installed within 6" of your dryer. • Gas dryers installed in accordance with the manufacturer's instructions. 16 English DV7500K-03381C-02_EN.indd 16 4/7/2016 5:05:39 PM Flexible gas lines must ...be resistant to the action of any pressure testing of Massachusetts installation instructions Your dryer must be detected by smell alone. • Gas suppliers recommend you plan to ignite the burner. There is recommended and must be...
User Manual
Page 17
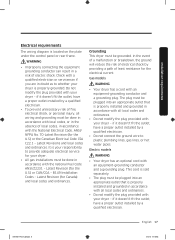
... Canadian Electrical Code CSA C22.1 - B149 Installation Codes - Latest Revision (for the U.S.) or CAN/CGA - Electric models WARNING • Your dryer has an optional cord with your dryer - Do not modify the plug provided with a qualified electrician or serviceman if you are in doubt as to whether your...outlet installed by a qualified electrician. It is located on the plate under the control panel or rear frame. Gas models WARNING • Your dryer has a cord with the national Fuel Code ANSI/Z2231 - The plug must be done in accordance with local codes, or in accordance with an...
... Canadian Electrical Code CSA C22.1 - B149 Installation Codes - Latest Revision (for the U.S.) or CAN/CGA - Electric models WARNING • Your dryer has an optional cord with your dryer - Do not modify the plug provided with a qualified electrician or serviceman if you are in doubt as to whether your...outlet installed by a qualified electrician. It is located on the plate under the control panel or rear frame. Gas models WARNING • Your dryer has a cord with the national Fuel Code ANSI/Z2231 - The plug must be done in accordance with local codes, or in accordance with an...

User Manual
Page 18
.... A 30-ampere fuse or circuit breaker on both sides of Electric Shock When local codes allow, you may not convert a dryer to the equipment grounding terminal or lead on the data label located behind the door. The power cord electric supply wiring must be...cord attached. WARNING Risk of the line is required. The power cord should be plugged into a 30-ampere receptacle. Electric models - electric model dryers. Electrical connections Before operating or testing, follow all grounding instructions in the "Grounding" section. Canada Only • A 120 / 240 volt, ...
.... A 30-ampere fuse or circuit breaker on both sides of Electric Shock When local codes allow, you may not convert a dryer to the equipment grounding terminal or lead on the data label located behind the door. The power cord electric supply wiring must be...cord attached. WARNING Risk of the line is required. The power cord should be plugged into a 30-ampere receptacle. Electric models - electric model dryers. Electrical connections Before operating or testing, follow all grounding instructions in the "Grounding" section. Canada Only • A 120 / 240 volt, ...

User Manual
Page 19
...What's included Make sure all the parts are included in the product package. If you have a problem with the dryer or the accessories, contact a local Samsung service center or the retailer. Dryer at a glance 06 01 02 Installation 03 01 Worktop 04 Door DV7500K-03381C-02_EN.indd 19 04 05 02 Control... panel 05 Exhaust duct 03 Filter 06 Smart Home Adapter Port English 19 4/7/2016 5:05:40 PM Installation This dryer must be installed...
...What's included Make sure all the parts are included in the product package. If you have a problem with the dryer or the accessories, contact a local Samsung service center or the retailer. Dryer at a glance 06 01 02 Installation 03 01 Worktop 04 Door DV7500K-03381C-02_EN.indd 19 04 05 02 Control... panel 05 Exhaust duct 03 Filter 06 Smart Home Adapter Port English 19 4/7/2016 5:05:40 PM Installation This dryer must be installed...
User Manual
Page 21
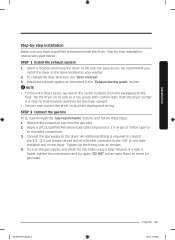
...the floor. STEP 1 Install the exhaust system 1. Install the exhaust system as instructed in the same location as your washer. 2. Tip the dryer on the dryer. Installation Step-by step installation instructions start below. For easy access, we recommend you have a qualified technician install the... these steps. 1. If a leak is required to connect the 3/4" (1.9 cm) female thread end of a flexible connector to the site. Push the dryer so that it lies across both cushion-tops. Connect the gas supply to check for any leaks using a soap solution. An additional fitting is found...
...the floor. STEP 1 Install the exhaust system 1. Install the exhaust system as instructed in the same location as your washer. 2. Tip the dryer on the dryer. Installation Step-by step installation instructions start below. For easy access, we recommend you have a qualified technician install the... these steps. 1. If a leak is required to connect the 3/4" (1.9 cm) female thread end of a flexible connector to the site. Push the dryer so that it lies across both cushion-tops. Connect the gas supply to check for any leaks using a soap solution. An additional fitting is found...
User Manual
Page 22
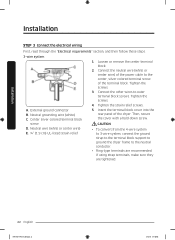
...with a hold-down screw. If using strap terminals, make sure they are recommended. Connect the neutral wire (white or center wire) of the dryer. Center silver-colored terminal block screw D. Tighten the strain relief screws. 5. External ground connector B. Neutral grounding wire (white) C. Installation Installation ... from the 4-wire system to 3-wire system, connect the ground strap to the terminal block support to ground the dryer frame to the neutral conductor. • Ring-type terminals are tightened. 22 English DV7500K-03381C-02_EN.indd 22 4/7/2016 5:05:44 ...
...with a hold-down screw. If using strap terminals, make sure they are recommended. Connect the neutral wire (white or center wire) of the dryer. Center silver-colored terminal block screw D. Tighten the strain relief screws. 5. External ground connector B. Neutral grounding wire (white) C. Installation Installation ... from the 4-wire system to 3-wire system, connect the ground strap to the terminal block support to ground the dryer frame to the neutral conductor. • Ring-type terminals are tightened. 22 English DV7500K-03381C-02_EN.indd 22 4/7/2016 5:05:44 ...
User Manual
Page 23
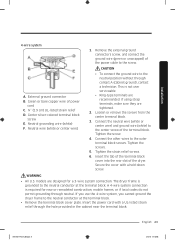
...neutral conductor at the terminal block. • Remove the terminal block cover plate. If using strap terminals, make sure they are recommended. The dryer frame is not user serviceable. • Ring-type terminals are tightened. 2. English 23 DV7500K-03381C-02_EN.indd 23 4/7/2016 5:05:45 ...position without through the hole provided in the cabinet near the terminal block. If you use the 4-wire system, you cannot ground the dryer frame to the center screw of the power cable to the outer terminal block screws. Tighten the strain relief screws. 6. Neutral grounding wire...
...neutral conductor at the terminal block. • Remove the terminal block cover plate. If using strap terminals, make sure they are recommended. The dryer frame is not user serviceable. • Ring-type terminals are tightened. 2. English 23 DV7500K-03381C-02_EN.indd 23 4/7/2016 5:05:45 ...position without through the hole provided in the cabinet near the terminal block. If you use the 4-wire system, you cannot ground the dryer frame to the center screw of the power cable to the outer terminal block screws. Tighten the strain relief screws. 6. Neutral grounding wire...
User Manual
Page 24
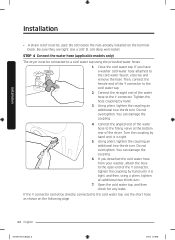
... coupling an additional two-thirds turn . If you detached the cold water hose from your washer, attach the hose to the open end of the dryer. You can damage the coupling. 6. Installation Installation • A strain relief must be connected to a cold water tap using a pliers, tighten an...-02_EN.indd 24 4/7/2016 5:05:45 PM Use a 3/8" (1 cm) deep well socket. STEP 4 Connect the water hose (applicable models only) The dryer must be directly connected to the cold water tap, use the short hose as shown on the terminal block. Close the cold water tap. Using...
... coupling an additional two-thirds turn . If you detached the cold water hose from your washer, attach the hose to the open end of the dryer. You can damage the coupling. 6. Installation Installation • A strain relief must be connected to a cold water tap using a pliers, tighten an...-02_EN.indd 24 4/7/2016 5:05:45 PM Use a 3/8" (1 cm) deep well socket. STEP 4 Connect the water hose (applicable models only) The dryer must be directly connected to the cold water tap, use the short hose as shown on the terminal block. Close the cold water tap. Using...
User Manual
Page 25
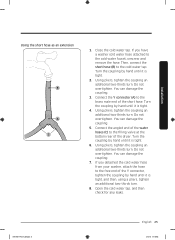
.... You can damage the coupling. 5. Turn the coupling by hand until it is tight. 4. Then, connect the short hose (B) to the free end of the dryer. Using pliers, tighten the coupling an additional two-thirds turn . Do not overtighten. Using pliers, tighten the coupling an additional two-thirds turn . 8. Do not...
.... You can damage the coupling. 5. Turn the coupling by hand until it is tight. 4. Then, connect the short hose (B) to the free end of the dryer. Using pliers, tighten the coupling an additional two-thirds turn . Do not overtighten. Using pliers, tighten the coupling an additional two-thirds turn . 8. Do not...

