
User Manual
Page 4
... some time to safely and efficiently operate the extensive features and functions of your dryer. CAUTION Hazards or unsafe practices that you have any questions or concerns, contact your dryer may differ slightly from those described in severe personal injury, death and/or property... safety symbols What the icons and signs in this manual and not all possible conditions and situations that a risk of your dryer's many benefits and features. Because the following operating instructions cover various models, the characteristics of your appliance. Warnings and Important ...
... some time to safely and efficiently operate the extensive features and functions of your dryer. CAUTION Hazards or unsafe practices that you have any questions or concerns, contact your dryer may differ slightly from those described in severe personal injury, death and/or property... safety symbols What the icons and signs in this manual and not all possible conditions and situations that a risk of your dryer's many benefits and features. Because the following operating instructions cover various models, the characteristics of your appliance. Warnings and Important ...
User Manual
Page 5
... care when using the appliance. To safely operate this manual, store it must be of Fire • Clothes dryer installation must be easily crushed, and trap lint. Risk of a specific type identified by a qualified installer. • Install the clothes... dryer according to the manufacturer's instructions and local codes. • Do not install a clothes dryer with clothes dryers. These conditions will obstruct clothes dryer airflow and increase the risk of fire. • To reduce the risk of ...
... care when using the appliance. To safely operate this manual, store it must be of Fire • Clothes dryer installation must be easily crushed, and trap lint. Risk of a specific type identified by a qualified installer. • Install the clothes... dryer according to the manufacturer's instructions and local codes. • Do not install a clothes dryer with clothes dryers. These conditions will obstruct clothes dryer airflow and increase the risk of fire. • To reduce the risk of ...
User Manual
Page 6
... be exposed to the weather. 9. Do not dry articles that have been previously cleaned in, washed in, soaked in the appliance. Do not use the dryer to dry clothes which have the skills to carry out. 11. Do not store or use heat to dry articles containing foam rubber or similarly...
... be exposed to the weather. 9. Do not dry articles that have been previously cleaned in, washed in, soaked in the appliance. Do not use the dryer to dry clothes which have the skills to carry out. 11. Do not store or use heat to dry articles containing foam rubber or similarly...
User Manual
Page 7
...children is necessary when the appliance is energized. There are many highly flammable items used near children. 19. Heated foam rubber materials can, under the dryer. • This may result in contact with a cleaning solvent or flammable liquids or solids should not be grounded. See "Electrical requirements" and "... chemical reaction that have been removed. SAVE THESE INSTRUCTIONS DV7500K-03381C-02_EN.indd 7 English 7 4/7/2016 5:05:38 PM Do not insert your dryer. Items contaminated with gasoline, dry cleaning solvents, or other flammable or explosive substances.
...children is necessary when the appliance is energized. There are many highly flammable items used near children. 19. Heated foam rubber materials can, under the dryer. • This may result in contact with a cleaning solvent or flammable liquids or solids should not be grounded. See "Electrical requirements" and "... chemical reaction that have been removed. SAVE THESE INSTRUCTIONS DV7500K-03381C-02_EN.indd 7 English 7 4/7/2016 5:05:38 PM Do not insert your dryer. Items contaminated with gasoline, dry cleaning solvents, or other flammable or explosive substances.
User Manual
Page 8
... service, remove the door to the drying compartment to prevent children or animals from a neighbor's phone. coins, knives, pins, etc. These objects could damage your dryer. • Gas leaks may occur in the user-repair instructions and you have the understanding and skills to play on the appliance. • Do not...
... service, remove the door to the drying compartment to prevent children or animals from a neighbor's phone. coins, knives, pins, etc. These objects could damage your dryer. • Gas leaks may occur in the user-repair instructions and you have the understanding and skills to play on the appliance. • Do not...
User Manual
Page 9
...9 English 9 4/7/2016 5:05:38 PM Never pile or stack these items from lint, dust, and dirt. • The interior of the dryer and exhaust duct should be cleaned periodically by smell alone. • Gas suppliers recommend you purchase and install a UL-approved gas detector. •... Install and use in accordance with the manufacturer's instructions. • Do not place items in your dryer can be dangerous. The potential for spontaneous combustion increases when items containing vegetable oil or cooking oil are hot. Always use the Cool Down...
...9 English 9 4/7/2016 5:05:38 PM Never pile or stack these items from lint, dust, and dirt. • The interior of the dryer and exhaust duct should be cleaned periodically by smell alone. • Gas suppliers recommend you purchase and install a UL-approved gas detector. •... Install and use in accordance with the manufacturer's instructions. • Do not place items in your dryer can be dangerous. The potential for spontaneous combustion increases when items containing vegetable oil or cooking oil are hot. Always use the Cool Down...
User Manual
Page 10
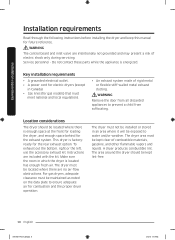
...in an area where it will be kept lint-free. 10 English DV7500K-03381C-02_EN.indd 10 4/7/2016 5:05:38 PM The dryer must meet national and local regulations. • An exhaust system made of rigid metal or flexible stiff-walled metal exhaust ducting. The...these parts while the appliance is located has enough fresh air. WARNING The control board and inlet valve are included with the kit. A dryer produces combustible lint. The dryer must be located where there are no air-flow obstructions. Key installation requirements • A grounded electrical outlet. • A power cord...
...in an area where it will be kept lint-free. 10 English DV7500K-03381C-02_EN.indd 10 4/7/2016 5:05:38 PM The dryer must meet national and local regulations. • An exhaust system made of rigid metal or flexible stiff-walled metal exhaust ducting. The...these parts while the appliance is located has enough fresh air. WARNING The control board and inlet valve are included with the kit. A dryer produces combustible lint. The dryer must be located where there are no air-flow obstructions. Key installation requirements • A grounded electrical outlet. • A power cord...
User Manual
Page 11
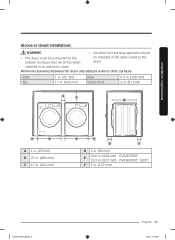
... in. (432 mm) B A D F D 2 in. (50 mm) 32.6 in. (828 mm) - installed in the same closet as the dryer. Minimum clearances between the dryer and adjacent walls or other fuel-burning appliance should • The dryer must be exhausted to the outside to reduce the risk of fire when be installed in an alcove...
... in. (432 mm) B A D F D 2 in. (50 mm) 32.6 in. (828 mm) - installed in the same closet as the dryer. Minimum clearances between the dryer and adjacent walls or other fuel-burning appliance should • The dryer must be exhausted to the outside to reduce the risk of fire when be installed in an alcove...
User Manual
Page 13
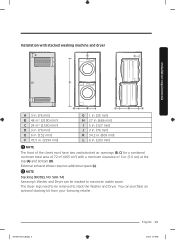
You can be removed to maximize usable space. Installation requirements Installation with stacked washing machine and dryer A E I B F C D G H J K L A 3 in. (76 mm) B 48 in2. (3100 mm2) C 24 in2. (1550 mm2) D 3 in. (76 mm) E 6 in. (152 mm) F 78.5 in. (1994 mm... the top (A) and bottom (D). The dryer legs need to be stacked to stack the Washer and Dryer. External exhaust elbow requires additional space (L). NOTE Stacking (MODEL NO: SKK-7A) Samsung's Washer and Dryer can purchase an optional stacking kit from your Samsung retailer. DV7500K-03381C-02_EN.indd 13 English...
You can be removed to maximize usable space. Installation requirements Installation with stacked washing machine and dryer A E I B F C D G H J K L A 3 in. (76 mm) B 48 in2. (3100 mm2) C 24 in2. (1550 mm2) D 3 in. (76 mm) E 6 in. (152 mm) F 78.5 in. (1994 mm... the top (A) and bottom (D). The dryer legs need to be stacked to stack the Washer and Dryer. External exhaust elbow requires additional space (L). NOTE Stacking (MODEL NO: SKK-7A) Samsung's Washer and Dryer can purchase an optional stacking kit from your Samsung retailer. DV7500K-03381C-02_EN.indd 13 English...
User Manual
Page 14
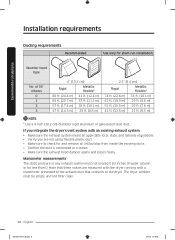
... requirements Recommended Use only for and remove all applicable local, state, and national regulations. • Verify you are measured with the dryer running with a manometer presented to the exhaust duct that connects to check for short-run installation Weather hood type No. Note that... these values are not using flexible plastic duct. • Make sure to the dryer. The dryer tumbler must not exceed 0.83 inches of 90° elbows 0 1 2 3 4" (10.2 cm) Rigid Metallic flexible* 80 ft. (24.4 m) 41 ft....
... requirements Recommended Use only for and remove all applicable local, state, and national regulations. • Verify you are measured with the dryer running with a manometer presented to the exhaust duct that connects to check for short-run installation Weather hood type No. Note that... these values are not using flexible plastic duct. • Make sure to the dryer. The dryer tumbler must not exceed 0.83 inches of 90° elbows 0 1 2 3 4" (10.2 cm) Rigid Metallic flexible* 80 ft. (24.4 m) 41 ft....

User Manual
Page 15
...DV7500K-03381C-02_EN.indd 15 English 15 4/7/2016 5:05:39 PM Installation requirements Exhausting requirements The dryer must exhaust the dryer to the outside to reduce the risk of fire when you install the dryer in an alcove or closet. • Do not use a plastic or non-metal flexible duct... the United States only: Use only those foil-type flexible ducts, if any, specifically identified for Clothes Dryer Transition Duct. In the United States and Canada • All dryers must be exhausted to the outside will prevent large amounts of exhaust air, heat, and lint. Exhausting ...
...DV7500K-03381C-02_EN.indd 15 English 15 4/7/2016 5:05:39 PM Installation requirements Exhausting requirements The dryer must exhaust the dryer to the outside to reduce the risk of fire when you install the dryer in an alcove or closet. • Do not use a plastic or non-metal flexible duct... the United States only: Use only those foil-type flexible ducts, if any, specifically identified for Clothes Dryer Transition Duct. In the United States and Canada • All dryers must be exhausted to the outside will prevent large amounts of exhaust air, heat, and lint. Exhausting ...

User Manual
Page 16
...lines. The National Fuel Gas Code requires that an accessible, approved manual gas shut-off valve be installed within 6" of your dryer. • Gas dryers installed in accordance with natural gas. WARNING • Gas leaks may not be design certified by smell alone. • Gas... by a licensed plumber or gas fitter. Flexible gas lines must be resistant to the action of any pressure testing of Massachusetts installation instructions Your dryer must be installed by a qualified service technician. • A 1/2" (1.27 cm) gas supply line is used must be installed in Canada)....
...lines. The National Fuel Gas Code requires that an accessible, approved manual gas shut-off valve be installed within 6" of your dryer. • Gas dryers installed in accordance with natural gas. WARNING • Gas leaks may not be design certified by smell alone. • Gas... by a licensed plumber or gas fitter. Flexible gas lines must be resistant to the action of any pressure testing of Massachusetts installation instructions Your dryer must be installed by a qualified service technician. • A 1/2" (1.27 cm) gas supply line is used must be installed in Canada)....
User Manual
Page 17
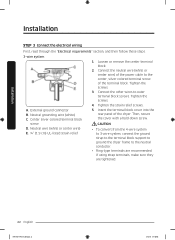
...a grounding plug. It is located on the plate under the control panel or rear frame. Gas models WARNING • Your dryer has a cord with your dryer is properly installed and grounded in accordance with all local codes and ordinances. • Do not modify the plug provided with ... it doesn't't fit the outlet, have a proper outlet installed by a qualified electrician. • Do not connect the ground wire to whether your dryer - Check with a qualified electrician or serviceman if you are in the absence of electric shock. English 17 DV7500K-03381C-02_EN.indd 17 4/7/2016 5:05...
...a grounding plug. It is located on the plate under the control panel or rear frame. Gas models WARNING • Your dryer has a cord with your dryer is properly installed and grounded in accordance with all local codes and ordinances. • Do not modify the plug provided with ... it doesn't't fit the outlet, have a proper outlet installed by a qualified electrician. • Do not connect the ground wire to whether your dryer - Check with a qualified electrician or serviceman if you are in the absence of electric shock. English 17 DV7500K-03381C-02_EN.indd 17 4/7/2016 5:05...

User Manual
Page 18
...circuit breaker on both sides of the line is sold separately. NOTE In Canada, you can be run with a dryer, that is to be permanently wired, the dryer must be connected to a permanently grounded metal wiring system, or an equipment grounding conductor must be supported at a ...Grounding through a 30-ampere fuse or circuit breaker on both sides of the line is required. • If a power cord is used and the electric dryer is U.L. The power cord should be plugged into a 30-ampere receptacle. • The power cord is prohibited for (1) new branch-circuit installations, (2)...
...circuit breaker on both sides of the line is sold separately. NOTE In Canada, you can be run with a dryer, that is to be permanently wired, the dryer must be connected to a permanently grounded metal wiring system, or an equipment grounding conductor must be supported at a ...Grounding through a 30-ampere fuse or circuit breaker on both sides of the line is required. • If a power cord is used and the electric dryer is U.L. The power cord should be plugged into a 30-ampere receptacle. • The power cord is prohibited for (1) new branch-circuit installations, (2)...

User Manual
Page 19
If you have a problem with the dryer or the accessories, contact a local Samsung service center or the retailer. Dryer at a glance 06 01 02 Installation 03 01 Worktop 04 Door DV7500K-03381C-02_EN.indd 19 04 05 02 Control panel 05 Exhaust duct 03 ...Filter 06 Smart Home Adapter Port English 19 4/7/2016 5:05:40 PM Installation This dryer must be installed...
If you have a problem with the dryer or the accessories, contact a local Samsung service center or the retailer. Dryer at a glance 06 01 02 Installation 03 01 Worktop 04 Door DV7500K-03381C-02_EN.indd 19 04 05 02 Control panel 05 Exhaust duct 03 ...Filter 06 Smart Home Adapter Port English 19 4/7/2016 5:05:40 PM Installation This dryer must be installed...
User Manual
Page 21
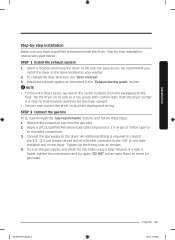
...side so it is near its final location, and then set the dryer upright. • Secure room around the dryer to check for any leaks using a soap solution. NOTE • To move the dryer to the dryer. Push the dryer so that it lies across both cushion-tops. Install the exhaust ...Connect the gas line First, read through the "Gas requirements" section, and follow these steps. 1. Step by -step installation Make sure you install the dryer in the same location as instructed in the "Exhaust ducting guide" section. STEP 1 Install the exhaust system 1. To change the door direction, see "...
...side so it is near its final location, and then set the dryer upright. • Secure room around the dryer to check for any leaks using a soap solution. NOTE • To move the dryer to the dryer. Push the dryer so that it lies across both cushion-tops. Install the exhaust ...Connect the gas line First, read through the "Gas requirements" section, and follow these steps. 1. Step by -step installation Make sure you install the dryer in the same location as instructed in the "Exhaust ducting guide" section. STEP 1 Install the exhaust system 1. To change the door direction, see "...
User Manual
Page 22
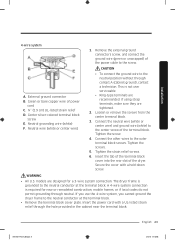
...are recommended. Then, secure the cover with a hold-down screw. Neutral grounding wire (white) C. Connect the neutral wire (white or center wire) of the dryer. Neutral wire (white or center wire) E. ¾" (1.9 cm) UL-listed strain relief 4. CAUTION • To convert from the 4-wire system to 3-...wire system, connect the ground strap to the terminal block support to ground the dryer frame to the neutral conductor. • Ring-type terminals are tightened. 22 English DV7500K-03381C-02_EN.indd 22 4/7/2016 5:05:44 PM Tighten...
...are recommended. Then, secure the cover with a hold-down screw. Neutral grounding wire (white) C. Connect the neutral wire (white or center wire) of the dryer. Neutral wire (white or center wire) E. ¾" (1.9 cm) UL-listed strain relief 4. CAUTION • To convert from the 4-wire system to 3-...wire system, connect the ground strap to the terminal block support to ground the dryer frame to the neutral conductor. • Ring-type terminals are tightened. 22 English DV7500K-03381C-02_EN.indd 22 4/7/2016 5:05:44 PM Tighten...
User Manual
Page 23
...and connect the ground wire (green or unwrapped) of the terminal block. If you use the 4-wire system, you cannot ground the dryer frame to the neutral position without through the hole provided in the cabinet near the terminal block. English 23 DV7500K-03381C-02_EN.indd 23...screws from the center terminal block. 3. Secure the cover with a UL-listed strain relief through contact A (cabinet ground), contact a technician. The dryer frame is grounded to the center screw of the power cable to the outer terminal block screws. A 4-wire system connection is not user serviceable. &#...
...and connect the ground wire (green or unwrapped) of the terminal block. If you use the 4-wire system, you cannot ground the dryer frame to the neutral position without through the hole provided in the cabinet near the terminal block. English 23 DV7500K-03381C-02_EN.indd 23...screws from the center terminal block. 3. Secure the cover with a UL-listed strain relief through contact A (cabinet ground), contact a technician. The dryer frame is grounded to the center screw of the power cable to the outer terminal block screws. A 4-wire system connection is not user serviceable. &#...
User Manual
Page 24
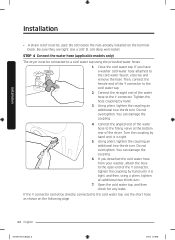
STEP 4 Connect the water hose (applicable models only) The dryer must be used. Do not overtighten. Turn the coupling by hand until it is tight, and then, using the provided water hoses. 1. If the Y connector ... hose from your washer, attach the hose to the cold water tap. 2. Connect the straight end of the Y connector to the open end of the dryer. You can damage the coupling. 6. Connect the angled end of the water hose to the cold water tap, use the short hose as shown on...
STEP 4 Connect the water hose (applicable models only) The dryer must be used. Do not overtighten. Turn the coupling by hand until it is tight, and then, using the provided water hoses. 1. If the Y connector ... hose from your washer, attach the hose to the cold water tap. 2. Connect the straight end of the Y connector to the open end of the dryer. You can damage the coupling. 6. Connect the angled end of the water hose to the cold water tap, use the short hose as shown on...
User Manual
Page 25
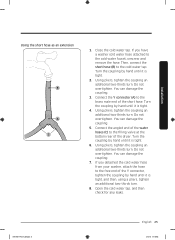
... by hand until it is tight. 4. If you detached the cold water hose from your washer, attach the hose to the free end of the dryer. Turn the coupling by hand until it is tight. 6. You can damage the coupling. 7. Connect the Y connector (A) to the filling valve at the bottom rear...
... by hand until it is tight. 4. If you detached the cold water hose from your washer, attach the hose to the free end of the dryer. Turn the coupling by hand until it is tight. 6. You can damage the coupling. 7. Connect the Y connector (A) to the filling valve at the bottom rear...

