User Manual (ENGLISH)
Page 1
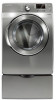
To receive more complete service, please register your product at www.samsung.com/global/register DV448AEG-02555A_EN.indd 1 2008-03-25 ¿ÀÈÄ 6:25:35 DV448AE* DV448AG* Gas and Electric Dryer user manual imagine the possibilities Thank you for purchasing this Samsung product.
To receive more complete service, please register your product at www.samsung.com/global/register DV448AEG-02555A_EN.indd 1 2008-03-25 ¿ÀÈÄ 6:25:35 DV448AE* DV448AG* Gas and Electric Dryer user manual imagine the possibilities Thank you for purchasing this Samsung product.
User Manual (ENGLISH)
Page 2
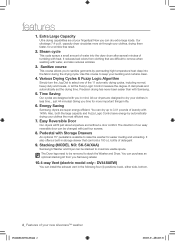
... your bedding and curtains clean. 4. All our dryers are super energy efficient. Stacking (MODEL NO: SK-5A/XAA) Samsung's Washer and Dryer can be changed with you can install the exhaust vent in less time... Energy Saving Samsung dryers are designed to keep your clothes in the following... four (4) positions: back, either side, bottom. 2_ Features of laundry with Samsung. 5. You can hold a 100 oz. Easy Reversible Door Our dryers will fit just about anywhere and without a door conflict. Our ultralarge 7.4 cu.ft. just 44 minutes! ...
... your bedding and curtains clean. 4. All our dryers are super energy efficient. Stacking (MODEL NO: SK-5A/XAA) Samsung's Washer and Dryer can be changed with you can install the exhaust vent in less time... Energy Saving Samsung dryers are designed to keep your clothes in the following... four (4) positions: back, either side, bottom. 2_ Features of laundry with Samsung. 5. You can hold a 100 oz. Easy Reversible Door Our dryers will fit just about anywhere and without a door conflict. Our ultralarge 7.4 cu.ft. just 44 minutes! ...
User Manual (ENGLISH)
Page 3
...sense, caution, and care when installing, maintaining, or operating your dryer. Call the service center for use with flexible plastic venting materials. This manual contains valuable information on your new Samsung Dryer. Flexible venting materials are known to prevent electric shock. It is... grounded to collapse, be of a specific type identified by a qualified installer. • Install the clothes dryer according to take the time to read...
...sense, caution, and care when installing, maintaining, or operating your dryer. Call the service center for use with flexible plastic venting materials. This manual contains valuable information on your new Samsung Dryer. Flexible venting materials are known to prevent electric shock. It is... grounded to collapse, be of a specific type identified by a qualified installer. • Install the clothes dryer according to take the time to read...
User Manual (ENGLISH)
Page 4
... specifically recommended in front of the fabric softener or product. Do not reach into the appliance when the drum is used in the dryer until all traces of all instructions before or after each load. Keep the area around the exhaust opening and surrounding areas free from ... cleaning solvents, or other flammable or explosive substances. Do not use fabric softeners or products to eliminate static unless recommended for dryer use any phone in your dryer from service, remove the door to the drying compartment to prevent children or animals from lint, dust, and dirt. safety ...
... specifically recommended in front of the fabric softener or product. Do not reach into the appliance when the drum is used in the dryer until all traces of all instructions before or after each load. Keep the area around the exhaust opening and surrounding areas free from ... cleaning solvents, or other flammable or explosive substances. Do not use fabric softeners or products to eliminate static unless recommended for dryer use any phone in your dryer from service, remove the door to the drying compartment to prevent children or animals from lint, dust, and dirt. safety ...
User Manual (ENGLISH)
Page 5
Because of continuing product improvements, Samsung reserves the right to heat. Install and use the ... before selecting cabinetry, making cutouts, or beginning installation. These objects could damage your system, resulting in your dryer. Even after being washed, these items may occur in a dangerous situation. Washing these items, allowing an ...in accordance with vegetable oil or cooking oil. For complete details, see the Installation Instructions packed with your dryer that is not grounded adequately and in the oil to occur. Do not wash clothing with extra detergent...
Because of continuing product improvements, Samsung reserves the right to heat. Install and use the ... before selecting cabinetry, making cutouts, or beginning installation. These objects could damage your system, resulting in your dryer. Even after being washed, these items may occur in a dangerous situation. Washing these items, allowing an ...in accordance with vegetable oil or cooking oil. For complete details, see the Installation Instructions packed with your dryer that is not grounded adequately and in the oil to occur. Do not wash clothing with extra detergent...
User Manual (ENGLISH)
Page 6
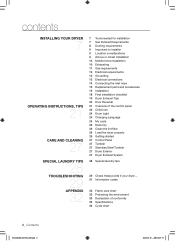
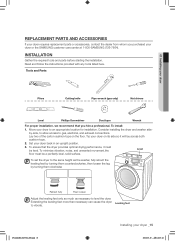
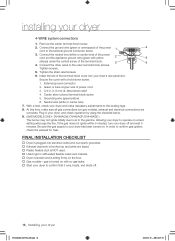
... requirements 12 Grounding 13 Electrical connections 14 Connecting the inlet hose 15 Replacement parts and accessories 15 Installation 18 Final installation checklist 19 Dryer Exhaust Tips 20 Door Reversal 21 Overview of the control panel 23 Child lock 24 Drum Light 24 Changing Language 24 My cycle ...Rack Dry 26 Clean the lint filter 26 Load the dryer properly 26 Getting started 27 Control Panel 27 Tumbler 27 Stainless Steel Tumbler 27 Dryer Exterior 27 Dryer Exhaust System 28 Special laundry tips 29 Check these points if your dryer... 31 Information codes 32 Fabric care chart 33 Protecting...
... requirements 12 Grounding 13 Electrical connections 14 Connecting the inlet hose 15 Replacement parts and accessories 15 Installation 18 Final installation checklist 19 Dryer Exhaust Tips 20 Door Reversal 21 Overview of the control panel 23 Child lock 24 Drum Light 24 Changing Language 24 My cycle ...Rack Dry 26 Clean the lint filter 26 Load the dryer properly 26 Getting started 27 Control Panel 27 Tumbler 27 Stainless Steel Tumbler 27 Dryer Exterior 27 Dryer Exhaust System 28 Special laundry tips 29 Check these points if your dryer... 31 Information codes 32 Fabric care chart 33 Protecting...
User Manual (ENGLISH)
Page 7
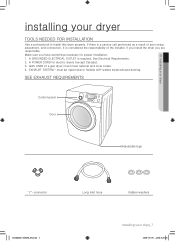
...rigid metal or flexible stiff-walled metal exhaust ducting. must meet national and local codes. 4. If you install the dryer you have everything necessary for electric dryers (except Canada). 3. A POWER CORD for proper installation. 1. EXHAUST SYSTEM - Make sure you are responsible. ...If there is a service call performed as a result of the installer. See Electrical Requirements. 2. 01 Installing your dryer installing your dryer_7 2008-03-25 ¿ÀÈÄ 6:25:39 A GROUNDED ELECTRICAL OUTLET is considered the responsibility of poor ...
...rigid metal or flexible stiff-walled metal exhaust ducting. must meet national and local codes. 4. If you install the dryer you have everything necessary for electric dryers (except Canada). 3. A POWER CORD for proper installation. 1. EXHAUST SYSTEM - Make sure you are responsible. ...If there is a service call performed as a result of the installer. See Electrical Requirements. 2. 01 Installing your dryer installing your dryer_7 2008-03-25 ¿ÀÈÄ 6:25:39 A GROUNDED ELECTRICAL OUTLET is considered the responsibility of poor ...
User Manual (ENGLISH)
Page 8
....) 10.1 m (33 ft.) 18.9 m (62 ft.) 8.8 m (29 ft.) 15.5 m (51 ft.) 7.6 m (25 ft.) 12.5 m (41 ft.) 6.5 m (21 ft.) 8_ Installing your dryer DUCTING REQUIREMENTS • Use a 4-inch (10.2 cm) diameter rigid aluminum or rigid galvanized steel duct. • Do not use a smaller duct. • Ducts larger than... and clean at least 12 inches (30.5 cm) of clearance between the bottom of flexible duct in increased lint accumulation. installing your dryer DV448AEG-02555A_EN.indd 8 2008-03-25 ¿ÀÈÄ 6:25:40 of wildlife. Lint accumulation should point down towards the ...
....) 10.1 m (33 ft.) 18.9 m (62 ft.) 8.8 m (29 ft.) 15.5 m (51 ft.) 7.6 m (25 ft.) 12.5 m (41 ft.) 6.5 m (21 ft.) 8_ Installing your dryer DUCTING REQUIREMENTS • Use a 4-inch (10.2 cm) diameter rigid aluminum or rigid galvanized steel duct. • Do not use a smaller duct. • Ducts larger than... and clean at least 12 inches (30.5 cm) of clearance between the bottom of flexible duct in increased lint accumulation. installing your dryer DV448AEG-02555A_EN.indd 8 2008-03-25 ¿ÀÈÄ 6:25:40 of wildlife. Lint accumulation should point down towards the ...
User Manual (ENGLISH)
Page 9
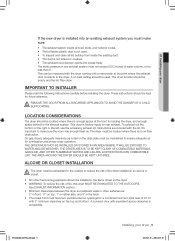
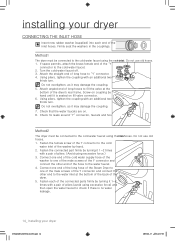
... in any exhaust system must make sure the room has enough fresh air. IMPORTANT TO INSTALLER Please read the following instructions carefully before installing the dryer. Instructions are : 2" in front, 17" on top, 1" on either side, and 5" in the same closet as noted on the top and bottom.... See EXHAUST INFORMATION section. • Minimum clearances between the dryer and adjacent walls or other fuel-burning appliance should be installed in the back. • The closet front must be located where there is no...
... in any exhaust system must make sure the room has enough fresh air. IMPORTANT TO INSTALLER Please read the following instructions carefully before installing the dryer. Instructions are : 2" in front, 17" on top, 1" on either side, and 5" in the same closet as noted on the top and bottom.... See EXHAUST INFORMATION section. • Minimum clearances between the dryer and adjacent walls or other fuel-burning appliance should be installed in the back. • The closet front must be located where there is no...

User Manual (ENGLISH)
Page 10
... plastic, non-metal, or combustible, replace it with metal. The exhaust duct may not terminate underneath the mobile home. When installing a dryer in mobile homes must be exhausted to the outside to the mobile home structure, using materials that has adequate fresh air. In the United... from being blown into the duct and catch lint. NEVER USE A PLASTIC OR NON-METAL FLEXIBLE DUCT. Call 1-800-SAMSUNG for more information. EXHAUSTING Exhausting the dryer to the outside will not support combustion. Use only a metal exhaust duct that extend into the room. Locate an area...
... plastic, non-metal, or combustible, replace it with metal. The exhaust duct may not terminate underneath the mobile home. When installing a dryer in mobile homes must be exhausted to the outside to the mobile home structure, using materials that has adequate fresh air. In the United... from being blown into the duct and catch lint. NEVER USE A PLASTIC OR NON-METAL FLEXIBLE DUCT. Call 1-800-SAMSUNG for more information. EXHAUSTING Exhausting the dryer to the outside will not support combustion. Use only a metal exhaust duct that extend into the room. Locate an area...
User Manual (ENGLISH)
Page 11
... of 3' (36"). - Flexible gas lines must be raised 18 inches (46 cm) above the floor. WARNING - Install and use in your dryer, the connector must be design certified by a qualified service technician. Additionally, a 1/8" (0.3 cm) N.P.T. (National Pipe Thread) plugged tapping, accessible ..., most local gas utilities will inspect a gas appliance installation. DO NOT reuse old flexible metal gas lines. 01 Installing your dryer. Your dryer uses an automatic ignition system to use with natural gas. GAS IGNITION - Gas suppliers recommend you plan to ignite the burner....
... of 3' (36"). - Flexible gas lines must be raised 18 inches (46 cm) above the floor. WARNING - Install and use in your dryer, the connector must be design certified by a qualified service technician. Additionally, a 1/8" (0.3 cm) N.P.T. (National Pipe Thread) plugged tapping, accessible ..., most local gas utilities will inspect a gas appliance installation. DO NOT reuse old flexible metal gas lines. 01 Installing your dryer. Your dryer uses an automatic ignition system to use with natural gas. GAS IGNITION - Gas suppliers recommend you plan to ignite the burner....

User Manual (ENGLISH)
Page 12
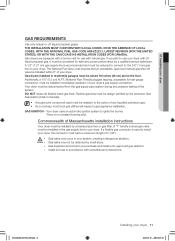
... outlet that is properly grounded. All gas installations must be plugged into an appropriate outlet that is your responsibility to whether your dryer - B149 Installation Codes - In the event of malfunction or breakdown, the ground will reduce the risk of electrical shock by ...Improper connection of the equipment grounding conductor can result in doubt as to provide adequate electrical services for the electrical current. GROUNDING This dryer must be grounded. NEVER CONNECT GROUND WIRE TO PLASTIC PLUMBING LINES, GAS LINES, OR HOT WATER PIPES. Latest Revisions and local ...
... outlet that is properly grounded. All gas installations must be plugged into an appropriate outlet that is your responsibility to whether your dryer - B149 Installation Codes - In the event of malfunction or breakdown, the ground will reduce the risk of electrical shock by ...Improper connection of the equipment grounding conductor can result in doubt as to provide adequate electrical services for the electrical current. GROUNDING This dryer must be grounded. NEVER CONNECT GROUND WIRE TO PLASTIC PLUMBING LINES, GAS LINES, OR HOT WATER PIPES. Latest Revisions and local ...
User Manual (ENGLISH)
Page 13
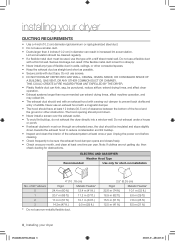
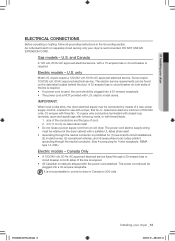
... breaker is recommended. and Canada A 120 volt, 60 Hz AC approved electrical service, with tinned leads. 1. IMPORTANT: When local codes allow, the dryer electrical supply may be connected by means of a new power supply cord kit, marked for use with a suitable UL-listed strain relief. • ...or circuit breaker on both sides of cord. 2. 3/4" (1.9 cm) UL-listed strain relief • Do not reuse a power supply cord from an old dryer. Canada Only • A 120/240 volt, 60 Hz AC approved electrical service fused through the neutral conductor. (Use 4-prong plug for (1) new branch...
... breaker is recommended. and Canada A 120 volt, 60 Hz AC approved electrical service, with tinned leads. 1. IMPORTANT: When local codes allow, the dryer electrical supply may be connected by means of a new power supply cord kit, marked for use with a suitable UL-listed strain relief. • ...or circuit breaker on both sides of cord. 2. 3/4" (1.9 cm) UL-listed strain relief • Do not reuse a power supply cord from an old dryer. Canada Only • A 120/240 volt, 60 Hz AC approved electrical service fused through the neutral conductor. (Use 4-prong plug for (1) new branch...
User Manual (ENGLISH)
Page 14
...the cold water faucet off. 3. Check that the water faucets are on coupling by hand until it is no water leakage. 14_ Installing your dryer CONNECTING THE INLET HOSE Insert new rubber washer (supplied) into each of the connected parts firmly by turning it may damage the coupling. 7. ... Fasten each end of the "Y" connector to the cold water faucet using excessive force.) 3. Firmly seat the washers in the couplings. Method1 The dryer must be connected to the cold water faucet using excessive force) and then open the water faucet to the water faucet. 4. Do not use old...
...the cold water faucet off. 3. Check that the water faucets are on coupling by hand until it is no water leakage. 14_ Installing your dryer CONNECTING THE INLET HOSE Insert new rubber washer (supplied) into each of the connected parts firmly by turning it may damage the coupling. 7. ... Fasten each end of the "Y" connector to the cold water faucet using excessive force.) 3. Firmly seat the washers in the couplings. Method1 The dryer must be connected to the cold water faucet using excessive force) and then open the water faucet to the water faucet. 4. Do not use old...
User Manual (ENGLISH)
Page 15
... loosen Adjust the leveling feet only as much as necessary to gas, electrical, and exhaust connections. DV448AEG-02555A_EN.indd 15 Installing your dryer or the SAMSUNG customer care center at 1-800-SAMSUNG (726-7864). Read and follow the instructions provided with any tools listed here. by turning them counterclockwise, then loosen the leg...
... loosen Adjust the leveling feet only as much as necessary to gas, electrical, and exhaust connections. DV448AEG-02555A_EN.indd 15 Installing your dryer or the SAMSUNG customer care center at 1-800-SAMSUNG (726-7864). Read and follow the instructions provided with any tools listed here. by turning them counterclockwise, then loosen the leg...
User Manual (ENGLISH)
Page 16
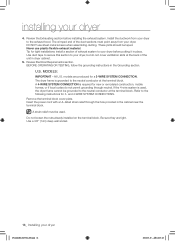
... to the exhaust hood. Be sure they are produced for tight installations: install a section of the unit in place. installing your dryer DV448AEG-02555A_EN.indd 16 2008-03-25 ¿ÀÈÄ 6:25:48 Use duct tape to secure this section to the ... do not permit grounding through the hole provided in the Grounding section. Review the Exhausting section before putting it in dryer cabinet. 5. Install the ductwork from your dryer before installing the exhaust system. Never use sheet metal screws when assembling ducting. Tip for a 3-WIRE SYSTEM CONNECTION. Review...
... to the exhaust hood. Be sure they are produced for tight installations: install a section of the unit in place. installing your dryer DV448AEG-02555A_EN.indd 16 2008-03-25 ¿ÀÈÄ 6:25:48 Use duct tape to secure this section to the ... do not permit grounding through the hole provided in the Grounding section. Review the Exhausting section before putting it in dryer cabinet. 5. Install the ductwork from your dryer before installing the exhaust system. Never use sheet metal screws when assembling ducting. Tip for a 3-WIRE SYSTEM CONNECTION. Review...
User Manual (ENGLISH)
Page 17
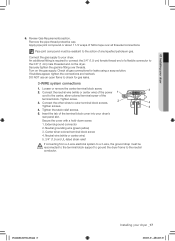
... a 4-wire electrical system to a 3-wire, the ground strap must be WARNING reconnected to the terminal block support to ground the dryer frame to your dryer _17 2008-03-25 ¿ÀÈÄ 6:25:49 Connect the gas supply to the neutral conductor. If bubbles appear, ...wire) of the power cord to the center, silver-colored terminal screw of a flexible connector to the action of the terminal block cover into your dryer 6. Tighten the strain relief screws. 5. Tighten screws. 4. Center silver-colored terminal block screw 4. Loosen or remove the center terminal block screw....
... a 4-wire electrical system to a 3-wire, the ground strap must be WARNING reconnected to the terminal block support to ground the dryer frame to your dryer _17 2008-03-25 ¿ÀÈÄ 6:25:49 Connect the gas supply to the neutral conductor. If bubbles appear, ...wire) of the power cord to the center, silver-colored terminal screw of a flexible connector to the action of the terminal block cover into your dryer 6. Tighten the strain relief screws. 5. Tighten screws. 4. Center silver-colored terminal block screw 4. Loosen or remove the center terminal block screw....
User Manual (ENGLISH)
Page 18
... (white or center wire) 7. DV448AGW, DV448AGP, DV448AGE ) The burner may not ignite initially due to the outer terminal block screws. Be sure the gas supply to the external ground conductor screw. 3. Insert the tab of power cord 3. 3/4 in your dryer has been turned on. Green or bare copper...center wire) of the power cord and the appliance ground wire (green with yellow stripes) under the central screw of the power cord to your dryer, and check operation by using the checklist below. 9. (GAS MODELS ONLY- Center silver-colored terminal block screw 5. Remove the center terminal block ...
... (white or center wire) 7. DV448AGW, DV448AGP, DV448AGE ) The burner may not ignite initially due to the outer terminal block screws. Be sure the gas supply to the external ground conductor screw. 3. Insert the tab of power cord 3. 3/4 in your dryer has been turned on. Green or bare copper...center wire) of the power cord and the appliance ground wire (green with yellow stripes) under the central screw of the power cord to your dryer, and check operation by using the checklist below. 9. (GAS MODELS ONLY- Center silver-colored terminal block screw 5. Remove the center terminal block ...
User Manual (ENGLISH)
Page 19
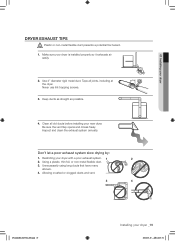
... TIPS Plastic or non-metal flexible duct presents a potential fire hazard. 01 Installing your dryer with a poor exhaust system. 1 2 2. Keep ducts as straight as possible. 4. Never use lint-trapping screws. 3. Inspect and clean the exhaust system annually. Unnecessarily .... Using a plastic, thin foil, or non-metal flexible duct. 3. Make sure your dryer _19 2008-03-25 ¿ÀÈÄ 6:25:52 Clean all joints, including at the dryer. Tape all old ducts before installing your new dryer. WARNING 1. Use 4" diameter rigid metal duct. Don't let a poor exhaust system slow...
... TIPS Plastic or non-metal flexible duct presents a potential fire hazard. 01 Installing your dryer with a poor exhaust system. 1 2 2. Keep ducts as straight as possible. 4. Never use lint-trapping screws. 3. Inspect and clean the exhaust system annually. Unnecessarily .... Using a plastic, thin foil, or non-metal flexible duct. 3. Make sure your dryer _19 2008-03-25 ¿ÀÈÄ 6:25:52 Clean all joints, including at the dryer. Tape all old ducts before installing your new dryer. WARNING 1. Use 4" diameter rigid metal duct. Don't let a poor exhaust system slow...
User Manual (ENGLISH)
Page 20
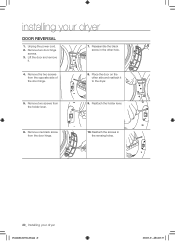
Reassemble the black screw in the remaing holes. 20_ Installing your dryer DOOR REVERSAL 1. Unplug the power cord. 2. Remove two door hinge screws. 3. Reattach the holder lever. 6. Place the door on the other hole. 4. Remove the two ... one black screw from the opposite side of the door hinge. 8. Lift the door and remove it to the dryer. 5. Reattach the screws in the other side and reattach it . 7. installing your dryer DV448AEG-02555A_EN.indd 20 2008-03-25 ¿ÀÈÄ 6:25:55 Remove two screws from the holder...
Reassemble the black screw in the remaing holes. 20_ Installing your dryer DOOR REVERSAL 1. Unplug the power cord. 2. Remove two door hinge screws. 3. Reattach the holder lever. 6. Place the door on the other hole. 4. Remove the two ... one black screw from the opposite side of the door hinge. 8. Lift the door and remove it to the dryer. 5. Reattach the screws in the other side and reattach it . 7. installing your dryer DV448AEG-02555A_EN.indd 20 2008-03-25 ¿ÀÈÄ 6:25:55 Remove two screws from the holder...


