User Manual
Page 1
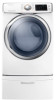
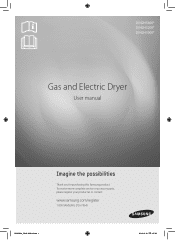
DV42H5400* DV42H5200* DV42H5000* Gas and Electric Dryer User manual Imagine the possibilities Thank you for purchasing this Samsung product. To receive more complete service or accessory parts, please register your product at or contact: www.samsung.com/register 1-800-SAMSUNG (726-7864) DV425000_DC68-03381A.indd 1 2013-12-19 �� 1:07:09
DV42H5400* DV42H5200* DV42H5000* Gas and Electric Dryer User manual Imagine the possibilities Thank you for purchasing this Samsung product. To receive more complete service or accessory parts, please register your product at or contact: www.samsung.com/register 1-800-SAMSUNG (726-7864) DV425000_DC68-03381A.indd 1 2013-12-19 �� 1:07:09
User Manual
Page 2
... 9 Grounding 9 Gas models 9 Electric models 9 Location considerations 10 Alcove or closet installations 10 Ducting requirements 12 Exhausting 13 Dryer exhaust tips 14 Gas requirements 15 Commonwealth of massachusetts installation instructions 15 Electrical requirements 16 Electrical connections 16 Connecting the inlet hose ... 19 Door reversal 20 Final installation checklist 21 Operating instructions, tips 22 Overview of the control panel 22 Load the dryer properly 26 Getting started 26 Rack dry (DV42H5400* Only 28 Child Lock 29 Drum Light 29 English - 2 DV425000_DC68...
... 9 Grounding 9 Gas models 9 Electric models 9 Location considerations 10 Alcove or closet installations 10 Ducting requirements 12 Exhausting 13 Dryer exhaust tips 14 Gas requirements 15 Commonwealth of massachusetts installation instructions 15 Electrical requirements 16 Electrical connections 16 Connecting the inlet hose ... 19 Door reversal 20 Final installation checklist 21 Operating instructions, tips 22 Overview of the control panel 22 Load the dryer properly 26 Getting started 26 Rack dry (DV42H5400* Only 28 Child Lock 29 Drum Light 29 English - 2 DV425000_DC68...
User Manual
Page 3
Sound Off 29 My Cycle 30 Smart Care 30 Care and cleaning 31 Control panel 31 Tumbler 31 Stainless steel tumbler 31 Dryer exterior 31 Dryer exhaust system 31 Clean the lint filter 31 Special laundry tips 32 Special laundry tips 32 Troubleshooting 33 Check these points if your dryer 33 Information codes 34 Appendix 35 Fabric care chart 35 Protecting the environment 36 Declaration of conformity 36 Specifications 36 DV425000_DC68-03381A.indd 3 English - 3 2013-12-19 �� 1:07:09
Sound Off 29 My Cycle 30 Smart Care 30 Care and cleaning 31 Control panel 31 Tumbler 31 Stainless steel tumbler 31 Dryer exterior 31 Dryer exhaust system 31 Clean the lint filter 31 Special laundry tips 32 Special laundry tips 32 Troubleshooting 33 Check these points if your dryer 33 Information codes 34 Appendix 35 Fabric care chart 35 Protecting the environment 36 Declaration of conformity 36 Specifications 36 DV425000_DC68-03381A.indd 3 English - 3 2013-12-19 �� 1:07:09
User Manual
Page 4
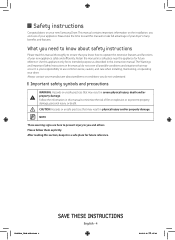
... possible conditions and situations that you need to know how to ensure that may occur. This manual contains important information on your new Samsung Dryer. It is your responsibility to take the time to read this appliance only for future reference. DV425000_DC68-03381A.indd 4 SAVE THESE INSTRUCTIONS... in severe physical injury, death and/or property damage. After reading this manual to use , and care of your dryer's many benefits and features. Safety instructions Congratulations on the installation, use common sense, caution, and care when installing, maintaining, or operating...
... possible conditions and situations that you need to know how to ensure that may occur. This manual contains important information on your new Samsung Dryer. It is your responsibility to take the time to read this appliance only for future reference. DV425000_DC68-03381A.indd 4 SAVE THESE INSTRUCTIONS... in severe physical injury, death and/or property damage. After reading this manual to use , and care of your dryer's many benefits and features. Safety instructions Congratulations on the installation, use common sense, caution, and care when installing, maintaining, or operating...
User Manual
Page 5
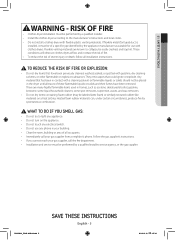
.... • Immediately call the fire department. • Installation and service must be performed by a qualified installer. • Install the clothes dryer according to collapse, be of all installation instructions. DV425000_DC68-03381A.indd 5 SAVE THESE INSTRUCTIONS English - 5 2013-12-19 �� 1:...If flexible metal (foil type) duct is installed, it must be easily crushed, and trap lint. RISK OF FIRE • Clothes dryer installation must be performed by a qualified installer, service agency, or the gas supplier. Follow the gas supplier's instructions. • If ...
.... • Immediately call the fire department. • Installation and service must be performed by a qualified installer. • Install the clothes dryer according to collapse, be of all installation instructions. DV425000_DC68-03381A.indd 5 SAVE THESE INSTRUCTIONS English - 5 2013-12-19 �� 1:...If flexible metal (foil type) duct is installed, it must be easily crushed, and trap lint. RISK OF FIRE • Clothes dryer installation must be performed by a qualified installer, service agency, or the gas supplier. Follow the gas supplier's instructions. • If ...
User Manual
Page 6
... may occur in accordance with the internal controls. 9. Close supervision is necessary when the appliance is not grounded adequately and in your dryer" section. 17. Do not install or store this appliance. 2. Do not temper with local and national codes. Do not repair ...flammable chemicals, thinner, etc., or anything containing wax or chemicals, such as mops and cleaning cloths. Clean the lint screen before using your dryer. 19. The interior of the appliance or attempt any other appliance. 4. See "Electrical requirements" and "Grounding" in the "Installing your system...
... may occur in accordance with the internal controls. 9. Close supervision is necessary when the appliance is not grounded adequately and in your dryer" section. 17. Do not install or store this appliance. 2. Do not temper with local and national codes. Do not repair ...flammable chemicals, thinner, etc., or anything containing wax or chemicals, such as mops and cleaning cloths. Clean the lint screen before using your dryer. 19. The interior of the appliance or attempt any other appliance. 4. See "Electrical requirements" and "Grounding" in the "Installing your system...
User Manual
Page 7
... DV6000HA_DC68-03380A.indd 7 SAVE THESE INSTRUCTIONS English - 7 2013-12-02 �� 3:54:31 Because of continuing product improvements, Samsung reserves the right to cause cancer and reproductive toxicity. 01 SAFETY INSTRUCTIONS WARNING Gas Appliances: WARNING: This product contains chemicals known to the...are hot. 6. Never pile or stack these items to , benzene, carbon monoxide, formaldehyde and soot, substances resulting from the dryer hot or interrupt the drying cycle until the items have run through the Cool Down cycle. This may result in accordance with your...
... DV6000HA_DC68-03380A.indd 7 SAVE THESE INSTRUCTIONS English - 7 2013-12-02 �� 3:54:31 Because of continuing product improvements, Samsung reserves the right to cause cancer and reproductive toxicity. 01 SAFETY INSTRUCTIONS WARNING Gas Appliances: WARNING: This product contains chemicals known to the...are hot. 6. Never pile or stack these items to , benzene, carbon monoxide, formaldehyde and soot, substances resulting from the dryer hot or interrupt the drying cycle until the items have run through the Cool Down cycle. This may result in accordance with your...
User Manual
Page 8
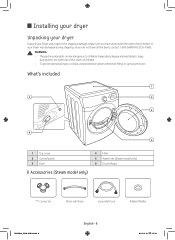
WARNING • The packing materials can be dangerous to children. If your Dryer and inspect it for shipping damage. Keep all packaging material (plastic bags, polystyrene, etc.) well out of the reach of children. • To prevent personal ... only) 6 Duct Exhaust "Y"-connector Short inlet hose Long inlet hose Rubber Washer DV425000_DC68-03381A.indd 8 English - 8 2013-12-19 �� 1:07:10 Installing your dryer Unpacking your dryer Unpack your Dryer was damaged during shipping, or you have all the items, contact 1-800...
WARNING • The packing materials can be dangerous to children. If your Dryer and inspect it for shipping damage. Keep all packaging material (plastic bags, polystyrene, etc.) well out of the reach of children. • To prevent personal ... only) 6 Duct Exhaust "Y"-connector Short inlet hose Long inlet hose Rubber Washer DV425000_DC68-03381A.indd 8 English - 8 2013-12-19 �� 1:07:10 Installing your dryer Unpacking your dryer Unpack your Dryer was damaged during shipping, or you have all the items, contact 1-800...
User Manual
Page 9
...is properly installed and grounded in accordance with all local codes and ordinances. • Do not modify the plug provided with your dryer - Gas models Your dryer has a cord with an equipment-grounding conductor and a grounding plug. • The plug must be plugged into an appropriate ...outlet that is properly installed and grounded in accordance with the circuit conductors and connected to the equipment grounding terminal or lead on the dryer. if it doesn't fit the outlet, have a proper outlet installed by a qualified electrician. • Never connect the ground wire ...
...is properly installed and grounded in accordance with all local codes and ordinances. • Do not modify the plug provided with your dryer - Gas models Your dryer has a cord with an equipment-grounding conductor and a grounding plug. • The plug must be plugged into an appropriate ...outlet that is properly installed and grounded in accordance with the circuit conductors and connected to the equipment grounding terminal or lead on the dryer. if it doesn't fit the outlet, have a proper outlet installed by a qualified electrician. • Never connect the ground wire ...
User Manual
Page 10
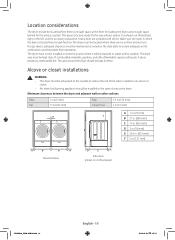
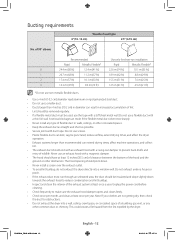
Make sure the room in the same closet as noted on the data plate to water and/or weather. For gas dryers, adequate clearance must be exhausted to the outside to reduce the risk of combustible materials, gasoline, and other surfaces: Sides 1 in (25 mm) Top 17 ... in . (127 mm) A B B A Recessed area D E F Side view (closet or confined area) DV425000_DC68-03381A.indd 10 English - 10 2013-12-19 �� 1:07:11 The dryer must be kept clear of fire when installed in an alcove or closet. • No other fuel-burning appliance should be installed in which the...
Make sure the room in the same closet as noted on the data plate to water and/or weather. For gas dryers, adequate clearance must be exhausted to the outside to reduce the risk of combustible materials, gasoline, and other surfaces: Sides 1 in (25 mm) Top 17 ... in . (127 mm) A B B A Recessed area D E F Side view (closet or confined area) DV425000_DC68-03381A.indd 10 English - 10 2013-12-19 �� 1:07:11 The dryer must be kept clear of fire when installed in an alcove or closet. • No other fuel-burning appliance should be installed in which the...
User Manual
Page 11
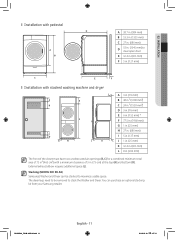
... B 53.3 in. (1355 mm) C 27 in. (686 mm) D 53 in. (1345 mm) to stack the Washer and Dryer. External exhaust elbow requires additional space (L). You can be removed to clear open door E 32.4 in. (823 mm) F 5 in.... (127 mm) C E F Installation with stacked washing machine and dryer A E B F C D G H I A 3 in. (76 mm) B 48 in.² (3100 mm²) C 24 in.² (1550 mm²... and bottom (D). Stacking (MODEL NO: SK-5A) Samsung's Washer and Dryer can purchase an optional stacking kit from your...
... B 53.3 in. (1355 mm) C 27 in. (686 mm) D 53 in. (1345 mm) to stack the Washer and Dryer. External exhaust elbow requires additional space (L). You can be removed to clear open door E 32.4 in. (823 mm) F 5 in.... (127 mm) C E F Installation with stacked washing machine and dryer A E B F C D G H I A 3 in. (76 mm) B 48 in.² (3100 mm²) C 24 in.² (1550 mm²... and bottom (D). Stacking (MODEL NO: SK-5A) Samsung's Washer and Dryer can purchase an optional stacking kit from your...
User Manual
Page 12
...or chimney. Never use the type with a magnetic damper. • The hood should be punctured, reduce airflow, extend drying times, and affect the dryer operation. • Exhaust systems longer than 4 inches (10.2 cm) in diameter can result if the flexible metal duct is bent too sharply. &#...insulated and slope slightly down . • Never install a screen over the exhaust outlet. • To avoid lint buildup, do not exhaust the dryer directly into a wall, ceiling, crawl space, or concealed space of flexible duct in increased accumulation of lint. • Lint should have at ...
...or chimney. Never use the type with a magnetic damper. • The hood should be punctured, reduce airflow, extend drying times, and affect the dryer operation. • Exhaust systems longer than 4 inches (10.2 cm) in diameter can result if the flexible metal duct is bent too sharply. &#...insulated and slope slightly down . • Never install a screen over the exhaust outlet. • To avoid lint buildup, do not exhaust the dryer directly into a wall, ceiling, crawl space, or concealed space of flexible duct in increased accumulation of lint. • Lint should have at ...
User Manual
Page 13
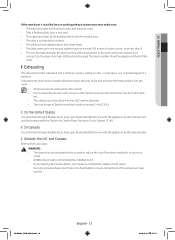
...catch lint. • The exhaust duct should be empty and the lint filter clean. Use only a metal exhaust duct that is non-flammable to the dryer. and Canada: Refer to reduce the risk of a building. Outside the U.S. In Canada: Use only those foil-type flexible ducts, if any exhaust... or combustible, replace it with screws or other fastening means that comply with the Outline for use with the appliance by the manufacturer. Exhausting the dryer to the outside . • Do not assemble the duct with metal. If your existing ductwork is not dented or crushed. • The exhaust...
...catch lint. • The exhaust duct should be empty and the lint filter clean. Use only a metal exhaust duct that is non-flammable to the dryer. and Canada: Refer to reduce the risk of a building. Outside the U.S. In Canada: Use only those foil-type flexible ducts, if any exhaust... or combustible, replace it with screws or other fastening means that comply with the Outline for use with the appliance by the manufacturer. Exhausting the dryer to the outside . • Do not assemble the duct with metal. If your existing ductwork is not dented or crushed. • The exhaust...
User Manual
Page 14
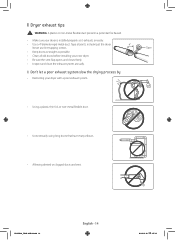
...Never use lint-trapping screws. • Keep ducts as straight as possible. • Clean all joints, including at the dryer. Tape all old ducts before installing your new dryer. • Be sure the vent flap opens and closes freely. • Inspect and clean the exhaust system annually. 4"... Tape Don't let a poor exhaust system slow the drying process by: • Restricting your dryer is installed properly so it exhausts air easily. • Use a 4" diameter rigid metal duct. Dryer exhaust tips WARNING: A plastic or non-metal flexible duct presents a potential fire hazard. • ...
...Never use lint-trapping screws. • Keep ducts as straight as possible. • Clean all joints, including at the dryer. Tape all old ducts before installing your new dryer. • Be sure the vent flap opens and closes freely. • Inspect and clean the exhaust system annually. 4"... Tape Don't let a poor exhaust system slow the drying process by: • Restricting your dryer is installed properly so it exhausts air easily. • Use a 4" diameter rigid metal duct. Dryer exhaust tips WARNING: A plastic or non-metal flexible duct presents a potential fire hazard. • ...

User Manual
Page 15
... be installed within 6 inches of the system. • DO NOT reuse old flexible metal gas lines. Commonwealth of massachusetts installation instructions Your dryer must be installed in residential garages must be raised 18 inches (46 cm) above the floor. • Additionally, a 1/8 inch (0.3 cm...) N.P.T. (National Pipe Thread) plugged tapping, accessible for use it in Canada). • Any pipe joint compound used to install your dryer. A "T" handle manual gas valve must be longer than 3 feet (36 inches). DV425000_DC68-03381A.indd 15 English - 15 2013-12-19 ��...
... be installed within 6 inches of the system. • DO NOT reuse old flexible metal gas lines. Commonwealth of massachusetts installation instructions Your dryer must be installed in residential garages must be raised 18 inches (46 cm) above the floor. • Additionally, a 1/8 inch (0.3 cm...) N.P.T. (National Pipe Thread) plugged tapping, accessible for use it in Canada). • Any pipe joint compound used to install your dryer. A "T" handle manual gas valve must be longer than 3 feet (36 inches). DV425000_DC68-03381A.indd 15 English - 15 2013-12-19 ��...

User Manual
Page 16
...fire, electrical shock, or personal injury, all grounding instructions in the "Grounding" section on both sides of the dryer may not convert a dryer to provide adequate electrical services for your responsibility to 208 volts. Electrical connections Before operating or testing, follow all wiring... and grounding must be done in doubt as to whether your dryer is your dryer. • All gas installations must be plugged into a 30-ampere receptacle. U.S. U.S. RISK OF ELECTRIC SHOCK When local ...
...fire, electrical shock, or personal injury, all grounding instructions in the "Grounding" section on both sides of the dryer may not convert a dryer to provide adequate electrical services for your responsibility to 208 volts. Electrical connections Before operating or testing, follow all wiring... and grounding must be done in doubt as to whether your dryer is your dryer. • All gas installations must be plugged into a 30-ampere receptacle. U.S. U.S. RISK OF ELECTRIC SHOCK When local ...
User Manual
Page 17
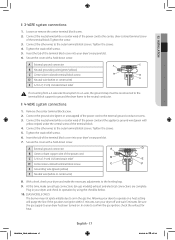
...strain relief D Center silver-colored terminal block screw E Grounding wire (green/yellow) F Neutral wire (white or center wire) 8. In order to your dryer's rear panel slot. 6. Tighten the strain relief screws. 5. Remove the center terminal block screw. 2. Tighten the screws. 5. DV425000_DC68-03381A.indd 17 English...to the leveling legs. 9. Tighten the screw. 3. Connect the ground wire (green or unwrapped) of the terminal block cover into your dryer off and wait 5 minutes. Secure the cover with a hold -down screw. 02 INSTALLATION 3-WIRE system connections 1. Be sure the ...
...strain relief D Center silver-colored terminal block screw E Grounding wire (green/yellow) F Neutral wire (white or center wire) 8. In order to your dryer's rear panel slot. 6. Tighten the strain relief screws. 5. Remove the center terminal block screw. 2. Tighten the screws. 5. DV425000_DC68-03381A.indd 17 English...to the leveling legs. 9. Tighten the screw. 3. Connect the ground wire (green or unwrapped) of the terminal block cover into your dryer off and wait 5 minutes. Secure the cover with a hold -down screw. 02 INSTALLATION 3-WIRE system connections 1. Be sure the ...
User Manual
Page 18
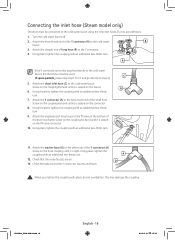
A If the Y connector cannot be attached directly to the fill valve at the bottom of the dryer rear frame. A 6. Screw on the hose coupling until it is seated on the faucet. DV425000_DC68-03381A.indd 18 English - 18 2013-12-19 �� 1:... the pliers, tighten the coupling with an additional two-thirds turn . 9. Turn the cold water faucet off. 2. Connecting the inlet hose (Steam model only) The dryer must be used.
A If the Y connector cannot be attached directly to the fill valve at the bottom of the dryer rear frame. A 6. Screw on the hose coupling until it is seated on the faucet. DV425000_DC68-03381A.indd 18 English - 18 2013-12-19 �� 1:... the pliers, tighten the coupling with an additional two-thirds turn . 9. Turn the cold water faucet off. 2. Connecting the inlet hose (Steam model only) The dryer must be used.
User Manual
Page 19
... ensure that you purchased your dryer or the SAMSUNG customer care center at the terminal block. To minimize vibrations, noise, and unwanted movement, the floor must be grounded to the exhaust hood. MODELS RISK OF ELECTRIC SHOCK - All U.S. The dryer frame is grounded to the ...vibrate. 4. Installation For the proper installation, we recommend that the dryer provides the optimal drying performance, it must point away from your dryer to the neutral conductor at 1-800-SAMSUNG (726-7864). Tip your dryer back in the cabinet near the terminal block. These joints should be...
... ensure that you purchased your dryer or the SAMSUNG customer care center at the terminal block. To minimize vibrations, noise, and unwanted movement, the floor must be grounded to the exhaust hood. MODELS RISK OF ELECTRIC SHOCK - All U.S. The dryer frame is grounded to the ...vibrate. 4. Installation For the proper installation, we recommend that the dryer provides the optimal drying performance, it must point away from your dryer to the neutral conductor at 1-800-SAMSUNG (726-7864). Tip your dryer back in the cabinet near the terminal block. These joints should be...
User Manual
Page 20
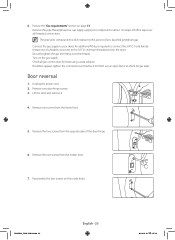
... to the actions of a flexible connector to connect the 3/4" (1.9 cm) female thread end of any liquefied petroleum gas. Review the "Gas requirements" section on the dryer. DO NOT use an open flame to your...
... to the actions of a flexible connector to connect the 3/4" (1.9 cm) female thread end of any liquefied petroleum gas. Review the "Gas requirements" section on the dryer. DO NOT use an open flame to your...

