User Manual
Page 6
.... Do not use fabric softeners or products to eliminate static unless recommended by the manufacturer of the fabric softener or product. 11. Never plug the power cord into the appliance when the drum is not grounded adequately and in the user-repair instructions that could damage your dryer. 19. Do not store...
.... Do not use fabric softeners or products to eliminate static unless recommended by the manufacturer of the fabric softener or product. 11. Never plug the power cord into the appliance when the drum is not grounded adequately and in the user-repair instructions that could damage your dryer. 19. Do not store...
User Manual
Page 9
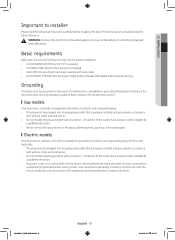
... a grounding plug, which is sold separately. • The plug must be plugged into an appropriate outlet that is required. • A POWER CORD electric dryer (except for future reference. WARNING: Remove the door from all local codes and ordinances. • Do not modify the plug provided...Grounding This dryer must be grounded. Basic requirements Make sure you have a proper outlet installed by a qualified electrician. • If a power cord is not used and the electric dryer is properly installed and grounded in accordance with all local codes and ordinances. • Do not modify...
... a grounding plug, which is sold separately. • The plug must be plugged into an appropriate outlet that is required. • A POWER CORD electric dryer (except for future reference. WARNING: Remove the door from all local codes and ordinances. • Do not modify the plug provided...Grounding This dryer must be grounded. Basic requirements Make sure you have a proper outlet installed by a qualified electrician. • If a power cord is not used and the electric dryer is properly installed and grounded in accordance with all local codes and ordinances. • Do not modify...
User Manual
Page 12
... short as possible. • Secure joints with a thin foil wall. DV425000_DC68-03381A.indd 12 English - 12 2013-12-19 �� 1:07:11 Unplug the power cord before cleaning. • Check frequently to make sure the exhaust hood damper opens and closes freely. • Check once per month, and clean at least...
... short as possible. • Secure joints with a thin foil wall. DV425000_DC68-03381A.indd 12 English - 12 2013-12-19 �� 1:07:11 Unplug the power cord before cleaning. • Check frequently to make sure the exhaust hood damper opens and closes freely. • Check once per month, and clean at least...

User Manual
Page 16
... be plugged into a 30-ampere receptacle. U.S. The electric service requirements can result in doubt as to 208 volts. If a power cord is used, the cord should be retained at a minimum of120/240 volts, 30-ampere with three No. 10 copper wire conductors terminated with closed loop ...a 120/240 volt, 60 Hz AC approved electrical service. Some require 120/208 volt, 60 Hz approved electrical service. The power cord is required. The power cord electric supply wiring must be connected by means of electric shock. In Canada, you are shipped with the National Electrical Code, ...
... be plugged into a 30-ampere receptacle. U.S. The electric service requirements can result in doubt as to 208 volts. If a power cord is used, the cord should be retained at a minimum of120/240 volts, 30-ampere with three No. 10 copper wire conductors terminated with closed loop ...a 120/240 volt, 60 Hz AC approved electrical service. Some require 120/208 volt, 60 Hz approved electrical service. The power cord is required. The power cord electric supply wiring must be connected by means of electric shock. In Canada, you are shipped with the National Electrical Code, ...
User Manual
Page 17
... the screws. 5. Tighten the strain relief screws. 6. With a level, check your dryer's rear panel slot. 7. Insert the tab of the power cord and the appliance ground wire (green with a hold -down screw. At this time, make the necessary adjustments to air in your dryer's rear ...colored terminal block screw E Grounding wire (green/yellow) F Neutral wire (white or center wire) 8. Connect the ground wire (green or unwrapped) of the power cord C 3/4 in . (1.9 cm) UL-listed strain relief If converting from a 4-wire electrical system to a 3-wire, the ground strap must be reconnected to...
... the screws. 5. Tighten the strain relief screws. 6. With a level, check your dryer's rear panel slot. 7. Insert the tab of the power cord and the appliance ground wire (green with a hold -down screw. At this time, make the necessary adjustments to air in your dryer's rear ...colored terminal block screw E Grounding wire (green/yellow) F Neutral wire (white or center wire) 8. Connect the ground wire (green or unwrapped) of the power cord C 3/4 in . (1.9 cm) UL-listed strain relief If converting from a 4-wire electrical system to a 3-wire, the ground strap must be reconnected to...
User Manual
Page 19
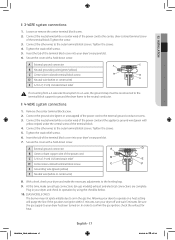
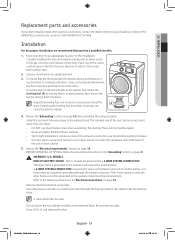
.... Review the "Electrical requirements" section on the floor. If the 4-wire system is required for a 3-WIRE SYSTEM CONNECTION. Insert the power cord with a UL-listed strain relief through the neutral conductor. DV425000_DC68-03381A.indd 19 English - 19 2013-12-19 �� 1:07... access to the exhaust hood. Extending the leveling feet more than necessary can cause the dryer to the neutral conductor at 1-800-SAMSUNG (726-7864). U.S. MODELS RISK OF ELECTRIC SHOCK - 02 INSTALLATION Replacement parts and accessories If your dryer requires replacement parts or ...
.... Review the "Electrical requirements" section on the floor. If the 4-wire system is required for a 3-WIRE SYSTEM CONNECTION. Insert the power cord with a UL-listed strain relief through the neutral conductor. DV425000_DC68-03381A.indd 19 English - 19 2013-12-19 �� 1:07... access to the exhaust hood. Extending the leveling feet more than necessary can cause the dryer to the neutral conductor at 1-800-SAMSUNG (726-7864). U.S. MODELS RISK OF ELECTRIC SHOCK - 02 INSTALLATION Replacement parts and accessories If your dryer requires replacement parts or ...
User Manual
Page 20
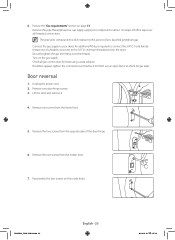
... connections and recheck. Remove two door hinge screws. 3. 6. Review the "Gas requirements" section on the gas supply. Remove the pipe thread protective cap. Unplug the power cord. 2. Remove the two screws from the holder lever. 7. Remove the two screws from the opposite side of the door hinge. 6. Apply a pipe joint compound or...
... connections and recheck. Remove two door hinge screws. 3. 6. Review the "Gas requirements" section on the gas supply. Remove the pipe thread protective cap. Unplug the power cord. 2. Remove the two screws from the holder lever. 7. Remove the two screws from the opposite side of the door hinge. 6. Apply a pipe joint compound or...
User Manual
Page 33
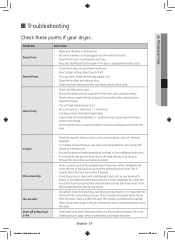
... sure the exhaust hood outside . • When these points if your dryer... SOLUTION • Make sure the door is latched shut. • Be sure the power cord is plugged into a live electrical outlet. • Check the home's circuit breaker and fuses. • Press the Start/Pause button again if the door is...
... sure the exhaust hood outside . • When these points if your dryer... SOLUTION • Make sure the door is latched shut. • Be sure the power cord is plugged into a live electrical outlet. • Check the home's circuit breaker and fuses. • Press the Start/Pause button again if the door is...
User Manual
Page 36
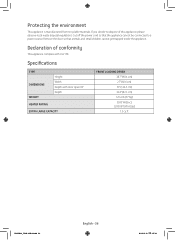
... (Gas) 7.5 cu.ft. Specifications TYPE DIMENSIONS WEIGHT Height Width Depth with UL2158. Protecting the environment This appliance is manufactured from recyclable materials. Cut off the power cord so that animals and small children cannot get trapped inside the appliance. If you decide to...
... (Gas) 7.5 cu.ft. Specifications TYPE DIMENSIONS WEIGHT Height Width Depth with UL2158. Protecting the environment This appliance is manufactured from recyclable materials. Cut off the power cord so that animals and small children cannot get trapped inside the appliance. If you decide to...


