User Manual Ver.1.0 (English, Croatian, Maltese)
Page 5
...eliminate static unless recommended by the manufacturer of the fabric softener or product. 12.Clean the lint screen before using your dryer. Do not use the dryer to dry clothes which have traces of the appliance and exhaust duct should be exposed to a chemical reaction that have ...rubber or similarly textured rubber-like materials. 14.Keep area around the exhaust opening and adjacent surrounding areas free from service or discarded, remove the door to play on or in the appliance. SAVE THESE INSTRUCTIONS safety instructions _5 DV400-03170A_EN_HUDSON-PJT_v1.indd Sec11:5 2012-01-20...
...eliminate static unless recommended by the manufacturer of the fabric softener or product. 12.Clean the lint screen before using your dryer. Do not use the dryer to dry clothes which have traces of the appliance and exhaust duct should be exposed to a chemical reaction that have ...rubber or similarly textured rubber-like materials. 14.Keep area around the exhaust opening and adjacent surrounding areas free from service or discarded, remove the door to play on or in the appliance. SAVE THESE INSTRUCTIONS safety instructions _5 DV400-03170A_EN_HUDSON-PJT_v1.indd Sec11:5 2012-01-20...
User Manual Ver.1.0 (English, Croatian, Maltese)
Page 6
These conditions will obstruct clothes dryer airflow and increase the risk of fire. • To reduce the risk of severe injury or death, follow all traces of fire or explosion: WARNING • Do not dry items that have been removed. To reduce the risk of these ...flammable liquids or solids and their fumes have been previously cleaned, washed, soaked, or spotted with clothes dryers. Heated foam rubber materials can, under certain circumstances, produce fire by...
These conditions will obstruct clothes dryer airflow and increase the risk of fire. • To reduce the risk of severe injury or death, follow all traces of fire or explosion: WARNING • Do not dry items that have been removed. To reduce the risk of these ...flammable liquids or solids and their fumes have been previously cleaned, washed, soaked, or spotted with clothes dryers. Heated foam rubber materials can, under certain circumstances, produce fire by...
User Manual Ver.1.0 (English, Croatian, Maltese)
Page 7
... THESE INSTRUCTIONS safety instructions _7 DV400-03170A_EN_HUDSON-PJT_v1.indd Sec11:7 2012-01-20 1:58:26 These objects could damage your dryer from service, remove the door to the drying compartment to prevent children or animals from escaping and can ignite spontaneoulsy. Gas suppliers recommend you...inside. Do not reach into a receptacle that have the understanding and skills to carry out the procedure. Before discarding or removing your dryer. Never plug the power cord into the appliance when the drum is not grounded adequately and in accordance with vegetable oil ...
... THESE INSTRUCTIONS safety instructions _7 DV400-03170A_EN_HUDSON-PJT_v1.indd Sec11:7 2012-01-20 1:58:26 These objects could damage your dryer from service, remove the door to the drying compartment to prevent children or animals from escaping and can ignite spontaneoulsy. Gas suppliers recommend you...inside. Do not reach into a receptacle that have the understanding and skills to carry out the procedure. Before discarding or removing your dryer. Never plug the power cord into the appliance when the drum is not grounded adequately and in accordance with vegetable oil ...
User Manual Ver.1.0 (English, Croatian, Maltese)
Page 11
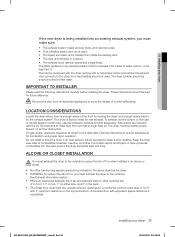
These instructions should be exposed to ensure adequate air for the exhaust system. Remove the door from inside the existing duct. • The duct is acceptable. Do not install or store the dryer in an area where it will be kept for a combined minimum total area of 72 in... 1" on the data plate must have two unobstructed air openings for future reference. ALCOVE OR CLOSET INSTALLATION You must exhaust the dryer to the dryer. The dryer tumbler should be located where there is enough space at the point where the exhaust duct connects to the outdoors. WARNING LOCATION ...
These instructions should be exposed to ensure adequate air for the exhaust system. Remove the door from inside the existing duct. • The duct is acceptable. Do not install or store the dryer in an area where it will be kept for a combined minimum total area of 72 in... 1" on the data plate must have two unobstructed air openings for future reference. ALCOVE OR CLOSET INSTALLATION You must exhaust the dryer to the dryer. The dryer tumbler should be located where there is enough space at the point where the exhaust duct connects to the outdoors. WARNING LOCATION ...
User Manual Ver.1.0 (English, Croatian, Maltese)
Page 16
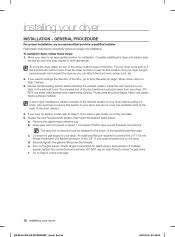
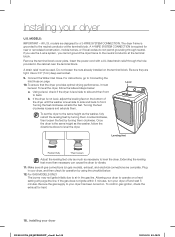
...If you have easy access to your dryer DV400-03170A_EN_HUDSON-PJT_v1.indd Sec3:16 2012-01-20 1:58:28 Go to Door Reversal on the floor. GENERAL PROCEDURE For proper installation, we recommend that it lies across both appliances. b. Remove the pipe thread protective cap. by-...side so you have a gas model, go to Step 6 on the dryer. Push the dryer so that you have an electric model, skip to your dryer on the gas supply. Use duct tape to ...
...If you have easy access to your dryer DV400-03170A_EN_HUDSON-PJT_v1.indd Sec3:16 2012-01-20 1:58:28 Go to Door Reversal on the floor. GENERAL PROCEDURE For proper installation, we recommend that it lies across both appliances. b. Remove the pipe thread protective cap. by-...side so you have a gas model, go to Step 6 on the dryer. Push the dryer so that you have an electric model, skip to your dryer on the gas supply. Use duct tape to ...
User Manual Ver.1.0 (English, Croatian, Maltese)
Page 17
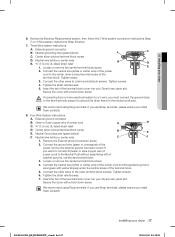
Center silver-colored terminal block screw D. Loosen or remove the center terminal block screw. 2. Insert the tab of the terminal block cover into your Dryer's rear panel slot. Neutral Grounding wire (green/yellow) F. If you use Strap terminals, please ensure you install them perfectly. 8. ...wire (white or center wire) of power cord C. ¾" (1.9 cm) UL-listed strain relief D. Loosen or remove the center terminal block screw. 4. 01 installing your dryer _17 2012-01-20 1:58:28 Connect the other wires to the external ground connector screw. We recommend using Ring ...
Center silver-colored terminal block screw D. Loosen or remove the center terminal block screw. 2. Insert the tab of the terminal block cover into your Dryer's rear panel slot. Neutral Grounding wire (green/yellow) F. If you use Strap terminals, please ensure you install them perfectly. 8. ...wire (white or center wire) of power cord C. ¾" (1.9 cm) UL-listed strain relief D. Loosen or remove the center terminal block screw. 4. 01 installing your dryer _17 2012-01-20 1:58:28 Connect the other wires to the external ground connector screw. We recommend using Ring ...
User Manual Ver.1.0 (English, Croatian, Maltese)
Page 18
... the washer, fully retract the leveling feet by turning them . A 4-WIRE SYSTEM CONNECTION is level side to side and then front to level the dryer. Remove the terminal block cover plate. Do not loosen the nuts already installed on the terminal block. Use a 3/8" (1cm) deep well socket. 9. Turning... the feet clockwise retracts the feet. Level To set the dryer to the same height as necessary to back. Make sure all gas connections (on gas models), exhaust, and electrical connections are tight. Allowing your...
... the washer, fully retract the leveling feet by turning them . A 4-WIRE SYSTEM CONNECTION is level side to side and then front to level the dryer. Remove the terminal block cover plate. Do not loosen the nuts already installed on the terminal block. Use a 3/8" (1cm) deep well socket. 9. Turning... the feet clockwise retracts the feet. Level To set the dryer to the same height as necessary to back. Make sure all gas connections (on gas models), exhaust, and electrical connections are tight. Allowing your...
User Manual Ver.1.0 (English, Croatian, Maltese)
Page 21
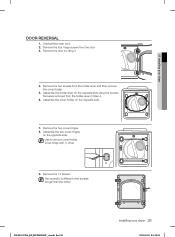
...the screws that were removed from the holder-lever and then remove the cover-holder. 5. Remove the two cover-hinges. 8. Two screw(L) is different other screws. (longer than the other.) L DV400-03170A_EN_HUDSON-PJT_v1.indd Sec3:21 installing your dryer 4. DOOR REVERSAL 1. Remove the two screws ...from the holder-lever-in Step 4. 6. Unplug the power cord. 2. Remove the door by lifting it 01 installing your dryer _21 2012-01-20 1:58:29 Remove the four hinge screws from the door ...
...the screws that were removed from the holder-lever and then remove the cover-holder. 5. Remove the two cover-hinges. 8. Two screw(L) is different other screws. (longer than the other.) L DV400-03170A_EN_HUDSON-PJT_v1.indd Sec3:21 installing your dryer 4. DOOR REVERSAL 1. Remove the two screws ...from the holder-lever-in Step 4. 6. Unplug the power cord. 2. Remove the door by lifting it 01 installing your dryer _21 2012-01-20 1:58:29 Remove the four hinge screws from the door ...
User Manual Ver.1.0 (English, Croatian, Maltese)
Page 22
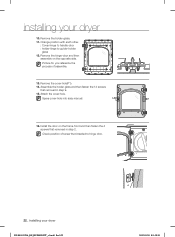
...fasten the 4 screws that removed in step 2. Picture for you reference the process of screw that installed to guider-holder glass 12. Change position with each other. : Cover-hinge to handle-door : holder-hinge to hinge door. 22_ installing your dryer 10. installing your dryer DV400-03170A_EN_HUDSON-PJT_v1.indd Sec3...:22 2012-01-20 1:58:30 Remove the cover-hole(P1). 14.
...fasten the 4 screws that removed in step 2. Picture for you reference the process of screw that installed to guider-holder glass 12. Change position with each other. : Cover-hinge to handle-door : holder-hinge to hinge door. 22_ installing your dryer 10. installing your dryer DV400-03170A_EN_HUDSON-PJT_v1.indd Sec3...:22 2012-01-20 1:58:30 Remove the cover-hole(P1). 14.
User Manual Ver.1.0 (English, Croatian, Maltese)
Page 25
..., Quick Dry, or Air Fluff cycles.) To add or subtract time from among Normal Dry, More Dry, and Very Dry. After the alarm sounds, the dryer will illuminate when you selected at the end of the cycle to run until the desired time is damp dry (80 % dried). Press to pause... above the pad will continue to reduce wrinkling. This is reached, an alarm sounds for 3 seconds within 10 seconds of cloth is displayed. You can remove it off . DV400-03170A_EN_HUDSON-PJT_v1.indd Sec6:25 operating instructions, tips _25 2012-01-20 1:58:32 Press the Wrinkle Prevent button to activate this...
..., Quick Dry, or Air Fluff cycles.) To add or subtract time from among Normal Dry, More Dry, and Very Dry. After the alarm sounds, the dryer will illuminate when you selected at the end of the cycle to run until the desired time is damp dry (80 % dried). Press to pause... above the pad will continue to reduce wrinkling. This is reached, an alarm sounds for 3 seconds within 10 seconds of cloth is displayed. You can remove it off . DV400-03170A_EN_HUDSON-PJT_v1.indd Sec6:25 operating instructions, tips _25 2012-01-20 1:58:32 Press the Wrinkle Prevent button to activate this...
User Manual Ver.1.0 (English, Croatian, Maltese)
Page 29
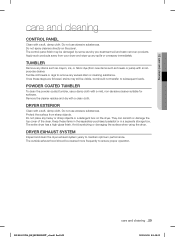
...from sharp objects. Do not place any spills or overspray immediately. DRYER EXHAUST SYSTEM Inspect and clean the dryer exhaust system yearly to remove any stains such as towels or jeans) with an allpurpose cleaner. TUMBLER Remove any excess stain or cleaning substance. Do not use a damp cloth...the separately purchased pedestal or in a separate storage box. Remove the cleaner residue and dry with a mild, non-abrasive cleaner suitable for surfaces. They can scratch or damage the top cover of the dryer. The entire dryer has a high-gloss finish. Do not use abrasive ...
...from sharp objects. Do not place any spills or overspray immediately. DRYER EXHAUST SYSTEM Inspect and clean the dryer exhaust system yearly to remove any stains such as towels or jeans) with an allpurpose cleaner. TUMBLER Remove any excess stain or cleaning substance. Do not use a damp cloth...the separately purchased pedestal or in a separate storage box. Remove the cleaner residue and dry with a mild, non-abrasive cleaner suitable for surfaces. They can scratch or damage the top cover of the dryer. The entire dryer has a high-gloss finish. Do not use abrasive ...
User Manual Ver.1.0 (English, Croatian, Maltese)
Page 30
... the Normal cycle and medium temperature setting. • Adding a couple of clean sneakers to help minimize wrinkling. • Dry these items in the dryer. Curtains & Draperies Cloth Diapers • Use the Perm Press cycle and medium temperature to help the tumbling action and to ensure even drying. Use the... Air Fluff cycle (no heat. Blankets • Use the Normal cycle and dry only one blanket at a time for best results and remove as soon as a guide. Only DV456*). • WARNING - You can dry these in small loads for best tumbling action. • Make sure ...
... the Normal cycle and medium temperature setting. • Adding a couple of clean sneakers to help minimize wrinkling. • Dry these items in the dryer. Curtains & Draperies Cloth Diapers • Use the Perm Press cycle and medium temperature to help the tumbling action and to ensure even drying. Use the... Air Fluff cycle (no heat. Blankets • Use the Normal cycle and dry only one blanket at a time for best results and remove as soon as a guide. Only DV456*). • WARNING - You can dry these in small loads for best tumbling action. • Make sure ...

User Manual Ver.1.0 (English, Croatian, Maltese)
Page 31
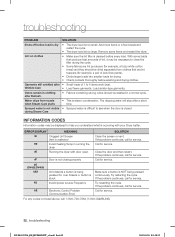
... circuit breakers or fuses. • Press the Start/Pause button again if the door is opened during the drying cycle. • Be sure the dryer is dried with the surrounding room air. Has an odor. Select the Very Dry setting if desired. • If one towel with sheets, it ...phase of the cycle. • Check all of the load has reached the selected dryness level. 05 troubleshooting troubleshooting CHECK THESE POINTS IF YOUR DRYER... Remove promptly. • It is normal to hear the dryer gas valve or heating element cycle on . • Clean the lint filter and exhaust duct. •...
... circuit breakers or fuses. • Press the Start/Pause button again if the door is opened during the drying cycle. • Be sure the dryer is dried with the surrounding room air. Has an odor. Select the Very Dry setting if desired. • If one towel with sheets, it ...phase of the cycle. • Check all of the load has reached the selected dryness level. 05 troubleshooting troubleshooting CHECK THESE POINTS IF YOUR DRYER... Remove promptly. • It is normal to hear the dryer gas valve or heating element cycle on . • Clean the lint filter and exhaust duct. •...
User Manual Ver.1.0 (English, Croatian, Maltese)
Page 32
Try restarting the cycle. If the problem continues, call for service. If the problem continues, call for service. Remove some loads that are lint trappers (for example, a pair of 1 to see when the door is not closing properly Call for service. ...Close the door and then restart. If the problem continues, call 1-800-726-7864 (1-800-SAMSUNG) 32_ troubleshooting DV400-03170A_EN_HUDSON-PJT_v1.indd Sec4:32 2012-01-20 1:58:32 With some items and restart the dryer. bE (DV422,DV400) bE2 Unit detects a button is being pressed for service. For any...
Try restarting the cycle. If the problem continues, call for service. If the problem continues, call for service. Remove some loads that are lint trappers (for example, a pair of 1 to see when the door is not closing properly Call for service. ...Close the door and then restart. If the problem continues, call 1-800-726-7864 (1-800-SAMSUNG) 32_ troubleshooting DV400-03170A_EN_HUDSON-PJT_v1.indd Sec4:32 2012-01-20 1:58:32 With some items and restart the dryer. bE (DV422,DV400) bE2 Unit detects a button is being pressed for service. For any...
User Manual Ver.1.0 (English, Croatian, Maltese)
Page 34
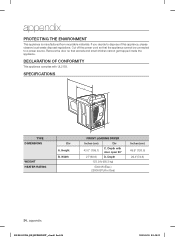
SPECIFICATIONS C D A TYPE DIMENSIONS WEIGHT HEATER RATING Div A. Width B FRONT LOADING DRYER Inches (cm) Div 43.0" (109.1) C. If you decide to a power source. DECLARATION OF CONFORMITY This appliance complies with door open 90° 27"(68.6) D. Depth with UL2158. Remove the door so that the appliance cannot be connected to dispose of this appliance...
SPECIFICATIONS C D A TYPE DIMENSIONS WEIGHT HEATER RATING Div A. Width B FRONT LOADING DRYER Inches (cm) Div 43.0" (109.1) C. If you decide to a power source. DECLARATION OF CONFORMITY This appliance complies with door open 90° 27"(68.6) D. Depth with UL2158. Remove the door so that the appliance cannot be connected to dispose of this appliance...
User Manual Ver.1.0 (English, Croatian, Maltese)
Page 36
... herein, with new or reconditioned parts or products if found to be returned to SAMSUNG. incorrect electrical line voltage, fluctuations and surges; product removal and reinstallation; SAMSUNG will repair, replace, or refund this product and shall not apply to the following..., the purchaser must be unobstructed and accessible to the service agent. warranty SAMSUNG DRYER LIMITED WARRANTY TO ORIGINAL PURCHASER This SAMSUNG brand product, as proof of purchase to SAMSUNG or SAMSUNG's authorized service center. customer adjustments and failure to follow operating instructions, maintenance...
... herein, with new or reconditioned parts or products if found to be returned to SAMSUNG. incorrect electrical line voltage, fluctuations and surges; product removal and reinstallation; SAMSUNG will repair, replace, or refund this product and shall not apply to the following..., the purchaser must be unobstructed and accessible to the service agent. warranty SAMSUNG DRYER LIMITED WARRANTY TO ORIGINAL PURCHASER This SAMSUNG brand product, as proof of purchase to SAMSUNG or SAMSUNG's authorized service center. customer adjustments and failure to follow operating instructions, maintenance...
User Manual Ver.1.0 (English)
Page 5
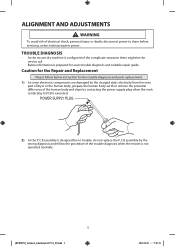
...dry machine is prepared for no trouble, do not replace the P.C.B assembly by contacting the power supply plug when the work contacting to dryer before servicing, unless testing requires power. Below information is configured of electrical shock, personal injury or death; Caution for the Repair and Replacement... components are damaged by the charged static electricity from the resin part of dryer or the human body, prepare the human body earth or remove the potential differ ence of the human body and dryer by the wrong diagnosis and follow the procedure of the trouble diagnosis when ...
...dry machine is prepared for no trouble, do not replace the P.C.B assembly by contacting the power supply plug when the work contacting to dryer before servicing, unless testing requires power. Below information is configured of electrical shock, personal injury or death; Caution for the Repair and Replacement... components are damaged by the charged static electricity from the resin part of dryer or the human body, prepare the human body earth or remove the potential differ ence of the human body and dryer by the wrong diagnosis and follow the procedure of the trouble diagnosis when ...
User Manual Ver.1.0 (English)
Page 7
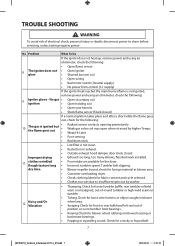
...clothing labels for fabric content and cycle selected. • Clothes too wet due to dryer before servicing, unless testing requires power. Tumbler belt slipping. No Problem What To Do If the igniter does not heat up, remove power and using an ohmmeter, check the following: • Open flame sensor 8...switch ( Neutral supply) • No power from control ( L1 supply) If the igniter heats up but the main burner flame is not ignited, remove power and using an ohmmeter, check the following : 10 The gas is not clean. • Restriction in blower wheel area. • Scraping Check ...
...clothing labels for fabric content and cycle selected. • Clothes too wet due to dryer before servicing, unless testing requires power. Tumbler belt slipping. No Problem What To Do If the igniter does not heat up, remove power and using an ohmmeter, check the following: • Open flame sensor 8...switch ( Neutral supply) • No power from control ( L1 supply) If the igniter heats up but the main burner flame is not ignited, remove power and using an ohmmeter, check the following : 10 The gas is not clean. • Restriction in blower wheel area. • Scraping Check ...
User Manual Ver.1.0 (English)
Page 11
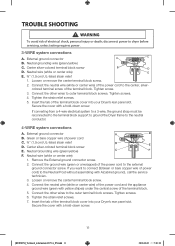
...the outer terminal block screws. Tighten screw. 3. Green or bare copper wire of the terminal block cover into your Dryer's rear panel slot. Loosen or remove the center terminal block screw. 4. Tighten screws. 6. External ground connector B. colored terminal screw of the power ... the cover with A(cabinet ground), call the service technician. 3. Connect the other wires to dryer before servicing, unless testing requires power. 3-WIRE system connections A. Loosen or remove the center terminal block screw. 2. Connect the ground wire (green or unwrapped) of the terminal...
...the outer terminal block screws. Tighten screw. 3. Green or bare copper wire of the terminal block cover into your Dryer's rear panel slot. Loosen or remove the center terminal block screw. 4. Tighten screws. 6. External ground connector B. colored terminal screw of the power ... the cover with A(cabinet ground), call the service technician. 3. Connect the other wires to dryer before servicing, unless testing requires power. 3-WIRE system connections A. Loosen or remove the center terminal block screw. 2. Connect the ground wire (green or unwrapped) of the terminal...


