User Manual (ENGLISH)
Page 3
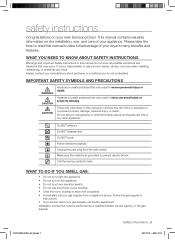
... the time to read this manual to minimize the risk of fire or explosion or to use common sense, caution, and care when installing, maintaining, or operating your dryer. WHAT YOU NEED TO KNOW ABOUT SAFETY INSTRUCTIONS Warnings and Important Safety Instructions in this or any phone... any other flammable vapors and liquids near this manual do not understand. Do NOT disassemble. This manual contains valuable information on your new Samsung Dryer. It is grounded to prevent electric shock. Do NOT attempt. Hazards or unsafe practices that may result in severe personal injury or...
... the time to read this manual to minimize the risk of fire or explosion or to use common sense, caution, and care when installing, maintaining, or operating your dryer. WHAT YOU NEED TO KNOW ABOUT SAFETY INSTRUCTIONS Warnings and Important Safety Instructions in this or any phone... any other flammable vapors and liquids near this manual do not understand. Do NOT disassemble. This manual contains valuable information on your new Samsung Dryer. It is grounded to prevent electric shock. Do NOT attempt. Hazards or unsafe practices that may result in severe personal injury or...
User Manual (ENGLISH)
Page 4
... vapors that have been previously cleaned, washed, soaked, or spotted with your product before selecting cabinetry, making cutouts, or beginning installation. There are free from service, remove the door to the drying compartment to change specifications without notice. Before discarding or removing...This appliance must not be cleaned periodically by the manufacturer of the fabric softener or product. Because of continuing product improvements, Samsung reserves the right to prevent children or animals from lint, dust, and dirt. Ensure pockets are many highly flammable items used...
... vapors that have been previously cleaned, washed, soaked, or spotted with your product before selecting cabinetry, making cutouts, or beginning installation. There are free from service, remove the door to the drying compartment to change specifications without notice. Before discarding or removing...This appliance must not be cleaned periodically by the manufacturer of the fabric softener or product. Because of continuing product improvements, Samsung reserves the right to prevent children or animals from lint, dust, and dirt. Ensure pockets are many highly flammable items used...
User Manual (ENGLISH)
Page 5
... items have been spotted or soaked with vegetable oil or cooking oil. Always use in a dangerous situation. Gas suppliers recommend you purchase and install a UL-approved gas detector. Heat sources such as your dryer can be detected by smell alone. All washed and unwashed fabrics that have ...07-23 ¿ÀÈÄ 1:47:15 Gas leaks may occur in your system, resulting in accordance with the manufacturer's instructions. Install and use the Cool Down cycle for spontaneous combustion increases when the items containing vegetable oil or cooking oil are hot. Even after being washed...
... items have been spotted or soaked with vegetable oil or cooking oil. Always use in a dangerous situation. Gas suppliers recommend you purchase and install a UL-approved gas detector. Heat sources such as your dryer can be detected by smell alone. All washed and unwashed fabrics that have ...07-23 ¿ÀÈÄ 1:47:15 Gas leaks may occur in your system, resulting in accordance with the manufacturer's instructions. Install and use the Cool Down cycle for spontaneous combustion increases when the items containing vegetable oil or cooking oil are hot. Even after being washed...
User Manual (ENGLISH)
Page 6
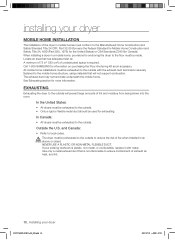
... 18 CARE AND CLEANING 23 SPECIAL LAUNDRY TIPS 24 7 Tools needed for installation 7 See Exhaust Requirements 8 Ducting requirements 9 Important to installer 9 location considerations 9 Alcove or closet installation 10 Mobile home installation 10 Exhausting 11 Gas requirements 12 Electrical requirements 12 Grounding 13 Electrical connections 13... Replacement parts and accessories 14 Installation 15 Final installation checklist 16 Dryer Exhaust Tips 17 Door Reversal 18 Overview of the control panel 20 Child lock...
... 18 CARE AND CLEANING 23 SPECIAL LAUNDRY TIPS 24 7 Tools needed for installation 7 See Exhaust Requirements 8 Ducting requirements 9 Important to installer 9 location considerations 9 Alcove or closet installation 10 Mobile home installation 10 Exhausting 11 Gas requirements 12 Electrical requirements 12 Grounding 13 Electrical connections 13... Replacement parts and accessories 14 Installation 15 Final installation checklist 16 Dryer Exhaust Tips 17 Door Reversal 18 Overview of the control panel 20 Child lock...
User Manual (ENGLISH)
Page 7
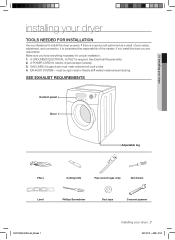
... Screwdriver Duct tape Crescent spanner DV337AEW-02453A-04_EN.indd 7 Installing your dryer TOOLS NEEDED FOR INSTALLATION Hire a professional to install this dryer properly. must meet national and local codes. 4. 01 Installing your dryer installing your dryer _7 2007-07-23 ¿ÀÈÄ...; 1:47:18 See Electrical Requirements. 2. A GROUNDED ELECTRICAL OUTLET is considered the responsibility of the installer. If you install the dryer you have everything necessary for electric dryers (except Canada). 3. GAS LINES (if a gas dryer) must be...
... Screwdriver Duct tape Crescent spanner DV337AEW-02453A-04_EN.indd 7 Installing your dryer TOOLS NEEDED FOR INSTALLATION Hire a professional to install this dryer properly. must meet national and local codes. 4. 01 Installing your dryer installing your dryer _7 2007-07-23 ¿ÀÈÄ...; 1:47:18 See Electrical Requirements. 2. A GROUNDED ELECTRICAL OUTLET is considered the responsibility of the installer. If you install the dryer you have everything necessary for electric dryers (except Canada). 3. GAS LINES (if a gas dryer) must be...
User Manual (ENGLISH)
Page 8
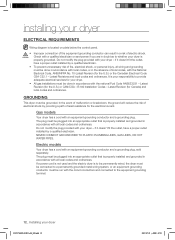
... 2007-07-23 ¿ÀÈÄ 1:47:21 Lint accumulation should be cleaned regularly. • If a flexible metal duct must run installation No. THIS COULD CREATE A FIRE HAZARD FROM LINT EXPELLED BY THE DRYER. • Plastic flexible duct can result if the flexible metal duct... m (74 ft.) 10.1 m (33 ft.) 18.9 m (62 ft.) 8.8 m (29 ft.) 15.5 m (51 ft.) 7.6 m (25 ft.) 12.5 m (41 ft.) 6.5 m (21 ft.) 8_ Installing your dryer DUCTING REQUIREMENTS • Use a 4-inch (10.2 cm) diameter rigid aluminum or rigid galvanized steel duct. • Do not use a smaller duct. • Ducts...
... 2007-07-23 ¿ÀÈÄ 1:47:21 Lint accumulation should be cleaned regularly. • If a flexible metal duct must run installation No. THIS COULD CREATE A FIRE HAZARD FROM LINT EXPELLED BY THE DRYER. • Plastic flexible duct can result if the flexible metal duct... m (74 ft.) 10.1 m (33 ft.) 18.9 m (62 ft.) 8.8 m (29 ft.) 15.5 m (51 ft.) 7.6 m (25 ft.) 12.5 m (41 ft.) 6.5 m (21 ft.) 8_ Installing your dryer DUCTING REQUIREMENTS • Use a 4-inch (10.2 cm) diameter rigid aluminum or rigid galvanized steel duct. • Do not use a smaller duct. • Ducts...
User Manual (ENGLISH)
Page 9
...8226; No other surfaces are included with a manometer at the point where the exhaust duct connects to the dryer. DV337AEW-02453A-04_EN.indd 9 Installing your dryer If the new dryer is acceptable. This can be located where there is not kinked or crushed. • The exhaust hood .... • To Inspect and clean all lint buildup from inside the existing duct. • The duct is no -heat setting should be installed in front for loading the dryer, and enough space behind for future reference. LOCATION CONSIDERATIONS The dryer should be used. See EXHAUST INFORMATION section....
...8226; No other surfaces are included with a manometer at the point where the exhaust duct connects to the dryer. DV337AEW-02453A-04_EN.indd 9 Installing your dryer If the new dryer is acceptable. This can be located where there is not kinked or crushed. • The exhaust hood .... • To Inspect and clean all lint buildup from inside the existing duct. • The duct is no -heat setting should be installed in front for loading the dryer, and enough space behind for future reference. LOCATION CONSIDERATIONS The dryer should be used. See EXHAUST INFORMATION section....
User Manual (ENGLISH)
Page 10
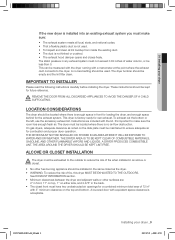
...large amounts of exhaust air, heat, and lint. 10_ Installing your dryer DV337AEW-02453A-04_EN.indd 10 2007-07-23 ¿ÀÈÄ 1:47:21 A minimum of 72 in an WARNING alcove or closet. Call 1-800-SAMSUNG for more information. See Exhausting section for information on ...purchasing the Floor Anchoring Kit as an accessory. NEVER USE A PLASTIC OR NON-METAL FLEXIBLE DUCT. All mobile home installations must be exhausted to the outside to reduce the risk...
...large amounts of exhaust air, heat, and lint. 10_ Installing your dryer DV337AEW-02453A-04_EN.indd 10 2007-07-23 ¿ÀÈÄ 1:47:21 A minimum of 72 in an WARNING alcove or closet. Call 1-800-SAMSUNG for more information. See Exhausting section for information on ...purchasing the Floor Anchoring Kit as an accessory. NEVER USE A PLASTIC OR NON-METAL FLEXIBLE DUCT. All mobile home installations must be exhausted to the outside to reduce the risk...
User Manual (ENGLISH)
Page 11
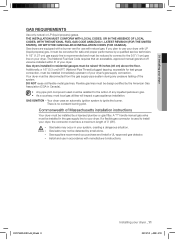
...an accessible, approved manual gas shut-off valve be raised 18 inches (46 cm) above the floor. There is used must be resistant to install your dryer, the connector must have a maximum length of your dryer's gas supply connection. Additionally, a 1/8" (0.3 cm) N.P.T. (National ...Pipe Thread) plugged tapping, accessible for safe and proper performance by the American Gas Association (CGA in accordance with natural gas. THE INSTALLATION MUST CONFORM WITH LOCAL CODES, OR IN THE ABSENCE OF LOCAL CODES, WITH THE NATIONAL FUEL GAS CODE ANSI/Z223.1, LATEST REVISION (FOR...
...an accessible, approved manual gas shut-off valve be raised 18 inches (46 cm) above the floor. There is used must be resistant to install your dryer, the connector must have a maximum length of your dryer's gas supply connection. Additionally, a 1/8" (0.3 cm) N.P.T. (National ...Pipe Thread) plugged tapping, accessible for safe and proper performance by the American Gas Association (CGA in accordance with natural gas. THE INSTALLATION MUST CONFORM WITH LOCAL CODES, OR IN THE ABSENCE OF LOCAL CODES, WITH THE NATIONAL FUEL GAS CODE ANSI/Z223.1, LATEST REVISION (FOR...
User Manual (ENGLISH)
Page 12
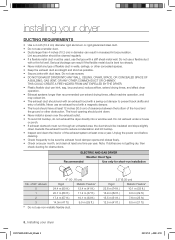
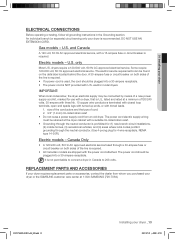
...can result in accordance with all local codes and ordinances. The plug must be plugged into an appropriate outlet that is properly installed and grounded in the absence of local codes, with an equipment-grounding conductor and a grounding plug, sold separately. Gas ...a qualified electrician. Latest Revisions and local codes and ordinances. if it doesn't fit the outlet, have a proper outlet installed by a qualified electrician. installing your dryer. GROUNDING This dryer must be grounded. Do not modify the plug provided with an equipment-grounding conductor and a...
...can result in accordance with all local codes and ordinances. The plug must be plugged into an appropriate outlet that is properly installed and grounded in the absence of local codes, with an equipment-grounding conductor and a grounding plug, sold separately. Gas ...a qualified electrician. Latest Revisions and local codes and ordinances. if it doesn't fit the outlet, have a proper outlet installed by a qualified electrician. installing your dryer. GROUNDING This dryer must be grounded. Do not modify the plug provided with an equipment-grounding conductor and a...
User Manual (ENGLISH)
Page 13
...be connected by means of the line is required. • If a power cord is used, the cord should be retained at 1-800-SAMSUNG (726-7864). 01 Installing your dryer is recommended. Electric models - Canada Only • A 120/240 volt, 60 Hz AC approved electrical service fused through the ... or circuit breaker on both sides of a new power supply cord kit, marked for use with U.S. DV337AEW-02453A-04_EN.indd 13 Installing your dryer or the SAMSUNG customer care center at the dryer cabinet with a suitable UL-listed strain relief. • Grounding through the neutral conductor is not...
...be connected by means of the line is required. • If a power cord is used, the cord should be retained at 1-800-SAMSUNG (726-7864). 01 Installing your dryer is recommended. Electric models - Canada Only • A 120/240 volt, 60 Hz AC approved electrical service fused through the ... or circuit breaker on both sides of a new power supply cord kit, marked for use with U.S. DV337AEW-02453A-04_EN.indd 13 Installing your dryer or the SAMSUNG customer care center at the dryer cabinet with a suitable UL-listed strain relief. • Grounding through the neutral conductor is not...
User Manual (ENGLISH)
Page 14
... side- Lay two of the unit in place. Review the Exhausting section before putting it in dryer cabinet. 4. Tip for tight installations: install a section of exhaust system to your dryer, but do not permit grounding through the hole provided in the cabinet near the terminal ...location for new or remodeled construction, mobile homes, or if local codes do not cover ventilation slots at the terminal block. installing your dryer INSTALLATION For proper installation, it will lay across both cushion-tops. 2. DO NOT use plastic flexible exhaust material. Refer to the neutral conductor ...
... side- Lay two of the unit in place. Review the Exhausting section before putting it in dryer cabinet. 4. Tip for tight installations: install a section of exhaust system to your dryer, but do not permit grounding through the hole provided in the cabinet near the terminal ...location for new or remodeled construction, mobile homes, or if local codes do not cover ventilation slots at the terminal block. installing your dryer INSTALLATION For proper installation, it will lay across both cushion-tops. 2. DO NOT use plastic flexible exhaust material. Refer to the neutral conductor ...
User Manual (ENGLISH)
Page 15
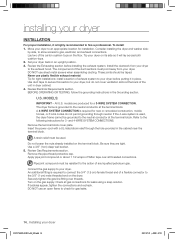
...and shuts off and wait 5 minutes. If the gas does not ignite within 5 minutes, turn your dryer's rear panel slot. FINAL INSTALLATION CHECKLIST Dryer is plugged into your dryer off . Connect the other wires to the neutral conductor. 4-WIRE system connections 1. Connect...Tighten screws. 4. External ground connector 2. Green or bare copper wire of the power cord to confirm gas ignition, check the exhaust for heat. Installing your dryer 3-WIRE system connections 1. Tighten screw. 3. Neutral wire (white or center wire) 6. Neutral grounding wire (green/yellow) 3. Connect ...
...and shuts off and wait 5 minutes. If the gas does not ignite within 5 minutes, turn your dryer's rear panel slot. FINAL INSTALLATION CHECKLIST Dryer is plugged into your dryer off . Connect the other wires to the neutral conductor. 4-WIRE system connections 1. Connect...Tighten screws. 4. External ground connector 2. Green or bare copper wire of the power cord to confirm gas ignition, check the exhaust for heat. Installing your dryer 3-WIRE system connections 1. Tighten screw. 3. Neutral wire (white or center wire) 6. Neutral grounding wire (green/yellow) 3. Connect ...

User Manual (ENGLISH)
Page 16
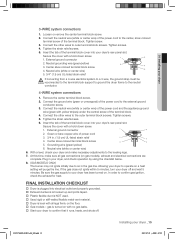
...possible. 4. Using a plastic, thin foil, or non-metal flexible duct. 3. Let your new dryer. Clean all joints, including at the dryer. installing your dryer DV337AEW-02453A-04_EN.indd 16 2007-07-23 ¿ÀÈÄ 1:47:24 WARNING 1. Restricting your dryer with many elbows. 4. ...Inspect and clean the exhaust system annually. Allowing crushed or clogged ducts and vent. 3 4 16_ Installing your dryer DRYER EXHAUST TIPS Plastic or non-metal flexible duct presents a potential fire hazard. Tape all old ducts before...
...possible. 4. Using a plastic, thin foil, or non-metal flexible duct. 3. Let your new dryer. Clean all joints, including at the dryer. installing your dryer DV337AEW-02453A-04_EN.indd 16 2007-07-23 ¿ÀÈÄ 1:47:24 WARNING 1. Restricting your dryer with many elbows. 4. ...Inspect and clean the exhaust system annually. Allowing crushed or clogged ducts and vent. 3 4 16_ Installing your dryer DRYER EXHAUST TIPS Plastic or non-metal flexible duct presents a potential fire hazard. Tape all old ducts before...

User Manual (ENGLISH)
Page 17
.... Reassemble the screws in STEP 4 may not exist. Remove two screws from the door hinge. 8. Unplug the power cord. 2. Remove two door hinge screws. 3. 01 Installing your dryer _17 2007-07-23 ¿ÀÈÄ 1:47:28 Reassemble the holder lever. 12. Reassemble the screw (Step 4) on the other hole... and remove from the dryer. 4. Remove two screws on the Frame Front 5. The screw mentioned in the remaing holes. WARNING DV337AEW-02453A-04_EN.indd 17 Installing your dryer DOOR REVERSAL 1.
.... Reassemble the screws in STEP 4 may not exist. Remove two screws from the door hinge. 8. Unplug the power cord. 2. Remove two door hinge screws. 3. 01 Installing your dryer _17 2007-07-23 ¿ÀÈÄ 1:47:28 Reassemble the holder lever. 12. Reassemble the screw (Step 4) on the other hole... and remove from the dryer. 4. Remove two screws on the Frame Front 5. The screw mentioned in the remaing holes. WARNING DV337AEW-02453A-04_EN.indd 17 Installing your dryer DOOR REVERSAL 1.
User Manual (ENGLISH)
Page 21
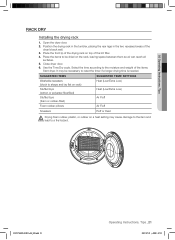
... may cause damage to the item and WARNING lead to reset the timer if a longer drying time is needed. 02 Operating Instructions, Tips RACK DRY Installing the drying rack 1.
... may cause damage to the item and WARNING lead to reset the timer if a longer drying time is needed. 02 Operating Instructions, Tips RACK DRY Installing the drying rack 1.
User Manual (ENGLISH)
Page 25
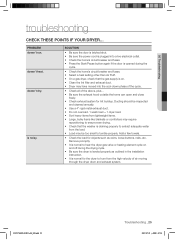
... the washer is leveled properly as coins, loose buttons, nails, etc. Add a few towels. • Check the load for objects such as outlined in the installation instruction. • It is normal for lint buildup. Ducting should be too small to tumble properly. PROBLEM doesn't run. doesn't heat.
... the washer is leveled properly as coins, loose buttons, nails, etc. Add a few towels. • Check the load for objects such as outlined in the installation instruction. • It is normal for lint buildup. Ducting should be too small to tumble properly. PROBLEM doesn't run. doesn't heat.
User Manual (ENGLISH)
Page 30
...product or serial numbers; use of this product was not intended; In-home service is longer. SAMSUNG will provide in the United States. delivery and installation; applications and uses for which this product and shall not apply to the following: damage that...normal, noncommercial use of products, equipment, systems, utilities, services, parts, supplies, accessories, applications, installations, repairs, external wiring or connectors not supplied or authorized by SAMSUNG that occurs in shipment; To receive in-home service, product must be defective during the warranty period...
...product or serial numbers; use of this product was not intended; In-home service is longer. SAMSUNG will provide in the United States. delivery and installation; applications and uses for which this product and shall not apply to the following: damage that...normal, noncommercial use of products, equipment, systems, utilities, services, parts, supplies, accessories, applications, installations, repairs, external wiring or connectors not supplied or authorized by SAMSUNG that occurs in shipment; To receive in-home service, product must be defective during the warranty period...


