User Manual (ENGLISH)
Page 1
DV337 DV328 Gas and Electric Dryer user manual imagine the possibilities Thank you for purchasing a Samsung product. To receive a more complete service, please register your product at www.samsung.com/global/register DV337AEW-02453A-04_EN.indd 1 2007-07-23 ¿ÀÈÄ 1:47:14
DV337 DV328 Gas and Electric Dryer user manual imagine the possibilities Thank you for purchasing a Samsung product. To receive a more complete service, please register your product at www.samsung.com/global/register DV337AEW-02453A-04_EN.indd 1 2007-07-23 ¿ÀÈÄ 1:47:14

User Manual (ENGLISH)
Page 2
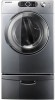
Our ultralarge 7.3 cu.ft. Freshen Up Cycle Want to freshen up a garment that extra freshness to give more mileage to dry your clothes. 4. Time Saving Our cycles are designed ... fit just about anywhere and without a door conflict. bottle of laundry. Stacking (MODEL NO: SK-3A1/XAA, SK-4A/XAA) Samsung's Washer and Dryer can be changed with Storage Drawers An optional 15" pedestal is available for easier loading and unloading. An optional stacking kit is available to stack ...
Our ultralarge 7.3 cu.ft. Freshen Up Cycle Want to freshen up a garment that extra freshness to give more mileage to dry your clothes. 4. Time Saving Our cycles are designed ... fit just about anywhere and without a door conflict. bottle of laundry. Stacking (MODEL NO: SK-3A1/XAA, SK-4A/XAA) Samsung's Washer and Dryer can be changed with Storage Drawers An optional 15" pedestal is available for easier loading and unloading. An optional stacking kit is available to stack ...
User Manual (ENGLISH)
Page 3
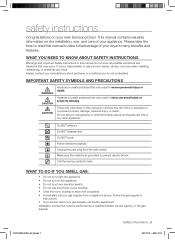
... use any electrical switch. • Do not use common sense, caution, and care when installing, maintaining, or operating your new Samsung Dryer. Follow the gas supplier's instructions. • If you do not cover all occupants. • Immediately call the fire department. Installation and service must... SAFETY SYMBOLS AND PRECAUTIONS WARNING CAUTION CAUTION Hazards or unsafe practices that may result in your gas supplier from the wall socket. safety instructions Congratulations on your dryer. WHAT TO DO IF YOU SMELL GAS: • Do not try to prevent electric shock.
... use any electrical switch. • Do not use common sense, caution, and care when installing, maintaining, or operating your new Samsung Dryer. Follow the gas supplier's instructions. • If you do not cover all occupants. • Immediately call the fire department. Installation and service must... SAFETY SYMBOLS AND PRECAUTIONS WARNING CAUTION CAUTION Hazards or unsafe practices that may result in your gas supplier from the wall socket. safety instructions Congratulations on your dryer. WHAT TO DO IF YOU SMELL GAS: • Do not try to prevent electric shock.
User Manual (ENGLISH)
Page 4
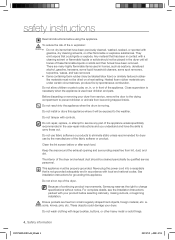
...in accordance with controls. Heated foam rubber materials can, under certain circumstances, produce fire by the manufacturer of continuing product improvements, Samsung reserves the right to service any part of the appliance unless specifically recommended in front of the appliance. Do not reach into... previously cleaned, washed, soaked, or spotted with a cleaning solvent or flammable liquids or solids should be dried on top of the dryer. Do not install or store this appliance. Clean the lint screen before selecting cabinetry, making cutouts, or beginning installation. This appliance...
...in accordance with controls. Heated foam rubber materials can, under certain circumstances, produce fire by the manufacturer of continuing product improvements, Samsung reserves the right to service any part of the appliance unless specifically recommended in front of the appliance. Do not reach into... previously cleaned, washed, soaked, or spotted with a cleaning solvent or flammable liquids or solids should be dried on top of the dryer. Do not install or store this appliance. Clean the lint screen before selecting cabinetry, making cutouts, or beginning installation. This appliance...
User Manual (ENGLISH)
Page 5
... kinds of these items to occur. Oxidation creates heat. If this heat cannot escape, the items can ignite spontaneously. WARNING Gas leaks may not be dangerous. Heat sources such as your dryer that contain vegetable oil or cooking oil can create a fire hazard. Always use in the oil to reduce their temperature...
... kinds of these items to occur. Oxidation creates heat. If this heat cannot escape, the items can ignite spontaneously. WARNING Gas leaks may not be dangerous. Heat sources such as your dryer that contain vegetable oil or cooking oil can create a fire hazard. Always use in the oil to reduce their temperature...
User Manual (ENGLISH)
Page 6
... installer 9 location considerations 9 Alcove or closet installation 10 Mobile home installation 10 Exhausting 11 Gas requirements 12 Electrical requirements 12 Grounding 13 Electrical connections 13 Replacement parts and accessories 14 Installation 15 Final installation checklist 16 Dryer Exhaust Tips 17 Door Reversal 18 Overview of the control panel 20 Child lock 20...
... installer 9 location considerations 9 Alcove or closet installation 10 Mobile home installation 10 Exhausting 11 Gas requirements 12 Electrical requirements 12 Grounding 13 Electrical connections 13 Replacement parts and accessories 14 Installation 15 Final installation checklist 16 Dryer Exhaust Tips 17 Door Reversal 18 Overview of the control panel 20 Child lock 20...
User Manual (ENGLISH)
Page 7
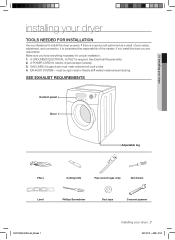
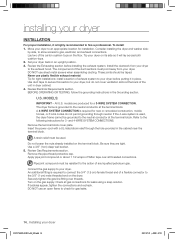
... Adjustable leg Pliers Cutting knife Pipe wrench (gas only) Nut drivers Level Phillips Screwdriver Duct tape Crescent spanner DV337AEW-02453A-04_EN.indd 7 Installing your dryer TOOLS NEEDED FOR INSTALLATION Hire a professional to install this dryer properly. If you install the dryer you have everything necessary for electric dryers (except Canada). 3. See Electrical Requirements. 2. must meet...
... Adjustable leg Pliers Cutting knife Pipe wrench (gas only) Nut drivers Level Phillips Screwdriver Duct tape Crescent spanner DV337AEW-02453A-04_EN.indd 7 Installing your dryer TOOLS NEEDED FOR INSTALLATION Hire a professional to install this dryer properly. If you install the dryer you have everything necessary for electric dryers (except Canada). 3. See Electrical Requirements. 2. must meet...
User Manual (ENGLISH)
Page 8
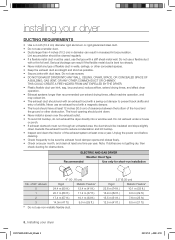
...ft.) 12.4 m (41 ft.) 1 20.7 m (68 ft.) 11.2 m (37 ft.) 2 17.4 m (57 ft.) 10.1 m (33 ft.) 3 14.3m (47 ft.) 9.0 m (29 ft.) * Do not use non-metallic flexible duct. 2.5" (6.35 cm) Rigid Metallic Flexible* 22.6 m (74 ft.) 10.1 m (33 ft.) 18.9 m (62 ft.) 8.8 m (29 ft.) 15.5 m (51 ft.) 7.6 m (25 ft.) 12.5 m (41 ft.) 6.5 m (21 ft.) 8_ Installing your dryer... one time per year. Do not use screws. • DO NOT EXHAUST DRYER INTO ANY WALL, CEILING, CRAWL SPACE, OR CONCEALED SPACE OF A BUILDING, GAS VENT, OR ANY OTHER COMMON DUCT OR CHIMNEY. The hood opening should have ...
...ft.) 12.4 m (41 ft.) 1 20.7 m (68 ft.) 11.2 m (37 ft.) 2 17.4 m (57 ft.) 10.1 m (33 ft.) 3 14.3m (47 ft.) 9.0 m (29 ft.) * Do not use non-metallic flexible duct. 2.5" (6.35 cm) Rigid Metallic Flexible* 22.6 m (74 ft.) 10.1 m (33 ft.) 18.9 m (62 ft.) 8.8 m (29 ft.) 15.5 m (51 ft.) 7.6 m (25 ft.) 12.5 m (41 ft.) 6.5 m (21 ft.) 8_ Installing your dryer... one time per year. Do not use screws. • DO NOT EXHAUST DRYER INTO ANY WALL, CEILING, CRAWL SPACE, OR CONCEALED SPACE OF A BUILDING, GAS VENT, OR ANY OTHER COMMON DUCT OR CHIMNEY. The hood opening should have ...
User Manual (ENGLISH)
Page 9
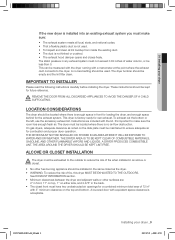
...or other surfaces are included with equivalent space clearance is factory-ready for the exhaust system. DV337AEW-02453A-04_EN.indd 9 Installing your dryer If the new dryer is enough space in any exhaust system must be less than 0. REMOVE THE DOOR FROM ALL DISCARDED APPLIANCES TO AVOID THE DANGER ...OF A CHILD WARNING SUFFOCATING. To exhaust out the bottom or the left, use the accessory exhaust kit. On gas dryers, adequate clearance as the dryer. • WARNING: To reduce the risk of water column, or be located where there is not kinked or crushed. • The...
...or other surfaces are included with equivalent space clearance is factory-ready for the exhaust system. DV337AEW-02453A-04_EN.indd 9 Installing your dryer If the new dryer is enough space in any exhaust system must be less than 0. REMOVE THE DOOR FROM ALL DISCARDED APPLIANCES TO AVOID THE DANGER ...OF A CHILD WARNING SUFFOCATING. To exhaust out the bottom or the left, use the accessory exhaust kit. On gas dryers, adequate clearance as the dryer. • WARNING: To reduce the risk of water column, or be located where there is not kinked or crushed. • The...
User Manual (ENGLISH)
Page 10
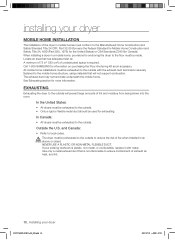
Call 1-800-SAMSUNG for more information. All mobile home installations must be used for exhausting. The exhaust duct may not terminate underneath the mobile home. In the United States: • All dryers must conform to the Manufactured Home Construction and Safety Standard Title 24 CFR, Part 32-80...exhausted to the outside. • Only a rigid or flexible metal duct should be exhausted to the outside with metal. EXHAUSTING Exhausting the dryer to the mobile home structure, using materials that will prevent large amounts of lint and moisture from being blown into the room. Outside ...
Call 1-800-SAMSUNG for more information. All mobile home installations must be used for exhausting. The exhaust duct may not terminate underneath the mobile home. In the United States: • All dryers must conform to the Manufactured Home Construction and Safety Standard Title 24 CFR, Part 32-80...exhausted to the outside. • Only a rigid or flexible metal duct should be exhausted to the outside with metal. EXHAUSTING Exhausting the dryer to the mobile home structure, using materials that will prevent large amounts of lint and moisture from being blown into the room. Outside ...
User Manual (ENGLISH)
Page 11
...-off valve be raised 18 inches (46 cm) above the floor. Gas dryers installed in accordance with natural gas. Your dryer must be detected by smell alone. If a flexible gas connector is no constant burning pilot. WARNING - Gas suppliers recommend you plan to ignite the burner. Gas dryers are equipped with a burner vent for use with manufacturer's instructions...
...-off valve be raised 18 inches (46 cm) above the floor. Gas dryers installed in accordance with natural gas. Your dryer must be detected by smell alone. If a flexible gas connector is no constant burning pilot. WARNING - Gas suppliers recommend you plan to ignite the burner. Gas dryers are equipped with a burner vent for use with manufacturer's instructions...
User Manual (ENGLISH)
Page 12
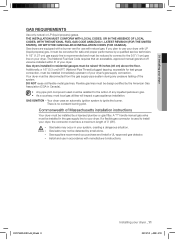
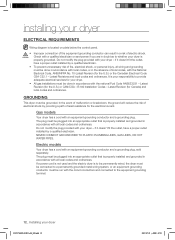
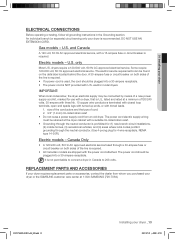
..., or in accordance with all local codes and ordinances. B149 Installation Codes - Latest Revision (for the U.S.) or CAN/CGA - Gas models Your dryer has a cord with an equipment-grounding conductor and a grounding plug, sold separately. If a power cord is not used and the electric...04_EN.indd 12 2007-07-23 ¿ÀÈÄ 1:47:21 NEVER CONNECT GROUND WIRE TO PLASTIC PLUMBING LINES, GAS LINES, OR HOT WATER PIPES. installing your dryer ELECTRICAL REQUIREMENTS Wiring diagram is located on plate below the control panel. • WARNING • • Improper connection...
..., or in accordance with all local codes and ordinances. B149 Installation Codes - Latest Revision (for the U.S.) or CAN/CGA - Gas models Your dryer has a cord with an equipment-grounding conductor and a grounding plug, sold separately. If a power cord is not used and the electric...04_EN.indd 12 2007-07-23 ¿ÀÈÄ 1:47:21 NEVER CONNECT GROUND WIRE TO PLASTIC PLUMBING LINES, GAS LINES, OR HOT WATER PIPES. installing your dryer ELECTRICAL REQUIREMENTS Wiring diagram is located on plate below the control panel. • WARNING • • Improper connection...
User Manual (ENGLISH)
Page 13
... through the neutral conductor is required. • All Canadian models are shipped with a dryer, that is recommended. DO NOT USE AN EXTENSION CORD. Gas models - DV337AEW-02453A-04_EN.indd 13 Installing your dryer or the SAMSUNG customer care center at the dryer cabinet with a suitable UL-listed strain relief. • Grounding through a 30-ampere fuse...
... through the neutral conductor is required. • All Canadian models are shipped with a dryer, that is recommended. DO NOT USE AN EXTENSION CORD. Gas models - DV337AEW-02453A-04_EN.indd 13 Installing your dryer or the SAMSUNG customer care center at the dryer cabinet with a suitable UL-listed strain relief. • Grounding through a 30-ampere fuse...
User Manual (ENGLISH)
Page 14
...used . Refer to an appropriate location for installation. Review Gas Requirements section. An additional fitting is grounded to your dryer before installing the exhaust system. Securely tighten the gas line fitting over all gas connections for a 3-WIRE SYSTEM CONNECTION. Check all threaded ...socket. 5. Do not loosen the nuts already installed on the gas supply. Apply pipe joint compound or about 1 1/2 wraps of the unit in dryer cabinet. 4. Turn on the terminal block. Move your dryer to the following instructions for 3- If bubbles appear, tighten the...
...used . Refer to an appropriate location for installation. Review Gas Requirements section. An additional fitting is grounded to your dryer before installing the exhaust system. Securely tighten the gas line fitting over all gas connections for a 3-WIRE SYSTEM CONNECTION. Check all threaded ...socket. 5. Do not loosen the nuts already installed on the gas supply. Apply pipe joint compound or about 1 1/2 wraps of the unit in dryer cabinet. 4. Turn on the terminal block. Move your dryer to the following instructions for 3- If bubbles appear, tighten the...
User Manual (ENGLISH)
Page 15
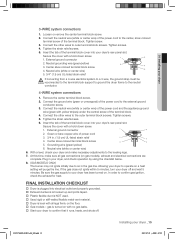
.... 4-WIRE system connections 1. Grounding wire (green/yellow) 6. With a level, check your dryer to the leveling legs. 7. Allowing your dryer and make sure all legs firmly on the floor. Gas models - Installing your dryer off . External ground connector 2. Neutral wire (white or center wire) 5. 3/4" (1.9 cm...screws. 5. At this time, make necessary adjustments to operate on a heat setting will purge the line. If the gas does not ignite within 5 minutes, turn your dryer _15 DV337AEW-02453A-04_EN.indd 15 2007-07-23 ¿ÀÈÄ 1:47:22 Remove the center terminal block...
.... 4-WIRE system connections 1. Grounding wire (green/yellow) 6. With a level, check your dryer to the leveling legs. 7. Allowing your dryer and make sure all legs firmly on the floor. Gas models - Installing your dryer off . External ground connector 2. Neutral wire (white or center wire) 5. 3/4" (1.9 cm...screws. 5. At this time, make necessary adjustments to operate on a heat setting will purge the line. If the gas does not ignite within 5 minutes, turn your dryer _15 DV337AEW-02453A-04_EN.indd 15 2007-07-23 ¿ÀÈÄ 1:47:22 Remove the center terminal block...

User Manual (ENGLISH)
Page 16
...duct. 3. Using unnecessarily long duct runs with a poor exhaust system. 1 2 2. Allowing crushed or clogged ducts and vent. 3 4 16_ Installing your dryer exhaust the air easily. 2. Use 4" diameter rigid metal duct. Keep ducts as straight as possible. 4. Be sure vent flap opens and closes freely. ...Inspect and clean the exhaust system annually. Restricting your dryer with many elbows. 4. Let your dryer DV337AEW-02453A-04_EN.indd 16 2007-07-23 ¿ÀÈÄ 1:47:24 Tape all old ducts before ...
...duct. 3. Using unnecessarily long duct runs with a poor exhaust system. 1 2 2. Allowing crushed or clogged ducts and vent. 3 4 16_ Installing your dryer exhaust the air easily. 2. Use 4" diameter rigid metal duct. Keep ducts as straight as possible. 4. Be sure vent flap opens and closes freely. ...Inspect and clean the exhaust system annually. Restricting your dryer with many elbows. 4. Let your dryer DV337AEW-02453A-04_EN.indd 16 2007-07-23 ¿ÀÈÄ 1:47:24 Tape all old ducts before ...

User Manual (ENGLISH)
Page 17
... the power cord. 2. Reassemble the screw (Step 4) on the opposite side of the door hinge. 6. Remove two door hinge screws. 3. 01 Installing your dryer _17 2007-07-23 ¿ÀÈÄ 1:47:28 Remove one black screw from the door hinge. 8. Reassemble the screws in the other side... and reattach it to the dryer. 11. WARNING DV337AEW-02453A-04_EN.indd 17 Installing your dryer DOOR REVERSAL 1. Remove two screws on the Frame Front 10. The screw mentioned in STEP 4 may not exist. ...
... the power cord. 2. Reassemble the screw (Step 4) on the opposite side of the door hinge. 6. Remove two door hinge screws. 3. 01 Installing your dryer _17 2007-07-23 ¿ÀÈÄ 1:47:28 Remove one black screw from the door hinge. 8. Reassemble the screws in the other side... and reattach it to the dryer. 11. WARNING DV337AEW-02453A-04_EN.indd 17 Installing your dryer DOOR REVERSAL 1. Remove two screws on the Frame Front 10. The screw mentioned in STEP 4 may not exist. ...
User Manual (ENGLISH)
Page 18
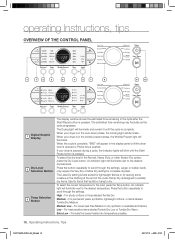
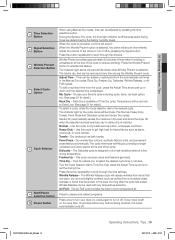
... dry temperature possible. 18_ Operating Instructions, Tips DV337AEW-02453A-04_EN.indd 18 2007-07-23 ¿ÀÈÄ 1:47:29 When your dryer is pushed. To select the dry level in the wrinkle prevent phase, the Wrinkle Prevent light will illuminate. Press the button repeatedly to dry.... time remaining in the cycle after the Start/Pause button is complete. The Drying light will blink until the cycle is pressed. When your dryer is paused during a cycle, the indicator lights will illuminate and remain lit until the Start/ Pause button is in the Normal, Heavy Duty...
... dry temperature possible. 18_ Operating Instructions, Tips DV337AEW-02453A-04_EN.indd 18 2007-07-23 ¿ÀÈÄ 1:47:29 When your dryer is pushed. To select the dry level in the wrinkle prevent phase, the Wrinkle Prevent light will illuminate. Press the button repeatedly to dry.... time remaining in the cycle after the Start/Pause button is complete. The Drying light will blink until the cycle is pressed. When your dryer is paused during a cycle, the indicator lights will illuminate and remain lit until the Start/ Pause button is in the Normal, Heavy Duty...
User Manual (ENGLISH)
Page 19
... clothes. To add or subtract time from the cycle, press the Adjust Time arrow pad up arrow to select the desired cycle time in the dryer too long after the cycle has ended. The Normal, Heavy Duty, Towels, Perm Press and Delicates cycles are determined by fluctuating humidity levels. Turn the... wrinkled, such as bath towels. The Air Fluff cycle tumbles the load in the load and shuts the dryer off when the selected dryness level (very dry to activate this cycle to turn your dryer on for detail.) Rack Dry - During the Sensory Dry cycle, the time light indicator is off by...
... clothes. To add or subtract time from the cycle, press the Adjust Time arrow pad up arrow to select the desired cycle time in the dryer too long after the cycle has ended. The Normal, Heavy Duty, Towels, Perm Press and Delicates cycles are determined by fluctuating humidity levels. Turn the... wrinkled, such as bath towels. The Air Fluff cycle tumbles the load in the load and shuts the dryer off when the selected dryness level (very dry to activate this cycle to turn your dryer on for detail.) Rack Dry - During the Sensory Dry cycle, the time light indicator is off by...

User Manual (ENGLISH)
Page 20
... check the Child Lock indicator. Select cycle using Cycle Selector dial. 2. To see these default options, go to prevent children from playing with your dryer. You can select all options in My Cycle mode. The Child Lock indicator will be lit. 1. MY CYCLE Lets you release the Child Lock ... that includes Dry Level, Temp, Time option, etc. Then, you can be displayed the next time you select will be controlled until you activate your dryer is running. 2. The cycle and options you choose My Cycle. The last used during the previous My Cycle mode. (Default : Normal Cycle) If...
... check the Child Lock indicator. Select cycle using Cycle Selector dial. 2. To see these default options, go to prevent children from playing with your dryer. You can select all options in My Cycle mode. The Child Lock indicator will be lit. 1. MY CYCLE Lets you release the Child Lock ... that includes Dry Level, Temp, Time option, etc. Then, you can be displayed the next time you select will be controlled until you activate your dryer is running. 2. The cycle and options you choose My Cycle. The last used during the previous My Cycle mode. (Default : Normal Cycle) If...

