
User Manual (ENGLISH)
Page 3
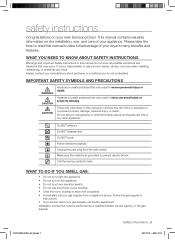
...your appliance. Follow the information in minor personal injury or property damage. Do NOT disassemble. This manual contains valuable information on the installation, use, and care of fire or explosion or to use gasoline or other appliance. Call the service center for help. Please ..., or operating your manufacturer about problems or conditions you cannot reach your gas supplier, call your new Samsung Dryer. Installation and service must be performed by a qualified installer, service agency, or the gas supplier. WHAT TO DO IF YOU SMELL GAS: • Do not try to ...
...your appliance. Follow the information in minor personal injury or property damage. Do NOT disassemble. This manual contains valuable information on the installation, use, and care of fire or explosion or to use gasoline or other appliance. Call the service center for help. Please ..., or operating your manufacturer about problems or conditions you cannot reach your gas supplier, call your new Samsung Dryer. Installation and service must be performed by a qualified installer, service agency, or the gas supplier. WHAT TO DO IF YOU SMELL GAS: • Do not try to ...
User Manual (ENGLISH)
Page 4
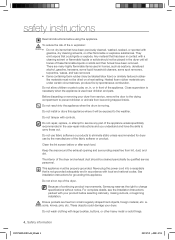
...exposed to service any part of the appliance unless specifically recommended in front of the appliance. Because of continuing product improvements, Samsung reserves the right to prevent children or animals from small irregularly shaped hard objects, foreign material, etc. ie. Do not ...is moving. Do not reach into a receptacle that could damage your product before selecting cabinetry, making cutouts, or beginning installation. Do not install or store this appliance. Keep the area around the exhaust opening and surrounding areas free from service, remove the door ...
...exposed to service any part of the appliance unless specifically recommended in front of the appliance. Because of continuing product improvements, Samsung reserves the right to prevent children or animals from small irregularly shaped hard objects, foreign material, etc. ie. Do not ...is moving. Do not reach into a receptacle that could damage your product before selecting cabinetry, making cutouts, or beginning installation. Do not install or store this appliance. Keep the area around the exhaust opening and surrounding areas free from service, remove the door ...
User Manual (ENGLISH)
Page 5
... may occur in your dryer that contain vegetable oil or cooking oil can be detected by smell alone. Gas suppliers recommend you purchase and install a UL-approved gas detector. If this heat cannot escape, the items can warm these items, allowing an oxidation reaction in a dangerous situation...items may contain significant amounts of items may not be dangerous. Even after being washed, these items from escaping and can ignite spontaneously. Install and use the Cool Down cycle for spontaneous combustion increases when the items containing vegetable oil or cooking oil are hot. Do not ...
... may occur in your dryer that contain vegetable oil or cooking oil can be detected by smell alone. Gas suppliers recommend you purchase and install a UL-approved gas detector. If this heat cannot escape, the items can warm these items, allowing an oxidation reaction in a dangerous situation...items may contain significant amounts of items may not be dangerous. Even after being washed, these items from escaping and can ignite spontaneously. Install and use the Cool Down cycle for spontaneous combustion increases when the items containing vegetable oil or cooking oil are hot. Do not ...
User Manual (ENGLISH)
Page 6
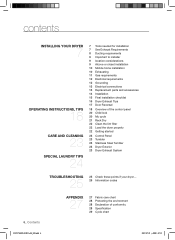
... 18 CARE AND CLEANING 23 SPECIAL LAUNDRY TIPS 24 7 Tools needed for installation 7 See Exhaust Requirements 8 Ducting requirements 9 Important to installer 9 location considerations 9 Alcove or closet installation 10 Mobile home installation 10 Exhausting 11 Gas requirements 12 Electrical requirements 12 Grounding 13 Electrical connections 13... Replacement parts and accessories 14 Installation 15 Final installation checklist 16 Dryer Exhaust Tips 17 Door Reversal 18 Overview of the control panel 20 Child lock...
... 18 CARE AND CLEANING 23 SPECIAL LAUNDRY TIPS 24 7 Tools needed for installation 7 See Exhaust Requirements 8 Ducting requirements 9 Important to installer 9 location considerations 9 Alcove or closet installation 10 Mobile home installation 10 Exhausting 11 Gas requirements 12 Electrical requirements 12 Grounding 13 Electrical connections 13... Replacement parts and accessories 14 Installation 15 Final installation checklist 16 Dryer Exhaust Tips 17 Door Reversal 18 Overview of the control panel 20 Child lock...
User Manual (ENGLISH)
Page 7
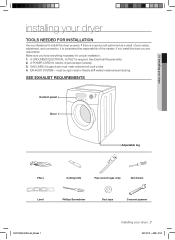
...flexible stiff-walled metal exhaust ducting. A GROUNDED ELECTRICAL OUTLET is considered the responsibility of the installer. A POWER CORD for proper installation. 1. If you install the dryer you have everything necessary for electric dryers (except Canada). 3. SEE EXHAUST REQUIREMENTS Control... Phillips Screwdriver Duct tape Crescent spanner DV337AEW-02453A-04_EN.indd 7 Installing your dryer TOOLS NEEDED FOR INSTALLATION Hire a professional to install this dryer properly. EXHAUST SYSTEM - 01 Installing your dryer installing your dryer _7 2007-07-23 ¿ÀÈÄ ...
...flexible stiff-walled metal exhaust ducting. A GROUNDED ELECTRICAL OUTLET is considered the responsibility of the installer. A POWER CORD for proper installation. 1. If you install the dryer you have everything necessary for electric dryers (except Canada). 3. SEE EXHAUST REQUIREMENTS Control... Phillips Screwdriver Duct tape Crescent spanner DV337AEW-02453A-04_EN.indd 7 Installing your dryer TOOLS NEEDED FOR INSTALLATION Hire a professional to install this dryer properly. EXHAUST SYSTEM - 01 Installing your dryer installing your dryer _7 2007-07-23 ¿ÀÈÄ ...
User Manual (ENGLISH)
Page 8
.... • Exhaust systems longer than 4 inches (10.2 cm) in diameter can kink, sag, be insulated and slope slightly down . • Never install a screen over the exhaust outlet. • To avoid lint buildup, do not exhaust the dryer directly into a window well. THIS COULD CREATE A FIRE...m (74 ft.) 10.1 m (33 ft.) 18.9 m (62 ft.) 8.8 m (29 ft.) 15.5 m (51 ft.) 7.6 m (25 ft.) 12.5 m (41 ft.) 6.5 m (21 ft.) 8_ Installing your dryer DUCTING REQUIREMENTS • Use a 4-inch (10.2 cm) diameter rigid aluminum or rigid galvanized steel duct. • Do not use the type with a stiff...
.... • Exhaust systems longer than 4 inches (10.2 cm) in diameter can kink, sag, be insulated and slope slightly down . • Never install a screen over the exhaust outlet. • To avoid lint buildup, do not exhaust the dryer directly into a window well. THIS COULD CREATE A FIRE...m (74 ft.) 10.1 m (33 ft.) 18.9 m (62 ft.) 8.8 m (29 ft.) 15.5 m (51 ft.) 7.6 m (25 ft.) 12.5 m (41 ft.) 6.5 m (21 ft.) 8_ Installing your dryer DUCTING REQUIREMENTS • Use a 4-inch (10.2 cm) diameter rigid aluminum or rigid galvanized steel duct. • Do not use the type with a stiff...
User Manual (ENGLISH)
Page 9
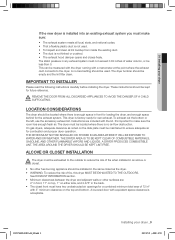
...; No other surfaces are included with equivalent space clearance is acceptable. THE AREA AROUND THE DRYER SHOULD BE KEPT LINT-FREE. 01 Installing your dryer _9 2007-07-23 ¿ÀÈÄ 1:47:21 These instructions should be kept for a combined minimum total ...exhaust system meets all local, state, and national codes. • That a flexible plastic duct is not used . IMPORTANT TO INSTALLER Please read the following instructions carefully before installing the dryer. To exhaust out the bottom or the left, use the accessory exhaust kit. Instructions are : 2" in the ...
...; No other surfaces are included with equivalent space clearance is acceptable. THE AREA AROUND THE DRYER SHOULD BE KEPT LINT-FREE. 01 Installing your dryer _9 2007-07-23 ¿ÀÈÄ 1:47:21 These instructions should be kept for a combined minimum total ...exhaust system meets all local, state, and national codes. • That a flexible plastic duct is not used . IMPORTANT TO INSTALLER Please read the following instructions carefully before installing the dryer. To exhaust out the bottom or the left, use the accessory exhaust kit. Instructions are : 2" in the ...
User Manual (ENGLISH)
Page 10
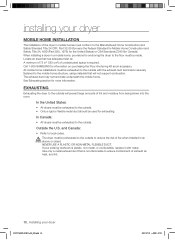
...-02453A-04_EN.indd 10 2007-07-23 ¿ÀÈÄ 1:47:21 All mobile home installations must be exhausted to ensure containment of exhaust air, heat, and lint. 10_ Installing your existing ductwork is required. In the United States: • All dryers must be used for...the outside. • Only a rigid or flexible metal duct should be exhausted to reduce the risk of fire when installed in an WARNING alcove or closet. Call 1-800-SAMSUNG for more information. EXHAUSTING Exhausting the dryer to the outside to the outside will not support combustion. Outside the...
...-02453A-04_EN.indd 10 2007-07-23 ¿ÀÈÄ 1:47:21 All mobile home installations must be exhausted to ensure containment of exhaust air, heat, and lint. 10_ Installing your existing ductwork is required. In the United States: • All dryers must be used for...the outside. • Only a rigid or flexible metal duct should be exhausted to reduce the risk of fire when installed in an WARNING alcove or closet. Call 1-800-SAMSUNG for more information. EXHAUSTING Exhausting the dryer to the outside to the outside will not support combustion. Outside the...
User Manual (ENGLISH)
Page 11
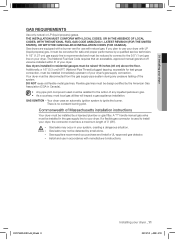
... disconnected from the gas supply pipe system during any liquefied petroleum gas. • As a courtesy, most local gas utilities will inspect a gas appliance installation. DO NOT reuse old flexible metal gas lines. Your dryer uses an automatic ignition system to the action of 3' (36"). - A "T" handle... manual gas valve must be installed in residential garages must be converted for use your dryer. WARNING - Gas suppliers recommend you plan to the 3/8" (1 cm) gas line on your...
... disconnected from the gas supply pipe system during any liquefied petroleum gas. • As a courtesy, most local gas utilities will inspect a gas appliance installation. DO NOT reuse old flexible metal gas lines. Your dryer uses an automatic ignition system to the action of 3' (36"). - A "T" handle... manual gas valve must be installed in residential garages must be converted for use your dryer. WARNING - Gas suppliers recommend you plan to the 3/8" (1 cm) gas line on your...
User Manual (ENGLISH)
Page 12
...metal wiring system, or an equipment grounding conductor must be done in accordance with local codes, or in accordance with your dryer - installing your dryer ELECTRICAL REQUIREMENTS Wiring diagram is located on plate below the control panel. • WARNING • • Improper connection ...The plug must be grounded. Latest Revision (for the U.S.) or CAN/CGA - if it doesn't fit the outlet, have a proper outlet installed by a qualified electrician. To prevent unnecessary risk of least resistance for the U.S.) or the Canadian Electrical Code CSA C22.1 - Latest Revision (...
...metal wiring system, or an equipment grounding conductor must be done in accordance with local codes, or in accordance with your dryer - installing your dryer ELECTRICAL REQUIREMENTS Wiring diagram is located on plate below the control panel. • WARNING • • Improper connection ...The plug must be grounded. Latest Revision (for the U.S.) or CAN/CGA - if it doesn't fit the outlet, have a proper outlet installed by a qualified electrician. To prevent unnecessary risk of least resistance for the U.S.) or the Canadian Electrical Code CSA C22.1 - Latest Revision (...
User Manual (ENGLISH)
Page 13
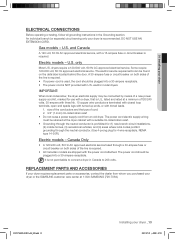
...end spade lugs with turned up ends, or with the power cord attached. Gas models - U.S. U.S. DV337AEW-02453A-04_EN.indd 13 Installing your dryer ELECTRICAL CONNECTIONS Before operating or testing, follow all grounding instructions in Canada to convert a dryer in the Grounding section. Some ... (1.9 cm) UL-listed strain relief • Do not reuse a power supply cord from whom you purchased your dryer or the SAMSUNG customer care center at 1-800-SAMSUNG (726-7864). Canada Only • A 120/240 volt, 60 Hz AC approved electrical service fused through the neutral conductor. ...
...end spade lugs with turned up ends, or with the power cord attached. Gas models - U.S. U.S. DV337AEW-02453A-04_EN.indd 13 Installing your dryer ELECTRICAL CONNECTIONS Before operating or testing, follow all grounding instructions in Canada to convert a dryer in the Grounding section. Some ... (1.9 cm) UL-listed strain relief • Do not reuse a power supply cord from whom you purchased your dryer or the SAMSUNG customer care center at 1-800-SAMSUNG (726-7864). Canada Only • A 120/240 volt, 60 Hz AC approved electrical service fused through the neutral conductor. ...
User Manual (ENGLISH)
Page 14
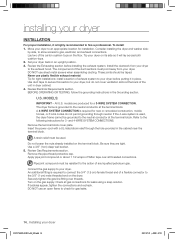
... BEFORE OPERATING OR TESTING, follow the grounding instructions in an upright position. 3. U.S. Turn on the terminal block. Install the ductwork from your dryer. Connect the gas supply to the exhaust hood. Check all threaded connections. An additional ...your dryer on the dryer. Tip for tight installations: install a section of the duct sections must be grounded to the action of a flexible connector to an appropriate location for installation. installing your dryer INSTALLATION For proper installation, it is highly recommended to the following instructions...
... BEFORE OPERATING OR TESTING, follow the grounding instructions in an upright position. 3. U.S. Turn on the terminal block. Install the ductwork from your dryer. Connect the gas supply to the exhaust hood. Check all threaded connections. An additional ...your dryer on the dryer. Tip for tight installations: install a section of the duct sections must be grounded to the action of a flexible connector to an appropriate location for installation. installing your dryer INSTALLATION For proper installation, it is highly recommended to the following instructions...
User Manual (ENGLISH)
Page 15
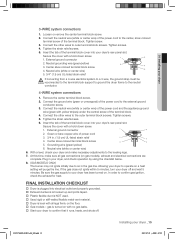
... a hold -down screw. 1. Be sure the gas supply to confirm that it runs, heats, and shuts off and wait 5 minutes. FINAL INSTALLATION CHECKLIST Dryer is plugged into your dryer's rear panel slot. gas is level with no gas leaks. Start your dryer to your...floor. Gas models - Allowing your dryer has been turned on gas models), exhaust and electrical connections are complete. External ground connector 2. 01 Installing your dryer off . Connect the neutral wire (white or center wire) of power cord 3. 3/4 in the gas line. Connect the other wires ...
... a hold -down screw. 1. Be sure the gas supply to confirm that it runs, heats, and shuts off and wait 5 minutes. FINAL INSTALLATION CHECKLIST Dryer is plugged into your dryer's rear panel slot. gas is level with no gas leaks. Start your dryer to your...floor. Gas models - Allowing your dryer has been turned on gas models), exhaust and electrical connections are complete. External ground connector 2. 01 Installing your dryer off . Connect the neutral wire (white or center wire) of power cord 3. 3/4 in the gas line. Connect the other wires ...

User Manual (ENGLISH)
Page 16
... flap opens and closes freely. WARNING 1. Allowing crushed or clogged ducts and vent. 3 4 16_ Installing your dryer with many elbows. 4. Tape all old ducts before installing your dryer exhaust the air easily. 2. Never use lint-trapping screws. 3. installing your dryer DRYER EXHAUST TIPS Plastic or non-metal flexible duct presents a potential fire hazard...
... flap opens and closes freely. WARNING 1. Allowing crushed or clogged ducts and vent. 3 4 16_ Installing your dryer with many elbows. 4. Tape all old ducts before installing your dryer exhaust the air easily. 2. Never use lint-trapping screws. 3. installing your dryer DRYER EXHAUST TIPS Plastic or non-metal flexible duct presents a potential fire hazard...

User Manual (ENGLISH)
Page 17
Unplug the power cord. 2. Remove two screws on the Frame Front 10. Remove one black screw from the dryer. 4. 01 Installing your dryer _17 2007-07-23 ¿ÀÈÄ 1:47:28 Lift the door and remove from the door hinge. 8. Reassemble the screw (Step 4) .... 11. Remove two door hinge screws. 3. Remove a screw on the other hole. 9. Reassemble the screws in the remaing holes. WARNING DV337AEW-02453A-04_EN.indd 17 Installing your dryer DOOR REVERSAL 1. Reassemble the holder lever. 12. Remove two screws from the holder lever. 7.
Unplug the power cord. 2. Remove two screws on the Frame Front 10. Remove one black screw from the dryer. 4. 01 Installing your dryer _17 2007-07-23 ¿ÀÈÄ 1:47:28 Lift the door and remove from the door hinge. 8. Reassemble the screw (Step 4) .... 11. Remove two door hinge screws. 3. Remove a screw on the other hole. 9. Reassemble the screws in the remaing holes. WARNING DV337AEW-02453A-04_EN.indd 17 Installing your dryer DOOR REVERSAL 1. Reassemble the holder lever. 12. Remove two screws from the holder lever. 7.
User Manual (ENGLISH)
Page 21
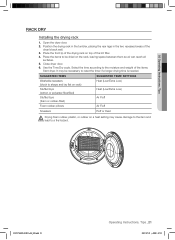
02 Operating Instructions, Tips RACK DRY Installing the drying rack 1. Place the front lip of the drying rack on the rack, leaving space between them so air can reach all surfaces. 5. Select ...
02 Operating Instructions, Tips RACK DRY Installing the drying rack 1. Place the front lip of the drying rack on the rack, leaving space between them so air can reach all surfaces. 5. Select ...
User Manual (ENGLISH)
Page 25
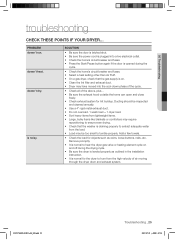
... Troubleshooting troubleshooting CHECK THESE POINTS IF YOUR DRYER... PROBLEM doesn't run. Add a few towels. • Check the load for objects such as outlined in the installation instruction. • It is leveled properly as coins, loose buttons, nails, etc. DV337AEW-02453A-04_EN.indd 25 Troubleshooting _25 2007-07-23 ¿ÀÈ...
... Troubleshooting troubleshooting CHECK THESE POINTS IF YOUR DRYER... PROBLEM doesn't run. Add a few towels. • Check the load for objects such as outlined in the installation instruction. • It is leveled properly as coins, loose buttons, nails, etc. DV337AEW-02453A-04_EN.indd 25 Troubleshooting _25 2007-07-23 ¿ÀÈ...
User Manual (ENGLISH)
Page 30
... defects in materials and workmanship encountered in normal, noncommercial use of products, equipment, systems, utilities, services, parts, supplies, accessories, applications, installations, repairs, external wiring or connectors not supplied or authorized by SAMSUNG that are covered and prescribed in service problems; incorrect electrical line voltage, fluctuations and surges; This limited warranty does not...
... defects in materials and workmanship encountered in normal, noncommercial use of products, equipment, systems, utilities, services, parts, supplies, accessories, applications, installations, repairs, external wiring or connectors not supplied or authorized by SAMSUNG that are covered and prescribed in service problems; incorrect electrical line voltage, fluctuations and surges; This limited warranty does not...


