
User Manual
Page 8
... accordance with the manufacturer's instructions. • Do not place items in accordance with extra detergent will reduce, but not eliminate, the hazard. Never plug the power cord into a receptacle that is recommended for dryer use by the manufacturer of the fabric softener or product. • Clean the lint screen before or after...
... accordance with the manufacturer's instructions. • Do not place items in accordance with extra detergent will reduce, but not eliminate, the hazard. Never plug the power cord into a receptacle that is recommended for dryer use by the manufacturer of the fabric softener or product. • Clean the lint screen before or after...
User Manual
Page 9
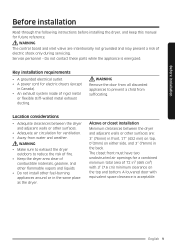
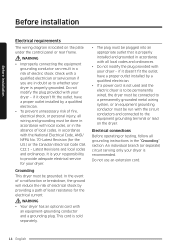
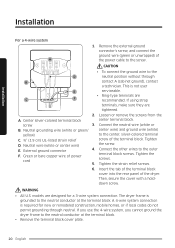
... ducting. WARNING The control board and inlet valve are : 3" (76mm) in the same place as the dryer. Key installation requirements • A grounded electrical outlet. • A power cord for future reference. WARNING • Make sure to exhaust the dryer outdoors to prevent a child from suffocating. Location considerations • Adequate clearances between the dryer...
... ducting. WARNING The control board and inlet valve are : 3" (76mm) in the same place as the dryer. Key installation requirements • A grounded electrical outlet. • A power cord for future reference. WARNING • Make sure to exhaust the dryer outdoors to prevent a child from suffocating. Location considerations • Adequate clearances between the dryer...
User Manual
Page 14
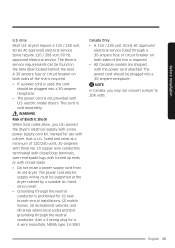
...(for the U.S.) or the Canadian Electrical Code CSA C22.1 - Latest Revisions and local codes and ordinances. Do not use an extension cord. 14 English WARNING • Improperly connecting the equipment grounding conductor can result in the "Grounding" section. Electrical connections Before operating or ... for your dryer - if it doesn't fit the outlet, have a proper outlet installed by a qualified electrician. • If a power cord is not used and the electric dryer is to be permanently wired, the dryer must be connected to whether your dryer is recommended. An...
...(for the U.S.) or the Canadian Electrical Code CSA C22.1 - Latest Revisions and local codes and ordinances. Do not use an extension cord. 14 English WARNING • Improperly connecting the equipment grounding conductor can result in the "Grounding" section. Electrical connections Before operating or ... for your dryer - if it doesn't fit the outlet, have a proper outlet installed by a qualified electrician. • If a power cord is not used and the electric dryer is to be permanently wired, the dryer must be connected to whether your dryer is recommended. An...
User Manual
Page 15
... U.S. The electric service requirements can connect the dryer's electrical supply with a new power supply cord kit, marked for a 4 wire receptacle, NEMA type 14-30R.) Canada Only • A 120 / 240 volt, 60 Hz AC approved electrical service fused through a 30-ampere fuse or circuit breaker on both sides...require a 120 / 240 volt, 60 Hz AC approved electrical service. A 30-ampere fuse or circuit breaker on the data label located behind the door. only Most U.S. Some require 120 / 208 volt, 60 Hz approved electrical service. The power cord should be found on both sides of the ...
... U.S. The electric service requirements can connect the dryer's electrical supply with a new power supply cord kit, marked for a 4 wire receptacle, NEMA type 14-30R.) Canada Only • A 120 / 240 volt, 60 Hz AC approved electrical service fused through a 30-ampere fuse or circuit breaker on both sides...require a 120 / 240 volt, 60 Hz AC approved electrical service. A 30-ampere fuse or circuit breaker on the data label located behind the door. only Most U.S. Some require 120 / 208 volt, 60 Hz approved electrical service. The power cord should be found on both sides of the ...
User Manual
Page 20
... to the neutral conductor at the terminal block. Neutral wire (white or center wire) E. Green or bare copper wire of power cord • To connect the ground wire to the center, silver-colored terminal screw of the dryer. Tighten the screw. 4. Then, secure the cover with a holddown ...
... to the neutral conductor at the terminal block. Neutral wire (white or center wire) E. Green or bare copper wire of power cord • To connect the ground wire to the center, silver-colored terminal screw of the dryer. Tighten the screw. 4. Then, secure the cover with a holddown ...
User Manual
Page 21
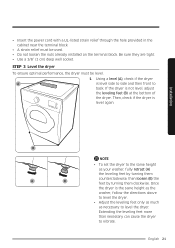
... as much as your washer, fully retract (A) the leveling feet by turning them A B counterclockwise, then loosen (B) the feet by turning them clockwise. • Insert the power cord with a UL-listed strain relief through the hole provided in the cabinet near the terminal block. • A strain relief must be used. • Do not...
... as much as your washer, fully retract (A) the leveling feet by turning them A B counterclockwise, then loosen (B) the feet by turning them clockwise. • Insert the power cord with a UL-listed strain relief through the hole provided in the cabinet near the terminal block. • A strain relief must be used. • Do not...

User Manual
Page 28
Remove the two screws on the opposite side of the dryer. 2. Remove the two hinge screws from the door, and then remove the door by lifting it up slightly. 3. Unplug the power cord of the door hinge. 28 English Installation Installation Switching the door position To reverse the direction of the door, we recommend that you contact a qualified technician. 1.
Remove the two screws on the opposite side of the dryer. 2. Remove the two hinge screws from the door, and then remove the door by lifting it up slightly. 3. Unplug the power cord of the door hinge. 28 English Installation Installation Switching the door position To reverse the direction of the door, we recommend that you contact a qualified technician. 1.
User Manual
Page 42
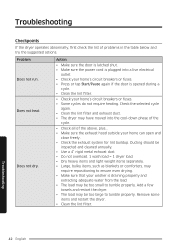
... open and close freely. • Check the exhaust system for lint buildup. Action • Make sure the door is latched shut. • Make sure the power cord is plugged into the cool-down phase of the cycle. • Check all of problems in the table below and try the suggested actions. Troubleshooting...
... open and close freely. • Check the exhaust system for lint buildup. Action • Make sure the door is latched shut. • Make sure the power cord is plugged into the cool-down phase of the cycle. • Check all of problems in the table below and try the suggested actions. Troubleshooting...

User Manual
Page 47
Cut off the power cord so that animals and small children cannot get trapped inside the appliance. Iron dry or steam temperatures High Medium Low Warning symbols for laundering Do ... Line dry / Hang to dispose of this appliance, please observe local waste disposal regulations. Remove the door so that the appliance cannot be connected to a power source. Specification English 47 If you decide to dry Drip dry Dry flat Protecting the environment This appliance is manufactured from recyclable materials.
Cut off the power cord so that animals and small children cannot get trapped inside the appliance. Iron dry or steam temperatures High Medium Low Warning symbols for laundering Do ... Line dry / Hang to dispose of this appliance, please observe local waste disposal regulations. Remove the door so that the appliance cannot be connected to a power source. Specification English 47 If you decide to dry Drip dry Dry flat Protecting the environment This appliance is manufactured from recyclable materials.


