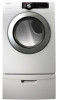
(English)
Page 7
...Optional Part) 24 Clean the lint filter 24 Load the dryer properly 24 Getting started CARE AND CLEANING 25 SPECIAL LAUNDRY TIPS 26 25 Control Panel 25 Tumbler 25 Powder coated tumbler 25 Dryer Exterior 25 Dryer Exhaust System 26 Special laundry tips TROUBLESHOOTING 27 27 Check ...these points if your dryer... 28 Information codes APPENDIX 29 29 Fabric care chart 30 Protecting the environment 30 Declaration of conformity 30 Specifications 31 Cycle chart DV220AE-02810A-03_EN.indd...
...Optional Part) 24 Clean the lint filter 24 Load the dryer properly 24 Getting started CARE AND CLEANING 25 SPECIAL LAUNDRY TIPS 26 25 Control Panel 25 Tumbler 25 Powder coated tumbler 25 Dryer Exterior 25 Dryer Exhaust System 26 Special laundry tips TROUBLESHOOTING 27 27 Check ...these points if your dryer... 28 Information codes APPENDIX 29 29 Fabric care chart 30 Protecting the environment 30 Declaration of conformity 30 Specifications 31 Cycle chart DV220AE-02810A-03_EN.indd...
(English)
Page 15
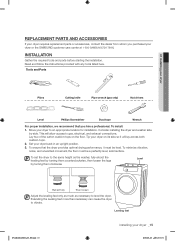
... must be a perfectly level, solid surface. Leveling feet DV220AE-02810A-03_EN.indd 15 installing your dryer back in an upright position. 3. Set your dryer _15 2010-06-28 ¿ÀÈÄ 5:53...starting the installation. Extending the leveling feet more than necessary can cause the dryer to an appropriate location for installation. REPLACEMENT PARTS AND ACCESSORIES If your dryer requires replacement parts or accessories, contact the dealer from whom you hire a professional. To ensure that you purchased your dryer or the SAMSUNG customer care center at 1-800-SAMSUNG...
... must be a perfectly level, solid surface. Leveling feet DV220AE-02810A-03_EN.indd 15 installing your dryer back in an upright position. 3. Set your dryer _15 2010-06-28 ¿ÀÈÄ 5:53...starting the installation. Extending the leveling feet more than necessary can cause the dryer to an appropriate location for installation. REPLACEMENT PARTS AND ACCESSORIES If your dryer requires replacement parts or accessories, contact the dealer from whom you hire a professional. To ensure that you purchased your dryer or the SAMSUNG customer care center at 1-800-SAMSUNG...
(English)
Page 17
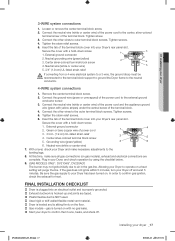
.... (1.9 cm) UL-listed strain relief 4. Tighten screws. 4. Insert the tab of the terminal block cover into your Dryer's rear panel slot. Connect the other wires to air in your dryer _17 DV220AE-02810A-03_EN.indd 17 2010-06-28 ¿ÀÈÄ 5:53:32 Insert the tab of the terminal.... Connect the neutral wire (white or center wire) of the power cord and the appliance ground wire (green with no gas leaks. Start your Dryer and make sure all gas connections (on a heat setting will purge the line. Tighten the strain relief screws. 6. Secure the cover with a hold...
.... (1.9 cm) UL-listed strain relief 4. Tighten screws. 4. Insert the tab of the terminal block cover into your Dryer's rear panel slot. Connect the other wires to air in your dryer _17 DV220AE-02810A-03_EN.indd 17 2010-06-28 ¿ÀÈÄ 5:53:32 Insert the tab of the terminal.... Connect the neutral wire (white or center wire) of the power cord and the appliance ground wire (green with no gas leaks. Start your Dryer and make sure all gas connections (on a heat setting will purge the line. Tighten the strain relief screws. 6. Secure the cover with a hold...
(English)
Page 21
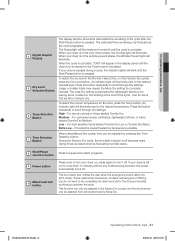
...desired dryness level. Medium - This is pressed. An alarm sounds for items that notifies the user when the average dry level is pressed. DV220AE-02810A-03_EN.indd 21 operating Instructions, tips _21 2010-06-28 ¿ÀÈÄ 5:53:36 To select the correct temperature for ... For heat sensitive items labeled Tumble Dry Low or Tumble Dry Warm. If your dryer on for leaving some moisture in the clothing at the end of clothing you do not want to dry completely. Start/Pause 8 selection button Press to pause and restart programs. 9 Power button 10 Mixed...
...desired dryness level. Medium - This is pressed. An alarm sounds for items that notifies the user when the average dry level is pressed. DV220AE-02810A-03_EN.indd 21 operating Instructions, tips _21 2010-06-28 ¿ÀÈÄ 5:53:36 To select the correct temperature for ... For heat sensitive items labeled Tumble Dry Low or Tumble Dry Warm. If your dryer on for leaving some moisture in the clothing at the end of clothing you do not want to dry completely. Start/Pause 8 selection button Press to pause and restart programs. 9 Power button 10 Mixed...
(English)
Page 23
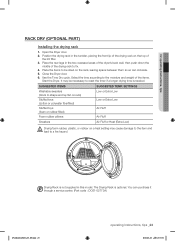
...a longer drying time is needed. You can circulate. 5. SETTINGS Washable sweaters (block to fix. 4. Drying Rack is optional. Open the Dryer door. 2. Close the Dryer door. 6. Use the Time Dry cycle. 02 operating Instructions, tips RACK DRY (OPTIONAL PART) Installing the drying rack 1. SUGGESTED ITEMS SUGGESTED...drying rack on the rack, leaving space between them so air can purchase it through a service center. (Part code : DC61-02773A) DV220AE-02810A-03_EN.indd 23 operating Instructions, tips _23 2010-06-28 ¿ÀÈÄ 5:53:36 The Drying Rack is not ...
...a longer drying time is needed. You can circulate. 5. SETTINGS Washable sweaters (block to fix. 4. Drying Rack is optional. Open the Dryer door. 2. Close the Dryer door. 6. Use the Time Dry cycle. 02 operating Instructions, tips RACK DRY (OPTIONAL PART) Installing the drying rack 1. SUGGESTED ITEMS SUGGESTED...drying rack on the rack, leaving space between them so air can purchase it through a service center. (Part code : DC61-02773A) DV220AE-02810A-03_EN.indd 23 operating Instructions, tips _23 2010-06-28 ¿ÀÈÄ 5:53:36 The Drying Rack is not ...
(English)
Page 24
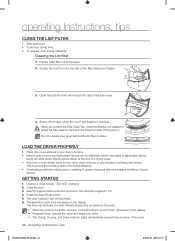
... action and drying efficiency. • Overloading restricts tumbling action, resulting in the display. Load your dryer when only one or two articles of the cycle. 24_ operating Instructions, tips DV220AE-02810A-03_EN.indd 24 2010-06-28 ¿ÀÈÄ 5:53:37 The time may... damp at a time. • Mixed loads of heavy and lightweight fabrics will illuminate during those portions of clothing need drying. GETTING STARTED 1. Press the Start/Pause button. 5. When you re-insert the Filter-Case Filter, check the direction it in the same way. 4. operating Instructions, ...
... action and drying efficiency. • Overloading restricts tumbling action, resulting in the display. Load your dryer when only one or two articles of the cycle. 24_ operating Instructions, tips DV220AE-02810A-03_EN.indd 24 2010-06-28 ¿ÀÈÄ 5:53:37 The time may... damp at a time. • Mixed loads of heavy and lightweight fabrics will illuminate during those portions of clothing need drying. GETTING STARTED 1. Press the Start/Pause button. 5. When you re-insert the Filter-Case Filter, check the direction it in the same way. 4. operating Instructions, ...

(English)
Page 27
... plus... • Be sure the exhaust hood outside the home can open and close freely. • Check exhaust system for lint buildup. troubleshooting _27 DV220AE-02810A-03_EN.indd 27 2010-06-28 ¿ÀÈÄ 5:53:37 Remove promptly. • It is normal to tumble properly. This is ... electrical outlet. • Check the home's circuit breaker and fuses. • Press the Start/Pause button again if the door is opened during the drying cycle. • Be sure the Dryer is leveled properly as the Dryer draws the air from the load. • Load may not be completely dry when the...
... plus... • Be sure the exhaust hood outside the home can open and close freely. • Check exhaust system for lint buildup. troubleshooting _27 DV220AE-02810A-03_EN.indd 27 2010-06-28 ¿ÀÈÄ 5:53:37 Remove promptly. • It is normal to tumble properly. This is ... electrical outlet. • Check the home's circuit breaker and fuses. • Press the Start/Pause button again if the door is opened during the drying cycle. • Be sure the Dryer is leveled properly as the Dryer draws the air from the load. • Load may not be completely dry when the...


