
User Manual (user Manual) (ver.1.0) (English)
Page 1
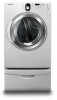
DV219AE* DV219AG* Gas and Electric Dryer user manual imagine the possibilities Thank you for purchasing this Samsung product. To receive more complete service, please register your product at www.samsung.com/register DV219AGW-02691A_EN.indd 1 2009-01-30 ¿ÀÈÄ 6:19:21
DV219AE* DV219AG* Gas and Electric Dryer user manual imagine the possibilities Thank you for purchasing this Samsung product. To receive more complete service, please register your product at www.samsung.com/register DV219AGW-02691A_EN.indd 1 2009-01-30 ¿ÀÈÄ 6:19:21
User Manual (user Manual) (ver.1.0) (English)
Page 2
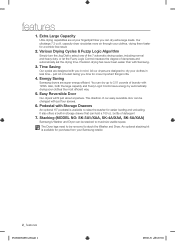
... fingertips! The direction of detergent 7. bottle of our easy reversible door can be stacked to dry your Samsung retailer. 2_ features DV219AGW-02691A_EN.indd 2 2009-01-30 ¿ÀÈÄ 6:19:21 The Dryer legs need to be changed with Storage Drawers An optional 15" pedestal is available for easier loading and...
... fingertips! The direction of detergent 7. bottle of our easy reversible door can be stacked to dry your Samsung retailer. 2_ features DV219AGW-02691A_EN.indd 2 2009-01-30 ¿ÀÈÄ 6:19:21 The Dryer legs need to be changed with Storage Drawers An optional 15" pedestal is available for easier loading and...
User Manual (user Manual) (ver.1.0) (English)
Page 3
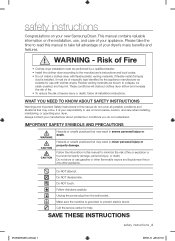
... may result in this or any other appliance. Do NOT disassemble. This manual contains valuable information on your new Samsung Dryer. These conditions will obstruct clothes dryer airflow and increase the risk of fire. • To reduce the risk of severe injury or death, follow... of Fire • Clothes dryer installation must be easily crushed, and trap lint. Do NOT attempt. Unplug the power plug from the wall socket. SAVE THESE INSTRUCTIONS safety instructions _3 DV219AGW-02691A_EN.indd 3 2009-01-30 ¿ÀÈÄ 6:19:21 Follow directions ...
... may result in this or any other appliance. Do NOT disassemble. This manual contains valuable information on your new Samsung Dryer. These conditions will obstruct clothes dryer airflow and increase the risk of fire. • To reduce the risk of severe injury or death, follow... of Fire • Clothes dryer installation must be easily crushed, and trap lint. Do NOT attempt. Unplug the power plug from the wall socket. SAVE THESE INSTRUCTIONS safety instructions _3 DV219AGW-02691A_EN.indd 3 2009-01-30 ¿ÀÈÄ 6:19:21 Follow directions ...

User Manual (user Manual) (ver.1.0) (English)
Page 4
...8226; Do not turn on the appliance. • Do not touch any electrical switch. • Do not use by the manufacturer of the dryer and exhaust duct should not be performed by a qualified installer, service agency, or the gas supplier. Do not install or store this appliance ... of the appliance. Keep the area around the exhaust opening and surrounding areas free from a neighbor's phone. SAVE THESE INSTRUCTIONS 4_ safety instructions DV219AGW-02691A_EN.indd 4 2009-01-30 ¿ÀÈÄ 6:19:21 Heated foam rubber materials can, under certain circumstances, produce fire by ...
...8226; Do not turn on the appliance. • Do not touch any electrical switch. • Do not use by the manufacturer of the dryer and exhaust duct should not be performed by a qualified installer, service agency, or the gas supplier. Do not install or store this appliance ... of the appliance. Keep the area around the exhaust opening and surrounding areas free from a neighbor's phone. SAVE THESE INSTRUCTIONS 4_ safety instructions DV219AGW-02691A_EN.indd 4 2009-01-30 ¿ÀÈÄ 6:19:21 Heated foam rubber materials can, under certain circumstances, produce fire by ...

User Manual (user Manual) (ver.1.0) (English)
Page 5
... heat. All washed and unwashed fabrics that contain vegetable oil or cooking oil can ignite spontaneously. SAVE THESE INSTRUCTIONS safety instructions _5 DV219AGW-02691A_EN.indd 5 2009-01-30 ¿ÀÈÄ 6:19:21 Do not sit on clothing can be properly grounded. Do..., or other heavy metal or solid things. Residual oil on top of continuing product improvements, Samsung reserves the right to catch fire. Never remove these items in your dryer. See installation instructions for spontaneous combustion increases when items containing vegetable oil or cooking oil are ...
... heat. All washed and unwashed fabrics that contain vegetable oil or cooking oil can ignite spontaneously. SAVE THESE INSTRUCTIONS safety instructions _5 DV219AGW-02691A_EN.indd 5 2009-01-30 ¿ÀÈÄ 6:19:21 Do not sit on clothing can be properly grounded. Do..., or other heavy metal or solid things. Residual oil on top of continuing product improvements, Samsung reserves the right to catch fire. Never remove these items in your dryer. See installation instructions for spontaneous combustion increases when items containing vegetable oil or cooking oil are ...

User Manual (user Manual) (ver.1.0) (English)
Page 6
... Gas requirements 12 Electrical requirements 12 Grounding 13 Electrical connections 14 Replacement parts and accessories 14 Installation 17 Final installation checklist 18 Dryer Exhaust Tips 19 Door Reversal 20 Overview of the control panel 22 Child lock 23 Rack Dry 24 Clean the lint filter...26 Special laundry tips TROUBLESHOOTING 27 27 Check these points if your dryer... 28 Information codes 6_ contents APPENDIX 29 29 Fabric care chart 30 Protecting the environment 30 Declaration of conformity 30 Specifications 31 Cycle chart DV219AGW-02691A_EN.indd 6 2009-01-30 ¿ÀÈÄ ...
... Gas requirements 12 Electrical requirements 12 Grounding 13 Electrical connections 14 Replacement parts and accessories 14 Installation 17 Final installation checklist 18 Dryer Exhaust Tips 19 Door Reversal 20 Overview of the control panel 22 Child lock 23 Rack Dry 24 Clean the lint filter...26 Special laundry tips TROUBLESHOOTING 27 27 Check these points if your dryer... 28 Information codes 6_ contents APPENDIX 29 29 Fabric care chart 30 Protecting the environment 30 Declaration of conformity 30 Specifications 31 Cycle chart DV219AGW-02691A_EN.indd 6 2009-01-30 ¿ÀÈÄ ...

User Manual (user Manual) (ver.1.0) (English)
Page 7
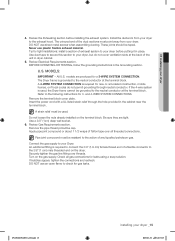
... responsibility of poor setup, adjustment, and connection, it is required. A POWER CORD for proper installation. 1. SEE DRYER EXTERIOR Door Control panel Adjustable legs DV219AGW-02691A_EN.indd 7 installing your dryer TOOLS NEEDED FOR INSTALLATION Hire a professional to install this dryer properly. EXHAUST SYSTEM - must meet national and local codes. 4. See page 13. 3. Make sure you...
... responsibility of poor setup, adjustment, and connection, it is required. A POWER CORD for proper installation. 1. SEE DRYER EXTERIOR Door Control panel Adjustable legs DV219AGW-02691A_EN.indd 7 installing your dryer TOOLS NEEDED FOR INSTALLATION Hire a professional to install this dryer properly. EXHAUST SYSTEM - must meet national and local codes. 4. See page 13. 3. Make sure you...

User Manual (user Manual) (ver.1.0) (English)
Page 8
...ground or other concealed spaces. • Only a rigid or flexible metal duct should be punctured, reduce airflow, extend drying times, and affect dryer operation. • Exhaust systems longer than 4 inches (10.2 cm) in diameter can result in increased lint accumulation. The hood opening should be...duct is bent too sharply. • Never install any type of flexible duct in walls, ceilings, or other obstruction. installing your dryer DV219AGW-02691A_EN.indd 8 2009-01-30 ¿ÀÈÄ 6:19:22 Lint accumulation should point down towards the exhaust hood to reduce...
...ground or other concealed spaces. • Only a rigid or flexible metal duct should be punctured, reduce airflow, extend drying times, and affect dryer operation. • Exhaust systems longer than 4 inches (10.2 cm) in diameter can result in increased lint accumulation. The hood opening should be...duct is bent too sharply. • Never install any type of flexible duct in walls, ceilings, or other obstruction. installing your dryer DV219AGW-02691A_EN.indd 8 2009-01-30 ¿ÀÈÄ 6:19:22 Lint accumulation should point down towards the exhaust hood to reduce...

User Manual (user Manual) (ver.1.0) (English)
Page 9
...inside the existing duct. • The duct is not kinked or crushed. • The exhaust hood damper opens and closes freely. The Dryer tumbler should be located where there is enough space at the point where the exhaust duct connects to make sure: • The exhaust ...system you must have two unobstructed air openings for rear exhaust. THE DRYER AREA IS TO BE KEPT CLEAR OF COMBUSTIBLE MATERIALS, GASOLINE, AND OTHER FLAMMABLE VAPORS AND LIQUIDS. DV219AGW-02691A_EN.indd 9 installing your dryer If the new Dryer is factory-ready for a combined minimum total area of fire when...
...inside the existing duct. • The duct is not kinked or crushed. • The exhaust hood damper opens and closes freely. The Dryer tumbler should be located where there is enough space at the point where the exhaust duct connects to make sure: • The exhaust ...system you must have two unobstructed air openings for rear exhaust. THE DRYER AREA IS TO BE KEPT CLEAR OF COMBUSTIBLE MATERIALS, GASOLINE, AND OTHER FLAMMABLE VAPORS AND LIQUIDS. DV219AGW-02691A_EN.indd 9 installing your dryer If the new Dryer is factory-ready for a combined minimum total area of fire when...

User Manual (user Manual) (ver.1.0) (English)
Page 10
...materials that extend into the room. and Canada: • Refer to ensure containment of exhaust air, heat, and lint. 10_ installing your dryer DV219AGW-02691A_EN.indd 10 2009-01-30 ¿ÀÈÄ 6:19:22 The exhaust duct may not terminate underneath the mobile home. In...-metal, or combustible, replace it with the exhaust duct termination securely fastened to the outside will not support combustion. Call 1-800-SAMSUNG for more information. NEVER USE A PLASTIC OR NON-METAL FLEXIBLE DUCT. See Exhausting section for information on purchasing the Floor Anchoring Kit...
...materials that extend into the room. and Canada: • Refer to ensure containment of exhaust air, heat, and lint. 10_ installing your dryer DV219AGW-02691A_EN.indd 10 2009-01-30 ¿ÀÈÄ 6:19:22 The exhaust duct may not terminate underneath the mobile home. In...-metal, or combustible, replace it with the exhaust duct termination securely fastened to the outside will not support combustion. Call 1-800-SAMSUNG for more information. NEVER USE A PLASTIC OR NON-METAL FLEXIBLE DUCT. See Exhausting section for information on purchasing the Floor Anchoring Kit...
User Manual (user Manual) (ver.1.0) (English)
Page 11
...; 6:19:22 Commonwealth of 3' (36"). - WARNING - Install and use in the gas supply line to the action of any pressure testing of your dryer GAS REQUIREMENTS Use only natural or LP (liquid propane) gases. If you purchase and install a UL-approved gas detector. A "T" handle manual gas valve ... to connect to ignite the burner. If a flexible gas connector is used must be raised 18 inches (46 cm) above the floor. DV219AGW-02691A_EN.indd 11 installing your dryer. A 1/2" (1.27 cm) gas supply line is no constant burning pilot. Gas leaks may not be converted for use your...
...; 6:19:22 Commonwealth of 3' (36"). - WARNING - Install and use in the gas supply line to the action of any pressure testing of your dryer GAS REQUIREMENTS Use only natural or LP (liquid propane) gases. If you purchase and install a UL-approved gas detector. A "T" handle manual gas valve ... to connect to ignite the burner. If a flexible gas connector is used must be raised 18 inches (46 cm) above the floor. DV219AGW-02691A_EN.indd 11 installing your dryer. A 1/2" (1.27 cm) gas supply line is no constant burning pilot. Gas leaks may not be converted for use your...

User Manual (user Manual) (ver.1.0) (English)
Page 12
...accordance with the national Fuel Code ANSI/Z2231 - All gas installations must be connected to the equipment grounding terminal. 12_ installing your dryer DV219AGW-02691A_EN.indd 12 2009-01-30 ¿ÀÈÄ 6:19:22 B149 Installation Codes - NEVER CONNECT GROUND WIRE TO ... providing a path of least resistance for the U.S.) or the Canadian Electrical Code CSA C22.1 - The plug must be grounded. installing your dryer ELECTRICAL REQUIREMENTS A Wiring diagram is located on the plate below the control panel. • WARNING • • Improper connection of the...
...accordance with the national Fuel Code ANSI/Z2231 - All gas installations must be connected to the equipment grounding terminal. 12_ installing your dryer DV219AGW-02691A_EN.indd 12 2009-01-30 ¿ÀÈÄ 6:19:22 B149 Installation Codes - NEVER CONNECT GROUND WIRE TO ... providing a path of least resistance for the U.S.) or the Canadian Electrical Code CSA C22.1 - The plug must be grounded. installing your dryer ELECTRICAL REQUIREMENTS A Wiring diagram is located on the plate below the control panel. • WARNING • • Improper connection of the...

User Manual (user Manual) (ver.1.0) (English)
Page 13
.... • The power cord is prohibited for 4 wire receptacle, NEMA type 14-30R.) Electric models - Gas models - listed and rated at the dryer cabinet with a dryer, that is required. • All Canadian models are shipped with U.S. Canada Only • A 120/240 volt, 60 Hz AC approved electrical service ... circuit breaker on both sides of cord. 2. 3/4" (1.9 cm) UL-listed strain relief • Do not reuse a power supply cord from an old Dryer. DV219AGW-02691A_EN.indd 13 installing your Dryer is not permissible to convert a dryer in the Grounding section. Electric models -
.... • The power cord is prohibited for 4 wire receptacle, NEMA type 14-30R.) Electric models - Gas models - listed and rated at the dryer cabinet with a dryer, that is required. • All Canadian models are shipped with U.S. Canada Only • A 120/240 volt, 60 Hz AC approved electrical service ... circuit breaker on both sides of cord. 2. 3/4" (1.9 cm) UL-listed strain relief • Do not reuse a power supply cord from an old Dryer. DV219AGW-02691A_EN.indd 13 installing your Dryer is not permissible to convert a dryer in the Grounding section. Electric models -

User Manual (user Manual) (ver.1.0) (English)
Page 14
...you purchased your dryer or the SAMSUNG customer care center at 1-800-SAMSUNG (726-7864). Read and follow the instructions provided with any tools listed here. Consider installing the dryer and washer side ...by turning them clockwise Level Retract fully Then loosen Adjust the leveling feet only as much as necessary to an appropriate location for installation. Set your dryer DV219AGW...
...you purchased your dryer or the SAMSUNG customer care center at 1-800-SAMSUNG (726-7864). Read and follow the instructions provided with any tools listed here. Consider installing the dryer and washer side ...by turning them clockwise Level Retract fully Then loosen Adjust the leveling feet only as much as necessary to an appropriate location for installation. Set your dryer DV219AGW...
User Manual (user Manual) (ver.1.0) (English)
Page 15
... joint compound or about 1 1/2 wraps of the unit in the cabinet near the terminal block. An additional fitting is grounded to your dryer _15 2009-01-30 ¿ÀÈÄ 6:19:25 DO NOT use sheet metal screws when assembling ducting. and 4-WIRE SYSTEM ...through neutral conductor. Remove the pipe thread protective cap. DV219AGW-02691A_EN.indd 15 installing your Dryer. If bubbles appear, tighten the connections and recheck. 01 installing your dryer, but do not permit grounding through the hole provided in dryer cabinet. 5. Review the Exhausting section before putting it in...
... joint compound or about 1 1/2 wraps of the unit in the cabinet near the terminal block. An additional fitting is grounded to your dryer _15 2009-01-30 ¿ÀÈÄ 6:19:25 DO NOT use sheet metal screws when assembling ducting. and 4-WIRE SYSTEM ...through neutral conductor. Remove the pipe thread protective cap. DV219AGW-02691A_EN.indd 15 installing your Dryer. If bubbles appear, tighten the connections and recheck. 01 installing your dryer, but do not permit grounding through the hole provided in dryer cabinet. 5. Review the Exhausting section before putting it in...

User Manual (user Manual) (ver.1.0) (English)
Page 16
... External ground connector 2. External ground connector 2. Remove the center terminal block screw. 2. Grounding wire (green/yellow) 6. installing your dryer DV219AGW-02691A_EN.indd 16 2009-01-30 ¿ÀÈÄ 6:19:25 Loosen or remove the center terminal block screw. 2. Connect ... from a 4-wire electrical system to a 3-wire, the ground strap must be WARNING reconnected to the terminal block support to ground the Dryer frame to the neutral conductor. 4-WIRE system connections 1. Tighten screws. 5. Secure the cover with yellow stripes) under the central screw of...
... External ground connector 2. External ground connector 2. Remove the center terminal block screw. 2. Grounding wire (green/yellow) 6. installing your dryer DV219AGW-02691A_EN.indd 16 2009-01-30 ¿ÀÈÄ 6:19:25 Loosen or remove the center terminal block screw. 2. Connect ... from a 4-wire electrical system to a 3-wire, the ground strap must be WARNING reconnected to the terminal block support to ground the Dryer frame to the neutral conductor. 4-WIRE system connections 1. Tighten screws. 5. Secure the cover with yellow stripes) under the central screw of...
User Manual (user Manual) (ver.1.0) (English)
Page 17
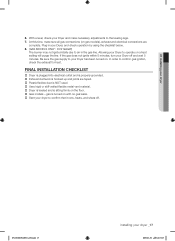
... the floor. Gas models - With a level, check your dryer 6. Plug in the gas line. If the gas does not ignite within 5 minutes, turn your Dryer, and check operation by using the checklist below. 8. (GAS MODELS ONLY : DV219AGW) The burner may not ignite initially due to the leveling legs. 7.... In order to your dryer _17 2009-01-30 ¿ÀÈÄ 6:19:25 At this time, make necessary adjustments to air in your Dryer off . DV219AGW-02691A_EN.indd 17 installing your Dryer has been turned on. Be sure the gas supply to ...
... the floor. Gas models - With a level, check your dryer 6. Plug in the gas line. If the gas does not ignite within 5 minutes, turn your Dryer, and check operation by using the checklist below. 8. (GAS MODELS ONLY : DV219AGW) The burner may not ignite initially due to the leveling legs. 7.... In order to your dryer _17 2009-01-30 ¿ÀÈÄ 6:19:25 At this time, make necessary adjustments to air in your Dryer off . DV219AGW-02691A_EN.indd 17 installing your Dryer has been turned on. Be sure the gas supply to ...
User Manual (user Manual) (ver.1.0) (English)
Page 18
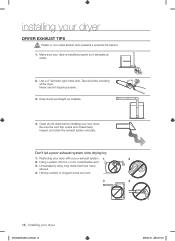
.... 3. Never use lint-trapping screws. 3. Inspect and clean the exhaust system annually. Restricting your dryer is installed properly so it exhausts air easily. 2. Clean all joints, including at the dryer. Use a 4" diameter rigid metal duct. Be sure the vent flap opens and closes freely. ...Tape all old ducts before installing your new dryer. Having crushed or clogged ducts and vent. 3 4 18_ installing your dryer DRYER EXHAUST TIPS Plastic or non-metal flexible duct presents a potential fire hazard. Unnecessarily using long ducts ...
.... 3. Never use lint-trapping screws. 3. Inspect and clean the exhaust system annually. Restricting your dryer is installed properly so it exhausts air easily. 2. Clean all joints, including at the dryer. Use a 4" diameter rigid metal duct. Be sure the vent flap opens and closes freely. ...Tape all old ducts before installing your new dryer. Having crushed or clogged ducts and vent. 3 4 18_ installing your dryer DRYER EXHAUST TIPS Plastic or non-metal flexible duct presents a potential fire hazard. Unnecessarily using long ducts ...

User Manual (user Manual) (ver.1.0) (English)
Page 19
Remove two door hinge screws. 3. Lift the door and remove it to the dryer. 11. Reinsert the black screw in the remaining holes. Reinsert the screw (Step 4) on the opposite side of the door hinge. 6. Reattach the holder lever. ... 10. Remove a screw on the other hole. 9. Unplug the power cord. 2. 01 installing your dryer _19 2009-01-30 ¿ÀÈÄ 6:19:29 Remove two screws from the door hinge. 8. DV219AGW-02691A_EN.indd 19 installing your dryer DOOR REVERSAL 1. Place the door on the Frame Front 5. Reattach the screws in the...
Remove two door hinge screws. 3. Lift the door and remove it to the dryer. 11. Reinsert the black screw in the remaining holes. Reinsert the screw (Step 4) on the opposite side of the door hinge. 6. Reattach the holder lever. ... 10. Remove a screw on the other hole. 9. Unplug the power cord. 2. 01 installing your dryer _19 2009-01-30 ¿ÀÈÄ 6:19:29 Remove two screws from the door hinge. 8. DV219AGW-02691A_EN.indd 19 installing your dryer DOOR REVERSAL 1. Place the door on the Frame Front 5. Reattach the screws in the...

User Manual (user Manual) (ver.1.0) (English)
Page 20
... Wrinkle Release can be used with any temperature selection. The display window shows the estimated time remaining in the display panel until the dryer door is opened or the Power key is pushed. When the cycle is paused during a cycle, the indicator lights will illuminate....- The estimated time remaining may fluctuate as jeans, corduroys, or work clothes. The Delicates cycle is reached. When your dryer is pressed. 20_ operating Instructions, tips DV219AGW-02691A_EN.indd 20 2009-01-30 ¿ÀÈÄ 6:19:29 Wrinkle Release - The Wrinkle Release cycle will ...
... Wrinkle Release can be used with any temperature selection. The display window shows the estimated time remaining in the display panel until the dryer door is opened or the Power key is pushed. When the cycle is paused during a cycle, the indicator lights will illuminate....- The estimated time remaining may fluctuate as jeans, corduroys, or work clothes. The Delicates cycle is reached. When your dryer is pressed. 20_ operating Instructions, tips DV219AGW-02691A_EN.indd 20 2009-01-30 ¿ÀÈÄ 6:19:29 Wrinkle Release - The Wrinkle Release cycle will ...

