User Manual (user Manual) (ver.1.0) (English)
Page 1
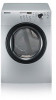
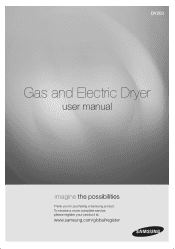
To receive a more complete service, please register your product at www.samsung.com/global/register DV203 Gas and Electric Dryer user manual imagine the possibilities Thank you for purchasing a Samsung product.
To receive a more complete service, please register your product at www.samsung.com/global/register DV203 Gas and Electric Dryer user manual imagine the possibilities Thank you for purchasing a Samsung product.
User Manual (user Manual) (ver.1.0) (English)
Page 2
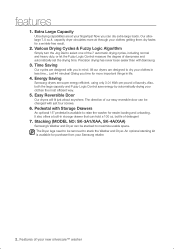
... with just four screws. 6. Stacking (MODEL NO: SK-3A1/XAA, SK-4A/XAA) Samsung's Washer and Dryer can dry extra-large loads. features 1. Extra Large Capacity Ultra drying capabilities are designed with Samsung. 3. Our ultralarge 7.0 cu.ft. Precision drying has never been easier than with you can... easier loading and unloading. just 44 minutes! Giving you time for purchase from your Samsung retailer. 2_ Features of laundry. bottle of dampness and automatically set the drying time. The Dryer legs need to be stacked to select one of the 7 automatic drying cycles, including...
... with just four screws. 6. Stacking (MODEL NO: SK-3A1/XAA, SK-4A/XAA) Samsung's Washer and Dryer can dry extra-large loads. features 1. Extra Large Capacity Ultra drying capabilities are designed with Samsung. 3. Our ultralarge 7.0 cu.ft. Precision drying has never been easier than with you can... easier loading and unloading. just 44 minutes! Giving you time for purchase from your Samsung retailer. 2_ Features of laundry. bottle of dampness and automatically set the drying time. The Dryer legs need to be stacked to select one of the 7 automatic drying cycles, including...
User Manual (user Manual) (ver.1.0) (English)
Page 3
...use common sense, caution, and care when installing, maintaining, or operating your manufacturer about problems or conditions you cannot reach your new Samsung Dryer. Follow the gas supplier's instructions. • If you do not cover all occupants. • Immediately call the fire department....Do NOT touch. Make sure the machine is your responsibility to prevent property damage, personal injury, or death. Always contact your dryer. Unplug the pwer plug from a neighbor's phone. Safety information _3 This manual contains valuable information on the appliance. • ...
...use common sense, caution, and care when installing, maintaining, or operating your manufacturer about problems or conditions you cannot reach your new Samsung Dryer. Follow the gas supplier's instructions. • If you do not cover all occupants. • Immediately call the fire department....Do NOT touch. Make sure the machine is your responsibility to prevent property damage, personal injury, or death. Always contact your dryer. Unplug the pwer plug from a neighbor's phone. Safety information _3 This manual contains valuable information on the appliance. • ...
User Manual (user Manual) (ver.1.0) (English)
Page 4
... damage your dryer. These objects could ignite or explode. Do not wash clothing with controls. Do not install or store this appliance. Clean the lint screen before using the appliance. ie. safety instructions Read all traces of continuing product improvements, Samsung reserves the ...hard objects, foreign material, etc. Ensure pockets are many highly flammable items used near children and pets. The interior of the dryer and exhaust duct should not be cleaned periodically by qualified service personnel. For complete details, see the Installation Instructions packed with ...
... damage your dryer. These objects could ignite or explode. Do not wash clothing with controls. Do not install or store this appliance. Clean the lint screen before using the appliance. ie. safety instructions Read all traces of continuing product improvements, Samsung reserves the ...hard objects, foreign material, etc. Ensure pockets are many highly flammable items used near children and pets. The interior of the dryer and exhaust duct should not be cleaned periodically by qualified service personnel. For complete details, see the Installation Instructions packed with ...
User Manual (user Manual) (ver.1.0) (English)
Page 5
...vegetable oil or cooking oil are hot. Even after being washed, these items may contain significant amounts of items may prevent heat from the dryer hot or interrupt the drying cycle until the items have been spotted or soaked with the manufacturer's instructions. Heat sources such as your system... items in hot water with extra detergent will reduce, but not eliminate, the hazard. Safety information _5 Do not place items in your dryer that contain vegetable oil or cooking oil can be detected by smell alone. Always use in accordance with vegetable oil or cooking oil. WARNING...
...vegetable oil or cooking oil are hot. Even after being washed, these items may contain significant amounts of items may prevent heat from the dryer hot or interrupt the drying cycle until the items have been spotted or soaked with the manufacturer's instructions. Heat sources such as your system... items in hot water with extra detergent will reduce, but not eliminate, the hazard. Safety information _5 Do not place items in your dryer that contain vegetable oil or cooking oil can be detected by smell alone. Always use in accordance with vegetable oil or cooking oil. WARNING...

User Manual (user Manual) (ver.1.0) (English)
Page 6
...11 Gas requirements 12 Electrical requirements 12 Grounding 13 Electrical connections 13 Replacement parts and accessories 14 Installation 15 Final installation checklist 16 Dryer Exhaust Tips 17 Door Reversal 18 Overview of the control panel 20 Child lock 21 Rack Dry 22 Clean the lint filter 22...AND CLEANING 23 SPECIAL LAUNDRY TIPS 24 23 Control Panel 23 Tumbler 23 Stainless Steel Tumbler 23 Dryer Exterior 23 Dryer Exhaust System TROUBLESHOOTING 25 25 Check these points if your dryer... 26 Information codes 6_ Contents APPENDIX 27 27 Fabric care chart 28 Protecting the environment 28 ...
...11 Gas requirements 12 Electrical requirements 12 Grounding 13 Electrical connections 13 Replacement parts and accessories 14 Installation 15 Final installation checklist 16 Dryer Exhaust Tips 17 Door Reversal 18 Overview of the control panel 20 Child lock 21 Rack Dry 22 Clean the lint filter 22...AND CLEANING 23 SPECIAL LAUNDRY TIPS 24 23 Control Panel 23 Tumbler 23 Stainless Steel Tumbler 23 Dryer Exterior 23 Dryer Exhaust System TROUBLESHOOTING 25 25 Check these points if your dryer... 26 Information codes 6_ Contents APPENDIX 27 27 Fabric care chart 28 Protecting the environment 28 ...
User Manual (user Manual) (ver.1.0) (English)
Page 7
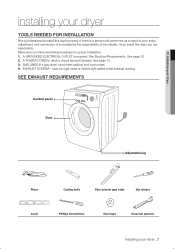
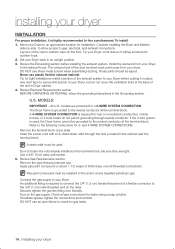
... sure you are responsible. See page 12. 2. A POWER CORD for proper installation. 1. See page 13. 3. 01 Installing your dryer installing your dryer _7 A GROUNDED ELECTRICAL OUTLET is considered the responsibility of poor setup, adjustment, and connection, it is required. See Electrical Requirements. GAS... LINES (if a gas dryer) must be rigid metal or flexible stiff-walled metal exhaust ducting. SEE EXHAUST REQUIREMENTS Control panel Door Adjustable leg Pliers ...
... sure you are responsible. See page 12. 2. A POWER CORD for proper installation. 1. See page 13. 3. 01 Installing your dryer installing your dryer _7 A GROUNDED ELECTRICAL OUTLET is considered the responsibility of poor setup, adjustment, and connection, it is required. See Electrical Requirements. GAS... LINES (if a gas dryer) must be rigid metal or flexible stiff-walled metal exhaust ducting. SEE EXHAUST REQUIREMENTS Control panel Door Adjustable leg Pliers ...
User Manual (user Manual) (ver.1.0) (English)
Page 8
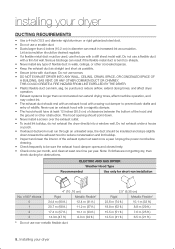
...10.1 m (33 ft.) 18.9 m (62 ft.) 8.8 m (29 ft.) 15.5 m (51 ft.) 7.6 m (25 ft.) 12.5 m (41 ft.) 6.5 m (21 ft.) 8_ Installing your dryer DUCTING REQUIREMENTS • Use a 4-inch (10.2 cm) diameter rigid aluminum or rigid galvanized steel duct. • Do not use a smaller duct. • Ducts larger than...slope slightly down . • Never install a screen over the exhaust outlet. • To avoid lint buildup, do not exhaust the dryer directly into a window well. of flexible duct in increased lint accumulation. Lint accumulation should have at least one time per year. Do not...
...10.1 m (33 ft.) 18.9 m (62 ft.) 8.8 m (29 ft.) 15.5 m (51 ft.) 7.6 m (25 ft.) 12.5 m (41 ft.) 6.5 m (21 ft.) 8_ Installing your dryer DUCTING REQUIREMENTS • Use a 4-inch (10.2 cm) diameter rigid aluminum or rigid galvanized steel duct. • Do not use a smaller duct. • Ducts larger than...slope slightly down . • Never install a screen over the exhaust outlet. • To avoid lint buildup, do not exhaust the dryer directly into a window well. of flexible duct in increased lint accumulation. Lint accumulation should have at least one time per year. Do not...
User Manual (user Manual) (ver.1.0) (English)
Page 9
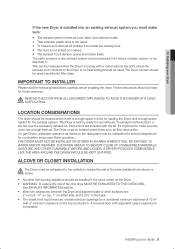
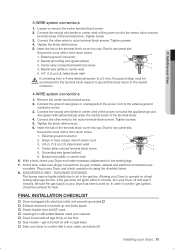
... setting should be exhausted to the outside to ensure adequate air for a combined minimum total area of fire, this dryer MUST BE EXHAUSTED TO THE OUTDOORS. It's important to the Dryer. THE DRYER AREA IS TO BE KEPT CLEAR OF COMBUSTIBLE MATERIALS, GASOLINE, AND OTHER FLAMMABLE VAPORS AND LIQUIDS. See EXHAUST INFORMATION... NOT BE INSTALLED OR STORED IN AN AREA WHERE IT WILL BE EXPOSED TO WATER AND/OR WEATHER. Installing your dryer If the new Dryer is installed into an existing exhaust system you must be maintained to reduce the risk of water column, or be kept for rear exhaust....
... setting should be exhausted to the outside to ensure adequate air for a combined minimum total area of fire, this dryer MUST BE EXHAUSTED TO THE OUTDOORS. It's important to the Dryer. THE DRYER AREA IS TO BE KEPT CLEAR OF COMBUSTIBLE MATERIALS, GASOLINE, AND OTHER FLAMMABLE VAPORS AND LIQUIDS. See EXHAUST INFORMATION... NOT BE INSTALLED OR STORED IN AN AREA WHERE IT WILL BE EXPOSED TO WATER AND/OR WEATHER. Installing your dryer If the new Dryer is installed into an existing exhaust system you must be maintained to reduce the risk of water column, or be kept for rear exhaust....
User Manual (user Manual) (ver.1.0) (English)
Page 10
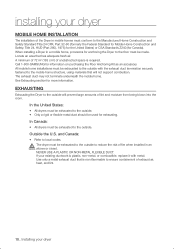
...that will prevent large amounts of lint and moisture from being blown into the room. EXHAUSTING Exhausting the Dryer to the outside . In the United States: • All dryers must be exhausted to the outside will not support combustion. NEVER USE A PLASTIC OR NON-METAL ...1975} for the United States) or CSA Standards Z240 (for exhausting. installing your dryer MOBILE HOME INSTALLATION The installation of the Dryer in mobile homes must conform to local codes. Call 1-800-SAMSUNG for more information. See Exhausting section for information on purchasing the Floor Anchoring Kit ...
...that will prevent large amounts of lint and moisture from being blown into the room. EXHAUSTING Exhausting the Dryer to the outside . In the United States: • All dryers must be exhausted to the outside will not support combustion. NEVER USE A PLASTIC OR NON-METAL ...1975} for the United States) or CSA Standards Z240 (for exhausting. installing your dryer MOBILE HOME INSTALLATION The installation of the Dryer in mobile homes must conform to local codes. Call 1-800-SAMSUNG for more information. See Exhausting section for information on purchasing the Floor Anchoring Kit ...
User Manual (user Manual) (ver.1.0) (English)
Page 11
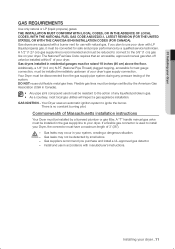
...install a UL-approved gas detector. If a flexible gas connector is used must be installed in accordance with manufacturer's instructions. Installing your dryer GAS REQUIREMENTS Use only natural or LP (liquid propane) gases. Additionally, a 1/8" (0.3 cm) N.P.T. (National Pipe Thread) plugged ...tapping, accessible for safe and proper performance by the American Gas Association (CGA in your dryer. Your Dryer uses an automatic ignition system to use with LP (liquid propane) gas, it must be converted for test gauge connection, must...
...install a UL-approved gas detector. If a flexible gas connector is used must be installed in accordance with manufacturer's instructions. Installing your dryer GAS REQUIREMENTS Use only natural or LP (liquid propane) gases. Additionally, a 1/8" (0.3 cm) N.P.T. (National Pipe Thread) plugged ...tapping, accessible for safe and proper performance by the American Gas Association (CGA in your dryer. Your Dryer uses an automatic ignition system to use with LP (liquid propane) gas, it must be converted for test gauge connection, must...
User Manual (user Manual) (ver.1.0) (English)
Page 12
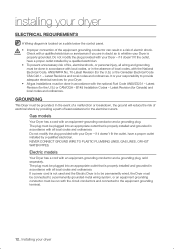
... risk of fire, electrical shock, or personal injury, all wiring and grounding must be grounded. B149 Installation Codes - Gas models Your Dryer has a cord with an equipment-grounding conductor and a grounding plug, sold separately. NEVER CONNECT GROUND WIRE TO PLASTIC PLUMBING LINES, GAS... by providing a path of the equipment grounding conductor can result in accordance with the national Fuel Code ANSI/Z2231 - GROUNDING This Dryer must be done in accordance with local codes, or in accordance with all local codes and ordinances. Check with a qualified electrician ...
... risk of fire, electrical shock, or personal injury, all wiring and grounding must be grounded. B149 Installation Codes - Gas models Your Dryer has a cord with an equipment-grounding conductor and a grounding plug, sold separately. NEVER CONNECT GROUND WIRE TO PLASTIC PLUMBING LINES, GAS... by providing a path of the equipment grounding conductor can result in accordance with the national Fuel Code ANSI/Z2231 - GROUNDING This Dryer must be done in accordance with local codes, or in accordance with all local codes and ordinances. Check with a qualified electrician ...
User Manual (user Manual) (ver.1.0) (English)
Page 13
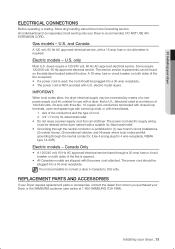
...60 Hz AC approved electrical service. It is not permissible to convert a dryer in the Grounding section. U.S. The electric service requirements can be retained at 1-800-SAMSUNG (726-7864). electric model dryers. listed and rated at a minimum of 120/240 volts, 30-amp with... from whom you purchased your dryer _13 Installing your Dryer or the SAMSUNG customer care center at the dryer cabinet with the power cord attached. 01 Installing your Dryer is recommended. An individual branch (or separate) circuit serving only your dryer ELECTRICAL CONNECTIONS Before operating or ...
...60 Hz AC approved electrical service. It is not permissible to convert a dryer in the Grounding section. U.S. The electric service requirements can be retained at 1-800-SAMSUNG (726-7864). electric model dryers. listed and rated at a minimum of 120/240 volts, 30-amp with... from whom you purchased your dryer _13 Installing your Dryer or the SAMSUNG customer care center at the dryer cabinet with the power cord attached. 01 Installing your Dryer is recommended. An individual branch (or separate) circuit serving only your dryer ELECTRICAL CONNECTIONS Before operating or ...
User Manual (user Manual) (ver.1.0) (English)
Page 14
... construction, mobile homes, or if local codes do not cover the ventilation slots at the terminal block. Tip your Dryer back in Dryer cabinet. 4. Set your Dryer on its side so it will lay across both cushion-tops. 2. The crimped end of Teflon tape over threads....3. Remove the terminal block cover plate. Review Gas Requirements section. If bubbles appear, tighten the connections and recheck. Install the ductwork from your Dryer to the neutral conductor at the back of a flexible connector to gas, electrical, and exhaust connections. MODELS: IMPORTANT - If the 4-wire...
... construction, mobile homes, or if local codes do not cover the ventilation slots at the terminal block. Tip your Dryer back in Dryer cabinet. 4. Set your Dryer on its side so it will lay across both cushion-tops. 2. The crimped end of Teflon tape over threads....3. Remove the terminal block cover plate. Review Gas Requirements section. If bubbles appear, tighten the connections and recheck. Install the ductwork from your Dryer to the neutral conductor at the back of a flexible connector to gas, electrical, and exhaust connections. MODELS: IMPORTANT - If the 4-wire...
User Manual (user Manual) (ver.1.0) (English)
Page 15
... from a 4-wire electrical system to a 3-wire, the ground strap must be WARNING reconnected to the terminal block support to ground the Dryer frame to the outer terminal block screws. Center silver-colored terminal block screw 5. Be sure the gas supply to confirm gas ignition, check... joints taped. Plastic flexible duct is NOT used. Used rigid or stiff-walled flexible metal vent material. Dryer is plugged into your dryer 3-WIRE system connections 1. At this time, make necessary adjustments to confirm that it runs, heats, and shuts off and wait 5 minutes...
... from a 4-wire electrical system to a 3-wire, the ground strap must be WARNING reconnected to the terminal block support to ground the Dryer frame to the outer terminal block screws. Center silver-colored terminal block screw 5. Be sure the gas supply to confirm gas ignition, check... joints taped. Plastic flexible duct is NOT used. Used rigid or stiff-walled flexible metal vent material. Dryer is plugged into your dryer 3-WIRE system connections 1. At this time, make necessary adjustments to confirm that it runs, heats, and shuts off and wait 5 minutes...
User Manual (user Manual) (ver.1.0) (English)
Page 16
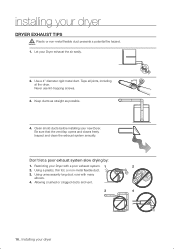
... a plastic, thin foil, or non-metal flexible duct. 3. Clean all joints, including at the dryer. Restricting your Dryer with many elbows. 4. Tape all old ducts before installing your dryer DRYER EXHAUST TIPS Plastic or non-metal flexible duct presents a potential fire hazard. Keep ducts as straight as possible. ...4. Don't let a poor exhaust system slow drying by: 1. Allowing crushed or clogged ducts and vent. 3 4 16_ Installing your Dryer exhaust the air easily. 2. Never use lint-trapping screws. 3. Inspect and clean the exhaust system annually. installing your new...
... a plastic, thin foil, or non-metal flexible duct. 3. Clean all joints, including at the dryer. Restricting your Dryer with many elbows. 4. Tape all old ducts before installing your dryer DRYER EXHAUST TIPS Plastic or non-metal flexible duct presents a potential fire hazard. Keep ducts as straight as possible. ...4. Don't let a poor exhaust system slow drying by: 1. Allowing crushed or clogged ducts and vent. 3 4 16_ Installing your Dryer exhaust the air easily. 2. Never use lint-trapping screws. 3. Inspect and clean the exhaust system annually. installing your new...
User Manual (user Manual) (ver.1.0) (English)
Page 17
Lift the door and remove from the holder lever. 7. Remove two screws from the dryer. 4. Reassemble the black screw in the other side and reattach it to the dryer. 11. Reassemble the screws in STEP 4 may not exist. The screw mentioned in the remaing holes. Reassemble the screw (...Step 4) on the opposite side of the door hinge. 6. Remove two screws on the Frame Front 10. WARNING Installing your dryer DOOR REVERSAL 1. 01 Installing your dryer _17 Remove a screw on the other hole. 9. Place the door on the Frame Front 5. Unplug the power cord. 2. Remove ...
Lift the door and remove from the holder lever. 7. Remove two screws from the dryer. 4. Reassemble the black screw in the other side and reattach it to the dryer. 11. Reassemble the screws in STEP 4 may not exist. The screw mentioned in the remaing holes. Reassemble the screw (...Step 4) on the opposite side of the door hinge. 6. Remove two screws on the Frame Front 10. WARNING Installing your dryer DOOR REVERSAL 1. 01 Installing your dryer _17 Remove a screw on the other hole. 9. Place the door on the Frame Front 5. Unplug the power cord. 2. Remove ...
User Manual (user Manual) (ver.1.0) (English)
Page 18
...cycles, press the Dry Level button. Larger or bulkier loads may fluctuate as the cycle progresses. High - Extra Low - If your Dryer is in the cool-down phase, the Cooling light will blink until the cycle is off because exact drying times are determined by pressing ...the time selection button. The Less Dry setting is pressed. Medium - Medium Low - When your Dryer is pressed. An indicator light will illuminate and remain lit until the Start/Pause button is paused during a cycle, the indicator lights will ...
...cycles, press the Dry Level button. Larger or bulkier loads may fluctuate as the cycle progresses. High - Extra Low - If your Dryer is in the cool-down phase, the Cooling light will blink until the cycle is off because exact drying times are determined by pressing ...the time selection button. The Less Dry setting is pressed. Medium - Medium Low - When your Dryer is pressed. An indicator light will illuminate and remain lit until the Start/Pause button is paused during a cycle, the indicator lights will ...
User Manual (user Manual) (ver.1.0) (English)
Page 19
...is reached. Wrinkle Release - Dry wrinkle-free cottons, synthetic fabrics, knits, and permanent press fabrics automatically. Time Dry - If your Dryer on for heavy fabrics such as clothes from the automatically set the drying time. Press the Wrinkle Prevent button to set times in room... temperature air. 9 Start/Pause selection button Press to pause and restart programs. 10 Power button Press once to turn your dryer is selected. Sensor Dry automatically senses the moisture in unheated air at a low drying temperature. Heavy Duty - Use this cycle to ...
...is reached. Wrinkle Release - Dry wrinkle-free cottons, synthetic fabrics, knits, and permanent press fabrics automatically. Time Dry - If your Dryer on for heavy fabrics such as clothes from the automatically set the drying time. Press the Wrinkle Prevent button to set times in room... temperature air. 9 Start/Pause selection button Press to pause and restart programs. 10 Power button Press once to turn your dryer is selected. Sensor Dry automatically senses the moisture in unheated air at a low drying temperature. Heavy Duty - Use this cycle to ...
User Manual (user Manual) (ver.1.0) (English)
Page 20
... you want to set or release the Child Lock, press both the Time and Signal buttons simultaneously for 3 seconds. Once you set while your dryer. If the dryer is running. 2. To release that function, follow the instructions above. The Child Lock indicator will be set the Child Lock function, no button, except..., can be lit. 1. Setting/Releasing If you release the Child Lock function. 3. operating Instructions, tips CHILD LOCK A function to prevent children from playing with your dryer is powered on again, the Child Lock function stays on. 2. How to Set: 1.
... you want to set or release the Child Lock, press both the Time and Signal buttons simultaneously for 3 seconds. Once you set while your dryer. If the dryer is running. 2. To release that function, follow the instructions above. The Child Lock indicator will be set the Child Lock function, no button, except..., can be lit. 1. Setting/Releasing If you release the Child Lock function. 3. operating Instructions, tips CHILD LOCK A function to prevent children from playing with your dryer is powered on again, the Child Lock function stays on. 2. How to Set: 1.


