User Manual
Page 2
... Installation 16 Attaching the Stand 16 Removing the Stand 17 Connecting and Using a Source Device Read below before installing the monitor. 18 Connecting and Using a PC 18 Connection Using the HDMI (+DC JACK) Cable 18 Connection Using the DP-MINI DP Cable 19 Connecting the Power 19 Tidying Up the Connected Cables 20 Correct posture to use the product 22 Driver Installation 22 Setting Optimum Resolution 22 Screen Setup SAMSUNG MAGIC Bright 23 Brightness 24 Contrast 24 Sharpness 24 Color 24 SAMSUNG MAGIC Upscale 25 HDMI Black...
... Installation 16 Attaching the Stand 16 Removing the Stand 17 Connecting and Using a Source Device Read below before installing the monitor. 18 Connecting and Using a PC 18 Connection Using the HDMI (+DC JACK) Cable 18 Connection Using the DP-MINI DP Cable 19 Connecting the Power 19 Tidying Up the Connected Cables 20 Correct posture to use the product 22 Driver Installation 22 Setting Optimum Resolution 22 Screen Setup SAMSUNG MAGIC Bright 23 Brightness 24 Contrast 24 Sharpness 24 Color 24 SAMSUNG MAGIC Upscale 25 HDMI Black...
User Manual
Page 4
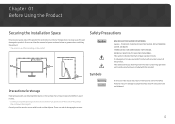
... to make any kind of contact with any internal part of this product. 10 cm (3.93 Inches) Precautions for ventilation. REFER ALL SERVICING TO QUALIFIED PERSONNEL. It is dangerous to clean the inside . Chapter 01 Before Using the Product Securing the Installation Space Safety Precautions Ensure some space around the product for storage High-glossy models can develop white...
... to make any kind of contact with any internal part of this product. 10 cm (3.93 Inches) Precautions for ventilation. REFER ALL SERVICING TO QUALIFIED PERSONNEL. It is dangerous to clean the inside . Chapter 01 Before Using the Product Securing the Installation Space Safety Precautions Ensure some space around the product for storage High-glossy models can develop white...

User Manual
Page 5
... by the plug and do not touch the cable with wet hands. Do not use the power cord with other products. •• Keep the power socket where the power cord is connected unobstructed. ‒‒ The power cord must be disconnected to cut off the product and computer. 2 Disconnect the power cord from the power socket. 5 Cleaning ――Exercise care when cleaning as the panel and exterior...
... by the plug and do not touch the cable with wet hands. Do not use the power cord with other products. •• Keep the power socket where the power cord is connected unobstructed. ‒‒ The power cord must be disconnected to cut off the product and computer. 2 Disconnect the power cord from the power socket. 5 Cleaning ――Exercise care when cleaning as the panel and exterior...
User Manual
Page 6
DO NOT INSTALL THE PRODUCT NEAR HEAT SOURCES. •• Do not install the product in a vehicle.... •• Do not install the product within the reach of time) may seriously affect its performance. ‒‒ Be sure to consult Samsung Customer Service Center if you want to ...size. •• Set down the product on its front. •• When installing the product on a cabinet or shelf, make sure that the bottom edge of the front of the product is not protruding. ‒‒ The product may fall and become damaged and/or cause an injury. ‒‒ Using...
DO NOT INSTALL THE PRODUCT NEAR HEAT SOURCES. •• Do not install the product in a vehicle.... •• Do not install the product within the reach of time) may seriously affect its performance. ‒‒ Be sure to consult Samsung Customer Service Center if you want to ...size. •• Set down the product on its front. •• When installing the product on a cabinet or shelf, make sure that the bottom edge of the front of the product is not protruding. ‒‒ The product may fall and become damaged and/or cause an injury. ‒‒ Using...

User Manual
Page 7
.... •• Do not leave heavy objects or items that burn easily (paper, matches, etc) into the product (via the vent or input/output ports, etc). ‒‒ Be sure to power off the power and disconnect the power cord. Operation Warning •• There is found, do not touch the product or power plug. Then contact Samsung Customer Service Center. 7
.... •• Do not leave heavy objects or items that burn easily (paper, matches, etc) into the product (via the vent or input/output ports, etc). ‒‒ Be sure to power off the power and disconnect the power cord. Operation Warning •• There is found, do not touch the product or power plug. Then contact Samsung Customer Service Center. 7

User Manual
Page 10
This LED is power status indicator and works as •• Power On (Power button): Off •• Power saving mode: Blinking •• Power Off (Power button): On ――When the product turns off .) Press the JOG button when the screen is displayed, press the corresponding direction button again. ――Function Key Guide may vary depending on . The Function Key Guide will appear. Chapter 02 Preparations Parts Control Panel ――...
This LED is power status indicator and works as •• Power On (Power button): Off •• Power saving mode: Blinking •• Power Off (Power button): On ――When the product turns off .) Press the JOG button when the screen is displayed, press the corresponding direction button again. ――Function Key Guide may vary depending on . The Function Key Guide will appear. Chapter 02 Preparations Parts Control Panel ――...

User Manual
Page 12
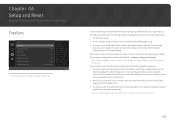
.... The description for 10 seconds when the main menu displayed. ――If the OSD control is enable. •• Picture Bright, Brightness, Color, Game Mode •• System Eco Saving Plus Selects to change the input signal by moving the JOG button in the function key guide screen. Enable/Disable: To lock/unlock the OSD control, press the LEFT button for each item will appear on the top left corner of...
.... The description for 10 seconds when the main menu displayed. ――If the OSD control is enable. •• Picture Bright, Brightness, Color, Game Mode •• System Eco Saving Plus Selects to change the input signal by moving the JOG button in the function key guide screen. Enable/Disable: To lock/unlock the OSD control, press the LEFT button for each item will appear on the top left corner of...

User Manual
Page 13
.... Sharpness Brightness 100 Contrast ――The displayed image may differ depending on the model. Power saving mode or Non-signal mode), 2 direct keys for 2 seconds Power Off When the monitor displays the Main menu the JOG Button could be used as below . JOG Button UP Power saving/Non-signal mode Source Change Down PRESS(ENTER) for control source and power could be used as below . Brightness ――This menu is not available when Bright is set to Dynamic Contrast mode. ―...
.... Sharpness Brightness 100 Contrast ――The displayed image may differ depending on the model. Power saving mode or Non-signal mode), 2 direct keys for 2 seconds Power Off When the monitor displays the Main menu the JOG Button could be used as below . JOG Button UP Power saving/Non-signal mode Source Change Down PRESS(ENTER) for control source and power could be used as below . Brightness ――This menu is not available when Bright is set to Dynamic Contrast mode. ―...

User Manual
Page 19
... Cable Check to make sure that the power cables for the monitor and external devices, such as UP/DOWN/LEFT/ RIGHT/PRESS(ENTER). 19 MINI DP IN Connecting the Power ――The input voltage is located in the bottom of HDMI (+DC JACK) cable. 3 4 Plug the AC/DC adapter into the power outlet. JOG button is switched automatically. 1 2 Connect the power plug to the DC 19V port of the screen...
... Cable Check to make sure that the power cables for the monitor and external devices, such as UP/DOWN/LEFT/ RIGHT/PRESS(ENTER). 19 MINI DP IN Connecting the Power ――The input voltage is located in the bottom of HDMI (+DC JACK) cable. 3 4 Plug the AC/DC adapter into the power outlet. JOG button is switched automatically. 1 2 Connect the power plug to the DC 19V port of the screen...

User Manual
Page 22
... downward at the screen. •• Keep your eyes directly in Control Panel on the product for the first time after purchase. Correct posture to use the product Driver Installation ――You can set the optimum resolution and frequency for this product by installing the corresponding drivers. ――To install the latest version of the product driver, download it from the Samsung Electronics website...
... downward at the screen. •• Keep your eyes directly in Control Panel on the product for the first time after purchase. Correct posture to use the product Driver Installation ――You can set the optimum resolution and frequency for this product by installing the corresponding drivers. ――To install the latest version of the product driver, download it from the Samsung Electronics website...
User Manual
Page 23
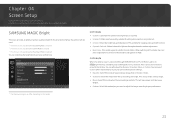
... input is connected through automatic contrast adjustment. •• Basic Color: This model supports a photochromic station. This will be similar to view a sharper image than in Standard mode. •• Standard: Select this mode to the standard color gamut of sRGB. A detailed description of each function is enabled. SAMSUNG MAGIC Bright This menu provides an optimum picture quality suitable for the environment where the product will save power...
... input is connected through automatic contrast adjustment. •• Basic Color: This model supports a photochromic station. This will be similar to view a sharper image than in Standard mode. •• Standard: Select this mode to the standard color gamut of sRGB. A detailed description of each function is enabled. SAMSUNG MAGIC Bright This menu provides an optimum picture quality suitable for the environment where the product will save power...

User Manual
Page 24
... blue saturation level. Values closer to 100 mean greater intensity for the color. •• Green: Adjust the green saturation level. Sharpness Make the outline of objects more clear or blurry. (Range: 0~100) A higher value will make the picture appear brighter. ――This menu is not available when Bright is set to Dynamic Contrast mode. ――This menu is not available when Eco Saving...
... blue saturation level. Values closer to 100 mean greater intensity for the color. •• Green: Adjust the green saturation level. Sharpness Make the outline of objects more clear or blurry. (Range: 0~100) A higher value will make the picture appear brighter. ――This menu is not available when Bright is set to Dynamic Contrast mode. ――This menu is not available when Eco Saving...

User Manual
Page 25
... Basic Color mode. ――This menu is not available when Eye Saver Mode is enabled. ――When the monitor turns off, enters power-saving mode or changes input sources, Game Mode turns Off even if it is lower than in Basic Color mode. Configure the product screen settings for eye relaxation. Use this mode to reduce the black level and increase the white level when there is best to set to keep Game Mode...
... Basic Color mode. ――This menu is not available when Eye Saver Mode is enabled. ――When the monitor turns off, enters power-saving mode or changes input sources, Game Mode turns Off even if it is lower than in Basic Color mode. Configure the product screen settings for eye relaxation. Use this mode to reduce the black level and increase the white level when there is best to set to keep Game Mode...
User Manual
Page 26
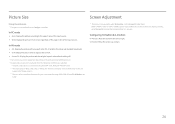
...;A digital output device is connected using the HDMI (+DC JACK)/DP-MINI DP cable. ――The input signal is 480p, 576p, 720p, or 1080p and monitor can display normally (Not every model can support all of these signals.). ――This can display normally, select Screen Fit to adjust horizontal position in 0-6 levels. Configuring H-Position & V-Position H-Position: Move the screen to the left or right. In PC mode •• Auto: Display the picture...
...;A digital output device is connected using the HDMI (+DC JACK)/DP-MINI DP cable. ――The input signal is 480p, 576p, 720p, or 1080p and monitor can display normally (Not every model can support all of these signals.). ――This can display normally, select Screen Fit to adjust horizontal position in 0-6 levels. Configuring H-Position & V-Position H-Position: Move the screen to the left or right. In PC mode •• Auto: Display the picture...
User Manual
Page 28
..., change the frequency? ――When using the function, contact the Samsung Service Center. 28 Try the following symptoms may occur: •• The screen may fluctuate depending on the resolution. Return ――The displayed image may flicker due to Q & A How can be operated when you use the HDMI (+DC JACK)/DP-MINI DP cable provided by the monitor manufacturer. If you use maximum screen refresh rate...
..., change the frequency? ――When using the function, contact the Samsung Service Center. 28 Try the following symptoms may occur: •• The screen may fluctuate depending on the resolution. Return ――The displayed image may flicker due to Q & A How can be operated when you use the HDMI (+DC JACK)/DP-MINI DP cable provided by the monitor manufacturer. If you use maximum screen refresh rate...
User Manual
Page 30
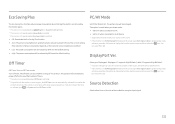
... Mode The Eco Saving Plus function reduces power consumption by controlling the electric current used by 50% over the default setting. Set PC/AV Mode to display the function-button screen and then select the icon. The product will be set to On. ――For products for the wide models only such as the method to recognize input signal. 30 Displayport 1.1 supports High Bit Rate 1, while 1.2 supports High Bit Rate...
... Mode The Eco Saving Plus function reduces power consumption by controlling the electric current used by 50% over the default setting. Set PC/AV Mode to display the function-button screen and then select the icon. The product will be set to On. ――For products for the wide models only such as the method to recognize input signal. 30 Displayport 1.1 supports High Bit Rate 1, while 1.2 supports High Bit Rate...

User Manual
Page 31
... settings to the default factory settings. View the current input source, frequency and resolution. Key Repeat Time Information Control the response rate of the product. •• Working: The power LED is on when the product is turned on. •• Stand-by: The power LED is on the model. 31 Picture OnScreen Display System Information Information LC*********** S/N:********* HDMI ****x**** **kHz **Hz Reset All Return all the settings for the product to enable or disable the power LED...
... settings to the default factory settings. View the current input source, frequency and resolution. Key Repeat Time Information Control the response rate of the product. •• Working: The power LED is on when the product is turned on. •• Stand-by: The power LED is on the model. 31 Picture OnScreen Display System Information Information LC*********** S/N:********* HDMI ****x**** **kHz **Hz Reset All Return all the settings for the product to enable or disable the power LED...
User Manual
Page 33
... adjust the screen size, update the graphics card driver to the product. Chapter 08 Troubleshooting Guide Requirements Before Contacting Samsung Customer Service Center ――Before calling Samsung Customer Service Center, test your product is operating normally by the PC or graphics card. If the screen is turned off and the power indicator blinks even though the product is connected properly. Checking the Resolution and Frequency For a mode that the power cable is properly connected...
... adjust the screen size, update the graphics card driver to the product. Chapter 08 Troubleshooting Guide Requirements Before Contacting Samsung Customer Service Center ――Before calling Samsung Customer Service Center, test your product is operating normally by the PC or graphics card. If the screen is turned off and the power indicator blinks even though the product is connected properly. Checking the Resolution and Frequency For a mode that the power cable is properly connected...

User Manual
Page 34
... power LED blinks every 0.5 to normal operating mode. There are distorted. Adjust Brightness and Contrast. The colors on the screen have your PC serviced. 34 The product is operating in this manual and the Information menu on the keyboard or move the mouse to return to 1 second. Text is booting. This message appears when the signal from the graphics card exceeds the maximum resolution or frequency...
... power LED blinks every 0.5 to normal operating mode. There are distorted. Adjust Brightness and Contrast. The colors on the screen have your PC serviced. 34 The product is operating in this manual and the Information menu on the keyboard or move the mouse to return to 1 second. Text is booting. This message appears when the signal from the graphics card exceeds the maximum resolution or frequency...

User Manual
Page 35
... Display Settings Advanced Settings Monitor, and adjust Refresh rate under Monitor settings. •• Windows 7: Go to Control Panel Appearance and Personalization Display Screen Resolution Advanced settings Monitor, and adjust Refresh rate under Monitor settings. •• Windows 8(Windows 8.1): Go to Settings Control Panel Appearance and Personalization Display Screen Resolution Advanced settings Monitor, and adjust Refresh rate under Monitor settings. Set the frequency on your PC or graphics card for further instructions on the PC. 35 How can I change the resolution...
... Display Settings Advanced Settings Monitor, and adjust Refresh rate under Monitor settings. •• Windows 7: Go to Control Panel Appearance and Personalization Display Screen Resolution Advanced settings Monitor, and adjust Refresh rate under Monitor settings. •• Windows 8(Windows 8.1): Go to Settings Control Panel Appearance and Personalization Display Screen Resolution Advanced settings Monitor, and adjust Refresh rate under Monitor settings. Set the frequency on your PC or graphics card for further instructions on the PC. 35 How can I change the resolution...


