User Manual (user Manual) (ver.1.0) (English)
Page 1
SyncMaster B2230HD B2330HD B2430HD LCD TV Monitor User Manual The color and the appearance may differ depending on the product, and the specifications are subject to change without prior notice to improve the performance.
SyncMaster B2230HD B2330HD B2430HD LCD TV Monitor User Manual The color and the appearance may differ depending on the product, and the specifications are subject to change without prior notice to improve the performance.
User Manual (user Manual) (ver.1.0) (English)
Page 3
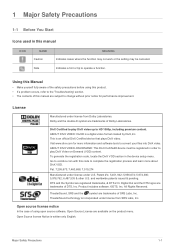
...an official DivX Certified device that plays DivX video. Open Source license Notice is a digital video format created by DivX,Inc. Using this Manual • Make yourself fully aware of the safety precautions before using open source software, Open Source License are available on -Demand (VOD) ...content. Dolby and the double-D symbol are trademarks of DTS, Inc. 1 Major Safety Precautions 1-1 Before You Start Icons used in this manual are subject to change without prior notice for more about DivX VOD. License Manufactured under license from SRS Labs, Inc. ABOUT DIVX VIDEO-ON-...
...an official DivX Certified device that plays DivX video. Open Source license Notice is a digital video format created by DivX,Inc. Using this Manual • Make yourself fully aware of the safety precautions before using open source software, Open Source License are available on -Demand (VOD) ...content. Dolby and the double-D symbol are trademarks of DTS, Inc. 1 Major Safety Precautions 1-1 Before You Start Icons used in this manual are subject to change without prior notice for more about DivX VOD. License Manufactured under license from SRS Labs, Inc. ABOUT DIVX VIDEO-ON-...
User Manual (user Manual) (ver.1.0) (English)
Page 4
...Precautions The contents of this manual is reserved by Samsung Electronics, Co., Ltd. VESA, DPM and DDC are the registered trademarks of Samsung Electronics, Co., Ltd. All Rights Reserved. Microsoft, Windows and Windows NT are the registered trademarks of Samsung Electronics, Co., Ltd. The... copyright of Microsoft Corporation. The SAMSUNG logo and SyncMaster are the registered trademarks of this manual may not be partially or in whole reproduced, distributed or used...
...Precautions The contents of this manual is reserved by Samsung Electronics, Co., Ltd. VESA, DPM and DDC are the registered trademarks of Samsung Electronics, Co., Ltd. All Rights Reserved. Microsoft, Windows and Windows NT are the registered trademarks of Samsung Electronics, Co., Ltd. The... copyright of Microsoft Corporation. The SAMSUNG logo and SyncMaster are the registered trademarks of this manual may not be partially or in whole reproduced, distributed or used...
User Manual (user Manual) (ver.1.0) (English)
Page 12
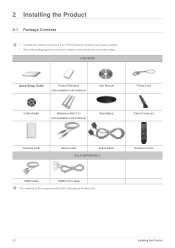
... Contents • Unpack the product and check if all of the following contents have been included. • Store the packaging box in all locations) User Manual Power Cord Cable Holder Batteries (AAA X 2) (Not available in case you need to DVI cable The cleaning cloth is supplied with black high-glossy models...
... Contents • Unpack the product and check if all of the following contents have been included. • Store the packaging box in all locations) User Manual Power Cord Cable Holder Batteries (AAA X 2) (Not available in case you need to DVI cable The cleaning cloth is supplied with black high-glossy models...
User Manual (user Manual) (ver.1.0) (English)
Page 23
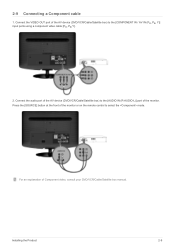
Installing the Product 2-9 Press the [SOURCE] button at the front of the AV device (DVD/VCR/Cable/Satellite box) to select the mode. For an explanation of the monitor. Connect the VIDEO OUT port of the monitor or on the remote control to the [COMPONENT IN / AV IN (PR, PB, Y)] input ports using a component video cable [PR, PB,Y]. 2. 2-9 Connecting a Component cable 1. Connect the audio port of the AV device (DVD/VCR/Cable/Satellite box) to the [AUDIO IN (R-AUDIO-L)] port of Component video, consult your DVD/VCR/Cable/Satellite box manual.
Installing the Product 2-9 Press the [SOURCE] button at the front of the AV device (DVD/VCR/Cable/Satellite box) to select the mode. For an explanation of the monitor. Connect the VIDEO OUT port of the monitor or on the remote control to the [COMPONENT IN / AV IN (PR, PB, Y)] input ports using a component video cable [PR, PB,Y]. 2. 2-9 Connecting a Component cable 1. Connect the audio port of the AV device (DVD/VCR/Cable/Satellite box) to the [AUDIO IN (R-AUDIO-L)] port of Component video, consult your DVD/VCR/Cable/Satellite box manual.
User Manual (user Manual) (ver.1.0) (English)
Page 25
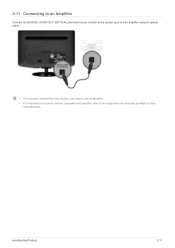
2-11 Connecting to an Amplifier Connect the [DIGITAL AUDIO OUT (OPTICAL)] terminal of your monitor to the optical input of your amplifier using an optical cable. • If no sound is emitted from the monitor, you need to use an amplifier. • For information on how to connect a speaker and amplifier, refer to the respective user manuals provided by their manufacturers. Installing the Product 2-11
2-11 Connecting to an Amplifier Connect the [DIGITAL AUDIO OUT (OPTICAL)] terminal of your monitor to the optical input of your amplifier using an optical cable. • If no sound is emitted from the monitor, you need to use an amplifier. • For information on how to connect a speaker and amplifier, refer to the respective user manuals provided by their manufacturers. Installing the Product 2-11
User Manual (user Manual) (ver.1.0) (English)
Page 27
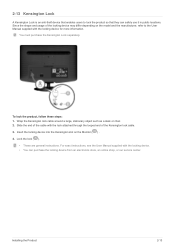
... the locking device into the Kensington slot on the model and the manufacturer, refer to lock the product so that enables users to the User Manual supplied with the locking device. • You can safely use it in public locations. Lock the lock ( ). • These are general instructions.... Lock separately. Wrap the Kensington lock cable around a large, stationary object such as a desk or chair. 2. For exact instructions, see the User Manual supplied with the locking device for more information. Slide the end of the cable with the lock attached through the looped end of the locking...
... the locking device into the Kensington slot on the model and the manufacturer, refer to lock the product so that enables users to the User Manual supplied with the locking device. • You can safely use it in public locations. Lock the lock ( ). • These are general instructions.... Lock separately. Wrap the Kensington lock cable around a large, stationary object such as a desk or chair. 2. For exact instructions, see the User Manual supplied with the locking device for more information. Slide the end of the cable with the lock attached through the looped end of the locking...
User Manual (user Manual) (ver.1.0) (English)
Page 28
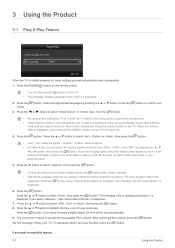
Press the [ choice. 3. Press the [ ] button. Press the ▲ or ▼ button to select , or , then press the [ ] button. • : antenna signal. / : antenna signal. • In Cable mode, you have finished, press the [ ] button. Press the [ ] button. When you can also use in your local area. If you have received a digital signal, the time will be set to mode for the best picture in your home environment. • mode is displayed. 6. Press the ◄ or ► button to select or , then the [ ] button. ] button to confirm your • We recommend ...
Press the [ choice. 3. Press the [ ] button. Press the ▲ or ▼ button to select , or , then press the [ ] button. • : antenna signal. / : antenna signal. • In Cable mode, you have finished, press the [ ] button. Press the [ ] button. When you can also use in your local area. If you have received a digital signal, the time will be set to mode for the best picture in your home environment. • mode is displayed. 6. Press the ◄ or ► button to select or , then the [ ] button. ] button to confirm your • We recommend ...

User Manual (user Manual) (ver.1.0) (English)
Page 43
... , or screen by pressing the yellow button. • : A reserved program. • : A program currently being broadcast. Shows all added channels. • - The check mark appears to manually adjust a particular channel for multiple channels at the same time. Shows all the selected channels at the same time. Shows all current reserved programs. •...
... , or screen by pressing the yellow button. • : A reserved program. • : A program currently being broadcast. Shows all added channels. • - The check mark appears to manually adjust a particular channel for multiple channels at the same time. Shows all the selected channels at the same time. Shows all current reserved programs. •...
User Manual (user Manual) (ver.1.0) (English)
Page 44
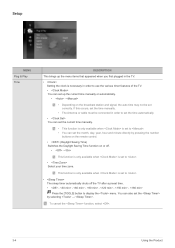
...must be set correctly. To cancel the function, select . 3-4 Using the Product Setup MENU Plug & Play Time DESCRIPTION This brings up the current time manually or automatically. • - • Depending on the broadcast station and signal, the auto time may not be connected in the TV. •... to . • You can set the month, day, year, hour and minute directly by selecting → . You can set the current time manually. • This function is only available when is set to display the menu. Press the [TOOLS] button to . • The sleep timer automatically...
...must be set correctly. To cancel the function, select . 3-4 Using the Product Setup MENU Plug & Play Time DESCRIPTION This brings up the current time manually or automatically. • - • Depending on the broadcast station and signal, the auto time may not be connected in the TV. •... to . • You can set the month, day, year, hour and minute directly by selecting → . You can set the current time manually. • This function is only available when is set to display the menu. Press the [TOOLS] button to . • The sleep timer automatically...

User Manual (user Manual) (ver.1.0) (English)
Page 45
This function is only available in timer On mode and prevents overheating, which may occur if a TV is too long, the folder cannot be made. When using more than one photo file in the USB device containing music or photo files to be played when the TV is turned on automatically. • If there is no controls are operated for too long time. Press the [ ] button over the desired day and the ( ) mark will appear. • You can set the , and channel by selecting → . • You can select the source to be played when the TV turns on automatically. (USB can set the by ...
This function is only available in timer On mode and prevents overheating, which may occur if a TV is too long, the folder cannot be made. When using more than one photo file in the USB device containing music or photo files to be played when the TV is turned on automatically. • If there is no controls are operated for too long time. Press the [ ] button over the desired day and the ( ) mark will appear. • You can set the , and channel by selecting → . • You can select the source to be played when the TV turns on automatically. (USB can set the by ...
User Manual (user Manual) (ver.1.0) (English)
Page 52
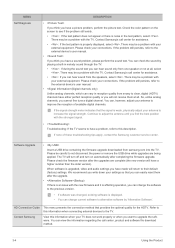
...analog channels, you can change current software to their default (factory) settings. You can check the sound by 'Alternative Software'. Contact Samsung's call center, product and software file download method. 3-4 Using the Product Please check your connections. Please check your connections. You ... signal. • Troubleshooting: If the TV seems to have either perfect reception quality or you want to the external device's user manual. • (Digital channels only) Unlike analog channels, which can easily reset them at all . If the problem still persists, refer...
...analog channels, you can change current software to their default (factory) settings. You can check the sound by 'Alternative Software'. Contact Samsung's call center, product and software file download method. 3-4 Using the Product Please check your connections. Please check your connections. You ... signal. • Troubleshooting: If the TV seems to have either perfect reception quality or you want to the external device's user manual. • (Digital channels only) Unlike analog channels, which can easily reset them at all . If the problem still persists, refer...
User Manual (user Manual) (ver.1.0) (English)
Page 66
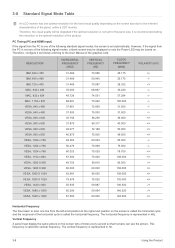
... PC is set for the best visual quality depending on . However, if the signal from the PC is recommended setting the resolution to the User Manual of times every second so that humans can see the picture. 3-8 Standard Signal Mode Table An LCD monitor has one optimal resolution for the panel...
... PC is set for the best visual quality depending on . However, if the signal from the PC is recommended setting the resolution to the User Manual of times every second so that humans can see the picture. 3-8 Standard Signal Mode Table An LCD monitor has one optimal resolution for the panel...
User Manual (user Manual) (ver.1.0) (English)
Page 72
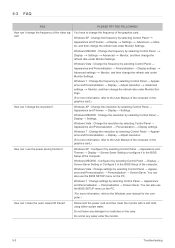
...not let any detergent or scratches on the PC. (For more information, refer to the Windows user manual for the computer.) How can I change the refresh rate under Monitor Settings. You have to the User Manual of the video signal? Disconnect the power cord and then clean the monitor with a soft cloth.... Windows Vista : Change settings by selecting Control Panel → Appearance and Personalization → Display → Adjust resolution. (For more information, refer to the User Manual of the computer. Do not leave any water enter the monitor. 5-3 Troubleshooting
...not let any detergent or scratches on the PC. (For more information, refer to the Windows user manual for the computer.) How can I change the refresh rate under Monitor Settings. You have to the User Manual of the video signal? Disconnect the power cord and then clean the monitor with a soft cloth.... Windows Vista : Change settings by selecting Control Panel → Appearance and Personalization → Display → Adjust resolution. (For more information, refer to the User Manual of the computer. Do not leave any water enter the monitor. 5-3 Troubleshooting


