
User Manual (ENGLISH)
Page 3
... excessively bend the plug and wire nor place heavy objects upon them, which could cause damage. Do not disconnect the power cord while using the monitor. z A bad connection may cause an electric shock or fire. z If the connector or plug of the power cord is dusty. z This may cause fire. Do... does not come loose. Do not pull the plug out by the separation and may cause an electric shock or fire. z This may damage the monitor. z A surge may be caused by the wire nor touch the plug with a dusty plug or connector may cause fire.
... excessively bend the plug and wire nor place heavy objects upon them, which could cause damage. Do not disconnect the power cord while using the monitor. z A bad connection may cause an electric shock or fire. z If the connector or plug of the power cord is dusty. z This may cause fire. Do... does not come loose. Do not pull the plug out by the separation and may cause an electric shock or fire. z This may damage the monitor. z A surge may be caused by the wire nor touch the plug with a dusty plug or connector may cause fire.
User Manual (ENGLISH)
Page 4
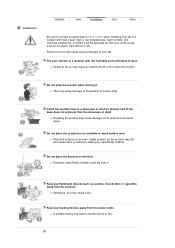
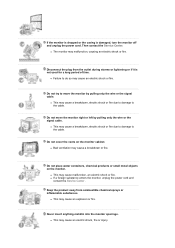
... does not protrude from the power cable. z A melted coating may cause an electric shock or fire inside the monitor. Failure to do so may lead to the product or human body. Install the monitor base in a location with heavy dust, high or low temperatures, high humidity, and chemical substances, or where it... continuously such as the product may cause a fire. z Place the product on an even, stable surface, as an airport, train station or etc. Put your monitor in a showcase or shelf so that the end of dust. z Someone, specifically children could trip over it . Do not drop the...
... does not protrude from the power cable. z A melted coating may cause an electric shock or fire inside the monitor. Failure to do so may lead to the product or human body. Install the monitor base in a location with heavy dust, high or low temperatures, high humidity, and chemical substances, or where it... continuously such as the product may cause a fire. z Place the product on an even, stable surface, as an airport, train station or etc. Put your monitor in a showcase or shelf so that the end of dust. z Someone, specifically children could trip over it . Do not drop the...
User Manual (ENGLISH)
Page 5
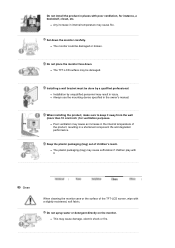
...be damaged or broken. z Installation by a qualified professional. Clean When cleaning the monitor case or the surface of children's reach. When installing the product, make sure to keep it . z The TFT-LCD surface may cause suffocation if children play with a slightly moistened, soft fabric. ...Do not place the monitor face down the monitor carefully. Installing a wall bracket must be done by unqualified personnel may cause ...
...be damaged or broken. z Installation by a qualified professional. Clean When cleaning the monitor case or the surface of children's reach. When installing the product, make sure to keep it . z The TFT-LCD surface may cause suffocation if children play with a slightly moistened, soft fabric. ...Do not place the monitor face down the monitor carefully. Installing a wall bracket must be done by unqualified personnel may cause ...
User Manual (ENGLISH)
Page 6
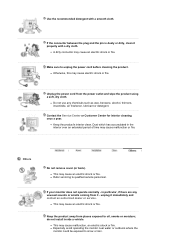
...sounds or smells coming from the power outlet and wipe the product using a soft, dry cloth. z Keep the product's interior clean. If your monitor does not operate normally - do not install inside a vehicle. Use the recommended detergent with a dry cloth. Make sure to qualified service personnel. ...unplug it properly with a smooth cloth. z This may cause an electric shock or fire. z Especially avoid operating the monitor near water or outdoors where the monitor could be exposed to oil, smoke or moisture; Dust which has accumulated in particular, if there are any chemicals such ...
...sounds or smells coming from the power outlet and wipe the product using a soft, dry cloth. z Keep the product's interior clean. If your monitor does not operate normally - do not install inside a vehicle. Use the recommended detergent with a dry cloth. Make sure to qualified service personnel. ...unplug it properly with a smooth cloth. z This may cause an electric shock or fire. z Especially avoid operating the monitor near water or outdoors where the monitor could be exposed to oil, smoke or moisture; Dust which has accumulated in particular, if there are any chemicals such ...
User Manual (ENGLISH)
Page 7
... chemical sprays or inflammable substances. Do not cover the vents on the monitor. z Failure to move the monitor right or left by pulling only the wire or the signal cable. Do not move the monitor by pulling only the wire or the signal cable. Then contact the ...z This may cause a breakdown, electric shock or fire due to damage to the cable. Never insert anything metallic into the monitor openings. z If a foreign substance enters the monitor, unplug the power cord and contact the Service Center . z This may cause a breakdown, electric shock or fire due to ...
... chemical sprays or inflammable substances. Do not cover the vents on the monitor. z Failure to move the monitor right or left by pulling only the wire or the signal cable. Do not move the monitor by pulling only the wire or the signal cable. Then contact the ...z This may cause a breakdown, electric shock or fire due to damage to the cable. Never insert anything metallic into the monitor openings. z If a foreign substance enters the monitor, unplug the power cord and contact the Service Center . z This may cause a breakdown, electric shock or fire due to ...
User Manual (ENGLISH)
Page 8
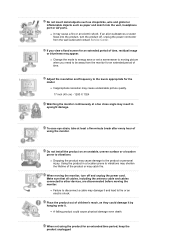
... flows into the vent, headphone port or AV ports. z Dropping the product may cause a fire or an electric shock. When not using the monitor. z Inappropriate resolution may catch fire. Using the product in eyesight damage. Do not install the product on an unstable, uneven surface or a location... you need to vibrations may shorten the lifetime of the product or may cause undesirable picture quality. 17 inch (43 cm) - 1280 X 1024 Watching the monitor continuously at least a five-minute break after every hour of using the product for an extended period of time. Adjust the ...
... flows into the vent, headphone port or AV ports. z Dropping the product may cause a fire or an electric shock. When not using the monitor. z Inappropriate resolution may catch fire. Using the product in eyesight damage. Do not install the product on an unstable, uneven surface or a location... you need to vibrations may shorten the lifetime of the product or may cause undesirable picture quality. 17 inch (43 cm) - 1280 X 1024 Watching the monitor continuously at least a five-minute break after every hour of using the product for an extended period of time. Adjust the ...
User Manual (ENGLISH)
Page 10
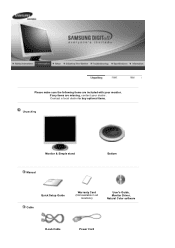
Please make sure the following items are missing, contact your monitor. Contact a local dealer to buy optional items. Unpacking Monitor & Simple stand Manual Bottom Quick Setup Guide Cable Warranty Card (Not available in all locations) User's Guide, Monitor Driver, Natural Color software D-sub Cable Power Cord If any items are included with your dealer.
Please make sure the following items are missing, contact your monitor. Contact a local dealer to buy optional items. Unpacking Monitor & Simple stand Manual Bottom Quick Setup Guide Cable Warranty Card (Not available in all locations) User's Guide, Monitor Driver, Natural Color software D-sub Cable Power Cord If any items are included with your dealer.
User Manual (ENGLISH)
Page 11
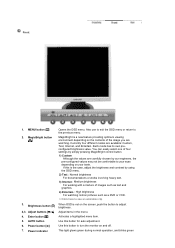
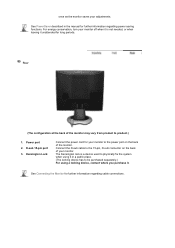
..., and blinks green Power indicator Opens the OSD menu. Activates a highlighted menu item. Also use to exit the OSD menu or return to turn the monitor on your taste. Each mode has its own preconfigured brightness value. MENU button [ ] 2. MagicBright button [] 3. AUTO button 6. Adjust items in the menu. If this is...
..., and blinks green Power indicator Opens the OSD menu. Activates a highlighted menu item. Also use to exit the OSD menu or return to turn the monitor on your taste. Each mode has its own preconfigured brightness value. MENU button [ ] 2. MagicBright button [] 3. AUTO button 6. Adjust items in the menu. If this is...
User Manual (ENGLISH)
Page 12
... Lock Connect the power cord for long periods. Rear (The configuration at the back of your adjustments. Power port 2. See Connecting the Monitor for further information regarding cable connections. The Kensington lock is not needed, or when leaving it in the manual for further information regarding power...port 3. See PowerSaver described in a public place. (The locking device has to physically fix the system when using it unattended for your monitor to the power port on the back of the monitor may vary from product to the 15-pin, D-sub connector on the back of the...
... Lock Connect the power cord for long periods. Rear (The configuration at the back of your adjustments. Power port 2. See Connecting the Monitor for further information regarding cable connections. The Kensington lock is not needed, or when leaving it in the manual for further information regarding power...port 3. See PowerSaver described in a public place. (The locking device has to physically fix the system when using it unattended for your monitor to the power port on the back of the monitor may vary from product to the 15-pin, D-sub connector on the back of the...
User Manual (ENGLISH)
Page 13
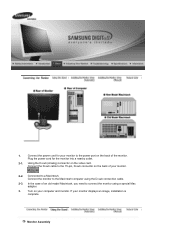
...the Macintosh computer using a special Mac adapter. 3. Connect the power cord for the monitor into a nearby outlet. 2-1. Connect the D-sub cable to connect the monitor using the D-sub connection cable. 2-3. Monitor Assembly Using the D-sub (Analog) connector on the back of an old model Macintosh..., you need to the 15-pin, D-sub connector on your monitor. 2-2. In the case of the monitor. Plug the power cord for your monitor displays an image, installation is complete. If your monitor to a Macintosh. 1. Connected to the power port on the video card...
...the Macintosh computer using a special Mac adapter. 3. Connect the power cord for the monitor into a nearby outlet. 2-1. Connect the D-sub cable to connect the monitor using the D-sub connection cable. 2-3. Monitor Assembly Using the D-sub (Analog) connector on the back of an old model Macintosh..., you need to the 15-pin, D-sub connector on your monitor. 2-2. In the case of the monitor. Plug the power cord for your monitor displays an image, installation is complete. If your monitor to a Macintosh. 1. Connected to the power port on the video card...
User Manual (ENGLISH)
Page 14
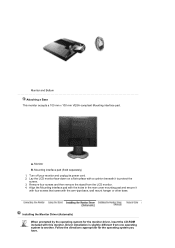
... four screws and then remove the stand from one operating system to protect the screen. 3. Driver installation is slightly different from the LCD monitor. 4. A. Monitor B. Align the Mounting interface pad with the holes in the rear cover mounting pad and secure it to another. Lay the... LCD monitor face-down on a flat surface with a cushion beneath it with four screws that came with this monitor. Follow the directions appropriate for the monitor driver, insert the CD-ROM included with the arm-type base, ...
... four screws and then remove the stand from one operating system to protect the screen. 3. Driver installation is slightly different from the LCD monitor. 4. A. Monitor B. Align the Mounting interface pad with the holes in the rear cover mounting pad and secure it to another. Lay the... LCD monitor face-down on a flat surface with a cushion beneath it with four screws that came with this monitor. Follow the directions appropriate for the monitor driver, insert the CD-ROM included with the arm-type base, ...
User Manual (ENGLISH)
Page 15
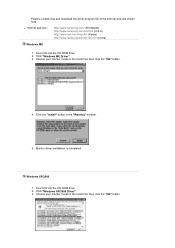
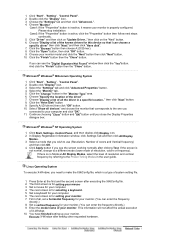
Click "Windows ME Driver". 3. Monitor driver installation is completed. z Internet web site : http://www.samsung.com/ (Worldwide) http://www.samsung.com/monitor (U.S.A) http://www.sec.co.kr/monitor (Korea) http://www.samsungmonitor.com.cn/ (China) Windows ME 1. Click the "Install" button in the model list, then click the "OK" button. Insert CD into ...
Click "Windows ME Driver". 3. Monitor driver installation is completed. z Internet web site : http://www.samsung.com/ (Worldwide) http://www.samsung.com/monitor (U.S.A) http://www.sec.co.kr/monitor (Korea) http://www.samsungmonitor.com.cn/ (China) Windows ME 1. Click the "Install" button in the model list, then click the "OK" button. Insert CD into ...
User Manual (ENGLISH)
Page 16
... certified driver will be posted on Samsung Monitor Homepage http://www.samsung.com/. 5. This monitor driver is under certifying MS logo,and this monitor. Insert CD into the CD-ROM driver. 2. 4. Then click "OK" button. z Internet web site : http://www.samsung.com/ (Worldwide) http://www.samsung.com/monitor (U.S.A) http://www.sec.co.kr/monitor (Korea) http://www.samsungmonitor.com...
... certified driver will be posted on Samsung Monitor Homepage http://www.samsung.com/. 5. This monitor driver is under certifying MS logo,and this monitor. Insert CD into the CD-ROM driver. 2. 4. Then click "OK" button. z Internet web site : http://www.samsung.com/ (Worldwide) http://www.samsung.com/monitor (U.S.A) http://www.sec.co.kr/monitor (Korea) http://www.samsungmonitor.com...
User Manual (ENGLISH)
Page 17
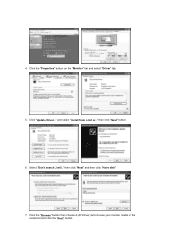
and select "Install from a list or.." Click "Update Driver.." Click the "Properties" button on the "Monitor" tab and select "Driver" tab. 5. Select "Don't search ,I will.." then click "Next" and then click "Have disk". 7. 4. Click the "Browse" button then choose A:(D:\Driver) and choose your monitor model in the model list and click the "Next" button. then click "Next" button. 6.
and select "Install from a list or.." Click "Update Driver.." Click the "Properties" button on the "Monitor" tab and select "Driver" tab. 5. Select "Don't search ,I will.." then click "Next" and then click "Have disk". 7. 4. Click the "Browse" button then choose A:(D:\Driver) and choose your monitor model in the model list and click the "Next" button. then click "Next" button. 6.
User Manual (ENGLISH)
Page 18
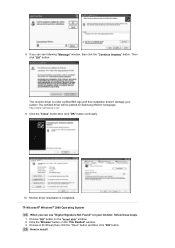
... "Browse" button on Samsung Monitor homepage. Choose A:(D:\Driver) then click the "Open" button and then click "OK" button. This monitor driver is completed. Click the "Close" button then click "OK" button continually. 10. Choose "OK" button on your system.The certified driver will be posted on the "File Needed" window. 3. Monitor driver installation is...
... "Browse" button on Samsung Monitor homepage. Choose A:(D:\Driver) then click the "Open" button and then click "OK" button. This monitor driver is completed. Click the "Close" button then click "OK" button continually. 10. Choose "OK" button on your system.The certified driver will be posted on the "File Needed" window. 3. Monitor driver installation is...
User Manual (ENGLISH)
Page 19
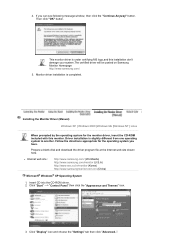
..."Update Driver.." Choose "Display a list of resolution, colors or frequency). Click the "Open" button, then click "OK" button. 9. Choose your monitor. Select the "Monitor" tab. 5. Click the "Change" button in a specific location.." Click Start, Settings, Control Panel, and then double-click Display icon. 2. Press... the "Finish" button then the "Close" button. Click the "Have Disk" button 9. Select "Show all devices" and choose the monitor that corresponds to the one you wish to the Preset Timing Modes in the user guide. Double click "Display" icon. 3. Choose "Display...
..."Update Driver.." Choose "Display a list of resolution, colors or frequency). Click the "Open" button, then click "OK" button. 9. Choose your monitor. Select the "Monitor" tab. 5. Click the "Change" button in a specific location.." Click Start, Settings, Control Panel, and then double-click Display icon. 2. Press... the "Finish" button then the "Close" button. Click the "Have Disk" button 9. Select "Show all devices" and choose the monitor that corresponds to the one you wish to the Preset Timing Modes in the user guide. Double click "Display" icon. 3. Choose "Display...
User Manual (ENGLISH)
Page 20
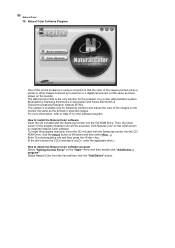
... this problem. Then, the initial screen of Windows and then select [Run...]. To install the program manually, insert the CD included with the Samsung monitor into the CD-ROM Drive. Select Natural Color from the list and then click the "Add/Delete" button. Click Natural Color on the... in using a computer is that the color of the images printed out by a printer or other images scanned by Samsung Electronics in the software program. It is the very solution for Samsung monitors and makes the color of the images on the "Start" menu and then double-click "Add/Delete a program".
... this problem. Then, the initial screen of Windows and then select [Run...]. To install the program manually, insert the CD included with the Samsung monitor into the CD-ROM Drive. Select Natural Color from the list and then click the "Add/Delete" button. Click Natural Color on the... in using a computer is that the color of the images printed out by a printer or other images scanned by Samsung Electronics in the software program. It is the very solution for Samsung monitors and makes the color of the images on the "Start" menu and then double-click "Add/Delete a program".
User Manual (ENGLISH)
Page 22
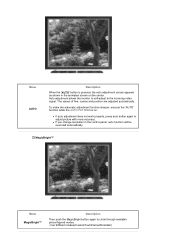
... picture with more accuracy. four different modes(Custom/Text/Internet/Entertain) The values of fine, coarse and position are adjusted automatically. Auto adjustment allows the monitor to self-adjust to the incoming video signal. Menu AUTO Description When the 'AUTO' button is on the center. To make the automatic adjustment function...
... picture with more accuracy. four different modes(Custom/Text/Internet/Entertain) The values of fine, coarse and position are adjusted automatically. Auto adjustment allows the monitor to self-adjust to the incoming video signal. Menu AUTO Description When the 'AUTO' button is on the center. To make the automatic adjustment function...
User Manual (ENGLISH)
Page 25
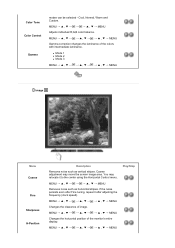
MENU MENU Changes the clearance of the monitor's entire display. MENU MENU Adjusts individual R,G,B color balance. z Mode 1 z Mode 2 z Mode 3 MENU MENU Image Menu Coarse Fine Sharpness H-Position Description Removes noise such as horizontal ...
MENU MENU Changes the clearance of the monitor's entire display. MENU MENU Adjusts individual R,G,B color balance. z Mode 1 z Mode 2 z Mode 3 MENU MENU Image Menu Coarse Fine Sharpness H-Position Description Removes noise such as horizontal ...
User Manual (ENGLISH)
Page 26
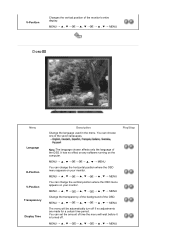
... menu will wait before it is turned off if no effect on any software running on your monitor. MENU MENU You can change the horizontal position where the OSD menu appears on your monitor. MENU MENU It has no adjustments are made for a certain time period. MENU MENU OSD... Menu Description Change the language used in the menu. You can choose one of the seven languages. You can set the amount of the monitor's entire display. MENU MENU You can change the vertical position where the OSD menu appears on the computer. V-Position Changes the vertical position ...
... menu will wait before it is turned off if no effect on any software running on your monitor. MENU MENU You can change the horizontal position where the OSD menu appears on your monitor. MENU MENU It has no adjustments are made for a certain time period. MENU MENU OSD... Menu Description Change the language used in the menu. You can choose one of the seven languages. You can set the amount of the monitor's entire display. MENU MENU You can change the vertical position where the OSD menu appears on the computer. V-Position Changes the vertical position ...


