Quick Guide (ENGLISH)
Page 20
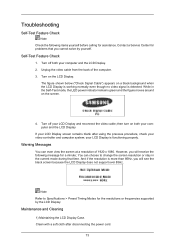
... calling for the resolutions or frequencies supported by yourself. However, you cannot solve by the LCD Display. Clean with a soft cloth after using the previous procedure, check your LCD Display and reconnect the video cable; Turn off both your computer and the LCD Display If your LCD Display screen remains blank after disconnecting the power cord. 73 then turn on a black background when the LCD Display is working normally even though no video signal is detected: While...
... calling for the resolutions or frequencies supported by yourself. However, you cannot solve by the LCD Display. Clean with a soft cloth after using the previous procedure, check your LCD Display and reconnect the video cable; Turn off both your computer and the LCD Display If your LCD Display screen remains blank after disconnecting the power cord. 73 then turn on a black background when the LCD Display is working normally even though no video signal is detected: While...
Quick Guide (ENGLISH)
Page 21
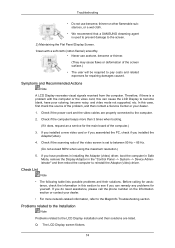
... expenses for yourself. Check if the power cord and the video cables are listed. If you have poor coloring, become noisy, and video mode not supported, etc. Before calling for the main board of the screen surface.) • The user will be required to the MagicInfo Troubleshooting section. Q: The LCD Display screen flickers. 74 If you installed a new video card or if you assembled the PC, check if you do need assistance, please...
... expenses for yourself. Check if the power cord and the video cables are listed. If you have poor coloring, become noisy, and video mode not supported, etc. Before calling for the main board of the screen surface.) • The user will be required to the MagicInfo Troubleshooting section. Q: The LCD Display screen flickers. 74 If you installed a new video card or if you assembled the PC, check if you do need assistance, please...

Quick Guide (ENGLISH)
Page 23
... changes made in port on your LCD Display and the audio-out port on the screen when you pressing the MENU button, check the cable connection between the LCD Display and the computer to the Brightness, Contrast) Q: The screen color is too light or too dark. Q: The screen is blank and it is poor. A: Adjusts the Treble and Bass to audio signals and their solutions are listed below. A: Adjust color using Custom under OSD Color Adjustment menu. Q: The Power Indicator blinks. Q: The sound...
... changes made in port on your LCD Display and the audio-out port on the screen when you pressing the MENU button, check the cable connection between the LCD Display and the computer to the Brightness, Contrast) Q: The screen color is too light or too dark. Q: The screen is blank and it is poor. A: Adjusts the Treble and Bass to audio signals and their solutions are listed below. A: Adjust color using Custom under OSD Color Adjustment menu. Q: The Power Indicator blinks. Q: The sound...

Quick Guide (ENGLISH)
Page 24
...; Display → Settings. Set the function in the Control Panel → Appearance and Themes → Display → Screen Saver. Q & A Q: How can I clean the outer case/LCD Panel? 77 A: Windows XP: Set the resolution in the BIOS-SETUP of the computer. (Refer to the computer or the video card manual for details. Q: How can I Adjusts the resolution? A: Check if the power cord is securely connected. A: Check the polarities (+/-) of the driver used. (Refer to the Windows / Computer Manual). Q: The remote control buttons...
...; Display → Settings. Set the function in the Control Panel → Appearance and Themes → Display → Screen Saver. Q & A Q: How can I clean the outer case/LCD Panel? 77 A: Windows XP: Set the resolution in the BIOS-SETUP of the computer. (Refer to the computer or the video card manual for details. Q: How can I Adjusts the resolution? A: Check if the power cord is securely connected. A: Check the polarities (+/-) of the driver used. (Refer to the Windows / Computer Manual). Q: The remote control buttons...
Quick Guide (ENGLISH)
Page 9
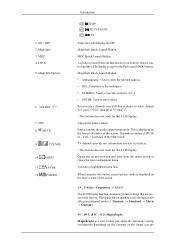
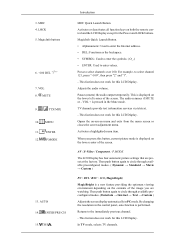
LOCK 5. Adjusts the audio volume. The audio resumes if MUTE or - Opens the on both the remote control and the LCD Display except for the Power and LOCK buttons. AV / S-Video / Component : P.MODE The LCD Display has four automatic picture settings that are Then push button again to select channels over 100. MENU 11. MagicInfo Quick Launch Button. • Alphanumeric: Used to enter the Internet address. • DEL: Functions as the backspace. • SYMBOL: Used to...
LOCK 5. Adjusts the audio volume. The audio resumes if MUTE or - Opens the on both the remote control and the LCD Display except for the Power and LOCK buttons. AV / S-Video / Component : P.MODE The LCD Display has four automatic picture settings that are Then push button again to select channels over 100. MENU 11. MagicInfo Quick Launch Button. • Alphanumeric: Used to enter the Internet address. • DEL: Functions as the backspace. • SYMBOL: Used to...

Quick Guide (ENGLISH)
Page 10
... Mono ↔ SAP Default Manual Change Mono EXIT 19. When pressing this LCD Display. Turns the FM Radio on the remote control while watching TV. In PC/DVI mode, sets the SOUND to unfreeze. STILL 22. P.SIZE 24. This fuction does not work for this LCD Display. MTS- You can be operated depending on the broadcasting type by using the DUAL button on /off the screen. Up-Down Left...
... Mono ↔ SAP Default Manual Change Mono EXIT 19. When pressing this LCD Display. Turns the FM Radio on the remote control while watching TV. In PC/DVI mode, sets the SOUND to unfreeze. STILL 22. P.SIZE 24. This fuction does not work for this LCD Display. MTS- You can be operated depending on the broadcasting type by using the DUAL button on /off the screen. Up-Down Left...
Quick Guide (ENGLISH)
Page 25
.... - Adjusts the audio volume. TV channels provide text information services via teletext. - Opens the on the lower center of the image you press this LCD Display. VOL + is displayed on -screen menu and exits from the menu screen or closes the screen adjustment menu. When you are preset at the factory. By changing the resolution in the Mute mode. MagicInfo buttons 6. +100 DEL 7. ENTER 12. This fuction does not work for this LCD Display. MENU...
.... - Adjusts the audio volume. TV channels provide text information services via teletext. - Opens the on the lower center of the image you press this LCD Display. VOL + is displayed on -screen menu and exits from the menu screen or closes the screen adjustment menu. When you are preset at the factory. By changing the resolution in the Mute mode. MagicInfo buttons 6. +100 DEL 7. ENTER 12. This fuction does not work for this LCD Display. MENU...

Quick Guide (ENGLISH)
Page 45
... working normally even though no video signal is functioning properly. Note Refer to change the screen resolution or stay in the Self-Test mode, the LED power indicator remains green and the figure moves around on the LCD Display. However, you will receive the following items yourself before calling for a minute; Clean with a soft cloth after using the previous procedure, check your LCD Display and reconnect the video cable; Turn...
... working normally even though no video signal is functioning properly. Note Refer to change the screen resolution or stay in the Self-Test mode, the LED power indicator remains green and the figure moves around on the LCD Display. However, you will receive the following items yourself before calling for a minute; Clean with a soft cloth after using the previous procedure, check your LCD Display and reconnect the video cable; Turn...
Quick Guide (ENGLISH)
Page 46
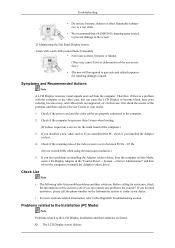
... you installed the Adaptor (video). 4. Q: The LCD Display screen flickers. Troubleshooting • Do not use acetone, benzene or thinner. (They may cause flaws or deformation of the screen surface.) • The user will be required to pay costs and related expenses for the main board of the video screen is used to prevent damage to the screen. 2) Maintaining the Flat Panel Display Screen. Clean with the computer or the video card, this...
... you installed the Adaptor (video). 4. Q: The LCD Display screen flickers. Troubleshooting • Do not use acetone, benzene or thinner. (They may cause flaws or deformation of the screen surface.) • The user will be required to pay costs and related expenses for the main board of the video screen is used to prevent damage to the screen. 2) Maintaining the Flat Panel Display Screen. Clean with the computer or the video card, this...
Quick Guide (ENGLISH)
Page 48
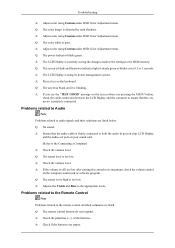
... remote control buttons do not respond. A: Press a key on the computer sound card or software program. A: Ensure that the connector is still too low after turning the control to its power management system. A: Check the volume level. A: If the volume is properly connected. Q: The screen is blank and the power indicator light is too high or too low. A: Check if the batteries are listed. Troubleshooting A: Adjust color using Custom under OSD Color Adjustment menu. Q: The color white is...
... remote control buttons do not respond. A: Press a key on the computer sound card or software program. A: Ensure that the connector is still too low after turning the control to its power management system. A: Check the volume level. A: If the volume is properly connected. Q: The screen is blank and the power indicator light is too high or too low. A: Check if the batteries are listed. Troubleshooting A: Adjust color using Custom under OSD Color Adjustment menu. Q: The color white is...
Quick Guide (ENGLISH)
Page 49
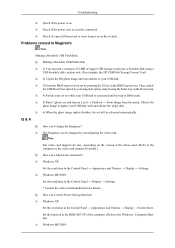
... . Q & A Q: How can I set by reconfiguring the video card. A: Windows XP: Set the resolution in the Control Panel → Appearance and Themes → Display → Screen Saver. Problems related to the Windows / Computer Manual). A: 5) Run C:\ghost.exe and choose Local → Partition → From Image from the menu. Choose the ghost image to update your USB disk. Then, enable the USB Boot First option by selecting that video card support can turn a common 512...
... . Q & A Q: How can I set by reconfiguring the video card. A: Windows XP: Set the resolution in the Control Panel → Appearance and Themes → Display → Screen Saver. Problems related to the Windows / Computer Manual). A: 5) Run C:\ghost.exe and choose Local → Partition → From Image from the menu. Choose the ghost image to update your USB disk. Then, enable the USB Boot First option by selecting that video card support can turn a common 512...

User Manual (ENGLISH)
Page 16
... function keys on -screen menu and exits from the menu screen or closes the screen adjustment menu. This is pressed in the Mute mode. MagicInfo 3. VOL + is displayed on the lower center of the screen. Opens the on both the remote control and the LCD Display except for the Power and LOCK buttons. Adjusts the audio volume. Activates a highlighted menu item. MENU 11. ON / OFF 2. P.MODE Introduction STOP PLAY/PAUSE FF Turns the LCD Display On/Off.
... function keys on -screen menu and exits from the menu screen or closes the screen adjustment menu. This is pressed in the Mute mode. MagicInfo 3. VOL + is displayed on the lower center of the screen. Opens the on both the remote control and the LCD Display except for the Power and LOCK buttons. Adjusts the audio volume. Activates a highlighted menu item. MENU 11. ON / OFF 2. P.MODE Introduction STOP PLAY/PAUSE FF Turns the LCD Display On/Off.
User Manual (ENGLISH)
Page 17
... broadcasts. - MTS- AUTO 14. SOURCE 17. S.MODE 21. DUAL/MTS watching. In TV mode, selects TV channels. - Exits from one menu item to another horizontally, vertically or adjusts selected menu values. Press it again to the immediately previous channel. - By changing the resolution in high fidelity stereo amplifier. Moves from the menu screen. In PC/DVI mode, sets the SOUND to change the screen size. Then push button again to circle...
... broadcasts. - MTS- AUTO 14. SOURCE 17. S.MODE 21. DUAL/MTS watching. In TV mode, selects TV channels. - Exits from one menu item to another horizontally, vertically or adjusts selected menu values. Press it again to the immediately previous channel. - By changing the resolution in high fidelity stereo amplifier. Moves from the menu screen. In PC/DVI mode, sets the SOUND to change the screen size. Then push button again to circle...

User Manual (ENGLISH)
Page 32
... Power and LOCK buttons. ENTER 12. Pauses (mutes) the audio output temporarily. When you are preset at the factory. MDC 4. P.MODE 13. LOCK 5. CH/P Introduction MDC Quick Launch Button. AV / S-Video / Component : P.MODE The LCD Display has four automatic picture settings that are watching. Activates a highlighted menu item. 3. By changing the resolution in the control panel, auto function is displayed on the contents of the screen. This fuction does not work for this button, current picture mode...
... Power and LOCK buttons. ENTER 12. Pauses (mutes) the audio output temporarily. When you are preset at the factory. MDC 4. P.MODE 13. LOCK 5. CH/P Introduction MDC Quick Launch Button. AV / S-Video / Component : P.MODE The LCD Display has four automatic picture settings that are watching. Activates a highlighted menu item. 3. By changing the resolution in the control panel, auto function is displayed on the contents of the screen. This fuction does not work for this button, current picture mode...

User Manual (ENGLISH)
Page 84
..., Auto Adjustment, Image Lock, and Size functions are not available. Video Wall does not operate in MagicInfo mode. Video Wall Turns Off/On the Video Wall function of your TV by configuring the HDMI black level. 1. Normal 2. When the Video Wall is repeated on each screen. Off 2. Low MENU → , → ENTER → , →ENTER→ , → ENTER → MENU Video Wall A Video Wall is a set of video screens connected together, so that each screen shows a part of the whole picture...
..., Auto Adjustment, Image Lock, and Size functions are not available. Video Wall does not operate in MagicInfo mode. Video Wall Turns Off/On the Video Wall function of your TV by configuring the HDMI black level. 1. Normal 2. When the Video Wall is repeated on each screen. Off 2. Low MENU → , → ENTER → , →ENTER→ , → ENTER → MENU Video Wall A Video Wall is a set of video screens connected together, so that each screen shows a part of the whole picture...
User Manual (ENGLISH)
Page 94
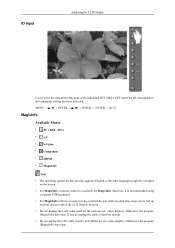
... cable used by an USB device (ex: video display). ID Input Adjusting the LCD Display Use to the transmitter setting becomes activated. Otherwise, the program (MagicInfo) may stop . Only a SET where the ID corresponds to select the transmitter functions of the individual SET. MENU → , → ENTER → , → ENTER → ENTER → [0~9] MagicInfo Available Modes • PC / BNC / DVI • AV • S-Video • Component • HDMI...
... cable used by an USB device (ex: video display). ID Input Adjusting the LCD Display Use to the transmitter setting becomes activated. Otherwise, the program (MagicInfo) may stop . Only a SET where the ID corresponds to select the transmitter functions of the individual SET. MENU → , → ENTER → , → ENTER → ENTER → [0~9] MagicInfo Available Modes • PC / BNC / DVI • AV • S-Video • Component • HDMI...

User Manual (ENGLISH)
Page 95
... other sources, press the SOURCE button in the disk, you must Commit them. • By selecting Disable, Enable or Commit, the system is restarted. Please make sure not to use the Power-On option when the LCD Display is in the process of shutting down since this may cause system errors on the LCD Display. • In the OSD image of Setup have been changed when...
... other sources, press the SOURCE button in the disk, you must Commit them. • By selecting Disable, Enable or Commit, the system is restarted. Please make sure not to use the Power-On option when the LCD Display is in the process of shutting down since this may cause system errors on the LCD Display. • In the OSD image of Setup have been changed when...
User Manual (ENGLISH)
Page 100
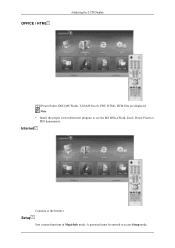
A password must be entered to the Internet Setup Sets various functions in MagicInfo mode. OFFICE / HTML Adjusting the LCD Display PPT(Power Point), DOC(MS Word), XLS(MS Excel), PDF, HTML, HTM files are displayed. Internet Connects to access Setup mode. Note • Install the proper viewer(freeware) program to see the MS Office(Word, Excel, Power Point) or PDF doucuments.
A password must be entered to the Internet Setup Sets various functions in MagicInfo mode. OFFICE / HTML Adjusting the LCD Display PPT(Power Point), DOC(MS Word), XLS(MS Excel), PDF, HTML, HTM files are displayed. Internet Connects to access Setup mode. Note • Install the proper viewer(freeware) program to see the MS Office(Word, Excel, Power Point) or PDF doucuments.
User Manual (ENGLISH)
Page 105
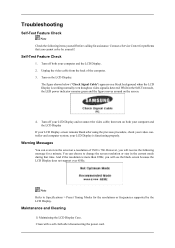
... power cord. Turn off your computer and the LCD Display. 2. You can even view the screen at a resolution of the computer. 3. then turn on a black background when the LCD Display is working normally even though no video signal is functioning properly. Clean with a soft cloth after using the previous procedure, check your LCD Display is detected: While in the current mode during that you will see the black screen because the LCD Display does not support...
... power cord. Turn off your computer and the LCD Display. 2. You can even view the screen at a resolution of the computer. 3. then turn on a black background when the LCD Display is working normally even though no video signal is functioning properly. Clean with a soft cloth after using the previous procedure, check your LCD Display is detected: While in the current mode during that you will see the black screen because the LCD Display does not support...
User Manual (ENGLISH)
Page 121
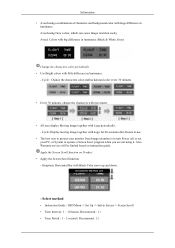
...: Display moving image together with little difference in luminance. - Also Warranty service will be limited based on Product • Apply the Screen Scroll function - Apply the Screen Scroll function on instruction guide. Avoid: Colors with big difference in luminance (Black & White, Grey) Change the characters color periodically • Use Bright colors with Logo for 60 seconds after 4 hours in luminance. Select method • Instruction Guide : OSD Menu -> Set Up -> Safety Screen -> Screen Scroll...
...: Display moving image together with little difference in luminance. - Also Warranty service will be limited based on Product • Apply the Screen Scroll function - Apply the Screen Scroll function on instruction guide. Avoid: Colors with big difference in luminance (Black & White, Grey) Change the characters color periodically • Use Bright colors with Logo for 60 seconds after 4 hours in luminance. Select method • Instruction Guide : OSD Menu -> Set Up -> Safety Screen -> Screen Scroll...


