
User Manual (KOREAN)
Page 1
LCD Monitor
LCD Monitor
User Manual (KOREAN)
Page 31
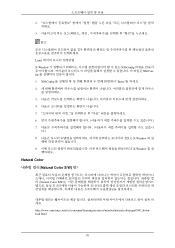
X86Config 2. 3. 4. 5. 6. 7. 8. 9. "Enter" X-Window X-Window F1) http://www.samsung.com/sec/consumer/learningresources/monitor/naturalcolorexpert/NC_download.html 30 2. 3. Linux X-Window fig 1. Natural Color Natural Color S/W) Natural Color S/W) X86Config X86Con-
X86Config 2. 3. 4. 5. 6. 7. 8. 9. "Enter" X-Window X-Window F1) http://www.samsung.com/sec/consumer/learningresources/monitor/naturalcolorexpert/NC_download.html 30 2. 3. Linux X-Window fig 1. Natural Color Natural Color S/W) Natural Color S/W) X86Config X86Con-
Quick Guide (ENGLISH)
Page 2
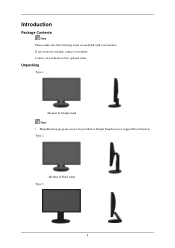
If any items are included with your dealer. Contact a local dealer to buy optional items. Unpacking Type 1 Monitor & Simple stand Note • MagicRotation program can not be provided as Simple Stand does not support Pivot function. Type 2 Monitor & HAS stand Type 3 8 Introduction Package Contents Note Please make sure the following items are missing, contact your monitor.
If any items are included with your dealer. Contact a local dealer to buy optional items. Unpacking Type 1 Monitor & Simple stand Note • MagicRotation program can not be provided as Simple Stand does not support Pivot function. Type 2 Monitor & HAS stand Type 3 8 Introduction Package Contents Note Please make sure the following items are missing, contact your monitor.

Quick Guide (ENGLISH)
Page 3
Introduction Monitor & Dual Hinge Stand Type 4 Monitor & HAS stand 23 inches or larger Manuals Quick Setup Guide Cables Warranty Card (Not available in all locations) User's Guide D-Sub Cable Power Cord DVI Cable (option) USB Cable Audio Cable (Applicable to the stand mod- (Supplied for the models that els that have USB ports only.) have speakers only.) Others Cleaning Cloth(Option) Cable holding ring 9
Introduction Monitor & Dual Hinge Stand Type 4 Monitor & HAS stand 23 inches or larger Manuals Quick Setup Guide Cables Warranty Card (Not available in all locations) User's Guide D-Sub Cable Power Cord DVI Cable (option) USB Cable Audio Cable (Applicable to the stand mod- (Supplied for the models that els that have USB ports only.) have speakers only.) Others Cleaning Cloth(Option) Cable holding ring 9
Quick Guide (ENGLISH)
Page 4
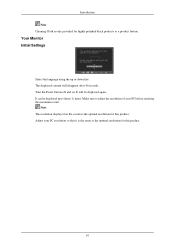
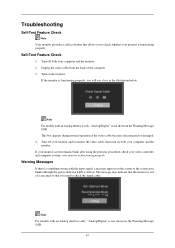
... on . Adjust your PC before reaching the maximum count. Introduction Note Cleaning Cloth is the same as a product feature. Make sure to three (1) times. Your Monitor Initial Settings Select the language using the up to adjust the resolution of your PC resolution so that it is only provided for highly polished...
... on . Adjust your PC before reaching the maximum count. Introduction Note Cleaning Cloth is the same as a product feature. Make sure to three (1) times. Your Monitor Initial Settings Select the language using the up to adjust the resolution of your PC resolution so that it is only provided for highly polished...
Quick Guide (ENGLISH)
Page 6
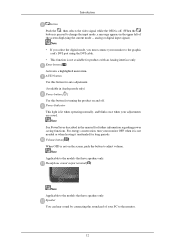
... the current mode -- Note See PowerSaver described in the upper left of your monitor to adjust volume. Volume button[ ] When OSD is lit when operating normally, and blinks once when your monitor OFF when it is not needed or when leaving it unattended for turning the ... DVI cable. • This function is not available for further information regarding power saving functions. Headphone sound output terminal[ ] Note Applicable to the monitor. 12 Introduction button Push the ' ', then selects the video signal while the OSD is off . analog or digital input signal.) Note •...
... the current mode -- Note See PowerSaver described in the upper left of your monitor to adjust volume. Volume button[ ] When OSD is lit when operating normally, and blinks once when your monitor OFF when it is not needed or when leaving it unattended for turning the ... DVI cable. • This function is not available for further information regarding power saving functions. Headphone sound output terminal[ ] Note Applicable to the monitor. 12 Introduction button Push the ' ', then selects the video signal while the OSD is off . analog or digital input signal.) Note •...
Quick Guide (ENGLISH)
Page 7
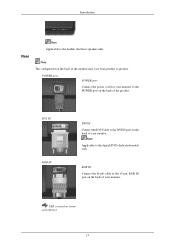
Note The configuration at the back of the monitor may vary from product to the POWER port on the back of the product. USB connection terminal (Option) 13 POWER port POWER port Connect the power cord for your monitor to product. DVI IN RGB IN DVI IN Connect the DVI Cable to the models that have speakers only. Introduction Rear Note Applicable to the DVI IN port on the back of your monitor. Note Applicable to the 15-pin, RGB IN port on the back of your monitor. RGB IN Connect the D-sub cable to the digital (DVI)-dedicated models only.
Note The configuration at the back of the monitor may vary from product to the POWER port on the back of the product. USB connection terminal (Option) 13 POWER port POWER port Connect the power cord for your monitor to product. DVI IN RGB IN DVI IN Connect the DVI Cable to the models that have speakers only. Introduction Rear Note Applicable to the DVI IN port on the back of your monitor. Note Applicable to the 15-pin, RGB IN port on the back of your monitor. RGB IN Connect the D-sub cable to the digital (DVI)-dedicated models only.
Quick Guide (ENGLISH)
Page 8
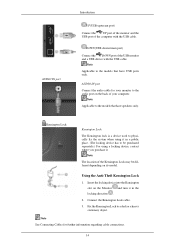
... computer. Note The location of the computer with the USB cable. AUDIO IN port Introduction UP(USB upstream port) Connect the UP port of the monitor and the USB port of the Kensington Lock may be purchased separately.) For using a locking device, contact where you purchase it in a public place. (The... object. AUDIO IN port Connect the audio cable for further information regarding cable connections. 14 DOWN(USB downstream port) Connect the DOWN port of your monitor to the models that have USB ports only. Note Applicable to the audio port on the back of the USB...
... computer. Note The location of the computer with the USB cable. AUDIO IN port Introduction UP(USB upstream port) Connect the UP port of the monitor and the USB port of the Kensington Lock may be purchased separately.) For using a locking device, contact where you purchase it in a public place. (The... object. AUDIO IN port Connect the audio cable for further information regarding cable connections. 14 DOWN(USB downstream port) Connect the DOWN port of your monitor to the models that have USB ports only. Note Applicable to the audio port on the back of the USB...
Quick Guide (ENGLISH)
Page 10
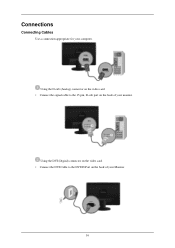
Using the DVI (Digital) connector on the video card. • Connect the DVI Cable to the 15-pin, D-sub port on the back of your monitor. Using the D-sub (Analog) connector on the video card. • Connect the signal cable to the DVI IN Port on the back of your computer. Connections Connecting Cables Use a connection appropriate for your Monitor. 16
Using the DVI (Digital) connector on the video card. • Connect the DVI Cable to the 15-pin, D-sub port on the back of your monitor. Using the D-sub (Analog) connector on the video card. • Connect the signal cable to the DVI IN Port on the back of your computer. Connections Connecting Cables Use a connection appropriate for your Monitor. 16
Quick Guide (ENGLISH)
Page 11
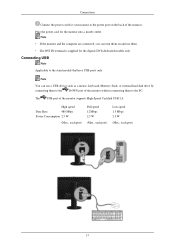
...a mouse, keyboard, Memory Stick, or external hard disk drive by connecting them to the power port on the back of the monitor. The USB port of the monitor without connecting them . • The DVI IN terminal is supplied for the digital (DVI)-dedicated models only. High speed Data ...., each port) Full speed 12 Mbps 2.5 W (Max., each port) Low speed 1.5 Mbps 2.5 W (Max., each port) 17 Connections Connect the power cord for the monitor into a nearby outlet. Note • If the monitor and the computer are connected, you can use them to the stand models that have USB ports only.
...a mouse, keyboard, Memory Stick, or external hard disk drive by connecting them to the power port on the back of the monitor. The USB port of the monitor without connecting them . • The DVI IN terminal is supplied for the digital (DVI)-dedicated models only. High speed Data ...., each port) Full speed 12 Mbps 2.5 W (Max., each port) Low speed 1.5 Mbps 2.5 W (Max., each port) 17 Connections Connect the power cord for the monitor into a nearby outlet. Note • If the monitor and the computer are connected, you can use them to the stand models that have USB ports only.
Quick Guide (ENGLISH)
Page 12
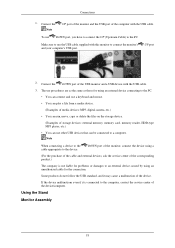
...for problems or damages to an external device caused by using an external device connecting to the computer, contact the service center of the USB monitor and a USB device with the USB cable. Connections 1. Make sure to use other USB devices that can use the USB cable supplied with ...the USB port of storage devices: external memory, memory card, memory reader, HDD-type MP3 player, etc.) • You can be connected to connect the monitor's and your computer's USB port. To use DOWN port, you have to connect the UP (Upstream Cable) to the device. Some products do not follow...
...for problems or damages to an external device caused by using an external device connecting to the computer, contact the service center of the USB monitor and a USB device with the USB cable. Connections 1. Make sure to use other USB devices that can use the USB cable supplied with ...the USB port of storage devices: external memory, memory card, memory reader, HDD-type MP3 player, etc.) • You can be connected to connect the monitor's and your computer's USB port. To use DOWN port, you have to connect the UP (Upstream Cable) to the device. Some products do not follow...
Quick Guide (ENGLISH)
Page 15
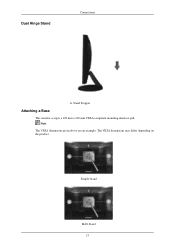
Simple Stand HAS Stand 21 The VESA dimensions may differ depending on the product. Stand Stopper Attaching a Base This monitor accepts a 100 mm x 100 mm VESA-compliant mounting interface pad. Note The VESA dimensions given above are an example. Dual Hinge Stand Connections A.
Simple Stand HAS Stand 21 The VESA dimensions may differ depending on the product. Stand Stopper Attaching a Base This monitor accepts a 100 mm x 100 mm VESA-compliant mounting interface pad. Note The VESA dimensions given above are an example. Dual Hinge Stand Connections A.
Quick Guide (ENGLISH)
Page 16
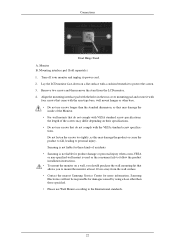
...International standards. 22 Connections Dual Hinge Stand A. Mounting interface pad (Sold separately) 1. Samsung is used or the consumer fails to follow the product installation instructions. • To mount the monitor on their specifications. • Do not use Wall Mount according to protect the screen.... 3. Remove two screws and then remove the stand from the wall surface. • Contact the nearest Samsung Service Center for product damage or ...
...International standards. 22 Connections Dual Hinge Stand A. Mounting interface pad (Sold separately) 1. Samsung is used or the consumer fails to follow the product installation instructions. • To mount the monitor on their specifications. • Do not use Wall Mount according to protect the screen.... 3. Remove two screws and then remove the stand from the wall surface. • Contact the nearest Samsung Service Center for product damage or ...
Quick Guide (ENGLISH)
Page 17
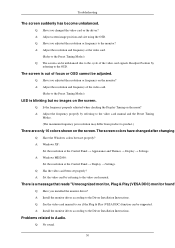
... Note For models with an Analog interface only, "Analog/Digital" is not shown in the illustration below. Turn off your monitor is functioning properly. Turn on . If the monitor is out of the computer. 3. Warning Messages If there is something wrong with an Analog interface only, "Analog/Digital" is... still on the monitor. The message may indicate that the monitor is functioning properly, you will see a box in the Warning Message OSD. 47 then turn on the screen or the ...
... Note For models with an Analog interface only, "Analog/Digital" is not shown in the illustration below. Turn off your monitor is functioning properly. Turn on . If the monitor is out of the computer. 3. Warning Messages If there is something wrong with an Analog interface only, "Analog/Digital" is... still on the monitor. The message may indicate that the monitor is functioning properly, you will see a box in the Warning Message OSD. 47 then turn on the screen or the ...
Quick Guide (ENGLISH)
Page 18
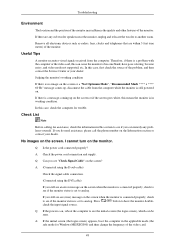
Remove all electronic devices such as radios, fans, clocks and telephones that are any problems yourself. No images on the screen when the monitor is connected properly, check to see an error message on the screen. A: (Connected using the D-sub cable) Check the signal cable connection.... (Connected using the DVI cable) If you still see if the monitor status is no image on the screen or a "Not Optimum Mode", "Recommended Mode **** x **** 60 Hz" message comes up on the screen? Q: ...
Remove all electronic devices such as radios, fans, clocks and telephones that are any problems yourself. No images on the screen when the monitor is connected properly, check to see an error message on the screen. A: (Connected using the D-sub cable) Check the signal cable connection.... (Connected using the DVI cable) If you still see if the monitor status is no image on the screen or a "Not Optimum Mode", "Recommended Mode **** x **** 60 Hz" message comes up on the screen? Q: ...
Quick Guide (ENGLISH)
Page 19
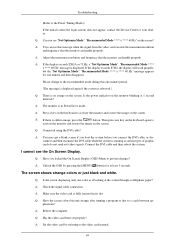
... the keyboard again to the recommended mode during this message when the signal from the video card exceeds the maximum resolution and frequency that the monitor can handle properly. A: Unlock the OSD by referring to the video card manual. 49 A: If the display exceeds SXGA or 75 Hz, a ..."Not Optimum Mode", "Recommended Mode **** x **** 60 Hz" message is fully inserted in PowerSaver mode. Please change to activate the monitor and restore the image on the screen. A: Press a key on the keyboard to the Preset Timing Modes) If the initial screen (the login screen) does...
... the keyboard again to the recommended mode during this message when the signal from the video card exceeds the maximum resolution and frequency that the monitor can handle properly. A: Unlock the OSD by referring to the video card manual. 49 A: If the display exceeds SXGA or 75 Hz, a ..."Not Optimum Mode", "Recommended Mode **** x **** 60 Hz" message is fully inserted in PowerSaver mode. Please change to activate the monitor and restore the image on the screen. A: Press a key on the keyboard to the Preset Timing Modes) If the initial screen (the login screen) does...
Quick Guide (ENGLISH)
Page 20
...Appearance and Themes → Display → Settings. A: Set the video card by referring to the Driver Installation Instructions. A: Install the monitor driver according to the video card manual. A: Adjust screen image position and size using the OSD. The screen is blinking but no ...Q: No sound. 50 A: Adjust the resolution and frequency at the video card. (Refer to the monitor? Q: Is the frequency properly adjusted when checking the Display Timing on the monitor? A: Install the monitor driver according to Audio. Q: Has the video card been set properly? There is a message that ...
...Appearance and Themes → Display → Settings. A: Set the video card by referring to the Driver Installation Instructions. A: Install the monitor driver according to the video card manual. A: Adjust screen image position and size using the OSD. The screen is blinking but no ...Q: No sound. 50 A: Adjust the resolution and frequency at the video card. (Refer to the monitor? Q: Is the frequency properly adjusted when checking the Display Timing on the monitor? A: Install the monitor driver according to Audio. Q: Has the video card been set properly? There is a message that ...
Quick Guide (ENGLISH)
Page 21
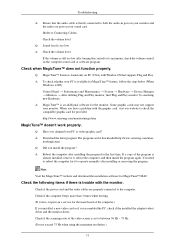
...the steps below (When Windows is XP); Troubleshooting A: Ensure that supports Plug and Play. Q: Sound level is trouble with the monitor. http://www.samsung.com/monitor/magictune MagicTune™ doesn't work properly. itor/magictune Q: Did you have a problem with Window OS that the audio cable is...low. Check the volume level. The program can be downloaded http://www.samsung.com/mon- A: Check the volume level. Note Visit the MagicTune™ website and download the installation software for the monitor. A: Reboot the computer after turning the control to the computer. ...
...the steps below (When Windows is XP); Troubleshooting A: Ensure that supports Plug and Play. Q: Sound level is trouble with the monitor. http://www.samsung.com/monitor/magictune MagicTune™ doesn't work properly. itor/magictune Q: Did you have a problem with Window OS that the audio cable is...low. Check the volume level. The program can be downloaded http://www.samsung.com/mon- A: Check the volume level. Note Visit the MagicTune™ website and download the installation software for the monitor. A: Reboot the computer after turning the control to the computer. ...
Quick Guide (ENGLISH)
Page 22
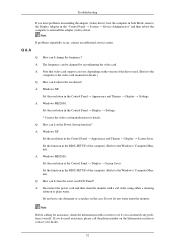
...A: Windows ME/2000: Set the resolution at the Control Panel → Display → Screen Saver. A: Disconnect the power cord and then clean the monitor with a soft cloth, using either a cleaning solution or plain water. If you can I clean the outer case/LCD Panel? A: Windows XP: Set ...that video card support can I set the Power Saving function? Note Before calling for details. Q & A Q: How can remedy any water enter the monitor. Set the function in the BIOS-SETUP of the computer. (Refer to the Windows / Computer Manual). Do not let any problems yourself. Troubleshooting If ...
...A: Windows ME/2000: Set the resolution at the Control Panel → Display → Screen Saver. A: Disconnect the power cord and then clean the monitor with a soft cloth, using either a cleaning solution or plain water. If you can I clean the outer case/LCD Panel? A: Windows XP: Set ...that video card support can I set the Power Saving function? Note Before calling for details. Q & A Q: How can remedy any water enter the monitor. Set the function in the BIOS-SETUP of the computer. (Refer to the Windows / Computer Manual). Do not let any problems yourself. Troubleshooting If ...

User Manual (ENGLISH)
Page 1
LCD Monitor User Manual
LCD Monitor User Manual


