
Quick Guide (ENGLISH)
Page 22
...Peripherals) -> Legacy USB Support item to "Full". For more information on how to install the driver, refer to "Installing and Using the Software". However, only a blank screen is blinking. Check if the power cord and the video cables are properly connected to display the BIOS ...Press [F2] to the computer. Save the settings and reboot the computer. My computer is on and the LED is displayed on the monitor. A: Move your USB monitor in the "Display Properties" window. Right-click the "Windows Desktop" and click on "Advanced". 3. The "Display Properties" window appears....
...Peripherals) -> Legacy USB Support item to "Full". For more information on how to install the driver, refer to "Installing and Using the Software". However, only a blank screen is blinking. Check if the power cord and the video cables are properly connected to display the BIOS ...Press [F2] to the computer. Save the settings and reboot the computer. My computer is on and the LED is displayed on the monitor. A: Move your USB monitor in the "Display Properties" window. Right-click the "Windows Desktop" and click on "Advanced". 3. The "Display Properties" window appears....

User Manual (ENGLISH)
Page 25
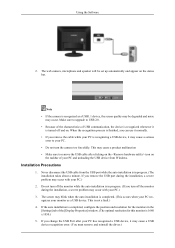
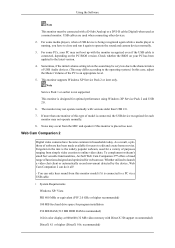
However, Windows Vista 64bit is not supported. RAM : 512 MB RAM or more USB : 1.1 or higher (USB 2.0 recommended) Auto Setup for viewing multimedia files simply by connecting the power cable and the USB cable to your monitor and PC using a USB cable, as shown in the figure below. Using the Software Using the WebCam Monitor This monitor can be used as a normal monitor for video communications and for the web camera, microphone and speaker 1. Minimum baseline spec • System Requirements CPU : 1.73GHz or Later OS : Windows XP Service Pack2 or later. Connect your PC.
However, Windows Vista 64bit is not supported. RAM : 512 MB RAM or more USB : 1.1 or higher (USB 2.0 recommended) Auto Setup for viewing multimedia files simply by connecting the power cable and the USB cable to your monitor and PC using a USB cable, as shown in the figure below. Using the Software Using the WebCam Monitor This monitor can be used as a normal monitor for video communications and for the web camera, microphone and speaker 1. Minimum baseline spec • System Requirements CPU : 1.73GHz or Later OS : Windows XP Service Pack2 or later. Connect your PC.
User Manual (ENGLISH)
Page 26
... of the [Display Properties] window. (The optimal resolution for the monitors in progress. (The installation takes about a minute. Installation Precautions 1. Do not turn off the monitor while the auto installation is turned off the monitor during the installation, a severe problem may occur. Using the Software 2. Note • If the camera is completed. (This occurs...
... of the [Display Properties] window. (The optimal resolution for the monitors in progress. (The installation takes about a minute. Installation Precautions 1. Do not turn off the monitor while the auto installation is turned off the monitor during the installation, a severe problem may occur. Using the Software 2. Note • If the camera is completed. (This occurs...

User Manual (ENGLISH)
Page 27
the "Hardware" tab. In this time, if the installation fails, click ( , ) and right-click it. Right-click My computer, click Properties - System Properties - Using the Software If the installation fails Note If the installation is displayed as shown in ( , ) 2. At this case, click "Scan for hardware changes" to be installed is ...
the "Hardware" tab. In this time, if the installation fails, click ( , ) and right-click it. Right-click My computer, click Properties - System Properties - Using the Software If the installation fails Note If the installation is displayed as shown in ( , ) 2. At this case, click "Scan for hardware changes" to be installed is ...

User Manual (ENGLISH)
Page 28
You should find that the web camera has been set up normally, as shown in the figure below . Checking the Web Camera Setup 1. Checking the Microphone and Speaker Setup 1. Click on the Windows Desktop. 2. A list of installed devices will be displayed, as shown in the figure below . Double-click Sounds and Audio Devices in the Control Panel. Double-click the USB Video Device #2. Double-click My Computer on "Device Manager". 3. Using the Software 2.
You should find that the web camera has been set up normally, as shown in the figure below . Checking the Web Camera Setup 1. Checking the Microphone and Speaker Setup 1. Click on the Windows Desktop. 2. A list of installed devices will be displayed, as shown in the figure below . Double-click Sounds and Audio Devices in the Control Panel. Double-click the USB Video Device #2. Double-click My Computer on "Device Manager". 3. Using the Software 2.

User Manual (ENGLISH)
Page 29
Follow the steps described below. The Camera and Audio functions of your PC to the maximum. 3. You should find that the microphone and speaker have been set up. Select the Voice tab and click on Using the Monitor 1. Restrictions on Test Hardware. Using the Software 2. Note If the sound from your monitor is too soft, adjust the volume after setting the volume of this monitor except the basic Display function are recognized as USB Devices.
Follow the steps described below. The Camera and Audio functions of your PC to the maximum. 3. You should find that the microphone and speaker have been set up. Select the Voice tab and click on Using the Monitor 1. Restrictions on Test Hardware. Using the Software 2. Note If the sound from your monitor is too soft, adjust the volume after setting the volume of this monitor except the basic Display function are recognized as USB Devices.
User Manual (ENGLISH)
Page 30
...widely popular webcam, used for users to an appropriate level. 5. As a result, a plethora of software has been made available for a variety of functions designed and optimized for each monitor may not boot up with a D-Sub (Analog) or a DVI-D cable (Digital) when used when... connecting other devices. 2. This monitor supports Windows XP Service Pack 2 or later only. Forgotten in households today. USB cables are used as a normal monitor. Using the Software Note This monitor must be very low due to operate the sound and camera devices normally...
...widely popular webcam, used for users to an appropriate level. 5. As a result, a plethora of software has been made available for a variety of functions designed and optimized for each monitor may not boot up with a D-Sub (Analog) or a DVI-D cable (Digital) when used when... connecting other devices. 2. This monitor supports Windows XP Service Pack 2 or later only. Forgotten in households today. USB cables are used as a normal monitor. Using the Software Note This monitor must be very low due to operate the sound and camera devices normally...

User Manual (ENGLISH)
Page 31
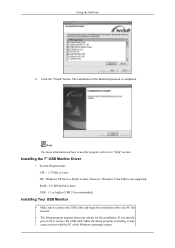
Click the "Next" button. 5. Using the Software Webcam 1. Click on Web Cam Companion 2 (WCC2). 3. Click the "Next" button. Insert the Program Setup CD into the CD-ROM drive. 2. Select a language and click the "OK" button. 4. Click the "Yes" button. 6.
Click the "Next" button. 5. Using the Software Webcam 1. Click on Web Cam Companion 2 (WCC2). 3. Click the "Next" button. Insert the Program Setup CD into the CD-ROM drive. 2. Select a language and click the "OK" button. 4. Click the "Yes" button. 6.

User Manual (ENGLISH)
Page 32
Click the "Finish" button. The installation of the Web Cam Companion 2 program is completed. Opening the chat program • When the installation of the Web Cam Companion 2 is completed, touch the " " position on how to use the program, refer to appear, as shown in the figure below. Click the "Next" button. 8. Note For more information on the monitor for the Web Cam Companion 2 chat window to its "Help" section. Using the Software 7.
Click the "Finish" button. The installation of the Web Cam Companion 2 program is completed. Opening the chat program • When the installation of the Web Cam Companion 2 is completed, touch the " " position on how to use the program, refer to appear, as shown in the figure below. Click the "Next" button. 8. Note For more information on the monitor for the Web Cam Companion 2 chat window to its "Help" section. Using the Software 7.

User Manual (ENGLISH)
Page 33
... recommended) Magic-I Visual Effects ArcSoft Magic-i™! Visual Effects is a smart and simple webcam application designed to use. • Touch the " " position on the monitor. Using the Software • Install or select the chat program you want to enhance users' video chat experience through frames, effects, and themes. Using "Video Plug-in...
... recommended) Magic-I Visual Effects ArcSoft Magic-i™! Visual Effects is a smart and simple webcam application designed to use. • Touch the " " position on the monitor. Using the Software • Install or select the chat program you want to enhance users' video chat experience through frames, effects, and themes. Using "Video Plug-in...

User Manual (ENGLISH)
Page 34
Click on Magic-I Visual Effects. 3. Click the "Yes" button. 6. Select a language and click the "OK" button. 4. Click the "Next" button. Click the "Next" button. 5. Insert the Program Setup CD into the CD-ROM drive. 2. Using the Software DirectX 9.0c or above 1.
Click on Magic-I Visual Effects. 3. Click the "Yes" button. 6. Select a language and click the "OK" button. 4. Click the "Next" button. Click the "Next" button. 5. Insert the Program Setup CD into the CD-ROM drive. 2. Using the Software DirectX 9.0c or above 1.

User Manual (ENGLISH)
Page 35
Media-Impression ArcSoft Media Impression™ manages your photo, video, and music files. • System Requirements - Using the Software 7. Click the "Next" button. 8. Note For more information on how to use the program, refer to create and share projects featuring your media for you, and gives you tons of the Magic-I Visual Effects is completed. Click the "Finish" button. Windows XP/ Vista The installation of fun and exciting ways to its "Help" section.
Media-Impression ArcSoft Media Impression™ manages your photo, video, and music files. • System Requirements - Using the Software 7. Click the "Next" button. 8. Note For more information on how to use the program, refer to create and share projects featuring your media for you, and gives you tons of the Magic-I Visual Effects is completed. Click the "Finish" button. Windows XP/ Vista The installation of fun and exciting ways to its "Help" section.

User Manual (ENGLISH)
Page 36
... G4 800 MHz, or Intel processor 150 MB available hard disk space 800x600 pixels, 16-bit color monitor Apple QuickTime®6.0 or higher 1. Click on Media-Impression. 3. Using the Software Pentium III 1 GHz or equivalent 512 MB RAM 150 MB available hard disk space 800x600 pixels, 16...-bit color monitor Microsoft Windows Media Player 9.0 or higher Microsoft DirectX 9.0 or higher Apple QuickTime® 7.0 or ...
... G4 800 MHz, or Intel processor 150 MB available hard disk space 800x600 pixels, 16-bit color monitor Apple QuickTime®6.0 or higher 1. Click on Media-Impression. 3. Using the Software Pentium III 1 GHz or equivalent 512 MB RAM 150 MB available hard disk space 800x600 pixels, 16...-bit color monitor Microsoft Windows Media Player 9.0 or higher Microsoft DirectX 9.0 or higher Apple QuickTime® 7.0 or ...

User Manual (ENGLISH)
Page 37
Click the "Next" button. 8. Select a file type and click the "Next" button. Using the Software 6. Click the "Next" button. 7.
Click the "Next" button. 8. Select a file type and click the "Next" button. Using the Software 6. Click the "Next" button. 7.
User Manual (ENGLISH)
Page 38
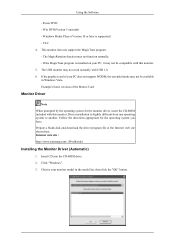
...; Make sure to its "Help" section. However, Windows Vista 64bit is completed. The installation of the Media-Impression is not supported. Installing the 7" USB Monitor Driver • System Requirements CPU : 1.73GHz or Later OS : Windows XP Service Pack2 or later. RAM : 512 MB RAM or more information on how to ... remove the USB cable while the Setup program is running, it may cause an error with the PC or the Windows operating system. Using the Software 9. Click the "Finish" button.
...; Make sure to its "Help" section. However, Windows Vista 64bit is completed. The installation of the Media-Impression is not supported. Installing the 7" USB Monitor Driver • System Requirements CPU : 1.73GHz or Later OS : Windows XP Service Pack2 or later. RAM : 512 MB RAM or more information on how to ... remove the USB cable while the Setup program is running, it may cause an error with the PC or the Windows operating system. Using the Software 9. Click the "Finish" button.
User Manual (ENGLISH)
Page 39
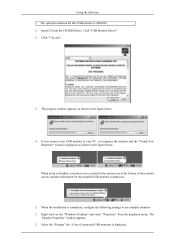
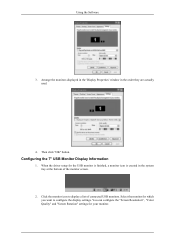
...following settings to your PC, it recognizes the monitor and the "Found New Hardware" wizard is displayed, as shown in the figure below . A list of the monitor screen, and the information for this USB monitor is 800x480. 1. The progress window appears, as... USB monitor to use multiple monitors. 1. Select the "Settings" tab. Click "I Accept". 3. When setup is finished, a monitor icon is created in the figure below . 4. The "Display Properties" window appears. 2. Click "USB Monitor Driver" 2. Using the Software • The optimal resolution for the installed USB monitor is ...
...following settings to your PC, it recognizes the monitor and the "Found New Hardware" wizard is displayed, as shown in the figure below . A list of the monitor screen, and the information for this USB monitor is 800x480. 1. The progress window appears, as... USB monitor to use multiple monitors. 1. Select the "Settings" tab. Click "I Accept". 3. When setup is finished, a monitor icon is created in the figure below . 4. The "Display Properties" window appears. 2. Click "USB Monitor Driver" 2. Using the Software • The optimal resolution for the installed USB monitor is ...
User Manual (ENGLISH)
Page 40
... Properties' window in the system tray at the bottom of connected USB monitors. Configuring the 7" USB Monitor Display Information 1. When the driver setup for the USB monitor is finished, a monitor icon is created in the order they are actually used. 4. Using the Software 3. You can configure the "Screen Resolution" , "Color Quality" and "Screen Rotation" settings...
... Properties' window in the system tray at the bottom of connected USB monitors. Configuring the 7" USB Monitor Display Information 1. When the driver setup for the USB monitor is finished, a monitor icon is created in the order they are actually used. 4. Using the Software 3. You can configure the "Screen Resolution" , "Color Quality" and "Screen Rotation" settings...

User Manual (ENGLISH)
Page 41
the "Hardware tab". 2. Click "Device Manager". 3. A list of the installed device will be displayed, as shown in the figure below. "System Properties" - Right-click "My Computer", and select "Properties" - Using the Software Checking the configuration After the installation, you can check the configuration by following these steps. 1.
the "Hardware tab". 2. Click "Device Manager". 3. A list of the installed device will be displayed, as shown in the figure below. "System Properties" - Right-click "My Computer", and select "Properties" - Using the Software Checking the configuration After the installation, you can check the configuration by following these steps. 1.

User Manual (ENGLISH)
Page 42
... OS (Operating Systems) • Windows XP - Because this USB monitor is recognized as a USB device, the DOS screen that appears for software using 3D hardware acceleration. - Supported movie programs Using the Software - For most 3D games - You cannot use the USB monitor for general monitors when a PC is booting up is not supported.) - The Initial...
... OS (Operating Systems) • Windows XP - Because this USB monitor is recognized as a USB device, the DOS screen that appears for software using 3D hardware acceleration. - Supported movie programs Using the Software - For most 3D games - You cannot use the USB monitor for general monitors when a PC is booting up is not supported.) - The Initial...
User Manual (ENGLISH)
Page 43
...OK" button. If the graphics card of the Matrox Card Monitor Driver Note When prompted by the operating system for the operating system you have. Insert CD into the CD-ROM drive. 2. Using the Software - Windows Media Player (Version 10 or later is slightly ...different from one operating system to another. Driver installation is supported.) - Internet web site : http://www.samsung.com/ (Worldwide) Installing the Monitor Driver (Automatic) 1. If the MagicTune program ...
...OK" button. If the graphics card of the Matrox Card Monitor Driver Note When prompted by the operating system for the operating system you have. Insert CD into the CD-ROM drive. 2. Using the Software - Windows Media Player (Version 10 or later is slightly ...different from one operating system to another. Driver installation is supported.) - Internet web site : http://www.samsung.com/ (Worldwide) Installing the Monitor Driver (Automatic) 1. If the MagicTune program ...


