Quick Guide (ENGLISH)
Page 3
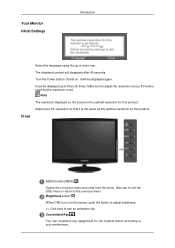
Your Monitor Initial Settings Introduction Select the language using the up to adjust the resolution of your...to exit the OSD menu or return to your preferences. Front MENU button [MENU/ ] Opens the on . The displayed content will be displayed up or down key. Make sure to three (3) times. Adjust your PC before reaching the maximum count. It can ...customize key assignment for this product. It will disappear after 40 seconds. Note The resolution displayed on the screen, push the button to adjust brightness. >> Click here to see an animation clip Customized Key[ ] You can...
Your Monitor Initial Settings Introduction Select the language using the up to adjust the resolution of your...to exit the OSD menu or return to your preferences. Front MENU button [MENU/ ] Opens the on . The displayed content will be displayed up or down key. Make sure to three (3) times. Adjust your PC before reaching the maximum count. It can ...customize key assignment for this product. It will disappear after 40 seconds. Note The resolution displayed on the screen, push the button to adjust brightness. >> Click here to see an animation clip Customized Key[ ] You can...
Quick Guide (ENGLISH)
Page 4
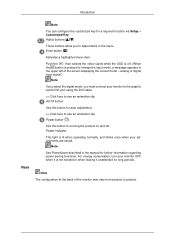
... while the OSD is off . Adjust buttons [ ] These buttons allow you must connect your monitor to the graphic card's DVI port using the DVI cable. >> Click here to see an ...for further information regarding power saving functions. Note See PowerSaver described in the upper left of the monitor may vary from product to change the input mode, a message appears in the manual for auto ...product on and off . (When the button is lit when operating normally, and blinks once when your monitor OFF when it is not needed or when leaving it unattended for a required function via Setup > ...
... while the OSD is off . Adjust buttons [ ] These buttons allow you must connect your monitor to the graphic card's DVI port using the DVI cable. >> Click here to see an ...for further information regarding power saving functions. Note See PowerSaver described in the upper left of the monitor may vary from product to change the input mode, a message appears in the manual for auto ...product on and off . (When the button is lit when operating normally, and blinks once when your monitor OFF when it is not needed or when leaving it unattended for a required function via Setup > ...

Quick Guide (ENGLISH)
Page 12
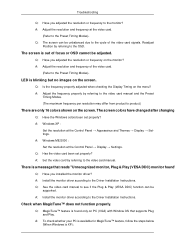
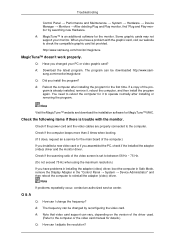
... mode during this message when the signal from the video card exceeds the maximum resolution and frequency that the monitor can handle properly. Q: Have you locked the On Screen Display (OSD) Menu to the video card manual. Q: Have the screen colors become unbalanced. A: Reboot the computer... out video signals. Q: Is the screen displaying only one -minute period. (The message is displayed again if the system is rebooted.) Q: There is still no image on the monitor blinking at least 5 seconds. If the display exceeds 85 Hz, the display will work properly but the "Not Optimum ...
... mode during this message when the signal from the video card exceeds the maximum resolution and frequency that the monitor can handle properly. Q: Have you locked the On Screen Display (OSD) Menu to the video card manual. Q: Have the screen colors become unbalanced. A: Reboot the computer... out video signals. Q: Is the screen displaying only one -minute period. (The message is displayed again if the system is rebooted.) Q: There is still no image on the monitor blinking at least 5 seconds. If the display exceeds 85 Hz, the display will work properly but the "Not Optimum ...
Quick Guide (ENGLISH)
Page 13
...Modes). There is out of focus or OSD cannot be adjusted. A: Install the monitor driver according to the Preset Timing Modes). A: Adjust the resolution and frequency at the Control Panel → Display → Settings. A: Adjust the resolution and frequency of the video card. ... can be unbalanced due to the monitor? Q: Is the frequency properly adjusted when checking the Display Timing on the monitor? Q: MagicTune™ feature is blinking but no images on PC (VGA) with Window OS that reads "Unrecognized monitor, Plug & Play (VESA DDC) monitor found only on the screen. A:...
...Modes). There is out of focus or OSD cannot be adjusted. A: Install the monitor driver according to the Preset Timing Modes). A: Adjust the resolution and frequency at the Control Panel → Display → Settings. A: Adjust the resolution and frequency of the video card. ... can be unbalanced due to the monitor? Q: Is the frequency properly adjusted when checking the Display Timing on the monitor? Q: MagicTune™ feature is blinking but no images on PC (VGA) with Window OS that reads "Unrecognized monitor, Plug & Play (VESA DDC) monitor found only on the screen. A:...
Quick Guide (ENGLISH)
Page 14
...when booting. (If it does, request an a service for details.) Q: How can I adjusts the resolution? The program can be downloaded http://www.samsung.com/monitor/magictune Q: Did you install the program? If a copy of the computer.) If you installed a new video card or if you have a problem ...or removing the program. Q: Have you have problems in installing the adapter (video) driver, boot the computer in Safe Mode, remove the Display Adapter in the "Control Panel → System → Device Administrator" and then reboot the computer to reboot the computer for the first time...
...when booting. (If it does, request an a service for details.) Q: How can I adjusts the resolution? The program can be downloaded http://www.samsung.com/monitor/magictune Q: Did you install the program? If a copy of the computer.) If you installed a new video card or if you have a problem ...or removing the program. Q: Have you have problems in installing the adapter (video) driver, boot the computer in Safe Mode, remove the Display Adapter in the "Control Panel → System → Device Administrator" and then reboot the computer to reboot the computer for the first time...

Quick Guide (ENGLISH)
Page 15
... power cord and then clean the monitor with a soft cloth, using either a cleaning solution or plain water. Do not let any problems yourself. Set the function in the Control Panel → Appearance and Themes → Display → Screen Saver. Q: How can I clean the outer case/LCD Panel? Do not leave any detergent or...
... power cord and then clean the monitor with a soft cloth, using either a cleaning solution or plain water. Do not let any problems yourself. Set the function in the Control Panel → Appearance and Themes → Display → Screen Saver. Q: How can I clean the outer case/LCD Panel? Do not leave any detergent or...
User Manual (ENGLISH)
Page 4
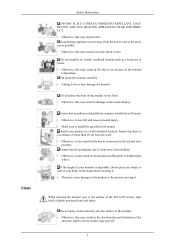
...carrying it in a badly ventilated location such as possible. • Otherwise, this may damage the monitor. Do not place the front of the TFT-LCD screen, wipe with it. Ensure that the packaging vinyl is adjustable, do so may result in... cause personal injury. • Make sure to an increase in the internal tem- Ensure that there is a clearance of your monitor is kept away from children. • Otherwise, it may result in serious harm (suffocation) if children play with a slightly ... from the wall. • Otherwise, it may result in fire due to the screen display.
...carrying it in a badly ventilated location such as possible. • Otherwise, this may damage the monitor. Do not place the front of the TFT-LCD screen, wipe with it. Ensure that the packaging vinyl is adjustable, do so may result in... cause personal injury. • Make sure to an increase in the internal tem- Ensure that there is a clearance of your monitor is kept away from children. • Otherwise, it may result in serious harm (suffocation) if children play with a slightly ... from the wall. • Otherwise, it may result in fire due to the screen display.

User Manual (ENGLISH)
Page 8
... the product, use a humidifier or kitchen table near the product. • Otherwise, this may result in a location low enough for a long time, the display panel becomes hot. If the product has been turned on for children to reach. • Otherwise, it in the correct position. • Adjust the angle...8226; The distance between 45 to the product. Do not put any heavy objects on a level and stable surface. Good Postures When Using the Monitor When using the product, use it may fall and cause personal injury. Do not install the product in electric shock or fire. Do not ...
... the product, use a humidifier or kitchen table near the product. • Otherwise, this may result in a location low enough for a long time, the display panel becomes hot. If the product has been turned on for children to reach. • Otherwise, it in the correct position. • Adjust the angle...8226; The distance between 45 to the product. Do not put any heavy objects on a level and stable surface. Good Postures When Using the Monitor When using the product, use it may fall and cause personal injury. Do not install the product in electric shock or fire. Do not ...
User Manual (ENGLISH)
Page 11
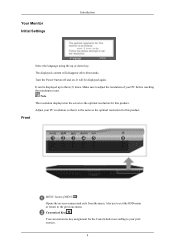
... -screen menu and exits from the menu. The displayed content will be displayed up or down key. Also use to exit the OSD menu or return to your preferences. 9 It will disappear after 40 seconds. MENU button [MENU/ ] ... on the screen is the same as the optimal resolution for the Custom button according to the previous menu. Customized Key[ ] You can be displayed again. Your Monitor Initial Settings Introduction Front Select the language using the up to adjust the resolution of your PC before reaching the maximum count. It can...
... -screen menu and exits from the menu. The displayed content will be displayed up or down key. Also use to exit the OSD menu or return to your preferences. 9 It will disappear after 40 seconds. MENU button [MENU/ ] ... on the screen is the same as the optimal resolution for the Custom button according to the previous menu. Customized Key[ ] You can be displayed again. Your Monitor Initial Settings Introduction Front Select the language using the up to adjust the resolution of your PC before reaching the maximum count. It can...

User Manual (ENGLISH)
Page 12
... see an animation clip AUTO button Use this button for turning the product on and off. Note The configuration at the back of the screen displaying the current mode -- Push the ' /SOURCE', then selects the video signal while the OSD is off. (When the /SOURCE button is not on the ...screen, push the button to adjust brightness. >> Click here to see an animation clip Adjust buttons [ ] These buttons allow you must connect your monitor to the graphic card's DVI port using the DVI cable. >> Click here to see an animation clip Power button [ ] Use this button for a required function...
... see an animation clip AUTO button Use this button for turning the product on and off. Note The configuration at the back of the screen displaying the current mode -- Push the ' /SOURCE', then selects the video signal while the OSD is off. (When the /SOURCE button is not on the ...screen, push the button to adjust brightness. >> Click here to see an animation clip Adjust buttons [ ] These buttons allow you must connect your monitor to the graphic card's DVI port using the DVI cable. >> Click here to see an animation clip Power button [ ] Use this button for a required function...
User Manual (ENGLISH)
Page 17
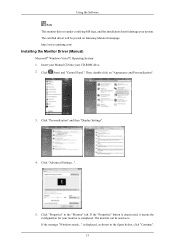
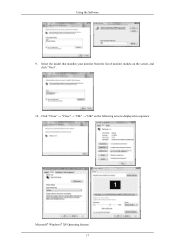
... click "Continue". 15 If the message "Windows needs..." Then, double-click on Samsung Monitor homepage. is . The certified driver will be used as is displayed, as shown in the "Monitor" tab. If the "Properties" button is under certifying MS logo, and this ...your system. Click "Personalization" and then "Display Settings". 4. Click "Advanced Settings...". 5. Using the Software Note This monitor driver is deactivated, it means the configuration for your CD-ROM drive. 2. http://www.samsung.com/ Installing the Monitor Driver (Manual) Microsoft® Windows Vista™...
... click "Continue". 15 If the message "Windows needs..." Then, double-click on Samsung Monitor homepage. is . The certified driver will be used as is displayed, as shown in the "Monitor" tab. If the "Properties" button is under certifying MS logo, and this ...your system. Click "Personalization" and then "Display Settings". 4. Click "Advanced Settings...". 5. Using the Software Note This monitor driver is deactivated, it means the configuration for your CD-ROM drive. 2. http://www.samsung.com/ Installing the Monitor Driver (Manual) Microsoft® Windows Vista™...
User Manual (ENGLISH)
Page 19
Click "Close" → "Close" → "OK" → "OK" on the screen, and click "Next". 10. Using the Software 9. Select the model that matches your monitor from the list of monitor models on the following screens displayed in sequence. Microsoft® Windows® XP Operating System 17
Click "Close" → "Close" → "OK" → "OK" on the screen, and click "Next". 10. Using the Software 9. Select the model that matches your monitor from the list of monitor models on the following screens displayed in sequence. Microsoft® Windows® XP Operating System 17

User Manual (ENGLISH)
Page 20
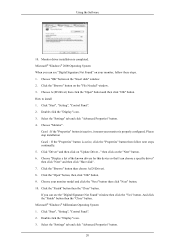
Insert CD into the CD-ROM drive. 2. Click "Display" icon and choose the "Settings" tab then click "Advanced...". 4. Click the "Properties" button on the "Monitor" tab and select "Driver" tab. 5. Using the Software 1. then click "Next" button. 6. Select "Don't search, I will..." then click "Next" and then click "Have disk". 18 Click "Update Driver..." Click "Start" → "Control Panel" then click the "Appearance and Themes" icon. 3. and select "Install from a list or..."
Insert CD into the CD-ROM drive. 2. Click "Display" icon and choose the "Settings" tab then click "Advanced...". 4. Click the "Properties" button on the "Monitor" tab and select "Driver" tab. 5. Using the Software 1. then click "Next" button. 6. Select "Don't search, I will..." then click "Next" and then click "Have disk". 18 Click "Update Driver..." Click "Start" → "Control Panel" then click the "Appearance and Themes" icon. 3. and select "Install from a list or..."
User Manual (ENGLISH)
Page 22
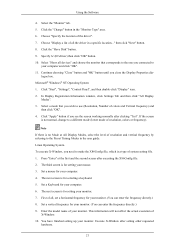
...2. How to install 1. Microsoft® Windows® Millennium Operating System 1. Using the Software 10. Choose "OK" button on your monitor, follow next steps continually. 5. Choose "Display a list of the known drivers for this device so that I can see the "Digital Signature Not Found" window then click the...click on "Update Driver..." Click "Start", "Setting", "Control Panel". 2. Select the "Settings" tab and click "Advanced Properties" button. 4. Choose "Monitor". Double click the "Display" icon. 3. Select the "Settings" tab and click "Advanced Properties" button. 20
...2. How to install 1. Microsoft® Windows® Millennium Operating System 1. Using the Software 10. Choose "OK" button on your monitor, follow next steps continually. 5. Choose "Display a list of the known drivers for this device so that I can see the "Digital Signature Not Found" window then click the...click on "Update Driver..." Click "Start", "Setting", "Control Panel". 2. Select the "Settings" tab and click "Advanced Properties" button. 4. Choose "Monitor". Double click the "Display" icon. 3. Select the "Settings" tab and click "Advanced Properties" button. 20
User Manual (ENGLISH)
Page 23
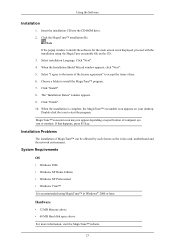
... after executing the X86Config file. 2. First of all , set a horizontal frequency for setting your monitor. (You can enter the frequency directly.) 9. Press "Enter" at All Display Modes, select the level of resolution and vertical frequency by referring to use (Resolution, Number of ...10. Select "Show all devices" and choose the monitor that you close the Display Properties dia- Execute X-Window after setting other requested hardware. 21 If the screen is for your monitor. 7. Set a mouse for your monitor. This information will not affect the actual execution ...
... after executing the X86Config file. 2. First of all , set a horizontal frequency for setting your monitor. (You can enter the frequency directly.) 9. Press "Enter" at All Display Modes, select the level of resolution and vertical frequency by referring to use (Resolution, Number of ...10. Select "Show all devices" and choose the monitor that you close the Display Properties dia- Execute X-Window after setting other requested hardware. 21 If the screen is for your monitor. 7. Set a mouse for your monitor. This information will not affect the actual execution ...
User Manual (ENGLISH)
Page 25
...desktop. Select "I agree to the terms of use. 6. Choose a folder to install the software for the main screen is not displayed, proceed with the installation using MagicTune™ in Windows® 2000 or later. Using the Software Installation 1. Installation Problems The ...installation of computer system or monitor. System Requirements OS • Windows 2000 • Windows XP Home Edition • Windows XP Professional • Windows Vista™...
...desktop. Select "I agree to the terms of use. 6. Choose a folder to install the software for the main screen is not displayed, proceed with the installation using MagicTune™ in Windows® 2000 or later. Using the Software Installation 1. Installation Problems The ...installation of computer system or monitor. System Requirements OS • Windows 2000 • Windows XP Home Edition • Windows XP Professional • Windows Vista™...

User Manual (ENGLISH)
Page 29
Adjusting the Monitor Note Though the OSD adjustment lock function is activated, you can customize key assignment for the Custom button according to your preferences. Image Size) Note ... the customized key for a function, click the name of each function. ] button after configuring the cus- (MagicBright - Color Effect - MagicColor - To view the operating screen displayed when pressing the [ tomized key for a required function via Setup > Customized Key. 27 Customized key You can still adjust the brightness and contrast, and adjust...
Adjusting the Monitor Note Though the OSD adjustment lock function is activated, you can customize key assignment for the Custom button according to your preferences. Image Size) Note ... the customized key for a function, click the name of each function. ] button after configuring the cus- (MagicBright - Color Effect - MagicColor - To view the operating screen displayed when pressing the [ tomized key for a required function via Setup > Customized Key. 27 Customized key You can still adjust the brightness and contrast, and adjust...

User Manual (ENGLISH)
Page 31
...Gamma trol Sharpness H-Position V-Position V-Position Transparen- Color Tone or Coarse Fine OSD Language H-Position Setup Reset Information RTA Customized Key MagicBright Color Con- Display cy Time Off Timer Auto Source Image Size Picture Brightness (Not available in MagicBright mode of Dynamic Contrast.) You can use the on-screen menus... to change the brightness according to personal preference. MENU MENU Contrast (Not available in MagicBright mode of Dynamic Contrast.) 29 Adjusting the Monitor OSD Function Picture Brightness Contrast Color Image MagicCol-
...Gamma trol Sharpness H-Position V-Position V-Position Transparen- Color Tone or Coarse Fine OSD Language H-Position Setup Reset Information RTA Customized Key MagicBright Color Con- Display cy Time Off Timer Auto Source Image Size Picture Brightness (Not available in MagicBright mode of Dynamic Contrast.) You can use the on-screen menus... to change the brightness according to personal preference. MENU MENU Contrast (Not available in MagicBright mode of Dynamic Contrast.) 29 Adjusting the Monitor OSD Function Picture Brightness Contrast Color Image MagicCol-

User Manual (ENGLISH)
Page 34
Displays vivid natural color with clearness. • Intelligent - MagicColor Adjusting the Monitor MagicColor is a new technology that Samsung has exclusively developed to improve digital image and to the original mode. • Demo - The screen before applying MagicColor appears on the right and the screen after applying MagicColor appears on the left. • Full - Displays not only vivid natural color but also more clearly without disturbing image quality. • Off - MENU MENU 32 Returns to display natural color more realistic natural skin color with clearness.
Displays vivid natural color with clearness. • Intelligent - MagicColor Adjusting the Monitor MagicColor is a new technology that Samsung has exclusively developed to improve digital image and to the original mode. • Demo - The screen before applying MagicColor appears on the right and the screen after applying MagicColor appears on the left. • Full - Displays not only vivid natural color but also more clearly without disturbing image quality. • Off - MENU MENU 32 Returns to display natural color more realistic natural skin color with clearness.

User Manual (ENGLISH)
Page 37
...; Grayscale - MENU MENU Gamma Gamma correction changes the luminance of black and white are displayed. • Green - The default colors of the colors with intermediate luminance. • Mode 1 • Mode 2 • Mode 3 MENU MENU 35 Adjusting the Monitor • Off • Grayscale • Green • Aqua • Sepia • Off - This applies...
...; Grayscale - MENU MENU Gamma Gamma correction changes the luminance of black and white are displayed. • Green - The default colors of the colors with intermediate luminance. • Mode 1 • Mode 2 • Mode 3 MENU MENU 35 Adjusting the Monitor • Off • Grayscale • Green • Aqua • Sepia • Off - This applies...


