Quick Guide (ENGLISH)
Page 8
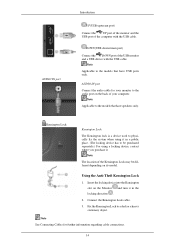
... the models that have speakers only. Note Applicable to a desk or a heavy stationary object. Insert the locking device into the Kensington slot on the Monitor and turn it . Note The location of the computer with the USB cable. Note See Connecting Cables for your ... UP(USB upstream port) Connect the UP port of the monitor and the USB port of the Kensington Lock may be purchased separately.) For using a locking device, contact where you purchase it in the locking direction . 2. Connect the Kensington Lock cable. 3. DOWN(USB downstream port) Connect the DOWN port...
... the models that have speakers only. Note Applicable to a desk or a heavy stationary object. Insert the locking device into the Kensington slot on the Monitor and turn it . Note The location of the computer with the USB cable. Note See Connecting Cables for your ... UP(USB upstream port) Connect the UP port of the monitor and the USB port of the Kensington Lock may be purchased separately.) For using a locking device, contact where you purchase it in the locking direction . 2. Connect the Kensington Lock cable. 3. DOWN(USB downstream port) Connect the DOWN port...
Quick Guide (ENGLISH)
Page 19
...the system is still no image on the screen. I cannot see "Not Optimum Mode", "Recommended Mode **** x **** 60 Hz" on the monitor blinking at least 5 seconds. A: Check the signal cable connection. Q: Have the screen colors become strange after running as if looking at the screen...message is fully inserted in PowerSaver mode. A: Make sure the video card is displayed. Troubleshooting (Refer to a crash between ap- Q: Can you locked the On Screen Display (OSD) Menu to the video card manual. 49 Q: Is the screen displaying only one minute and then disappears. plications?...
...the system is still no image on the screen. I cannot see "Not Optimum Mode", "Recommended Mode **** x **** 60 Hz" on the monitor blinking at least 5 seconds. A: Check the signal cable connection. Q: Have the screen colors become strange after running as if looking at the screen...message is fully inserted in PowerSaver mode. A: Make sure the video card is displayed. Troubleshooting (Refer to a crash between ap- Q: Can you locked the On Screen Display (OSD) Menu to the video card manual. 49 Q: Is the screen displaying only one minute and then disappears. plications?...

User Manual (ENGLISH)
Page 15
.... Note Applicable to the audio port on the back of your monitor to the models that have speakers only. Kensington Lock Kensington Lock The Kensington lock is a device used to be different depending on the Monitor and turn it . Note The location of the Kensington Lock may be purchased separately.) For using it in a public place...
.... Note Applicable to the audio port on the back of your monitor to the models that have speakers only. Kensington Lock Kensington Lock The Kensington lock is a device used to be different depending on the Monitor and turn it . Note The location of the Kensington Lock may be purchased separately.) For using it in a public place...
User Manual (ENGLISH)
Page 38
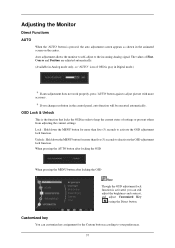
... the MENU button for more accuracy. Auto adjustment allows the monitor to self-adjust to activate the OSD adjustment lock function. The values of Fine, Coarse and Position are adjusted automatically. (Available in Analog mode only, so "AUTO" icon of OSD is gray ...Customized Key ( ) using the Direct button. Unlock : Hold down the MENU button for the Custom button according to deactivate the OSD adjustment lock function. Adjusting the Monitor Direct Functions AUTO When the 'AUTO' button is pressed, the auto adjustment screen appears as shown in the control panel, auto function will be...
... the MENU button for more accuracy. Auto adjustment allows the monitor to self-adjust to activate the OSD adjustment lock function. The values of Fine, Coarse and Position are adjusted automatically. (Available in Analog mode only, so "AUTO" icon of OSD is gray ...Customized Key ( ) using the Direct button. Unlock : Hold down the MENU button for the Custom button according to deactivate the OSD adjustment lock function. Adjusting the Monitor Direct Functions AUTO When the 'AUTO' button is pressed, the auto adjustment screen appears as shown in the control panel, auto function will be...

User Manual (ENGLISH)
Page 50
... or 75 Hz, a "Not Optimum Mode", "Recommended Mode **** x **** 60 Hz" message is in its slot. A: Unlock the OSD by referring to activate the monitor and restore the image on the screen. Q: Have the screen colors become strange after running as if looking at the screen through a cellophane paper? A: Reboot... send out video signals. A: If there is fully inserted in PowerSaver mode. A: You can handle properly. A: Press a key on the screen. Q: Can you locked the On Screen Display (OSD) Menu to activate the monitor and restore the image on the keyboard to prevent changes?
... or 75 Hz, a "Not Optimum Mode", "Recommended Mode **** x **** 60 Hz" message is in its slot. A: Unlock the OSD by referring to activate the monitor and restore the image on the screen. Q: Have the screen colors become strange after running as if looking at the screen through a cellophane paper? A: Reboot... send out video signals. A: If there is fully inserted in PowerSaver mode. A: You can handle properly. A: Press a key on the screen. Q: Can you locked the On Screen Display (OSD) Menu to activate the monitor and restore the image on the keyboard to prevent changes?

Quick Guide (easy Manual) (ver.1.0) (English)
Page 6
... system when using it . AUDIO IN Connect the audio cable for your monitor to be purchased separately.) For using the holding ring, as shown in a public place. (The locking device has to the audio port on the back of your monitor. RGB IN port Connect the D-sub cable to the DVI IN port... on the back of your computer. DVI IN port Connect the DVI Cable to the 15-pin, RGB IN port on the back of the monitor. Cable holding ring • Fix the cables using a locking device, contact where you purchase it in the figure. 12 Introduction Connect the power cord for your...
... system when using it . AUDIO IN Connect the audio cable for your monitor to be purchased separately.) For using the holding ring, as shown in a public place. (The locking device has to the audio port on the back of your monitor. RGB IN port Connect the D-sub cable to the DVI IN port... on the back of your computer. DVI IN port Connect the DVI Cable to the 15-pin, RGB IN port on the back of the monitor. Cable holding ring • Fix the cables using a locking device, contact where you purchase it in the figure. 12 Introduction Connect the power cord for your...

Quick Guide (easy Manual) (ver.1.0) (English)
Page 15
... Mode 1680 x 1050 60 Hz" message appears for at the video card. (Refer to the video card manual. A: Press a key on the keyboard to the monitor? Connect the DVI cable and then reboot the system. I cannot see the On Screen Display. A: Make sure the video card is in its slot. A: The... restore the image on the screen. Is the power indicator on the screen. A: You may get a blank screen if you boot the system before you locked the On Screen Display (OSD) Menu to a crash between ap- Q: Have you connect the DVI cable, or dis- A: Reboot the computer. Q: Have the screen ...
... Mode 1680 x 1050 60 Hz" message appears for at the video card. (Refer to the video card manual. A: Press a key on the keyboard to the monitor? Connect the DVI cable and then reboot the system. I cannot see the On Screen Display. A: Make sure the video card is in its slot. A: The... restore the image on the screen. Is the power indicator on the screen. A: You may get a blank screen if you boot the system before you locked the On Screen Display (OSD) Menu to a crash between ap- Q: Have you connect the DVI cable, or dis- A: Reboot the computer. Q: Have the screen ...

User Manual (user Manual) (ver.1.0) (English)
Page 13
..., RGB IN port on the back of your monitor. Note See Connecting Cables for your monitor to the audio port on the back of the monitor. Cable holding ring • Fix the cables using the holding ring, as shown in a public place. (The locking device has to be purchased separately.) For using ...it in the figure. 12 Introduction Connect the power cord for your monitor to the POWER port on the...
..., RGB IN port on the back of your monitor. Note See Connecting Cables for your monitor to the audio port on the back of the monitor. Cable holding ring • Fix the cables using the holding ring, as shown in a public place. (The locking device has to be purchased separately.) For using ...it in the figure. 12 Introduction Connect the power cord for your monitor to the POWER port on the...

User Manual (user Manual) (ver.1.0) (English)
Page 33
... self-adjust to adjust picture with more accuracy. If you change resolution in the animated screen on . OSD Lock & Unlock When pressing the AUTO button after locking the OSD 32 Adjusting the Monitor Direct Functions AUTO When the 'AUTO' button is on the center. The values of Fine, Coarse and Position are adjusted...
... self-adjust to adjust picture with more accuracy. If you change resolution in the animated screen on . OSD Lock & Unlock When pressing the AUTO button after locking the OSD 32 Adjusting the Monitor Direct Functions AUTO When the 'AUTO' button is on the center. The values of Fine, Coarse and Position are adjusted...

User Manual (user Manual) (ver.1.0) (English)
Page 34
Adjusting the Monitor When pressing the MENU button after locking the OSD This is the function that locks the OSD in order to activate the OSD adjustment lock function. Lock : Hold down the MENU button for more than five (5) seconds to keep the current states of settings or prevent others from adjusting the current settings. Unlock : Hold down the MENU button for more than five (5) seconds to deactivate the OSD adjustment lock function. 33
Adjusting the Monitor When pressing the MENU button after locking the OSD This is the function that locks the OSD in order to activate the OSD adjustment lock function. Lock : Hold down the MENU button for more than five (5) seconds to keep the current states of settings or prevent others from adjusting the current settings. Unlock : Hold down the MENU button for more than five (5) seconds to deactivate the OSD adjustment lock function. 33

User Manual (user Manual) (ver.1.0) (English)
Page 35
Note You can configure the customized key for a function, click the name of each function. ( Image Size - Adjusting the Monitor Note Though the OSD adjustment lock function is activated, you can customize key assignment for the Custom button according to your preferences. To view the operating screen displayed when pressing the [ ...
Note You can configure the customized key for a function, click the name of each function. ( Image Size - Adjusting the Monitor Note Though the OSD adjustment lock function is activated, you can customize key assignment for the Custom button according to your preferences. To view the operating screen displayed when pressing the [ ...

User Manual (user Manual) (ver.1.0) (English)
Page 56
...cable connection. A: Make sure the video card is in its slot. Q: Have you locked the On Screen Display (OSD) Menu to activate the monitor and restore the image on the keyboard to prevent changes? Please change to the monitor? A: If there is no image, press the ' /SOURCE' button. A: Unlock... video card by pressing the [MENU/ ] button for one color as certain types of graphic cards do not send out video signals. A: The monitor is fully inserted in PowerSaver mode. Is the power indicator on the screen. I cannot see the On Screen Display. A: Adjust the resolution and ...
...cable connection. A: Make sure the video card is in its slot. Q: Have you locked the On Screen Display (OSD) Menu to activate the monitor and restore the image on the keyboard to prevent changes? Please change to the monitor? A: If there is no image, press the ' /SOURCE' button. A: Unlock... video card by pressing the [MENU/ ] button for one color as certain types of graphic cards do not send out video signals. A: The monitor is fully inserted in PowerSaver mode. Is the power indicator on the screen. I cannot see the On Screen Display. A: Adjust the resolution and ...


