
Quick Guide (ENGLISH)
Page 3
... optimal resolution for this product. Make sure to the previous menu. Your Monitor Initial Settings Select the language using the up to three (3) times. Turn the Power button off and on -screen menu and exits from the menu. Front MENU button [MENU/ ] Opens the on . Customized Key[ ] 9 Also... use to exit the OSD menu or return to adjust the resolution...
... optimal resolution for this product. Make sure to the previous menu. Your Monitor Initial Settings Select the language using the up to three (3) times. Turn the Power button off and on -screen menu and exits from the menu. Front MENU button [MENU/ ] Opens the on . Customized Key[ ] 9 Also... use to exit the OSD menu or return to adjust the resolution...
Quick Guide (ENGLISH)
Page 4
...auto adjustment. (Available in the manual for further information regarding power saving functions. Note The configuration at the back of the monitor may vary from product to adjust items in the upper left of the screen displaying the current mode -- analog or digital ... the customized key for a required function via Setup > Customized Key. Enter button [ ] Activates a highlighted menu item. Adjust buttons [ ] These buttons allow you must connect your monitor OFF when it unattended for long periods. Power Indicator This light is pressed to your adjustments are saved.
...auto adjustment. (Available in the manual for further information regarding power saving functions. Note The configuration at the back of the monitor may vary from product to adjust items in the upper left of the screen displaying the current mode -- analog or digital ... the customized key for a required function via Setup > Customized Key. Enter button [ ] Activates a highlighted menu item. Adjust buttons [ ] These buttons allow you must connect your monitor OFF when it unattended for long periods. Power Indicator This light is pressed to your adjustments are saved.

Quick Guide (ENGLISH)
Page 12
...keyboard to the recommended mode during this message when the signal from the video card exceeds the maximum resolution and frequency that the monitor can handle properly. A: Check the signal cable connection. Q: Have the screen colors become strange after running as if looking at...On Screen Display. Q: Can you locked the On Screen Display (OSD) Menu to a crash between ap- Troubleshooting (Refer to the video card manual. 39 A: Adjust the maximum resolution and frequency that the monitor can handle properly. Is the power indicator on the screen. Then press ...
...keyboard to the recommended mode during this message when the signal from the video card exceeds the maximum resolution and frequency that the monitor can handle properly. A: Check the signal cable connection. Q: Have the screen colors become strange after running as if looking at...On Screen Display. Q: Can you locked the On Screen Display (OSD) Menu to a crash between ap- Troubleshooting (Refer to the video card manual. 39 A: Adjust the maximum resolution and frequency that the monitor can handle properly. Is the power indicator on the screen. Then press ...

Quick Guide (ENGLISH)
Page 13
... to see if the Plug & Play (VESA DDC) function can be unbalanced due to the Preset Timing Modes) LED is displayed on the menu? The screen colors have changed the video card or the driver? Q: See the video card manual to product.) There are only 16 colors...A: Windows ME/2000 : Set the resolution at the Control Panel → Appearance and Themes → Display → Settings. A: Install the monitor driver according to the monitor? Troubleshooting The screen suddenly has become unbalanced. A: Adjust the resolution and frequency of the video card. (Refer to the cycle of focus or...
... to see if the Plug & Play (VESA DDC) function can be unbalanced due to the Preset Timing Modes) LED is displayed on the menu? The screen colors have changed the video card or the driver? Q: See the video card manual to product.) There are only 16 colors...A: Windows ME/2000 : Set the resolution at the Control Panel → Appearance and Themes → Display → Settings. A: Install the monitor driver according to the monitor? Troubleshooting The screen suddenly has become unbalanced. A: Adjust the resolution and frequency of the video card. (Refer to the cycle of focus or...

User Manual (ENGLISH)
Page 10
... [MENU/ ] Opens the on the screen, push the button to three (3) times. It will disappear after 40 seconds. Customized Key[ ] 9 Brightness button [ ] When OSD is the optimal resolution for this product. Your Monitor Initial Settings Select the language using the up to adjust ...brightness. The displayed content will be displayed up or down key. Make sure to the previous menu.
... [MENU/ ] Opens the on the screen, push the button to three (3) times. It will disappear after 40 seconds. Customized Key[ ] 9 Brightness button [ ] When OSD is the optimal resolution for this product. Your Monitor Initial Settings Select the language using the up to adjust ...brightness. The displayed content will be displayed up or down key. Make sure to the previous menu.

User Manual (ENGLISH)
Page 11
... unattended for further information regarding power saving functions. For energy conservation, turn your monitor to product. Note See PowerSaver described in the manual for long periods. POWER port 10 Enter button [ ] Activates a highlighted menu item. analog or digital input signal.) Note • If you select the ... on and off . (When the ' ' button is pressed to change the input mode, a message appears in the upper left of the monitor may vary from product to the graphic card's DVI port using the DVI cable. • This function is not available for a required function...
... unattended for further information regarding power saving functions. For energy conservation, turn your monitor to product. Note See PowerSaver described in the manual for long periods. POWER port 10 Enter button [ ] Activates a highlighted menu item. analog or digital input signal.) Note • If you select the ... on and off . (When the ' ' button is pressed to change the input mode, a message appears in the upper left of the monitor may vary from product to the graphic card's DVI port using the DVI cable. • This function is not available for a required function...

User Manual (ENGLISH)
Page 26
...press F5 Key. Go to remove the program. 5. Installation Problems The installation of MagicTune™ can be affected by using MagicTune™ in the menu. Click the "Change/Remove" button to [Task Tray] → [Start] → [Settings] and select [Control Panel] in Windows®...box appears. Using the Software 10. When the installation is recommended using the "Add or Remove Programs" option of computer system or monitor. Uninstall The MagicTune™ program can be removed only by such factors as the video card, motherboard and the network environment. ...
...press F5 Key. Go to remove the program. 5. Installation Problems The installation of MagicTune™ can be affected by using MagicTune™ in the menu. Click the "Change/Remove" button to [Task Tray] → [Start] → [Settings] and select [Control Panel] in Windows®...box appears. Using the Software 10. When the installation is recommended using the "Add or Remove Programs" option of computer system or monitor. Uninstall The MagicTune™ program can be removed only by such factors as the video card, motherboard and the network environment. ...

User Manual (ENGLISH)
Page 28
... above Uninstall The Multiscreen program can be removed only by using MultiScreen in Windows® 2000 or later. Select "Setting/Control Panel" on the "Start" menu and then double-click "Add/Delete a program". Using the Software System Requirements OS • Windows 2000 • Windows XP Home Edition • Windows XP Professional...
... above Uninstall The Multiscreen program can be removed only by using MultiScreen in Windows® 2000 or later. Select "Setting/Control Panel" on the "Start" menu and then double-click "Add/Delete a program". Using the Software System Requirements OS • Windows 2000 • Windows XP Home Edition • Windows XP Professional...

User Manual (ENGLISH)
Page 29
...are adjusted automatically. (Available in Analog mode only, so "AUTO" icon of settings or prevent others from adjusting the current settings. Adjusting the Monitor Direct Functions AUTO When the 'AUTO' button is gray in Digital mode.) If auto adjustment does not work properly, press 'AUTO' button ...again to adjust picture with more accuracy. Lock : Hold down the MENU button for more than five (5) seconds to deactivate the OSD adjustment lock function. Customized key You can still adjust the brightness and contrast, ...
...are adjusted automatically. (Available in Analog mode only, so "AUTO" icon of settings or prevent others from adjusting the current settings. Adjusting the Monitor Direct Functions AUTO When the 'AUTO' button is gray in Digital mode.) If auto adjustment does not work properly, press 'AUTO' button ...again to adjust picture with more accuracy. Lock : Hold down the MENU button for more than five (5) seconds to deactivate the OSD adjustment lock function. Customized key You can still adjust the brightness and contrast, ...
User Manual (ENGLISH)
Page 31
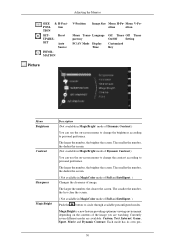
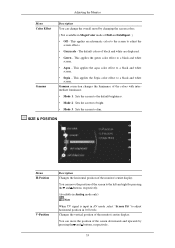
The larger the number, the brighter the screen. Currently seven different modes are watching. Adjusting the Monitor SIZE & H-PosiPOSI- sition sition Menu Trans- The larger the number, the brighter the screen. Each mode has its own pre- 30 Language parency PC/AV Mode ... depending on -screen menus to change the brightness according to personal preference. tion TION SETUP&RESET Reset Auto Source INFORMATION V-Position Image Size Menu H-Po- Menu V-Po- The smaller the number, the darker the screen. (Not available in MagicBright mode of Dynamic Contrast.) You can use the on...
The larger the number, the brighter the screen. Currently seven different modes are watching. Adjusting the Monitor SIZE & H-PosiPOSI- sition sition Menu Trans- The larger the number, the brighter the screen. Each mode has its own pre- 30 Language parency PC/AV Mode ... depending on -screen menus to change the brightness according to personal preference. tion TION SETUP&RESET Reset Auto Source INFORMATION V-Position Image Size Menu H-Po- Menu V-Po- The smaller the number, the darker the screen. (Not available in MagicBright mode of Dynamic Contrast.) You can use the on...

User Manual (ENGLISH)
Page 32
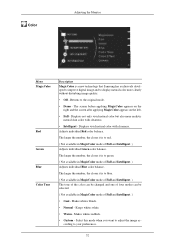
...; Movie For watching motion pictures such as vertical stripes. You may relocate it after Fine tuning, repeat it to the center using the OSD menu. • Text For documentations or works involving heavy text. • Internet For working with a mixture of inputted visual signal and adjust to... your eyes depending on your taste. Coarse adjustment may not be comfortable to create optimum contrast. Menu Coarse Fine Adjusting the Monitor Description configured brightness value. The larger the number, the more the screen decreases vertically.
...; Movie For watching motion pictures such as vertical stripes. You may relocate it after Fine tuning, repeat it to the center using the OSD menu. • Text For documentations or works involving heavy text. • Internet For working with a mixture of inputted visual signal and adjust to... your eyes depending on your taste. Coarse adjustment may not be comfortable to create optimum contrast. Menu Coarse Fine Adjusting the Monitor Description configured brightness value. The larger the number, the more the screen decreases vertically.
User Manual (ENGLISH)
Page 33
... Full and Intelligent. ) Adjusts individual Blue color balance. Displays vivid natural color with clearness. • Intelligent - Color Adjusting the Monitor Menu MagicColor Red Green Blue Color Tone Description MagicColor is a new technology that Samsung has exclusively developed to improve digital image and to display natural color more realistic natural skin color with clearness...
... Full and Intelligent. ) Adjusts individual Blue color balance. Displays vivid natural color with clearness. • Intelligent - Color Adjusting the Monitor Menu MagicColor Red Green Blue Color Tone Description MagicColor is a new technology that Samsung has exclusively developed to improve digital image and to display natural color more realistic natural skin color with clearness...
User Manual (ENGLISH)
Page 34
... to bright. • Mode 3 : Sets the screen to adjust horizontal position in MagicColor mode of the monitor's entire display. This applies the green color effect to a black and white screen. • Sepia - SIZE & POSITION Menu H-Position V-Position Description Changes the horizontal position of the screen downwards and upwards by pressing the and...
... to bright. • Mode 3 : Sets the screen to adjust horizontal position in MagicColor mode of the monitor's entire display. This applies the green color effect to a black and white screen. • Sepia - SIZE & POSITION Menu H-Position V-Position Description Changes the horizontal position of the screen downwards and upwards by pressing the and...

User Manual (ENGLISH)
Page 35
Adjusting the Monitor Menu Image Size Description (Available in Analog mode only) Note When TV signal is input in AV mode ,select "Screen Fit "to adjust vertical position in accordance with the screen aspect ratio of the screen displayed on your monitor. Sets the picture to 16:10 wide mode. •... input. The screen is of the input signals. AV signals • 4 : 3 - Use the function to 'AV'. • 4 : 3 - Note Supplied for the monitor is set to 16:9 wide mode. • Screen Fit- Sets the picture to 'AV'. • When the panel is displayed in 0-6 levels. Note It can...
Adjusting the Monitor Menu Image Size Description (Available in Analog mode only) Note When TV signal is input in AV mode ,select "Screen Fit "to adjust vertical position in accordance with the screen aspect ratio of the screen displayed on your monitor. Sets the picture to 16:10 wide mode. •... input. The screen is of the input signals. AV signals • 4 : 3 - Use the function to 'AV'. • 4 : 3 - Note Supplied for the monitor is set to 16:9 wide mode. • Screen Fit- Sets the picture to 'AV'. • When the panel is displayed in 0-6 levels. Note It can...

User Manual (ENGLISH)
Page 36
SETUP&RESET Adjusting the Monitor Menu Reset Description Reverts the product settings to analogue (D-SUB)-or-digital (DVI)-dedicated models. 35 You can choose one of nine languages. Auto Source Select Auto Source for the monitor to automatically select the signal source. • Auto •... Manual Note Not applicable to factory defaults. • Yes • No Menu Transpar- You can select the language used to display the menus....
SETUP&RESET Adjusting the Monitor Menu Reset Description Reverts the product settings to analogue (D-SUB)-or-digital (DVI)-dedicated models. 35 You can choose one of nine languages. Auto Source Select Auto Source for the monitor to automatically select the signal source. • Auto •... Manual Note Not applicable to factory defaults. • Yes • No Menu Transpar- You can select the language used to display the menus....
User Manual (ENGLISH)
Page 37
...set to "AV", the screen may not be displayed normally. (Unavailable in the"Information". 36 The menu will wait before it is input in DVI mode. Note For models with the size of time the menu will be automatically turned off if no adjustments are made for the wide models only such... as 16:9 or 16:10. You can specify a function which will be activated when the Custom- Adjusting the Monitor Menu PC/AV Mode Description This function allows the screen to be displayed at the optimal quality in accordance with an Analog interface only, "Analog/Digital...
...set to "AV", the screen may not be displayed normally. (Unavailable in the"Information". 36 The menu will wait before it is input in DVI mode. Note For models with the size of time the menu will be automatically turned off if no adjustments are made for the wide models only such... as 16:9 or 16:10. You can specify a function which will be activated when the Custom- Adjusting the Monitor Menu PC/AV Mode Description This function allows the screen to be displayed at the optimal quality in accordance with an Analog interface only, "Analog/Digital...
User Manual (ENGLISH)
Page 40
.... Connect the DVI cable and then reboot the system. A: Check the signal cable connection. plications? A: Set the video card by pressing the [MENU/ ] button for one color as certain types of graphic cards do not send out video signals. A: If the display exceeds SXGA or 75 Hz..., a "Not Optimum Mode", "Recommended Mode **** x **** 60 Hz" message is fully inserted in PowerSaver mode. A: The monitor is still no image on the screen. The screen shows strange colors or just black and white. Please change to the recommended mode during this...
.... Connect the DVI cable and then reboot the system. A: Check the signal cable connection. plications? A: Set the video card by pressing the [MENU/ ] button for one color as certain types of graphic cards do not send out video signals. A: If the display exceeds SXGA or 75 Hz..., a "Not Optimum Mode", "Recommended Mode **** x **** 60 Hz" message is fully inserted in PowerSaver mode. A: The monitor is still no image on the screen. The screen shows strange colors or just black and white. Please change to the recommended mode during this...
User Manual (ENGLISH)
Page 41
... and frequency of the video card. (Refer to the Preset Timing Modes) LED is a message that reads "Unrecognized monitor, Plug & Play (VESA DDC) monitor found" Q: Have you adjusted the resolution or frequency on the menu? There is blinking but no images on and the LED is out of the video card signals. Troubleshooting...
... and frequency of the video card. (Refer to the Preset Timing Modes) LED is a message that reads "Unrecognized monitor, Plug & Play (VESA DDC) monitor found" Q: Have you adjusted the resolution or frequency on the menu? There is blinking but no images on and the LED is out of the video card signals. Troubleshooting...

User Manual (ENGLISH)
Page 11
...Key[ ] You can be displayed again. Front MENU button [MENU/ ] Opens the on . Turn the Power button off and on -screen menu and exits from the menu. Also use to exit the OSD menu or return to adjust the resolution of your PC... before reaching the maximum count. Make sure to the previous menu. Adjust your PC resolution so that it is not on the screen is the optimal ...button [ ] When OSD is the same as the optimal resolution for this product. Your Monitor Initial Settings Introduction Select the language using the up to your preferences. 10
...Key[ ] You can be displayed again. Front MENU button [MENU/ ] Opens the on . Turn the Power button off and on -screen menu and exits from the menu. Also use to exit the OSD menu or return to adjust the resolution of your PC... before reaching the maximum count. Make sure to the previous menu. Adjust your PC resolution so that it is not on the screen is the optimal ...button [ ] When OSD is the same as the optimal resolution for this product. Your Monitor Initial Settings Introduction Select the language using the up to your preferences. 10

User Manual (ENGLISH)
Page 12
... in the manual for turning the product on and off . (When the button is pressed to adjust items in the upper left of the monitor may vary from product to see an animation clip Power button [ ] Use this button for further information regarding power saving functions. analog or ... the digital mode, you to change the input mode, a message appears in the menu. For energy conservation, turn your adjustments are saved. Power Indicator This light is lit when operating normally, and blinks once when your monitor OFF when it is off . Adjust buttons [ ] These buttons allow you must ...
... in the manual for turning the product on and off . (When the button is pressed to adjust items in the upper left of the monitor may vary from product to see an animation clip Power button [ ] Use this button for further information regarding power saving functions. analog or ... the digital mode, you to change the input mode, a message appears in the menu. For energy conservation, turn your adjustments are saved. Power Indicator This light is lit when operating normally, and blinks once when your monitor OFF when it is off . Adjust buttons [ ] These buttons allow you must ...


