

User Manual (user Manual) (ver.1.0) (English)
Page 2
Automatic - Manual User's Manual On-Screen Display Troubleshooting Check List Q & A Self-Test Feature Check Specifications General Specifications PowerSaver Preset Display Modes Information Service Terms Regulatory Natural Color For Better Display Authority Index Main Page Safety Instructions Notational Power Installation Cleaning Other Introduction Unpacking Front Rear Setup Connecting Your Monitor Installing the Monitor Driver -
Automatic - Manual User's Manual On-Screen Display Troubleshooting Check List Q & A Self-Test Feature Check Specifications General Specifications PowerSaver Preset Display Modes Information Service Terms Regulatory Natural Color For Better Display Authority Index Main Page Safety Instructions Notational Power Installation Cleaning Other Introduction Unpacking Front Rear Setup Connecting Your Monitor Installing the Monitor Driver -

User Manual (user Manual) (ver.1.0) (English)
Page 11
Unpacking D-Sub Cable Quick Setup Guide Power Cord Monitor Warranty Card (Not available in all locations) DC-Adapter VESA Mounting Bracket For Multimedia model (Option) User's Guide and Driver Installation CD Multimedia Speaker Stand Sound Cables If any items are included with your dealer. Introduction (SyncMaster 172B/172S) User's Manual Unpacking Please make sure the following items are missing, contact your monitor.
Unpacking D-Sub Cable Quick Setup Guide Power Cord Monitor Warranty Card (Not available in all locations) DC-Adapter VESA Mounting Bracket For Multimedia model (Option) User's Guide and Driver Installation CD Multimedia Speaker Stand Sound Cables If any items are included with your dealer. Introduction (SyncMaster 172B/172S) User's Manual Unpacking Please make sure the following items are missing, contact your monitor.

User Manual (user Manual) (ver.1.0) (English)
Page 14
... PowerSaver described in the menu. For energy conservation, turn the monitor on , a message appears in the center of the screen displaying the current mode -analog or digital input signal.) This light glows green during normal operation, and blinks green once as the monitor saves your adjustments. Auto button 2. Exit button Source button 3. Power indicator Use this button to auto adjustment direct access. Use this button to open the OSD and activate a highlighted menu item. Power button 6. These buttons allow you must connect your monitor OFF when it...
... PowerSaver described in the menu. For energy conservation, turn the monitor on , a message appears in the center of the screen displaying the current mode -analog or digital input signal.) This light glows green during normal operation, and blinks green once as the monitor saves your adjustments. Auto button 2. Exit button Source button 3. Power indicator Use this button to auto adjustment direct access. Use this button to open the OSD and activate a highlighted menu item. Power button 6. These buttons allow you must connect your monitor OFF when it...

User Manual (user Manual) (ver.1.0) (English)
Page 17
... monitor. Connect the monitor to connect the monitor using the D-SUB connection cable. 4. In the case of an old model Macintosh, you need to the Macintosh computer using a special Mac adaptor. 5. Turn on your monitor displays an image, installation is complete. Plug the power cord for your monitor to the 15-pin, D-sub connector on the back of your monitor. 3. Setup (SyncMaster 172B/172S) Connecting Your Monitor Setup-General User's Manual 1. Connect the signal cable to the power port on the back of the monitor. Connect the DC Adapter...
... monitor. Connect the monitor to connect the monitor using the D-SUB connection cable. 4. In the case of an old model Macintosh, you need to the Macintosh computer using a special Mac adaptor. 5. Turn on your monitor displays an image, installation is complete. Plug the power cord for your monitor to the 15-pin, D-sub connector on the back of your monitor. 3. Setup (SyncMaster 172B/172S) Connecting Your Monitor Setup-General User's Manual 1. Connect the signal cable to the power port on the back of the monitor. Connect the DC Adapter...

User Manual (user Manual) (ver.1.0) (English)
Page 18
... Mac adaptor. 5. In the case of an old model Macintosh, you need to a Macintosh. If you connect simultaneously both the D-sub and DVI cables to have the monitor double-check the input signal source. Connect the DC Adapter for the monitor into a nearby outlet. 2-1. Press Source button to one computer. Plug the power cord for your monitor displays an image, installation is set to analogue. Using the DVI (Digital) connector on the video card. Turn on your monitor using the DVI connector but get a blank screen...
... Mac adaptor. 5. In the case of an old model Macintosh, you need to a Macintosh. If you connect simultaneously both the D-sub and DVI cables to have the monitor double-check the input signal source. Connect the DC Adapter for the monitor into a nearby outlet. 2-1. Press Source button to one computer. Plug the power cord for your monitor displays an image, installation is set to analogue. Using the DVI (Digital) connector on the video card. Turn on your monitor using the DVI connector but get a blank screen...
User Manual (user Manual) (ver.1.0) (English)
Page 23
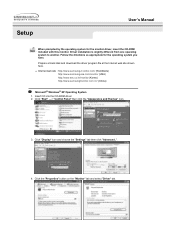
Setup User's Manual When prompted by the operating system for the operating system you have. Follow the directions as appropriate for the monitor driver, insert the CD-ROM included with this monitor. Click "Start" -> "Control Panel" then click the "Appearance and Themes" Icon. 3. Click the "Properties" button on the "Monitor" tab and select "Driver" tab. Prepare a blank disk and download the driver program file at...
Setup User's Manual When prompted by the operating system for the operating system you have. Follow the directions as appropriate for the monitor driver, insert the CD-ROM included with this monitor. Click "Start" -> "Control Panel" then click the "Appearance and Themes" Icon. 3. Click the "Properties" button on the "Monitor" tab and select "Driver" tab. Prepare a blank disk and download the driver program file at...

User Manual (user Manual) (ver.1.0) (English)
Page 24
then click "Next" and then click "Have disk". 7. If you can see following "Message" window, then click the "Continue Anyway" button. Then click "OK" button. Select "Don't search ,I will.." Setup User's Manual 5. then click "Next" button. 6. Click the "Browse" button then choose A:(D:\Driver) and choose your monitor model in the model list and click the "Next" button. 8. Click "Update Driver.." and select "Install from a list or.."
then click "Next" and then click "Have disk". 7. If you can see following "Message" window, then click the "Continue Anyway" button. Then click "OK" button. Select "Don't search ,I will.." Setup User's Manual 5. then click "Next" button. 6. Click the "Browse" button then choose A:(D:\Driver) and choose your monitor model in the model list and click the "Next" button. 8. Click "Update Driver.." and select "Install from a list or.."

User Manual (user Manual) (ver.1.0) (English)
Page 25
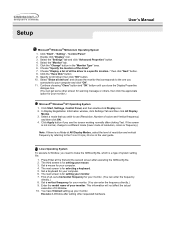
..." button. Monitor driver installation is properly configured. Click the "Browse" button on the "Insert disk" window. 2. Setup User's Manual This monitor driver is under certifying MS logo,and this device so that I can choose a specific driver" then click "Next" and then click "Have disk". 7. Click the "Close" button then click "OK" button continually. 10. Choose "OK" button on the "File Needed" window. 3. How to install 1. Click "Start" , "Setting" , "Control Panel". 2. Double click the "Display...
..." button. Monitor driver installation is properly configured. Click the "Browse" button on the "Insert disk" window. 2. Setup User's Manual This monitor driver is under certifying MS logo,and this device so that I can choose a specific driver" then click "Next" and then click "Have disk". 7. Click the "Close" button then click "OK" button continually. 10. Choose "OK" button on the "File Needed" window. 3. How to install 1. Click "Start" , "Setting" , "Control Panel". 2. Double click the "Display...
User Manual (user Manual) (ver.1.0) (English)
Page 26
... the frequency directly.) 8. Click "Start" , "Setting" , "Control Panel". 2. Choose "Display a list of colors and Vertical frequency) and then click OK. 4. Select "Show all the driver in a specific location.." Click Apply button if you need to the one you close the Display Properties dialogue box. (You can enter the frequency directly.) 9. Press Enter at All Display Modes, select the level of resolution, colors or frequency). Click the "Change" button in the user guide. Select a mode that...
... the frequency directly.) 8. Click "Start" , "Setting" , "Control Panel". 2. Choose "Display a list of colors and Vertical frequency) and then click OK. 4. Select "Show all the driver in a specific location.." Click Apply button if you need to the one you close the Display Properties dialogue box. (You can enter the frequency directly.) 9. Press Enter at All Display Modes, select the level of resolution, colors or frequency). Click the "Change" button in the user guide. Select a mode that...
User Manual (user Manual) (ver.1.0) (English)
Page 28
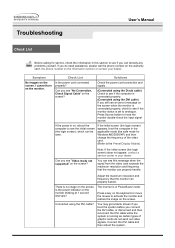
... have the monitor double-check the input signal source. Press Source button to activate the monitor and restore the image on the screen. I cannot turn on the monitor blinking at 1 second intervals? Check the power cord connection and supply. Note: If the initial screen (the login screen) does not appear, contact a service center or your dealer. You can see this section to see "Video mode not supported" on the screen? Troubleshooting User's Manual Check List Before calling for Windows ME...
... have the monitor double-check the input signal source. Press Source button to activate the monitor and restore the image on the screen. I cannot turn on the monitor blinking at 1 second intervals? Check the power cord connection and supply. Note: If the initial screen (the login screen) does not appear, contact a service center or your dealer. You can see this section to see "Video mode not supported" on the screen? Troubleshooting User's Manual Check List Before calling for Windows ME...

User Manual (user Manual) (ver.1.0) (English)
Page 29
... by referring to the video card manual. changes? Check the signal cable connection. using the OSD. LED is out of focus or OSD cannot or frequency on the screen. The screen colors have changed the video card Adjust screen image position and size or the driver? Set the video card by referring to the video card manual. Readjust Position by referring to the video card manual and the Preset Display Modes. be supported. Have you locked the On Screen Unlock the OSD by pressing the Display (OSD) Menu to if the Plug & Play (VESA DDC) the Driver Installation Instructions...
... by referring to the video card manual. changes? Check the signal cable connection. using the OSD. LED is out of focus or OSD cannot or frequency on the screen. The screen colors have changed the video card Adjust screen image position and size or the driver? Set the video card by referring to the video card manual. Readjust Position by referring to the video card manual and the Preset Display Modes. be supported. Have you locked the On Screen Unlock the OSD by pressing the Display (OSD) Menu to if the Plug & Play (VESA DDC) the Driver Installation Instructions...

User Manual (user Manual) (ver.1.0) (English)
Page 30
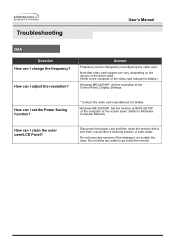
... installed a new video card or if you have problems in installing the adapter (video) driver, boot the computer in Safe Mode, remove the Display Adapter at 75Hz or 85Hz. (Do not exceed 60Hz when using the maximum resolution.) 5. Troubleshooting User's Manual Check List Check the following items if there is set at the "Control Panel, System, Device Administrator" and then reboot the computer to the computer. 2. Check if the power cord and the cable are properly connected...
... installed a new video card or if you have problems in installing the adapter (video) driver, boot the computer in Safe Mode, remove the Display Adapter at 75Hz or 85Hz. (Do not exceed 60Hz when using the maximum resolution.) 5. Troubleshooting User's Manual Check List Check the following items if there is set at the "Control Panel, System, Device Administrator" and then reboot the computer to the computer. 2. Check if the power cord and the cable are properly connected...
User Manual (user Manual) (ver.1.0) (English)
Page 31
... the Control Panel, Display, Settings. Disconnect the power cord and then clean the monitor with a soft cloth, using either a cleaning solution or plain water. Note that video card support can vary, depending on the version of the computer or the screen saver. (Refer to Windows/ Computer Manual). How can I change the frequency? Troubleshooting User's Manual Q&A Question How can I set the Power Saving function? * Contact the video card manufacturer for details.) Windows ME/2000/XP: Set the resolution at BIOS-SETUP...
... the Control Panel, Display, Settings. Disconnect the power cord and then clean the monitor with a soft cloth, using either a cleaning solution or plain water. Note that video card support can vary, depending on the version of the computer or the screen saver. (Refer to Windows/ Computer Manual). How can I change the frequency? Troubleshooting User's Manual Q&A Question How can I set the Power Saving function? * Contact the video card manufacturer for details.) Windows ME/2000/XP: Set the resolution at BIOS-SETUP...

User Manual (user Manual) (ver.1.0) (English)
Page 32
... monitor and reconnect the video cable; Troubleshooting User's Manual Self-Test Feature Check Your monitor provides a self test feature that allows you will see a box with your monitor. Turn on both your monitor is functioning properly, you to appear indicates a problem with a border and text inside as shown in the following illustration: The three boxes inside the border are red, green and blue. Turn off your video controller...
... monitor and reconnect the video cable; Troubleshooting User's Manual Self-Test Feature Check Your monitor provides a self test feature that allows you will see a box with your monitor. Turn on both your monitor is functioning properly, you to appear indicates a problem with a border and text inside as shown in the following illustration: The three boxes inside the border are red, green and blue. Turn off your video controller...

User Manual (user Manual) (ver.1.0) (English)
Page 33
... and relocate the woofer to check the signal cable. Useful Tips . Troubleshooting User's Manual Self-Test Feature Check Werning Messages If there is something wrong with the input signal, a message appears on the screen or the screen goes blank although the power indicator LED is trouble with the PC or the video card, this can cause the monitor to become blank, have poor coloring, noise, Video mode not supported, etc. The message may...
... and relocate the woofer to check the signal cable. Useful Tips . Troubleshooting User's Manual Self-Test Feature Check Werning Messages If there is something wrong with the input signal, a message appears on the screen or the screen goes blank although the power indicator LED is trouble with the PC or the video card, this can cause the monitor to become blank, have poor coloring, noise, Video mode not supported, etc. The message may...

User Manual (user Manual) (ver.1.0) (English)
Page 38
... functionality. State Power Indicator Power Consumption Normal Operation Green Max. 42W Power saving mode EPA/ENERGY 2000 Green, Blinking Less than 2W Power Switch off (120Vac) Black Less than 1W This monitor is not needed, or when leaving it has not been used with a computer equipped with a VESA DPMS compliant video card installed in power management system called PowerSaver. Specifications User's Manual PowerSaver This monitor has a built-in your monitor into a low-power mode when it...
... functionality. State Power Indicator Power Consumption Normal Operation Green Max. 42W Power saving mode EPA/ENERGY 2000 Green, Blinking Less than 2W Power Switch off (120Vac) Black Less than 1W This monitor is not needed, or when leaving it has not been used with a computer equipped with a VESA DPMS compliant video card installed in power management system called PowerSaver. Specifications User's Manual PowerSaver This monitor has a built-in your monitor into a low-power mode when it...

User Manual (user Manual) (ver.1.0) (English)
Page 42
... this problem, there is a Flicker-free Mode using a vertical frequency over 70 Hz. • Horizontal Frequency The time to scan one line connecting the right edge to ensure a clear image. The inverse number of red, green and blue dots. This number shows the accuracy of the screen from the top to compose the screen image is good for the user. To avoid this repetition per second in turn is called 'resolution'. This monitor...
... this problem, there is a Flicker-free Mode using a vertical frequency over 70 Hz. • Horizontal Frequency The time to scan one line connecting the right edge to ensure a clear image. The inverse number of red, green and blue dots. This number shows the accuracy of the screen from the top to compose the screen image is good for the user. To avoid this repetition per second in turn is called 'resolution'. This monitor...

User Manual (user Manual) (ver.1.0) (English)
Page 43
... technician for help. Before making the connection, make sure the voltage rating of Samsung 3351 Michelson Drive, Suite #290, Irvine, CA92612 USA Tel) 949-975-7310 Fax) 949-922-8301 Warning User must use only UL Listed detachable power cord with NEMA configuration 5-15P type (parallel blades) plug cap. Provided with this is the same as the monitor and that to Part 15...
... technician for help. Before making the connection, make sure the voltage rating of Samsung 3351 Michelson Drive, Suite #290, Irvine, CA92612 USA Tel) 949-975-7310 Fax) 949-922-8301 Warning User must use only UL Listed detachable power cord with NEMA configuration 5-15P type (parallel blades) plug cap. Provided with this is the same as the monitor and that to Part 15...

User Manual (user Manual) (ver.1.0) (English)
Page 50
... you view a fixed screen for an extended period of black pixels could be scrubbed out softly. Resolution: SyncMaster 1208 x 1024 Vertical frequency (refresh rate): 60 Hz 2 TFT LCD panel manufactured by using soft and dry cloth and polish it. But the pixels of RED, GREEN, BLUE and WHITE color seem to enjoy the best quality of time, residual image or blurriness may appear. This is not from the monitor for an extended period of picture...
... you view a fixed screen for an extended period of black pixels could be scrubbed out softly. Resolution: SyncMaster 1208 x 1024 Vertical frequency (refresh rate): 60 Hz 2 TFT LCD panel manufactured by using soft and dry cloth and polish it. But the pixels of RED, GREEN, BLUE and WHITE color seem to enjoy the best quality of time, residual image or blurriness may appear. This is not from the monitor for an extended period of picture...

User Manual (user Manual) (ver.1.0) (Spanish)
Page 44
... a particular installation. Información Manual del Usuario Regulatory FCC Information User Instructions The Federal Communications Commission Radio Frequency Interference Statement includes the following measures: z Reorient or relocate the receiving antenna. z Connect the equipment into an outlet on the standard of the Voluntary Control Council for the product. For 120 Volt applications, use only UL Listed Detachable power supply cord with NEMA...
... a particular installation. Información Manual del Usuario Regulatory FCC Information User Instructions The Federal Communications Commission Radio Frequency Interference Statement includes the following measures: z Reorient or relocate the receiving antenna. z Connect the equipment into an outlet on the standard of the Voluntary Control Council for the product. For 120 Volt applications, use only UL Listed Detachable power supply cord with NEMA...


