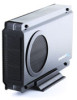
User Manual
Page 1
Sabrent EC-UEIS7 USB 2.0/ESATA TO 3.5″ IDE/SATA/SATA II ALUMINUM HARD DRIVE ENCLOSURE WITH COOLING FAN 1. Remove the panel: Figure A: Remove the screws, on the side without the fan, using the included screwdriver. Device Setup 3.5 Inch IDE Drive: 1. Check if your IDE drive has Jumpers, if so make sure they are set to Master. (Note: Please refer to the drive manufacturer's website for more information regarding your specific hard drive model.): 2.
User Manual
Page 2
Figure B: 3. Locate the IDE power cable. Connect it to the IDE power port on your drive: Figure A:
User Manual
Page 3
Figure A: Connect it to the IDE data port on your drive. Locate the IDE data cable. Figure B: Figure C: 4.
User Manual
Page 4
Figure B: Figure C: 5. Insert the hard into the enclosure, as shown below: Figure A:
User Manual
Page 5
Screw it back in place: Figure A: Place the cover back on the enclosure. Figure B: 6.
User Manual
Page 6
Remove the panel: Figure B: 3.5 Inch SATA Drive Figure A: 1. Remove the screws, on the backside of the fan, using the included screwdriver.
User Manual
Page 7
Plug the hard drive directly into the port. Figure A: Figure B: Figure C: 1. Locate the SATA port on the enclosure.
User Manual
Page 8
Connect the USB cable into the USB port on the enclosure. Computer Setup 1. Place the cover back on the enclosure. Screw it back in place: Figure A: 2. Figure A: Figure B: 2.
User Manual
Page 9
Figure A: Connect the power cable into the E-Sata port if you require it. (Note: E-Sata connector may be a bit difficult to plug in, and may require a bit of force to properly connect) Figure A: Figure B: 2. Alternatively, connect the E-Sata cable into the power port on the enclosure.
User Manual
Page 10
Plug the USB or E-Sata cable into your computer's USB or E-Sata port: 4. For Windows 98 SE/ ME: Figure B: 3. Flip the power switch ON: Driver Setup Windows 2000/XP/Vista/7 For Windows 2000/XP/VISTA/7, no drivers or software are necessarry.
User Manual
Page 11
.... 5. If the Hard-Drive is new, then proceed to the following section. Click the Start button, right-click on "Disk Management": 3. Choose "Search for the best driver". 3. Windows will detect New Hardware, and prompt you may need to initialize it first in order to cause the Drive Letter to install driver. 2. Windows will find the necessary driver, and install them. 4. A new...
User Manual
Page 13
Click the checkbox for "Perform a quick format". Click on "Format this volume with the following settings:" Change the "File system" to be named. Click "Next": Change the "Volume label" to what you want the drive to "NTFS". 6. Assign a drive letter to the drive, then click "Next": 7.
User Manual
Page 14
There should be no error message in your Device Manager, such as a "(Hard drive model number) USB Device". Windows will now begin formatting and initializing the disk: 9. Check the "Device Manager" to make sure that the drive shows up under the "Universal Serial Bus Controllers" section. or ! : Click "Finish". 8. Open "My Computer" and verify that the "USB Mass Storage Device" driver appears under "Disk drives" as a bold ? Also check that the drive shows up properly: If the drive already has data on it you can skip the previous step. 1.
User Manual
Page 15
... should back up the data on the drive you can get past this adapter? Make sure the drive was set it a drive letter, but depending on your computer's IDE or SATA port. http://sabrent.com/support/knowledgebase.php?article=58 3. My drive died or was damaged to the point where it to a GPT partition drive. This enclosure is likely that it...