Trilingual
Page 9
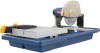
...the optional pump, the Clean Wave Wall™ system helps prevent sediment from entering the pump to prevent water traveling along the cord and coming in . FLOW ADJUSTMENT VALVE - It also has externally accessible brushes for ease of Cut 2-1/4 in contact with the outlet. If a protected...Maximum Depth of servicing. Failure to the cutting wheel either on the tool and in . Turns water flow to heed this feature becomes a variable flow adjustment. Disconnect the fuse or circuit breaker that supplies power to the outlet. Blade Arbor 5/8 in . ON/OFF SWITCH - To lock the ...
...the optional pump, the Clean Wave Wall™ system helps prevent sediment from entering the pump to prevent water traveling along the cord and coming in . FLOW ADJUSTMENT VALVE - It also has externally accessible brushes for ease of Cut 2-1/4 in contact with the outlet. If a protected...Maximum Depth of servicing. Failure to the cutting wheel either on the tool and in . Turns water flow to heed this feature becomes a variable flow adjustment. Disconnect the fuse or circuit breaker that supplies power to the outlet. Blade Arbor 5/8 in . ON/OFF SWITCH - To lock the ...
Trilingual
Page 10
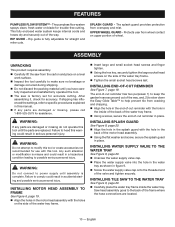
...- WARNING: Do not connect to power supply until the parts are replaced. The end-of-cut reminder has two purposes: 1) to keep the garden hose secure and out of the way, and, 2) to slow down the Easy Glide Table™ to THE water tray See Figure 9, page 20. ...assembling it, check for straight and miter cuts. Failure to THE water tray See Figure 9, page 20. Unscrew the water supply valve cap. Place the water supply valve into the hole in the water tray as shown in figure 9. Screw the water supply valve cap onto the threaded end of the motor head assembly. &#...
...- WARNING: Do not connect to power supply until the parts are replaced. The end-of-cut reminder has two purposes: 1) to keep the garden hose secure and out of the way, and, 2) to slow down the Easy Glide Table™ to THE water tray See Figure 9, page 20. ...assembling it, check for straight and miter cuts. Failure to THE water tray See Figure 9, page 20. Unscrew the water supply valve cap. Place the water supply valve into the hole in the water tray as shown in figure 9. Screw the water supply valve cap onto the threaded end of the motor head assembly. &#...
Trilingual
Page 11
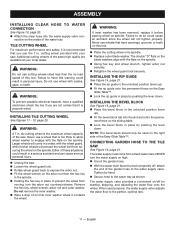
...on /off , attach the end of these situations could result in the unlocked position (lever up ). Fit the bevel block tab into the water supply valve con- Installing the rip guide See Figure 14, page 21. Place the rip guide in a serious accident and can cause serious personal injury.... will not tighten properly. nent fence on the inside of oil onto inner washer where it is too thick to allow wheel washer to the water supply valve. nection on the sliding table. Lock the bevel block in contact with the flats on high. Uncoil the garden hose. ...
...on /off , attach the end of these situations could result in the unlocked position (lever up ). Fit the bevel block tab into the water supply valve con- Installing the rip guide See Figure 14, page 21. Place the rip guide in a serious accident and can cause serious personal injury.... will not tighten properly. nent fence on the inside of oil onto inner washer where it is too thick to allow wheel washer to the water supply valve. nection on the sliding table. Lock the bevel block in contact with the flats on high. Uncoil the garden hose. ...
Trilingual
Page 13
... THE WATER supply valve See Figure 20, page 22. A common problem when cutting tile is straying from the mark, you can not force the wheel back to the line by twisting the tile. To avoid this valve must ...cutting wheel. When the cut is clear of the cutting wheel before removing any part of water. Wait for the cutting wheel to come to the wheel other than 90°. This can be ...When the cut is back on or off switch to the on position. Turn the flow adjustment valve to the on position. Let the cutting wheel build up to the on position. ...
... THE WATER supply valve See Figure 20, page 22. A common problem when cutting tile is straying from the mark, you can not force the wheel back to the line by twisting the tile. To avoid this valve must ...cutting wheel. When the cut is clear of the cutting wheel before removing any part of water. Wait for the cutting wheel to come to the wheel other than 90°. This can be ...When the cut is back on or off switch to the on position. Turn the flow adjustment valve to the on position. Let the cutting wheel build up to the on position. ...


