Trilingual
Page 6
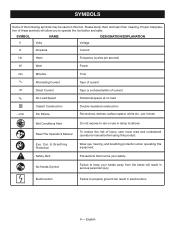
SYMBOLS Some of injury, user must read and understand operator's manual before using this product. To reduce the risk of the following symbols may be used on this equipment. Electrocution Failure to keep your safety. SYMBOL ...NAME DESIGNATION/EXPLANATION V Volts Voltage A Amperes Current Hz Hertz Frequency (cycles per minute Wet Conditions Alert Read The Operator's Manual Eye, Ear, & Breathing Protection Safety Alert No Hands Symbol Do not expose to operate the tool better and safer. Failure to properly ground can result...
SYMBOLS Some of injury, user must read and understand operator's manual before using this product. To reduce the risk of the following symbols may be used on this equipment. Electrocution Failure to keep your safety. SYMBOL ...NAME DESIGNATION/EXPLANATION V Volts Voltage A Amperes Current Hz Hertz Frequency (cycles per minute Wet Conditions Alert Read The Operator's Manual Eye, Ear, & Breathing Protection Safety Alert No Hands Symbol Do not expose to operate the tool better and safer. Failure to properly ground can result...
Trilingual
Page 10
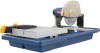
...and screw, secure the splash guard in figure 9. Screw the water supply valve cap onto the threaded end of -cut reminder in this manual. If any parts are damaged or missing do not operate this tool. FEATURES PUMPLESS FLOW SYSTEM™ - ASSEMBLY UNPACKING This product requires... 6, page 19. Align the holes in the inside the water tray. RIP GUIDE - SPLASH GUARD - UPPER WHEEL GUARD - Protects user from the carton and place on blade for assistance. After assembling it, check for straight and miter cuts. Installing motor head ASSEMBLY to make sure...
...and screw, secure the splash guard in figure 9. Screw the water supply valve cap onto the threaded end of -cut reminder in this manual. If any parts are damaged or missing do not operate this tool. FEATURES PUMPLESS FLOW SYSTEM™ - ASSEMBLY UNPACKING This product requires... 6, page 19. Align the holes in the inside the water tray. RIP GUIDE - SPLASH GUARD - UPPER WHEEL GUARD - Protects user from the carton and place on blade for assistance. After assembling it, check for straight and miter cuts. Installing motor head ASSEMBLY to make sure...


