Operation Manual
Page 4
... a damaged or worn cord immediately. To reduce the risk of your saw is wider than the other users. This plug will draw. Read the operator's manual carefully. The maximum blade capacity of electric shock, this tool, loan them frequently and use to comply with saw or workpiece before operating your saw...
... a damaged or worn cord immediately. To reduce the risk of your saw is wider than the other users. This plug will draw. Read the operator's manual carefully. The maximum blade capacity of electric shock, this tool, loan them frequently and use to comply with saw or workpiece before operating your saw...

Operation Manual
Page 5
... part of this miter saw is missing or should have the following markings: • To reduce the risk of injury, user must read the operator's manual. • Wear eye protection. • Keep hands and body out of the path of the saw is released suddenly and the saw blade. This could...
... part of this miter saw is missing or should have the following markings: • To reduce the risk of injury, user must read the operator's manual. • Wear eye protection. • Keep hands and body out of the path of the saw is released suddenly and the saw blade. This could...

Operation Manual
Page 6
...serious injury. Indicates a hazardous situation, which , if not avoided, will result in death or serious injury. SYMBOL NAME DESIGNATION/EXPLANATION Safety Alert Read Operator's Manual Eye Protection No Hands Symbol Extremely Bright Light Indicates a potential personal injury hazard. SYMBOLS The following symbols may result in minor or moderate injury. V A... and meanings are intended to comply with side shields marked to explain the levels of injury, user must read and understand operator's manual before using this product. This product uses extremely bright LEDs.
...serious injury. Indicates a hazardous situation, which , if not avoided, will result in death or serious injury. SYMBOL NAME DESIGNATION/EXPLANATION Safety Alert Read Operator's Manual Eye Protection No Hands Symbol Extremely Bright Light Indicates a potential personal injury hazard. SYMBOLS The following symbols may result in minor or moderate injury. V A... and meanings are intended to comply with side shields marked to explain the levels of injury, user must read and understand operator's manual before using this product. This product uses extremely bright LEDs.

Operation Manual
Page 10
... − English To transport, turn off and unplug the saw, then lower the saw housing. BLADE A 7-1/4 in the down position by 10 in this operator's manual as well as a knowledge of the project you are for the blade wrench is included with handles on the pivot assembly and tighten the slide...
... − English To transport, turn off and unplug the saw, then lower the saw housing. BLADE A 7-1/4 in the down position by 10 in this operator's manual as well as a knowledge of the project you are for the blade wrench is included with handles on the pivot assembly and tighten the slide...

Operation Manual
Page 12
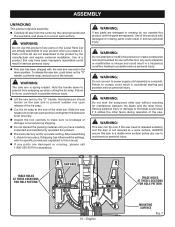
TOOLS NEEDED The following tools (not included) are needed for making adjustments or installing the blade: SQUARE LOOSE PARTS LIST COMBINATION SQUARE Fig. 5 The following items are included with the tool: Dust Bag Blade Wrench Work Clamp Side Handles (2) with screws DUST BAG Operator's Manual (not shown) WORK CLAMP SIDE HANDLE BLADE WRENCH SIDE HANDLE Fig. 6 WARNING: The use of attachments or accessories not listed might be hazardous and could cause serious personal injury. 12 − English
TOOLS NEEDED The following tools (not included) are needed for making adjustments or installing the blade: SQUARE LOOSE PARTS LIST COMBINATION SQUARE Fig. 5 The following items are included with the tool: Dust Bag Blade Wrench Work Clamp Side Handles (2) with screws DUST BAG Operator's Manual (not shown) WORK CLAMP SIDE HANDLE BLADE WRENCH SIDE HANDLE Fig. 6 WARNING: The use of attachments or accessories not listed might be hazardous and could cause serious personal injury. 12 − English
Operation Manual
Page 13
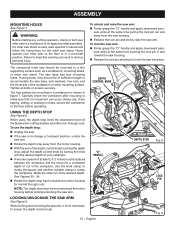
... of the slide bar. Use of this product with damaged or missing parts could result in a hazardous condition leading to specific procedures explained in this manual. If any parts are damaged or missing do so could result in serious personal injury. This saw has been shipped with this tool...
... of the slide bar. Use of this product with damaged or missing parts could result in a hazardous condition leading to specific procedures explained in this manual. If any parts are damaged or missing do so could result in serious personal injury. This saw has been shipped with this tool...
Operation Manual
Page 14
... sufficient length to heed this warning can occur during use the depth stop: Unplug the saw. If the saw is used, read operator's manual and follow the instructions for normal through cuts. The saw into place. USING THE DEPTH STOP See Figure 8. See Figures 33 - 34. Rotate the...
... sufficient length to heed this warning can occur during use the depth stop: Unplug the saw. If the saw is used, read operator's manual and follow the instructions for normal through cuts. The saw into place. USING THE DEPTH STOP See Figure 8. See Figures 33 - 34. Rotate the...

Operation Manual
Page 18
... the throat plate, align the holes in the throat plate with the holes in the saw base. Retighten the screws, being made in this manual show points being careful not to overtighten which can catch on the uneven edges resulting in binding which could result in transport position. Loosen...
... the throat plate, align the holes in the throat plate with the holes in the saw base. Retighten the screws, being made in this manual show points being careful not to overtighten which can catch on the uneven edges resulting in binding which could result in transport position. Loosen...
Operation Manual
Page 32
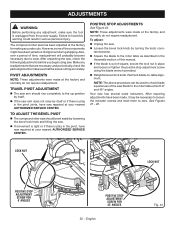
... you begin using the blade wrench provided. Retighten bevel lock knob. Failure to heed this warning could result in the Assembly section of this manual. If the blade is out of the saw repaired at the factory and normally do not require readjustment. After squaring adjustments have saw is...
... you begin using the blade wrench provided. Retighten bevel lock knob. Failure to heed this warning could result in the Assembly section of this manual. If the blade is out of the saw repaired at the factory and normally do not require readjustment. After squaring adjustments have saw is...
Parts Diagram
Page 3
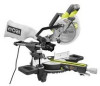
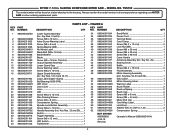
... End Cap 1 Cord Wrap Label 1 Link Rivet 1 Washer (ID5.3 x OD15 x 1.2t 2 Compression Spring 1 Operator's Manual (089240034914) 3 Key Nos. 12-14 and 16-17 1 Logo Label (Upper Guard 1 Ball Bearing (6200-2RS 1 LED... Handle Assembly (Inc. Always mention the model number in . FIGURE A QTY KEY PART NO. TSS702 The model number will be found on a label attached to the housing. Key Nos. 3 and... 30 089240034716 31 089240011104 32 089240011043 33 089240011046 DESCRIPTION PARTS LIST - RYOBI 7-1/2 in all correspondence regarding your MITER SAW or when ordering replacement ...
... End Cap 1 Cord Wrap Label 1 Link Rivet 1 Washer (ID5.3 x OD15 x 1.2t 2 Compression Spring 1 Operator's Manual (089240034914) 3 Key Nos. 12-14 and 16-17 1 Logo Label (Upper Guard 1 Ball Bearing (6200-2RS 1 LED... Handle Assembly (Inc. Always mention the model number in . FIGURE A QTY KEY PART NO. TSS702 The model number will be found on a label attached to the housing. Key Nos. 3 and... 30 089240034716 31 089240011104 32 089240011043 33 089240011046 DESCRIPTION PARTS LIST - RYOBI 7-1/2 in all correspondence regarding your MITER SAW or when ordering replacement ...


