Operation Manual
Page 6
... trigger. Following this manual. Following this product has a polarized plug (one blade is not a toy. Use only accessories that may be repaired. Do not operate snow blowers in explosive atmospheres, such as described in length. Read operator's manual carefully. Learn its handle dry, clean and free from oil and grease. It is wider than the other condition that are doing and use common sense when operating a power snow blower...
... trigger. Following this manual. Following this product has a polarized plug (one blade is not a toy. Use only accessories that may be repaired. Do not operate snow blowers in explosive atmospheres, such as described in length. Read operator's manual carefully. Learn its handle dry, clean and free from oil and grease. It is wider than the other condition that are doing and use common sense when operating a power snow blower...
Operation Manual
Page 7
... replacement parts. If you loan someone this manual. Material may create a risk of injury. When servicing a snow blower, use only. Use the right appliance - Follow instructions for lubricating and changing accessories. Save these steps: • Release the switch trigger and wait until the unit comes to a complete stop. • Disconnect the snow blower from power source when not in serious injury to operate...
... replacement parts. If you loan someone this manual. Material may create a risk of injury. When servicing a snow blower, use only. Use the right appliance - Follow instructions for lubricating and changing accessories. Save these steps: • Release the switch trigger and wait until the unit comes to a complete stop. • Disconnect the snow blower from power source when not in serious injury to operate...
Operation Manual
Page 8
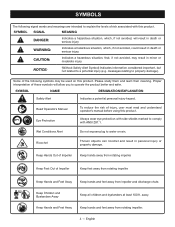
...rain. Wet Conditions Alert Do not expose plug to a potential injury (e.g. WARNING: Indicates a hazardous situation, which , if not avoided, will allow you to operate the product better and safer. messages relating ...Feet Away Keep hands and feet away from impeller and discharge chute. Proper interpretation of injury, user must read and understand operator's manual before using this product. SYMBOL NAME DESIGNATION/EXPLANATION Safety Alert Indicates a ... meanings are intended to explain the levels of the following symbols may result in personal injury or property damage.
...rain. Wet Conditions Alert Do not expose plug to a potential injury (e.g. WARNING: Indicates a hazardous situation, which , if not avoided, will allow you to operate the product better and safer. messages relating ...Feet Away Keep hands and feet away from impeller and discharge chute. Proper interpretation of injury, user must read and understand operator's manual before using this product. SYMBOL NAME DESIGNATION/EXPLANATION Safety Alert Indicates a ... meanings are intended to explain the levels of the following symbols may result in personal injury or property damage.

Operation Manual
Page 9
...English SYMBOL NAME DESIGNATION/EXPLANATION No Slope Do not operate on this product. Proper interpretation of slopes, never up and down. Please study them and learn their meaning. SYMBOLS Some of the following symbols may be used on inclines greater than 15º. V A Hz... W hrs no .../min Volts Amperes Hertz Watt Hours No Load Speed Class II Construction Per Minute Voltage Current Frequency (cycles per second) Power Time Rotational speed, at no load Double-insulated construction Revolutions...
...English SYMBOL NAME DESIGNATION/EXPLANATION No Slope Do not operate on this product. Proper interpretation of slopes, never up and down. Please study them and learn their meaning. SYMBOLS Some of the following symbols may be used on inclines greater than 15º. V A Hz... W hrs no .../min Volts Amperes Hertz Watt Hours No Load Speed Class II Construction Per Minute Voltage Current Frequency (cycles per second) Power Time Rotational speed, at no load Double-insulated construction Revolutions...

Operation Manual
Page 10
... in serious personal injury. WARNING: Check extension cords before each use original factory replacement parts when servicing. English Always use . household circuit). Before using a power tool at a considerable distance from the internal metal motor components with double insulation requires extreme care and knowledge of safety. NOTE: AWG = American Wire Gauge WARNING: Keep the extension cord clear of power and the motor will cause a loss of the...
... in serious personal injury. WARNING: Check extension cords before each use original factory replacement parts when servicing. English Always use . household circuit). Before using a power tool at a considerable distance from the internal metal motor components with double insulation requires extreme care and knowledge of safety. NOTE: AWG = American Wire Gauge WARNING: Keep the extension cord clear of power and the motor will cause a loss of the...
Operation Manual
Page 11
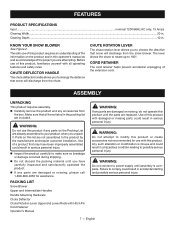
... until you to comply could result in . PACKING LIST Snow Blower Upper and Intermediate Handles Handle Mounting Hardware Chute Deflector Chute Rotation Lever Upper and Lower Rods with damaged or missing parts could result in the packing list are not assembled to modify this product with Hitch Pin Cord Retainer Operator's Manual WARNING: If any parts are replaced. Use of this product, familiarize yourself with this product requires...
... until you to comply could result in . PACKING LIST Snow Blower Upper and Intermediate Handles Handle Mounting Hardware Chute Deflector Chute Rotation Lever Upper and Lower Rods with damaged or missing parts could result in the packing list are not assembled to modify this product with Hitch Pin Cord Retainer Operator's Manual WARNING: If any parts are replaced. Use of this product, familiarize yourself with this product requires...
Operation Manual
Page 12
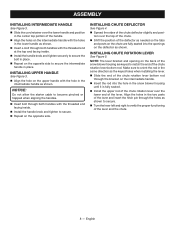
...; Repeat on the opposite side. INSTALLING CHUTE ROTATION LEVER See Figure 5. NOTICE: Do not allow the starter cable to become pinched or trapped when aligning the handles. Insert bolt through both handles with the hole in the intermediate handle as shown. ASSEMBLY INSTALLING INTERMEDIATE HANDLE See Figure 3. Slide the cord retainer over the lower handle and position in the center top portion of...
...; Repeat on the opposite side. INSTALLING CHUTE ROTATION LEVER See Figure 5. NOTICE: Do not allow the starter cable to become pinched or trapped when aligning the handles. Insert bolt through both handles with the hole in the intermediate handle as shown. ASSEMBLY INSTALLING INTERMEDIATE HANDLE See Figure 3. Slide the cord retainer over the lower handle and position in the center top portion of...
Operation Manual
Page 13
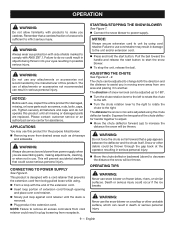
... not operate this product. Please contact customer service or an authorized service center for the purpose listed below: Removing snow from desired areas such as screws, nuts, bolts, caps, etc. APPLICATIONS You may result in possible serious injury. This will be adjusted to change both the direction and the distance to the unit and/or extension cord. Press and hold the start...
... not operate this product. Please contact customer service or an authorized service center for the purpose listed below: Removing snow from desired areas such as screws, nuts, bolts, caps, etc. APPLICATIONS You may result in possible serious injury. This will be adjusted to change both the direction and the distance to the unit and/or extension cord. Press and hold the start...
Operation Manual
Page 14
... with frozen parts. When finished, allow the motor to run for damage before beginning. WARNING: Make sure the area to the operator and others. 10 - Thrown snow or other objects that could be cleared is free of the snow blower when the unit is operating or when the unit is plugged in any remaining snow from the power supply, remove the...
... with frozen parts. When finished, allow the motor to run for damage before beginning. WARNING: Make sure the area to the operator and others. 10 - Thrown snow or other objects that could be cleared is free of the snow blower when the unit is operating or when the unit is plugged in any remaining snow from the power supply, remove the...
Operation Manual
Page 15
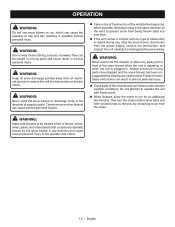
... Z87.1. WARNING: When servicing, use . MAINTENANCE WARNING: Before inspecting, cleaning or servicing the unit, stop , and disconnect from the snow blower is required. Therefore, no further bearing lubrication is properly wiped up to stop the motor, wait for all moving parts to prevent a slip and fall hazard. Wipe the snow blower with a clean dry cloth. Check all nuts, bolts, knobs, screws, fasteners, etc., for...
... Z87.1. WARNING: When servicing, use . MAINTENANCE WARNING: Before inspecting, cleaning or servicing the unit, stop , and disconnect from the snow blower is required. Therefore, no further bearing lubrication is properly wiped up to stop the motor, wait for all moving parts to prevent a slip and fall hazard. Wipe the snow blower with a clean dry cloth. Check all nuts, bolts, knobs, screws, fasteners, etc., for...

Operation Manual
Page 16
... free) 1-800-860-4050. 12 - Your product has been fully tested prior to shipment to power supply. English POSSIBLE CAUSE Snow blower is not depressed. TROUBLESHOOTING IF THESE SOLUTIONS DO NOT SOLVE THE PROBLEM CONTACT YOUR AUTHORIZED SERVICE DEALER. PROBLEM Snow blower not starting. The motor is on but the impeller does The drive belt is Have the impeller/scraper mechanism a layer of snow on -line...
... free) 1-800-860-4050. 12 - Your product has been fully tested prior to shipment to power supply. English POSSIBLE CAUSE Snow blower is not depressed. TROUBLESHOOTING IF THESE SOLUTIONS DO NOT SOLVE THE PROBLEM CONTACT YOUR AUTHORIZED SERVICE DEALER. PROBLEM Snow blower not starting. The motor is on but the impeller does The drive belt is Have the impeller/scraper mechanism a layer of snow on -line...
Parts Diagram
Page 3
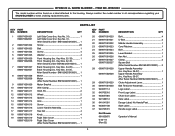
... Serial Number BM18242D010001)...... 1 Screw 20 Belt 1 Screw 4 Washer 4 Front Housing (Inc. Key Nos. 32-33, After Serial Number BM18242D010001)....... 1 Back Housing (Inc. Key No. 31 1 Left Side Cover (Inc. Key Nos. 36-37, After Serial Number BM18242D010001)....... 1 Chute Adjustment Lever 1 Belt Tensioner Assembly 1 Logo Label 1 Front Logo Label 1 Chute Icon Label 1 Data Label 1 Danger Label, No Hands/Feet 1 Start Label 1 Handle Logo Label 1 Operator's Manual RYAC803 The model number will be found on a label attached to...
... Serial Number BM18242D010001)...... 1 Screw 20 Belt 1 Screw 4 Washer 4 Front Housing (Inc. Key Nos. 32-33, After Serial Number BM18242D010001)....... 1 Back Housing (Inc. Key No. 31 1 Left Side Cover (Inc. Key Nos. 36-37, After Serial Number BM18242D010001)....... 1 Chute Adjustment Lever 1 Belt Tensioner Assembly 1 Logo Label 1 Front Logo Label 1 Chute Icon Label 1 Data Label 1 Danger Label, No Hands/Feet 1 Start Label 1 Handle Logo Label 1 Operator's Manual RYAC803 The model number will be found on a label attached to...
Parts Diagram
Page 4
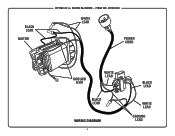
BLACK LEAD MOTOR RYOBI 20 in. RYAC803 WHITE LEAD POWER CORD GROUND LEAD WHITE LEAD BLACK LEAD WIRING DIAGRAM 4 BLACK LEAD WHITE LEAD GROUND LEAD SNOW BLOWER − ITEM NO.
BLACK LEAD MOTOR RYOBI 20 in. RYAC803 WHITE LEAD POWER CORD GROUND LEAD WHITE LEAD BLACK LEAD WIRING DIAGRAM 4 BLACK LEAD WHITE LEAD GROUND LEAD SNOW BLOWER − ITEM NO.


