

Operation Manual
Page 2
ii Consulte esta sección desplegable para ver todas las figuras a las que se hace referencia en el manual del operador. See this fold-out section for all of the figures referenced in the operator's manual. Consulter l'encart à volets afin d'examiner toutes les figures mentionnées dans le manuel d'utilisation.
ii Consulte esta sección desplegable para ver todas las figuras a las que se hace referencia en el manual del operador. See this fold-out section for all of the figures referenced in the operator's manual. Consulter l'encart à volets afin d'examiner toutes les figures mentionnées dans le manuel d'utilisation.
Operation Manual
Page 8
... the motor is damaged in , pull extension cord from openings and moving parts. Never pick up or holding the appliance. Avoid Unintentional Starting - Do not carry plugged in poor lighting. To reduce the risk of electric shock, this product has a polarized plug (one blade is wider than the other) and will require the use this manual. away while operating...
... the motor is damaged in , pull extension cord from openings and moving parts. Never pick up or holding the appliance. Avoid Unintentional Starting - Do not carry plugged in poor lighting. To reduce the risk of electric shock, this product has a polarized plug (one blade is wider than the other) and will require the use this manual. away while operating...

Operation Manual
Page 9
... its handle dry, clean, and free from oil and grease. Overreaching can be stored indoors in hard ground. Service or maintenance performed by poorly maintained cultivators. Keep the cultivator and its motor. Wear rubber boots when operating the cultivator. Do not use . Exercise extreme caution when crossing gravel surfaces. The tines continue to rotate once the lock-out...
... its handle dry, clean, and free from oil and grease. Overreaching can be stored indoors in hard ground. Service or maintenance performed by poorly maintained cultivators. Keep the cultivator and its motor. Wear rubber boots when operating the cultivator. Do not use . Exercise extreme caution when crossing gravel surfaces. The tines continue to rotate once the lock-out...

Operation Manual
Page 10
... of the appliance, a guard or other part that is damaged should be properly repaired or replaced by an authorized service facility. Before further use , before restarting and continuing to them frequently and use them these instructions. Keep handles dry, clean, and free from power source when not in this tool. Only operate the cultivator in accordance with the operating instructions provided in use of control and possible serious...
... of the appliance, a guard or other part that is damaged should be properly repaired or replaced by an authorized service facility. Before further use , before restarting and continuing to them frequently and use them these instructions. Keep handles dry, clean, and free from power source when not in this tool. Only operate the cultivator in accordance with the operating instructions provided in use of control and possible serious...
Operation Manual
Page 11
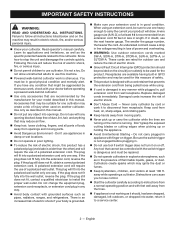
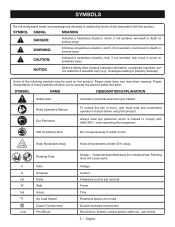
...speed, orbits etc., per second) Power Time Rotational speed, at least 50 ft. Voltage Current Frequency (cycles per minute 5 - WARNING: Indicates a hazardous situation, which is marked to explain the levels of risk associated with ANSI Z87.1 when operating this equipment. SYMBOL NAME DESIGNATION/EXPLANATION Safety Alert Indicates a potential personal injury hazard. Read Operator's Manual...to property damage). Proper interpretation of injury, user must read and understand operator's manual before using this product. SYMBOLS The following symbols may ...
...speed, orbits etc., per second) Power Time Rotational speed, at least 50 ft. Voltage Current Frequency (cycles per minute 5 - WARNING: Indicates a hazardous situation, which is marked to explain the levels of risk associated with ANSI Z87.1 when operating this equipment. SYMBOL NAME DESIGNATION/EXPLANATION Safety Alert Indicates a potential personal injury hazard. Read Operator's Manual...to property damage). Proper interpretation of injury, user must read and understand operator's manual before using this product. SYMBOLS The following symbols may ...
Operation Manual
Page 12
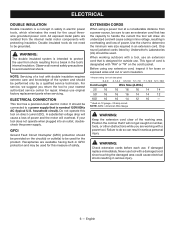
.... ELECTRICAL CONNECTION This tool has a precision-built electric motor. An undersized cord will draw. When working area. Never use original factory replacement parts when servicing. All exposed metal parts are available having built-in GFCI protection and may be sure to use . It should be grounded. GFCI Ground Fault Circuit Interrupter (GFCI) protection should be used for outside use. Use the chart to determine the minimum wire size...
.... ELECTRICAL CONNECTION This tool has a precision-built electric motor. An undersized cord will draw. When working area. Never use original factory replacement parts when servicing. All exposed metal parts are available having built-in GFCI protection and may be sure to use . It should be grounded. GFCI Ground Fault Circuit Interrupter (GFCI) protection should be used for outside use. Use the chart to determine the minimum wire size...
Operation Manual
Page 13
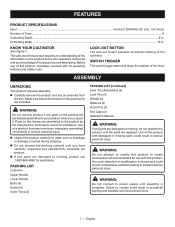
.... PACKING LIST Cultivator Upper Handle Lower Handle Bolts (4) Knobs (4) Outer Tines (2) PACKING LIST (continued) Inner Tine Assemblies (2) Lock Pins (4) Wheels (2) Washers (2) Hitch Pins (2) End Caps (2) Operator's Manual WARNING: If any parts on the packing list are replaced. SWITCH TRIGGER The switch trigger starts and stops the rotation of this product with all items listed in . Any such alteration or modification is complete. FEATURES PRODUCT SPECIFICATIONS Input...nominal 120V/60Hz AC only, 13.5 Amps Number of...
.... PACKING LIST Cultivator Upper Handle Lower Handle Bolts (4) Knobs (4) Outer Tines (2) PACKING LIST (continued) Inner Tine Assemblies (2) Lock Pins (4) Wheels (2) Washers (2) Hitch Pins (2) End Caps (2) Operator's Manual WARNING: If any parts on the packing list are replaced. SWITCH TRIGGER The switch trigger starts and stops the rotation of this product with all items listed in . Any such alteration or modification is complete. FEATURES PRODUCT SPECIFICATIONS Input...nominal 120V/60Hz AC only, 13.5 Amps Number of...
Operation Manual
Page 14
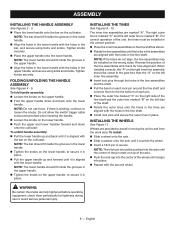
... the switch trigger cable to secure it in the bar, and secure using bolts and knobs. INSTALLING THE WHEELS See Figure 11. NOTE: The lower handle should fit inside the grooves in the upper handle. Align the holes in the lower handle with the holes in the tine shaft. Install lock pins and secure the outer tines in the upper handle, and secure using bolts and knobs. NOTE...
... the switch trigger cable to secure it in the bar, and secure using bolts and knobs. INSTALLING THE WHEELS See Figure 11. NOTE: The lower handle should fit inside the grooves in the upper handle. Align the holes in the lower handle with the holes in the tine shaft. Install lock pins and secure the outer tines in the upper handle, and secure using bolts and knobs. NOTE...
Operation Manual
Page 15
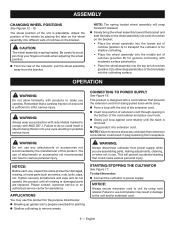
... top set of notches (position A) to the unit and/or extension cord. 9 - Tighten securely all missing or damaged parts are assembling parts, making adjustments, cleaning, or when not in plug loosening from power supply when you careless. Adjust the position of notches on the wheel assembly into the cultivating surface. NOTICE: Always secure extension cord to remove weeds STARTING/STOPPING THE CULTIVATOR See Figure 17. NOTE: The spring loaded wheel assembly...
... top set of notches (position A) to the unit and/or extension cord. 9 - Tighten securely all missing or damaged parts are assembling parts, making adjustments, cleaning, or when not in plug loosening from power supply when you careless. Adjust the position of notches on the wheel assembly into the cultivating surface. NOTICE: Always secure extension cord to remove weeds STARTING/STOPPING THE CULTIVATOR See Figure 17. NOTE: The spring loaded wheel assembly...
Operation Manual
Page 16
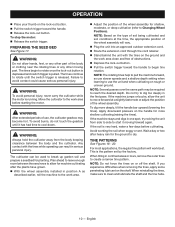
... depth setting when learning to use , the cultivator gearbox may be used to begin to rotate until it moving part. If the machine jumps or bucks, allow the unit to move forward at the time, the appropriate position of the wheel assembly will work area. Adjust the position of obstructions. Depress the lock-out button. Pull the switch trigger toward the handle...
... depth setting when learning to use , the cultivator gearbox may be used to begin to rotate until it moving part. If the machine jumps or bucks, allow the unit to move forward at the time, the appropriate position of the wheel assembly will work area. Adjust the position of obstructions. Depress the lock-out button. Pull the switch trigger toward the handle...
Operation Manual
Page 17
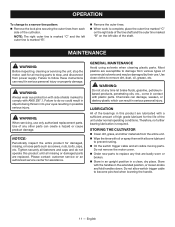
... time let brake fluids, gasoline, petroleumbased products, penetrating oils, etc., come in possible serious injury. Store with silicone lubricant to prevent rusting. Oil the switch trigger cable and all moving parts. MAINTENANCE WARNING: Before inspecting, cleaning or servicing the unit, stop , and disconnect from various types of the shaft. GENERAL MAINTENANCE Avoid using solvents when cleaning plastic parts. Do not remove the motor cover. Order new parts to follow these instructions...
... time let brake fluids, gasoline, petroleumbased products, penetrating oils, etc., come in possible serious injury. Store with silicone lubricant to prevent rusting. Oil the switch trigger cable and all moving parts. MAINTENANCE WARNING: Before inspecting, cleaning or servicing the unit, stop , and disconnect from various types of the shaft. GENERAL MAINTENANCE Avoid using solvents when cleaning plastic parts. Do not remove the motor cover. Order new parts to follow these instructions...

Operation Manual
Page 18
... business or commercial use). Motor runs but tines do not move. English Go to ensure your new tool on-line. Gear train failure. For warranty details, visit www.ryobitools.com or call the RYOBI Help Line! TROUBLESHOOTING IF THESE SOLUTIONS DO NOT SOLVE THE PROBLEM CONTACT YOUR AUTHORIZED SERVICE DEALER. For any questions about operating or maintaining your product, call (toll free) 1-800-860-4050...
... business or commercial use). Motor runs but tines do not move. English Go to ensure your new tool on-line. Gear train failure. For warranty details, visit www.ryobitools.com or call the RYOBI Help Line! TROUBLESHOOTING IF THESE SOLUTIONS DO NOT SOLVE THE PROBLEM CONTACT YOUR AUTHORIZED SERVICE DEALER. For any questions about operating or maintaining your product, call (toll free) 1-800-860-4050...
Operation Manual 1
Page 1
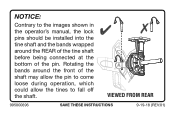
Rotating the bands around the front of the shaft may allow the pin to come loose during operation, which could allow the tines to the images shown in the operator's manual, the lock pins should be installed into the tine shaft and the bands wrapped around the REAR of the tine shaft before being connected at the bottom of the pin. NOTICE: Contrary to fall off the shaft. VIEWED FROM REAR 995000696 SAVE THESE INSTRUCTIONS 9-19-18 (REV:01)
Rotating the bands around the front of the shaft may allow the pin to come loose during operation, which could allow the tines to the images shown in the operator's manual, the lock pins should be installed into the tine shaft and the bands wrapped around the REAR of the tine shaft before being connected at the bottom of the pin. NOTICE: Contrary to fall off the shaft. VIEWED FROM REAR 995000696 SAVE THESE INSTRUCTIONS 9-19-18 (REV:01)
Parts Diagram
Page 3
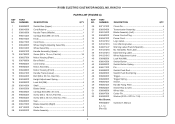
...19 (Rev:02) DESCRIPTION QTY Clevis Pin 4 Transmission Assembly 1 Blade Assembly (Left 1 Power Cord w/Plug 1 Power Cord 1 Logo Label 1 Icon Warning Label 1 Warning Label (French/Spanish 1 No Hands/No Feet Label 1 Data Warning Label 1 Wheel Adjustment Label 1 Lock Nut (M8 1 Switch Button 1 Switch Button Spring 1 Pin 1 Switch Push Rod 1 Switch Push Rod Spring 1 Trigger 1 Trigger Spring 1 Switch 1 Handle Fixing Plate 1 Switch Box (Lower 1 Wheel Hub 2 Cotter Pin 2 Washer (ID10 x OD18 x 1.5t 2 Operator's Manual 3 RYOBI ELECTRIC CULTIVATOR MODEL NO. RYAC701 KEY NO...
...19 (Rev:02) DESCRIPTION QTY Clevis Pin 4 Transmission Assembly 1 Blade Assembly (Left 1 Power Cord w/Plug 1 Power Cord 1 Logo Label 1 Icon Warning Label 1 Warning Label (French/Spanish 1 No Hands/No Feet Label 1 Data Warning Label 1 Wheel Adjustment Label 1 Lock Nut (M8 1 Switch Button 1 Switch Button Spring 1 Pin 1 Switch Push Rod 1 Switch Push Rod Spring 1 Trigger 1 Trigger Spring 1 Switch 1 Handle Fixing Plate 1 Switch Box (Lower 1 Wheel Hub 2 Cotter Pin 2 Washer (ID10 x OD18 x 1.5t 2 Operator's Manual 3 RYOBI ELECTRIC CULTIVATOR MODEL NO. RYAC701 KEY NO...
Parts Diagram
Page 4
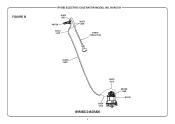
FIGURE B RYOBI ELECTRIC CULTIVATOR MODEL NO. RYAC701 BLACK LEAD SWITCH BLACK LEAD WHITE LEAD POWER CORD w/PLUG POWER CORD WHITE LEAD BLACK LEAD WIRING DIAGRAM 4 BROWN LEAD MOTOR
FIGURE B RYOBI ELECTRIC CULTIVATOR MODEL NO. RYAC701 BLACK LEAD SWITCH BLACK LEAD WHITE LEAD POWER CORD w/PLUG POWER CORD WHITE LEAD BLACK LEAD WIRING DIAGRAM 4 BROWN LEAD MOTOR


