
Operation Manual
Page 6
... extension cord only one way. If you are turning or the motor is not a toy. Don't grasp the exposed cutting blades or cutting edges when picking up or carry the cultivator while the tines are doing and use with finger on another cultivator. Be sure the switch trigger is not engaged before operating a powered walk-behind cultivator work , check with the switch trigger ...
... extension cord only one way. If you are turning or the motor is not a toy. Don't grasp the exposed cutting blades or cutting edges when picking up or carry the cultivator while the tines are doing and use with finger on another cultivator. Be sure the switch trigger is not engaged before operating a powered walk-behind cultivator work , check with the switch trigger ...

Operation Manual
Page 7
... become noisy, stop the motor and check immediately for misalignment or binding of moving parts, breakage of parts, and any moving parts of the machine or its handle dry, clean, and free from oil and grease. Following this rule will reduce the risk of loss of control and deterioration of balance. Store Idle Cultivators Indoors - When not in use, cultivator should strike...
... become noisy, stop the motor and check immediately for misalignment or binding of moving parts, breakage of parts, and any moving parts of the machine or its handle dry, clean, and free from oil and grease. Following this rule will reduce the risk of loss of control and deterioration of balance. Store Idle Cultivators Indoors - When not in use, cultivator should strike...

Operation Manual
Page 8
... the plug from power source when not in working order. Keep cutting edge sharp and clean for lubricating and changing accessories. Keep handles dry, clean, and free from oil and grease. Save these instructions also. 4 - Follow instructions for best performance and to reduce the risk of the appliance, a guard or other part that is damaged should be properly repaired or replaced by an authorized service facility...
... the plug from power source when not in working order. Keep cutting edge sharp and clean for lubricating and changing accessories. Keep handles dry, clean, and free from oil and grease. Save these instructions also. 4 - Follow instructions for best performance and to reduce the risk of the appliance, a guard or other part that is damaged should be properly repaired or replaced by an authorized service facility...
Operation Manual
Page 9
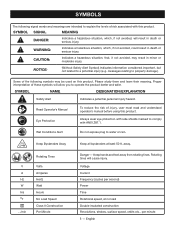
... second) Power Time Rotational speed, at least 50 ft. Rotating tines will allow you to comply with this product. away. English Proper interpretation of injury, user must read and understand operator's manual before using this product. Read Operator's Manual Eye Protection To reduce the risk of these symbols will cause injury. Wet Conditions Alert Do not expose plug to a potential...
... second) Power Time Rotational speed, at least 50 ft. Rotating tines will allow you to comply with this product. away. English Proper interpretation of injury, user must read and understand operator's manual before using this product. Read Operator's Manual Eye Protection To reduce the risk of these symbols will cause injury. Wet Conditions Alert Do not expose plug to a potential...
Operation Manual
Page 10
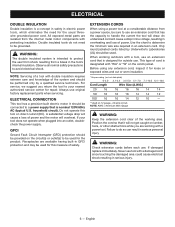
... normal safety precautions to handle the current the tool will not get caught on lumber, tools, or other obstructions while you return the tool to determine the minimum wire size required in an extension cord. ELECTRICAL CONNECTION This tool has a precision-built electric motor. household circuit). Before using a power tool at a considerable distance from a power source, be sure to use . If damaged replace immediately. ELECTRICAL DOUBLE INSULATION Double insulation...
... normal safety precautions to handle the current the tool will not get caught on lumber, tools, or other obstructions while you return the tool to determine the minimum wire size required in an extension cord. ELECTRICAL CONNECTION This tool has a precision-built electric motor. household circuit). Before using a power tool at a considerable distance from a power source, be sure to use . If damaged replace immediately. ELECTRICAL DOUBLE INSULATION Double insulation...
Operation Manual
Page 11
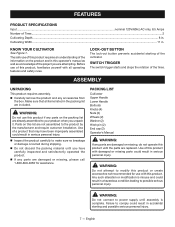
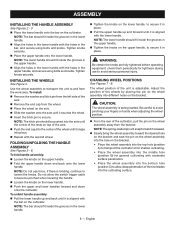
... use of this product requires an understanding of the information on this operator's manual as well as a knowledge of the project you are not assembled to modify this product or create accessories not recommended for assistance. PACKING LIST Cultivator Upper Handle Lower Handle Bolts (6) Knobs (4) Nuts (2) Wheels (2) Washer (2) Hitch pin (2) End cap (2) Operator's Manual WARNING: If any parts are replaced. LOCK-OUT BUTTON The lock-out button prevents accidental starting...
... use of this product requires an understanding of the information on this operator's manual as well as a knowledge of the project you are not assembled to modify this product or create accessories not recommended for assistance. PACKING LIST Cultivator Upper Handle Lower Handle Bolts (6) Knobs (4) Nuts (2) Wheels (2) Washer (2) Hitch pin (2) End cap (2) Operator's Manual WARNING: If any parts are replaced. LOCK-OUT BUTTON The lock-out button prevents accidental starting...
Operation Manual
Page 12
... using bolts and knobs. Adjust the position of the wheels by placing the pin on the wheel assembly into the center of the unit is spring loaded. English CAUTION: The wheel assembly is adjustable. Be careful to secure it in place. Pull the upper handle up and back until the center of the rests on top of the cultivator, pull the pin on the bracket. Use the wheel assembly...
... using bolts and knobs. Adjust the position of the wheels by placing the pin on the wheel assembly into the center of the unit is spring loaded. English CAUTION: The wheel assembly is adjustable. Be careful to secure it in place. Pull the upper handle up and back until the center of the rests on top of the cultivator, pull the pin on the bracket. Use the wheel assembly...
Operation Manual
Page 13
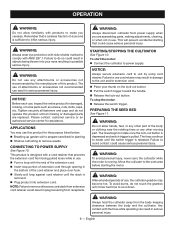
... a second is removed. Plug product into your thumb on the lock-out button. Pull the switch trigger toward the handle. Release the lock-out button. OPERATION WARNING: Do not allow hands, feet, or any other part of the body or clothing near the rotating tines or any attachments or accessories not recommended by using cord retainer. The use cord retainer may become...
... a second is removed. Plug product into your thumb on the lock-out button. Pull the switch trigger toward the handle. Release the lock-out button. OPERATION WARNING: Do not allow hands, feet, or any other part of the body or clothing near the rotating tines or any attachments or accessories not recommended by using cord retainer. The use cord retainer may become...
Operation Manual
Page 14
... pull the machine forward, so use slower speeds and a shallow depth setting when learning to use the unit and when cultivating on the handle for the ground to allow the unit to move forward at the time, the appropriate position of the wheel assembly will vary. Plug the unit into an approved outdoor extension cord. Route the extension cord through the cord...
... pull the machine forward, so use slower speeds and a shallow depth setting when learning to use the unit and when cultivating on the handle for the ground to allow the unit to move forward at the time, the appropriate position of the wheel assembly will vary. Plug the unit into an approved outdoor extension cord. Route the extension cord through the cord...
Operation Manual
Page 15
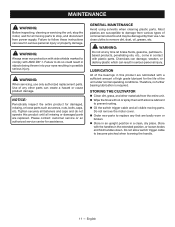
.... Do not allow switch trigger cable to follow these instructions can result in contact with ANSI Z87.1. GENERAL MAINTENANCE Avoid using solvents when cleaning plastic parts. STORING THE CULTIVATOR Clean dirt, grass, and other parts can create a hazard or cause product damage. Failure to become pinched when lowering the handle. 11 - Use of any time let brake fluids, gasoline, petroleumbased products, penetrating oils, etc., come...
.... Do not allow switch trigger cable to follow these instructions can result in contact with ANSI Z87.1. GENERAL MAINTENANCE Avoid using solvents when cleaning plastic parts. STORING THE CULTIVATOR Clean dirt, grass, and other parts can create a hazard or cause product damage. Failure to become pinched when lowering the handle. 11 - Use of any time let brake fluids, gasoline, petroleumbased products, penetrating oils, etc., come...

Operation Manual
Page 16
... new tool on-line. For warranty details, visit www.ryobitools.com or call the RYOBI Help Line! is loose. Gear train failure. Take unit to ensure your complete satisfaction. TROUBLESHOOTING IF THESE SOLUTIONS DO NOT SOLVE THE PROBLEM CONTACT YOUR AUTHORIZED SERVICE DEALER. connection is depressed. Household circuit breaker is not plugged in or Plug in the power cord. Go to start when switch trigger Power cord is tripped. PROBLEM...
... new tool on-line. For warranty details, visit www.ryobitools.com or call the RYOBI Help Line! is loose. Gear train failure. Take unit to ensure your complete satisfaction. TROUBLESHOOTING IF THESE SOLUTIONS DO NOT SOLVE THE PROBLEM CONTACT YOUR AUTHORIZED SERVICE DEALER. connection is depressed. Household circuit breaker is not plugged in or Plug in the power cord. Go to start when switch trigger Power cord is tripped. PROBLEM...
Operation Manual 1
Page 1
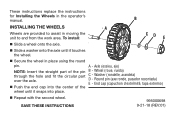
...) NOTE: Insert the straight part of the wheel until it snaps into place. Repeat with the second wheel. D - End cap (capuchon d'extrémité, tapa extremo) Push the end cap into the center of the pin B - SAVE THESE INSTRUCTIONS 995000698 9-21-18 (REV:01) These instructions replace the instructions for Installing the Wheels in the operator's manual. Washer (rondelle, arandela) over...
...) NOTE: Insert the straight part of the wheel until it snaps into place. Repeat with the second wheel. D - End cap (capuchon d'extrémité, tapa extremo) Push the end cap into the center of the pin B - SAVE THESE INSTRUCTIONS 995000698 9-21-18 (REV:01) These instructions replace the instructions for Installing the Wheels in the operator's manual. Washer (rondelle, arandela) over...
Parts Diagram
Page 3
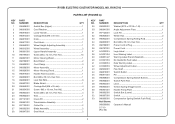
... QTY Washer (ID10 x OD18 x 1.5t 2 Angle Adjustment Plate 1 Lock Pin 1 Wheel Hub 2 Compression Spring (Pulling Rod 1 Bolt (M6 x 50 mm, Hex Hd 1 Power Cord w/Plug 1 Power Cord 1 Logo Label 1 Icon Warning Label 1 Warning Label (French/Spanish 1 No Hands/No Feet Label 1 Data Warning Label 1 Wheel Adjustment Label 1 Flex Shaft 1 Switch Button 1 Pin 1 Compression Spring (Switch Button 1 Switch Push Rod 1 Lever 1 Torsion Spring (Trigger Lever 1 Handle Fixing Plate 1 Switch Box (Lower 1 Switch 1 Compression Spring (Switch Push Rod 1 Operator's Manual 3
... QTY Washer (ID10 x OD18 x 1.5t 2 Angle Adjustment Plate 1 Lock Pin 1 Wheel Hub 2 Compression Spring (Pulling Rod 1 Bolt (M6 x 50 mm, Hex Hd 1 Power Cord w/Plug 1 Power Cord 1 Logo Label 1 Icon Warning Label 1 Warning Label (French/Spanish 1 No Hands/No Feet Label 1 Data Warning Label 1 Wheel Adjustment Label 1 Flex Shaft 1 Switch Button 1 Pin 1 Compression Spring (Switch Button 1 Switch Push Rod 1 Lever 1 Torsion Spring (Trigger Lever 1 Handle Fixing Plate 1 Switch Box (Lower 1 Switch 1 Compression Spring (Switch Push Rod 1 Operator's Manual 3
Parts Diagram
Page 4
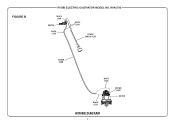
FIGURE B RYOBI ELECTRIC CULTIVATOR MODEL NO. RYAC700 BLACK LEAD SWITCH BLACK LEAD WHITE LEAD POWER CORD w/PLUG POWER CORD WHITE LEAD BLACK LEAD BROWN LEAD MOTOR WIRING DIAGRAM 4
FIGURE B RYOBI ELECTRIC CULTIVATOR MODEL NO. RYAC700 BLACK LEAD SWITCH BLACK LEAD WHITE LEAD POWER CORD w/PLUG POWER CORD WHITE LEAD BLACK LEAD BROWN LEAD MOTOR WIRING DIAGRAM 4


