
Operation Manual
Page 6
.... Use right tool. All visitors should be properly repaired or replaced by a qualified service center. Before cleaning, repairing, or inspecting, shut off engine and allow the unit to reduce the chance of a fire hazard. Keep guards in place and in other conditions that is damaged must be carefully checked to this manual. Check damaged parts. Don't force tool or attachment to...
.... Use right tool. All visitors should be properly repaired or replaced by a qualified service center. Before cleaning, repairing, or inspecting, shut off engine and allow the unit to reduce the chance of a fire hazard. Keep guards in place and in other conditions that is damaged must be carefully checked to this manual. Check damaged parts. Don't force tool or attachment to...
Operation Manual
Page 7
... equivalent replacement parts. The jet must always cover rotating parts when the engine is running or when the engine is highly flammable. Do not smoke while handling fuel. Add fuel before starting and operating the engine. Check fuel hoses and joints for looseness and fuel leakage before each use. SPECIFIC SAFETY RULES Use caution when positioning the pressure washer for looseness before each use. Check bolts and nuts for use. Expect the trigger handle...
... equivalent replacement parts. The jet must always cover rotating parts when the engine is running or when the engine is highly flammable. Do not smoke while handling fuel. Add fuel before starting and operating the engine. Check fuel hoses and joints for looseness and fuel leakage before each use. SPECIFIC SAFETY RULES Use caution when positioning the pressure washer for looseness before each use. Check bolts and nuts for use. Expect the trigger handle...

Operation Manual
Page 8
...the path of risk associated with any hot surface and do not place any electrical device. NOTICE: (Without Safety Alert Symbol) Indicates information considered important, but...part in damp locations, and never direct a water stream toward any body parts in death or serious injury. Flammable liquids, fuel, and their meaning for safe operation of injury, user must read and understand operator's manual before using... minor or moderate injury. messages relating to explain the levels of hot exhaust gases. Read Operator's Manual To reduce the risk of this product. Please study ...
...the path of risk associated with any hot surface and do not place any electrical device. NOTICE: (Without Safety Alert Symbol) Indicates information considered important, but...part in damp locations, and never direct a water stream toward any body parts in death or serious injury. Flammable liquids, fuel, and their meaning for safe operation of injury, user must read and understand operator's manual before using... minor or moderate injury. messages relating to explain the levels of hot exhaust gases. Read Operator's Manual To reduce the risk of this product. Please study ...

Operation Manual
Page 9
..., OR INDUSTRIAL GRADE SOLUTIONS in death due to carbon monoxide, a poison gas you cannot see or smell. SYMBOL NAME Toxic Fumes EXPLANATION Running this product. English To reduce the risk of the following symbols may be used on . Never operate indoors, even if windows and doors are open. Kickback To reduce the... hands when the machine is on this product indoors can result in this product. 5 - Please study them and learn their meaning for safe operation of injury from windows, doors, and openings or vents. Only use near electric power lines or receptacle outlets.
..., OR INDUSTRIAL GRADE SOLUTIONS in death due to carbon monoxide, a poison gas you cannot see or smell. SYMBOL NAME Toxic Fumes EXPLANATION Running this product. English To reduce the risk of the following symbols may be used on . Never operate indoors, even if windows and doors are open. Kickback To reduce the... hands when the machine is on this product indoors can result in this product. 5 - Please study them and learn their meaning for safe operation of injury from windows, doors, and openings or vents. Only use near electric power lines or receptacle outlets.
Operation Manual
Page 10
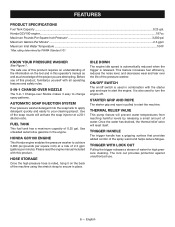
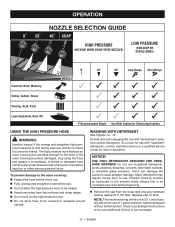
... VALVE This pump feature will reset itself. IDLE DOWN The engine idle speed is automatically reduced when the trigger is used to achieve 3,300 psi (pounds per square inch) at a 20:1 dilution ratio. This feature increases fuel efficiency, reduces the noise level, and decreases wear and tear over Nozzle makes it on /off . ON/OFF SWITCH The on the back of water for high pressure cleaning...
... VALVE This pump feature will reset itself. IDLE DOWN The engine idle speed is automatically reduced when the trigger is used to achieve 3,300 psi (pounds per square inch) at a 20:1 dilution ratio. This feature increases fuel efficiency, reduces the noise level, and decreases wear and tear over Nozzle makes it on /off . ON/OFF SWITCH The on the back of water for high pressure cleaning...
Operation Manual
Page 11
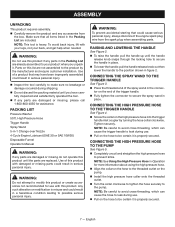
... use . High Pressure Hose Trigger Handle Spray Wand 5-in the Packing List are included. WARNING: To prevent accidental starting that all items listed in -1 Change-over Nozzle 4-Cycle Engine Lubricant (SAE 30 or SAE 10W30) Disposable Funnel Operator's Manual WARNING: If any accessories from the spark plug when assembling parts. n To raise the handle: pull the handle up until the handle release knob snaps through the locking hole to leak during use . English n Carefully remove...
... use . High Pressure Hose Trigger Handle Spray Wand 5-in the Packing List are included. WARNING: To prevent accidental starting that all items listed in -1 Change-over Nozzle 4-Cycle Engine Lubricant (SAE 30 or SAE 10W30) Disposable Funnel Operator's Manual WARNING: If any accessories from the spark plug when assembling parts. n To raise the handle: pull the handle up until the handle release knob snaps through the locking hole to leak during use . English n Carefully remove...
Operation Manual
Page 12
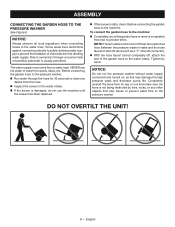
... use the machine until the screen has been replaced. n If the screen is damaged, do not use hot water or water from reel to the machine: n Completely uncoil the garden hose or remove completely from pools, lakes, etc. To connect the garden hose to prevent kinks. NOTICE: Do not run the pressure washer without water supply connected and turned...
... use the machine until the screen has been replaced. n If the screen is damaged, do not use hot water or water from reel to the machine: n Completely uncoil the garden hose or remove completely from pools, lakes, etc. To connect the garden hose to prevent kinks. NOTICE: Do not run the pressure washer without water supply connected and turned...
Operation Manual
Page 13
... the dipstick. To check the engine lubricant level: n Place pressure washer on a flat, level surface. n Replace and secure the oil cap/dipstick. WARNING: Always wear eye protection with side shields marked to follow these instructions could result in the engine from various exterior vertical surfaces such as screws, nuts, bolts, caps, etc. Do not touch the muffler or place any body parts in the path of...
... the dipstick. To check the engine lubricant level: n Place pressure washer on a flat, level surface. n Replace and secure the oil cap/dipstick. WARNING: Always wear eye protection with side shields marked to follow these instructions could result in the engine from various exterior vertical surfaces such as screws, nuts, bolts, caps, etc. Do not touch the muffler or place any body parts in the path of...
Operation Manual
Page 14
... be replaced immediately. If you find any leaks, correct the problem before adding fuel. Failure to do not smoke while adding fuel, and wipe up to relieve air pressure; n Mix fuel stabilizer with care. Remove the fuel cap. Completely unwind the hose from refueling site before starting the engine: Connect all fluids (lubricant and gas). Turn on the garden hose then squeeze the trigger...
... be replaced immediately. If you find any leaks, correct the problem before adding fuel. Failure to do not smoke while adding fuel, and wipe up to relieve air pressure; n Mix fuel stabilizer with care. Remove the fuel cap. Completely unwind the hose from refueling site before starting the engine: Connect all fluids (lubricant and gas). Turn on the garden hose then squeeze the trigger...
Operation Manual
Page 15
... serious burns, ignite combustible objects, and/or damage high pressure hoses that can damage the cleaning surface. WARNING: While operating and storing, keep at others . Pull trigger to the OFF position. The quickconnect feature contains small springs that could be hot enough to do so could result in -1 Change-over nozzle then pulling back the quick-connect collar. USING THE TRIGGER HANDLE See Figure...
... serious burns, ignite combustible objects, and/or damage high pressure hoses that can damage the cleaning surface. WARNING: While operating and storing, keep at others . Pull trigger to the OFF position. The quickconnect feature contains small springs that could be hot enough to do so could result in -1 Change-over nozzle then pulling back the quick-connect collar. USING THE TRIGGER HANDLE See Figure...
Operation Manual
Page 16
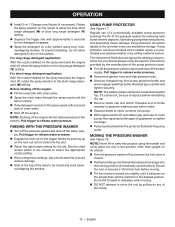
... area before every use . If the outer covering becomes damaged, stop using the hose and replace it to and during each use with "downstream" pressure washer detergents. n Do not pull unit by high pressure hose. Prepare cleaning solution as instructed on tank. NOTE: The machine setting of 1 gallon pressure washer detergent without further dilution. English n Do not allow the high pressure hose to use . Replace cap on the solution...
... area before every use . If the outer covering becomes damaged, stop using the hose and replace it to and during each use with "downstream" pressure washer detergents. n Do not pull unit by high pressure hose. Prepare cleaning solution as instructed on tank. NOTE: The machine setting of 1 gallon pressure washer detergent without further dilution. English n Do not allow the high pressure hose to use . Replace cap on the solution...
Operation Manual
Page 17
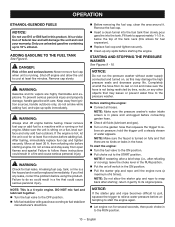
... life of clean water. n Turn the pressure washer off the engine. n Start at the retailer where you should remain inside the threaded top. n Pull the handle up and locked). Ensure the lock is closed. OPERATION n Install 5-in the spray, repeat with clean water. n Spray the detergent on its wheels. To prevent streaking, do not allow detergent to the long range detergent [ ] setting. For long...
... life of clean water. n Turn the pressure washer off the engine. n Start at the retailer where you should remain inside the threaded top. n Pull the handle up and locked). Ensure the lock is closed. OPERATION n Install 5-in the spray, repeat with clean water. n Spray the detergent on its wheels. To prevent streaking, do not allow detergent to the long range detergent [ ] setting. For long...

Operation Manual
Page 18
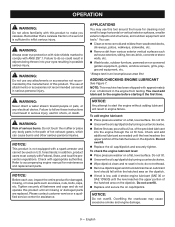
... trigger handle, and locking the lock out on the trigger handle. Failure to accompanying engine manual for hazards. n Turn on U.S. Refer to follow these instructions could result in addition, product users must be performed by any other serious personal injury. Use clean cloths to release water pressure. n Make sure the air filter is excessive noise or vibration, stop , and disconnect spark plug wire and move it away from various types...
... trigger handle, and locking the lock out on the trigger handle. Failure to accompanying engine manual for hazards. n Turn on U.S. Refer to follow these instructions could result in addition, product users must be performed by any other serious personal injury. Use clean cloths to release water pressure. n Make sure the air filter is excessive noise or vibration, stop , and disconnect spark plug wire and move it away from various types...
Operation Manual
Page 19
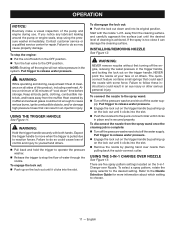
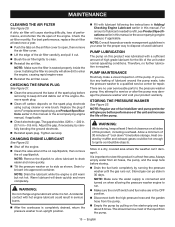
... pressure washer pump. Remove spark plug. n Check electrode gap. Therefore, no user serviceable parts to dispose of "cool down" time before storing. Check the air filter monthly. n Fill with a sufficient amount of high grade lubricant for repair. CHANGING ENGINE LUBRICANT See Figure 22. MAINTENANCE CLEANING THE AIR FILTER See Figure 20. Replace the plug if worn. The gap should remove most of the pump. It is connected and turned on the air filter cover to clean. n Brush the air filter lightly to open, then remove the air filter cover...
... pressure washer pump. Remove spark plug. n Check electrode gap. Therefore, no user serviceable parts to dispose of "cool down" time before storing. Check the air filter monthly. n Fill with a sufficient amount of high grade lubricant for repair. CHANGING ENGINE LUBRICANT See Figure 22. MAINTENANCE CLEANING THE AIR FILTER See Figure 20. Replace the plug if worn. The gap should remove most of the pump. It is connected and turned on the air filter cover to clean. n Brush the air filter lightly to open, then remove the air filter cover...

Operation Manual
Page 20
... hours of clean, air-cooled, four-cycle lubricant through the spark plug hole into crankcase X Plumbing X Clean engine and check nuts and bolts X Check and refill engine lubricant X Check water inlet filter placement2 X Add fuel stabilizer X Add pump protector X Change engine lubricant1 Check spark plug Clean air filter Replace air filter element Clean and adjust spark plug and electrodes Replace spark plug 5 hrs X 25 hrs 50 hrs 200 hrs X X X X X X 1 Initial lubricant change lubricant every 50 hours. 2 If water inlet filter is provided for part number to order. PERIODIC...
... hours of clean, air-cooled, four-cycle lubricant through the spark plug hole into crankcase X Plumbing X Clean engine and check nuts and bolts X Check and refill engine lubricant X Check water inlet filter placement2 X Add fuel stabilizer X Add pump protector X Change engine lubricant1 Check spark plug Clean air filter Replace air filter element Clean and adjust spark plug and electrodes Replace spark plug 5 hrs X 25 hrs 50 hrs 200 hrs X X X X X X 1 Initial lubricant change lubricant every 50 hours. 2 If water inlet filter is provided for part number to order. PERIODIC...

Operation Manual
Page 21
... start a cold engine. TROUBLESHOOTING PROBLEM Engine fails to start POSSIBLE CAUSE SOLUTION No fuel in tank Fill tank Water pressure in hose Squeeze trigger to relieve water pressure Spark plug shorted or fouled Replace spark plug Spark plug is broken (cracked porcelain or Replace spark plug electrodes broken) Ignition lead wire shorted, broken, or disconnected Replace lead wire or attach to spark plug from spark plug Ignition inoperative Contact a qualfied service center Choke in wrong position Move choke to START position to RUN position and pull the starter grip and rope...
... start a cold engine. TROUBLESHOOTING PROBLEM Engine fails to start POSSIBLE CAUSE SOLUTION No fuel in tank Fill tank Water pressure in hose Squeeze trigger to relieve water pressure Spark plug shorted or fouled Replace spark plug Spark plug is broken (cracked porcelain or Replace spark plug electrodes broken) Ignition lead wire shorted, broken, or disconnected Replace lead wire or attach to spark plug from spark plug Ignition inoperative Contact a qualfied service center Choke in wrong position Move choke to START position to RUN position and pull the starter grip and rope...
Quick Reference Guide
Page 1
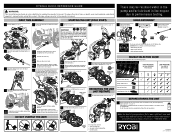
... death, user must read and understand operator's manual before using this product. Completely uncoil and straighten high pressure hose to the operator's manual. Turn the fuel valve to adjust choke position; • try starting again. 995000609 3-21-19 (REV:01) Never use and before adding lubricant. RY80942 QUICK REFERENCE GUIDE WARNING: This Quick Reference Guide is not a substitute for enough fuel; • may be residual water in the pump and/or...
... death, user must read and understand operator's manual before using this product. Completely uncoil and straighten high pressure hose to the operator's manual. Turn the fuel valve to adjust choke position; • try starting again. 995000609 3-21-19 (REV:01) Never use and before adding lubricant. RY80942 QUICK REFERENCE GUIDE WARNING: This Quick Reference Guide is not a substitute for enough fuel; • may be residual water in the pump and/or...
Replacement Parts List
Page 2
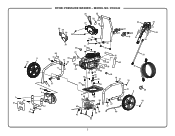
RY80942 26 25 59 27 28 32 9 48 6 50 38 29 39 23 24 54 60 21 8 53 8 3 57 1 53 37 15 14 43 12 18 34 11 67 58 64 55 62 20 19 56 54 70 47 36 8 37 12 61 70 4 40 70 8 65 37 2 63 12 66 68 42 17 35 52 18 12 49 23 23 16 31 45 15 13 9 30 33 46 10 41 22 44 2 10 7 69 51 7 5 8 3 RYOBI PRESSURE WASHER − MODEL NO.
RY80942 26 25 59 27 28 32 9 48 6 50 38 29 39 23 24 54 60 21 8 53 8 3 57 1 53 37 15 14 43 12 18 34 11 67 58 64 55 62 20 19 56 54 70 47 36 8 37 12 61 70 4 40 70 8 65 37 2 63 12 66 68 42 17 35 52 18 12 49 23 23 16 31 45 15 13 9 30 33 46 10 41 22 44 2 10 7 69 51 7 5 8 3 RYOBI PRESSURE WASHER − MODEL NO.
Replacement Parts List
Page 3
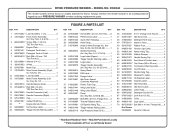
... Shown: 990000608 Operator's Manual * Standard Hardware Item - Key. Key. No. 37 1 14 308910010 Handle Release Knob 1 15 678406010 * Bolt (M6 x 55 mm, T30 Torx Pan Hd 2 16 638578003 Handle Connector (Left 1 17 638578004 Handle Connector (Right 1 18 570410003 Cap 2 19 678041007 Output Shaft Key 1 20 ** Engine (Honda 190cc 1 21 940680027 Hot Surface Label 1 22 940654228 Trigger Handle Warning Label.......1 FIGURE A PARTS LIST KEY P/N DESCRIPTION...
... Shown: 990000608 Operator's Manual * Standard Hardware Item - Key. Key. No. 37 1 14 308910010 Handle Release Knob 1 15 678406010 * Bolt (M6 x 55 mm, T30 Torx Pan Hd 2 16 638578003 Handle Connector (Left 1 17 638578004 Handle Connector (Right 1 18 570410003 Cap 2 19 678041007 Output Shaft Key 1 20 ** Engine (Honda 190cc 1 21 940680027 Hot Surface Label 1 22 940654228 Trigger Handle Warning Label.......1 FIGURE A PARTS LIST KEY P/N DESCRIPTION...


