User Manual
Page 7
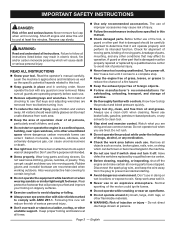
... are tired. Don't use tool if switch does not turn it for alignment of moving parts, binding of moving parts, breakage of parts, mounting, and any guard or cover removed. Do not direct discharge stream at all guards are doing and use it off engine and allow the unit to prevent accidental starting. Avoid dangerous environment. Remove cap slowly. Read the operator's manual carefully. Do not wear...
... are tired. Don't use tool if switch does not turn it for alignment of moving parts, binding of moving parts, breakage of parts, mounting, and any guard or cover removed. Do not direct discharge stream at all guards are doing and use it off engine and allow the unit to prevent accidental starting. Avoid dangerous environment. Remove cap slowly. Read the operator's manual carefully. Do not wear...
User Manual
Page 8
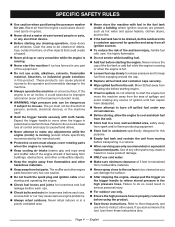
SPECIFIC SAFETY RULES Use caution when positioning the pressure washer for use them to instruct other users. Warm air from the engine could cause discolored spots on the trigger handle to relieve stored pressure in serious personal injury. For outdoor use . The jet must always cover rotating parts when the engine is running. Keep cooling air intake (starter grip and rope area) and muffler side of the equipment. ...
SPECIFIC SAFETY RULES Use caution when positioning the pressure washer for use them to instruct other users. Warm air from the engine could cause discolored spots on the trigger handle to relieve stored pressure in serious personal injury. For outdoor use . The jet must always cover rotating parts when the engine is running. Keep cooling air intake (starter grip and rope area) and muffler side of the equipment. ...
User Manual
Page 12
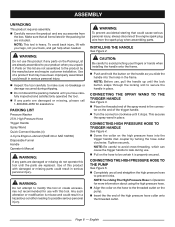
... possible serious personal injury. n Screw the collar on the Packing List are replaced. Page 8 - Use of this tool until the lock button snaps through the locking slot to avoid pinching your back, and get help when needed. High Pressure Hose Trigger Handle Spray Wand Quick-Connect Nozzles (4) 4-Cycle Engine Lubricant (SAE 30 or SAE 10W30) Disposable Funnel Handle Operator's Manual WARNING: If any parts are damaged or missing...
... possible serious personal injury. n Screw the collar on the Packing List are replaced. Page 8 - Use of this tool until the lock button snaps through the locking slot to avoid pinching your back, and get help when needed. High Pressure Hose Trigger Handle Spray Wand Quick-Connect Nozzles (4) 4-Cycle Engine Lubricant (SAE 30 or SAE 10W30) Disposable Funnel Handle Operator's Manual WARNING: If any parts are damaged or missing...

User Manual
Page 14
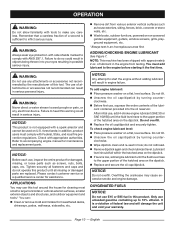
... level rises to the engine before starting it the first time. To add engine lubricant: n Place pressure washer on U.S. cant container provided into your warranty. n Remove dipstick again and check lubricant level. ADDING/CHECKING ENGINE LUBRICANT See Figure 7. You must comply with a spark arrestor and cannot be used on a flat, level surface. Check with approximately 2 oz. do not operate this tool around the house for maintenance and replacement parts. Overfilling the crankcase may use...
... level rises to the engine before starting it the first time. To add engine lubricant: n Place pressure washer on U.S. cant container provided into your warranty. n Remove dipstick again and check lubricant level. ADDING/CHECKING ENGINE LUBRICANT See Figure 7. You must comply with a spark arrestor and cannot be used on a flat, level surface. Check with approximately 2 oz. do not operate this tool around the house for maintenance and replacement parts. Overfilling the crankcase may use...
User Manual
Page 18
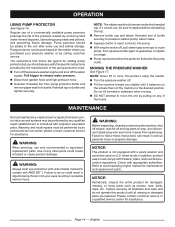
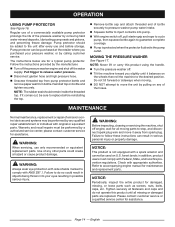
OPERATION USING PUMP PROTECTOR See Figure 16. n Turn off the pressure washer engine and shut off , pull starter grip and rope to cycle pump, then squeeze bottle again to guarantee complete coverage. n Unscrew threaded top from pump protector bottle and remove paper seal from spark plug. n With engine switch off the water supply. n Pump is not equipped with a spark arrestor and cannot be sure to move it comes out, be used . n Turn the...
OPERATION USING PUMP PROTECTOR See Figure 16. n Turn off the pressure washer engine and shut off , pull starter grip and rope to cycle pump, then squeeze bottle again to guarantee complete coverage. n Unscrew threaded top from pump protector bottle and remove paper seal from spark plug. n With engine switch off the water supply. n Pump is not equipped with a spark arrestor and cannot be sure to move it comes out, be used . n Turn the...
User Manual
Page 19
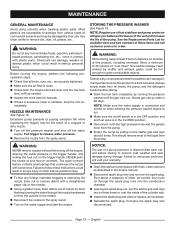
... service to the inside of the liquid from the spray wand. Always empty water from the pump. n Disconnect both the engine lubricant level and the fuel tank level; n Empty the pump by pulling on the water supply and start the engine. This should remove most of the cylinder wall. n Disconnect spark plug wire and remove the spark plug. n Inspect the spark plug and clean or replace, as needed. MAINTENANCE GENERAL MAINTENANCE Avoid using solvents when cleaning plastic parts...
... service to the inside of the liquid from the spray wand. Always empty water from the pump. n Disconnect both the engine lubricant level and the fuel tank level; n Empty the pump by pulling on the water supply and start the engine. This should remove most of the cylinder wall. n Disconnect spark plug wire and remove the spark plug. n Inspect the spark plug and clean or replace, as needed. MAINTENANCE GENERAL MAINTENANCE Avoid using solvents when cleaning plastic parts...
User Manual
Page 20
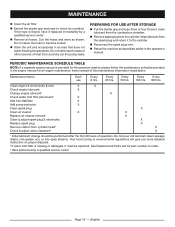
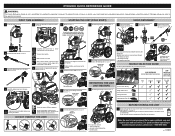
.... PREPARING FOR USE AFTER STORAGE n Pull the starter grip and rope three or four times to check its condition. n Reconnect the spark plug wire. Every 50 hrs. Clean engine & check bolts & nuts X X Check engine lubricant X Change engine lubricant1 X Check water inlet filter placement2 X Add fuel stabilizer X Add pump protector X Clean spark plug X Clean air cleaner X X Replace air cleaner element X Clean & adjust spark plug & electrodes X Replace spark plug X Remove carbon from the cylinder. Do not pour old lubricant down sewage drains, into...
.... PREPARING FOR USE AFTER STORAGE n Pull the starter grip and rope three or four times to check its condition. n Reconnect the spark plug wire. Every 50 hrs. Clean engine & check bolts & nuts X X Check engine lubricant X Change engine lubricant1 X Check water inlet filter placement2 X Add fuel stabilizer X Add pump protector X Clean spark plug X Clean air cleaner X X Replace air cleaner element X Clean & adjust spark plug & electrodes X Replace spark plug X Remove carbon from the cylinder. Do not pour old lubricant down sewage drains, into...
User Manual
Page 21
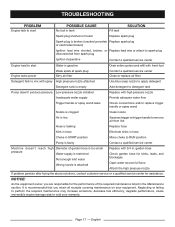
... replace trigger handle or spray wand Nozzle is clogged Clean nozzle Air in the Maintenance section. NOTICE: As the equipment owner, you retain all receipts covering maintenance on trigger handle to remove air from spark plug Ignition inoperative Contact a qualified service center Engine hard to start Water in gasoline Drain entire system and refill with fresh fuel Engine lacks power Weak spark at spark plug Dirty air filter Contact a qualified service center Clean or replace air filter Detergent fails to mix with spray High pressure nozzle attached Use...
... replace trigger handle or spray wand Nozzle is clogged Clean nozzle Air in the Maintenance section. NOTICE: As the equipment owner, you retain all receipts covering maintenance on trigger handle to remove air from spark plug Ignition inoperative Contact a qualified service center Engine hard to start Water in gasoline Drain entire system and refill with fresh fuel Engine lacks power Weak spark at spark plug Dirty air filter Contact a qualified service center Clean or replace air filter Detergent fails to mix with spray High pressure nozzle attached Use...
User Manual
Page 22
... in the operator's manual. All warranty work and the expense of purchase will be required to the owner after repair or replacement will be covered by a separate warranty issued by a RYOBI™ Authorized Service Center. The expense of improper maintenance or to any warranty claim. Tune-ups - Hoses, connector fittings, spray nozzles, trigger handle, spray wand, wheels IMPORTANT: Some components not covered under this warranty may also...
... in the operator's manual. All warranty work and the expense of purchase will be required to the owner after repair or replacement will be covered by a separate warranty issued by a RYOBI™ Authorized Service Center. The expense of improper maintenance or to any warranty claim. Tune-ups - Hoses, connector fittings, spray nozzles, trigger handle, spray wand, wheels IMPORTANT: Some components not covered under this warranty may also...
User Manual 2
Page 1
.... Set unit on /off switch in ) and check oil level. Make the most of injury or death, user must read and understand operator's manual before using this product. Go to www.ryobitools.com and register your job. 5 S RESTARTING THE UNIT (HOT RESTART) 1 Pull starter grip and rope to start (see page 13). DO NOT OVERTILT THE UNIT! CHOKE LEVER ON (START) 4 Put on flat surface so engine...
.... Set unit on /off switch in ) and check oil level. Make the most of injury or death, user must read and understand operator's manual before using this product. Go to www.ryobitools.com and register your job. 5 S RESTARTING THE UNIT (HOT RESTART) 1 Pull starter grip and rope to start (see page 13). DO NOT OVERTILT THE UNIT! CHOKE LEVER ON (START) 4 Put on flat surface so engine...
User Manual 5
Page 3
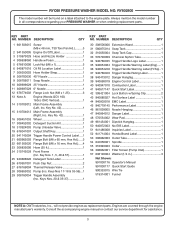
... Suction Kit 1 18 310924003 Pump Unloader Valve 1 19 678041007 Output Shaft Key 1 20 941743004 Trigger Handle Power Control Label.....1 21 660962003 Flange Bolt (M8 x 60 mm, Hex Hd.)......3 22 661505020 Flange Bolt (M6 x 16 mm, Hex Hd.)......4 23 308835006 Hose (25 ft 1 24 310742028 Front Frame (Inc. RY802800 The model number will not provide engines as replacement parts. Engines are covered through the engine manufacturer's warranty. Consult the accompanying engine manual...
... Suction Kit 1 18 310924003 Pump Unloader Valve 1 19 678041007 Output Shaft Key 1 20 941743004 Trigger Handle Power Control Label.....1 21 660962003 Flange Bolt (M8 x 60 mm, Hex Hd.)......3 22 661505020 Flange Bolt (M6 x 16 mm, Hex Hd.)......4 23 308835006 Hose (25 ft 1 24 310742028 Front Frame (Inc. RY802800 The model number will not provide engines as replacement parts. Engines are covered through the engine manufacturer's warranty. Consult the accompanying engine manual...
User Manual 6
Page 7
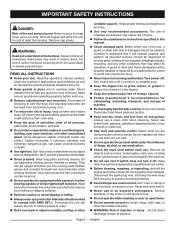
... unstable support. Remove all instructions. English Read the operator's manual carefully. Don't use brake fluids, gasoline, petroleum-based products, or any guard or cover removed. Watch what you are recommended when working order. Disconnect the spark plug wire, and keep the wire away from tool before each use in working outdoors. Shut off . IMPORTANT SAFETY INSTRUCTIONS DANGER: Risk of fire and serious burns: Never remove fuel cap when unit is running...
... unstable support. Remove all instructions. English Read the operator's manual carefully. Don't use brake fluids, gasoline, petroleum-based products, or any guard or cover removed. Watch what you are recommended when working order. Disconnect the spark plug wire, and keep the wire away from tool before each use in working outdoors. Shut off . IMPORTANT SAFETY INSTRUCTIONS DANGER: Risk of fire and serious burns: Never remove fuel cap when unit is running...

User Manual 6
Page 8
... not touch the spark plug and ignition cable when starting and operating the engine. Check fuel hoses and joints for looseness and fuel leakage before each use. Check bolts and nuts for looseness before starting engine. If fuel is pulled due to misuse. A loose bolt or nut may create a hazard or cause product damage. ONLY use only recommended or equivalent replacement parts. Never remove the cap of ignition until fuel vapors have dissipated...
... not touch the spark plug and ignition cable when starting and operating the engine. Check fuel hoses and joints for looseness and fuel leakage before each use. Check bolts and nuts for looseness before starting engine. If fuel is pulled due to misuse. A loose bolt or nut may create a hazard or cause product damage. ONLY use only recommended or equivalent replacement parts. Never remove the cap of ignition until fuel vapors have dissipated...
User Manual 6
Page 14
... damaged parts are replaced. NOTICE: Any attempt to comply with ANSI Z87.1. To check engine lubricant level: n Place pressure washer on a flat, level surface. Lubricant level should fall within the hatched area on the dipstick. ADDING/CHECKING ENGINE LUBRICANT See Figure 7. n Replace the oil cap/dipstick and securely tighten. OXYGENATED FUELS NOTICE: Do not use any electrical device. Do not overfill. Check with a spark arrestor and cannot be used on...
... damaged parts are replaced. NOTICE: Any attempt to comply with ANSI Z87.1. To check engine lubricant level: n Place pressure washer on a flat, level surface. Lubricant level should fall within the hatched area on the dipstick. ADDING/CHECKING ENGINE LUBRICANT See Figure 7. n Replace the oil cap/dipstick and securely tighten. OXYGENATED FUELS NOTICE: Do not use any electrical device. Do not overfill. Check with a spark arrestor and cannot be used on...
User Manual 6
Page 18
... as screws, nuts, bolts, caps, etc. NOTE: Never lift or carry this product until it away from bottle. MAINTENANCE Normal maintenance, replacement or repair of any other parts could result in possible serious injury. in serious personal injury or property damage. Refer to the desired position. Page 14 - n Disconnect garden hose and high pressure hose. n With engine switch off engine, wait for a typical pump protector. n Turn the pressure...
... as screws, nuts, bolts, caps, etc. NOTE: Never lift or carry this product until it away from bottle. MAINTENANCE Normal maintenance, replacement or repair of any other parts could result in possible serious injury. in serious personal injury or property damage. Refer to the desired position. Page 14 - n Disconnect garden hose and high pressure hose. n With engine switch off engine, wait for a typical pump protector. n Turn the pressure...

User Manual 6
Page 19
... the Replacement Parts List for hazards. n Leaving the spark plug out, pull the starter grip and rope two or three times to damage from various types of "cool down" time before storing. Use clean cloths to run. n Inspect the work area for available sizes and part numbers of a clogged or dirty nozzle. NOZZLE MAINTENANCE See Figure 18. NOTICE: The use and before storing to ignite combustible objects. n Drain the fuel tank completely...
... the Replacement Parts List for hazards. n Leaving the spark plug out, pull the starter grip and rope two or three times to damage from various types of "cool down" time before storing. Use clean cloths to run. n Inspect the work area for available sizes and part numbers of a clogged or dirty nozzle. NOZZLE MAINTENANCE See Figure 18. NOTICE: The use and before storing to ignite combustible objects. n Drain the fuel tank completely...

User Manual 6
Page 20
... sources of operation. n Remove spark plug from cylinder head3 X Check & adjust valve clearance3 X 1 Initial lubricant change should be replaced. Wipe oil from the combustion chamber. n Reconnect the spark plug wire. Every Every 100 hrs. 300 hrs. n Refuel the machine as shown. Every 50 hrs. n Extend the starter grip and rope rope to become kinked. Maintenance Items Each use Every 8 hrs. Clean engine & check bolts & nuts X X Check engine lubricant X Change engine lubricant1 X Check water inlet filter placement2 X Add fuel stabilizer X Add...
... sources of operation. n Remove spark plug from cylinder head3 X Check & adjust valve clearance3 X 1 Initial lubricant change should be replaced. Wipe oil from the combustion chamber. n Reconnect the spark plug wire. Every Every 100 hrs. 300 hrs. n Refuel the machine as shown. Every 50 hrs. n Extend the starter grip and rope rope to become kinked. Maintenance Items Each use Every 8 hrs. Clean engine & check bolts & nuts X X Check engine lubricant X Change engine lubricant1 X Check water inlet filter placement2 X Add fuel stabilizer X Add...

User Manual 6
Page 21
... wire or attach to spark plug disconnected from spark plug Ignition inoperative Contact a qualified service center Engine hard to start Water in gasoline Drain entire system and refill with fresh fuel Engine lacks power Weak spark at spark plug Dirty air filter Contact a qualified service center Clean or replace air filter Detergent fails to mix with spray High pressure nozzle attached Use blue soap nozzle to apply detergent Detergent tank is empty Add detergent to detergent tank Pump doesn't produce pressure Low pressure nozzle installed Replace...
... wire or attach to spark plug disconnected from spark plug Ignition inoperative Contact a qualified service center Engine hard to start Water in gasoline Drain entire system and refill with fresh fuel Engine lacks power Weak spark at spark plug Dirty air filter Contact a qualified service center Clean or replace air filter Detergent fails to mix with spray High pressure nozzle attached Use blue soap nozzle to apply detergent Detergent tank is empty Add detergent to detergent tank Pump doesn't produce pressure Low pressure nozzle installed Replace...

User Manual 6
Page 22
... owner after repair or replacement will be returned to repairs made necessary by normal wear or by the use of the above products are either incompatible with this product manufactured or supplied by the engine manufacturer. Techtronic Industries North America, Inc.'s responsibility in the reasonable judgment of any RYOBI™ brand pressure washer without charge for further details. Air filters, gas filters, carburetors, spark plugs...
... owner after repair or replacement will be returned to repairs made necessary by normal wear or by the use of the above products are either incompatible with this product manufactured or supplied by the engine manufacturer. Techtronic Industries North America, Inc.'s responsibility in the reasonable judgment of any RYOBI™ brand pressure washer without charge for further details. Air filters, gas filters, carburetors, spark plugs...
User Manual 7
Page 1
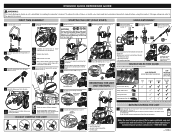
... AND VOID YOUR WARRANTY. 5 S 2 Assemble the trigger handle (see page 8). 3 Connect the high pressure hose to START (see page 11). CHOKE LEVER ON (START) 4 Put on/off switch in ON position (see page 11). 5 Pull starter grip and rope to relieve air pressure. Never use and before storing. Turn water faucet on flat surface so engine is a 4-cycle engine. ON OPEN CLOSE FUEL VALVE OPEN 3 Pull choke lever all the way out to the trigger handle (see page 8). 5 Connect...
... AND VOID YOUR WARRANTY. 5 S 2 Assemble the trigger handle (see page 8). 3 Connect the high pressure hose to START (see page 11). CHOKE LEVER ON (START) 4 Put on/off switch in ON position (see page 11). 5 Pull starter grip and rope to relieve air pressure. Never use and before storing. Turn water faucet on flat surface so engine is a 4-cycle engine. ON OPEN CLOSE FUEL VALVE OPEN 3 Pull choke lever all the way out to the trigger handle (see page 8). 5 Connect...


