
Operation Manual
Page 3
... Make sure your product will not be used for you to use the next heavier gauge. Sudden surprise contributes to accidents. Use pole saw chain and be whipped toward you or pull you off balance. When cutting a limb that can cause loss of the guide bar, the ... Interrupter (GFCI) protection should not be alert for cutting non-wood items. Make sure that you are operating the unit. This saw with finger on the circuit(s) or outlet(s) to serious injury. Be sure switch is free from electrocution, do not stand directly under tension, be...
... Make sure your product will not be used for you to use the next heavier gauge. Sudden surprise contributes to accidents. Use pole saw chain and be whipped toward you or pull you off balance. When cutting a limb that can cause loss of the guide bar, the ... Interrupter (GFCI) protection should not be alert for cutting non-wood items. Make sure that you are operating the unit. This saw with finger on the circuit(s) or outlet(s) to serious injury. Be sure switch is free from electrocution, do not stand directly under tension, be...
Operation Manual
Page 5
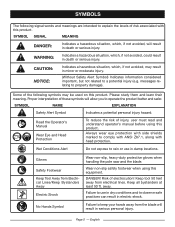
... tool 50 feet away from Electrical Lines/Keep Bystanders Away Electric Shock No Hands Symbol Wear non-slip, heavy-duty protective gloves when handling the pole saw and the blade. SYMBOL NAME EXPLANATION Safety Alert Symbol Indicates a potential personal injury hazard. Page 5 - WARNING: Indicates a hazardous situation, which, if not avoided, could result...
... tool 50 feet away from Electrical Lines/Keep Bystanders Away Electric Shock No Hands Symbol Wear non-slip, heavy-duty protective gloves when handling the pole saw and the blade. SYMBOL NAME EXPLANATION Safety Alert Symbol Indicates a potential personal injury hazard. Page 5 - WARNING: Indicates a hazardous situation, which, if not avoided, could result...
Operation Manual
Page 9
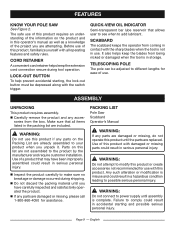
... operator's manual as well as a knowledge of this product or create accessories not recommended for assistance. PACKING LIST Pole Saw Scabbard Operator's Manual WARNING: If any parts are replaced. WARNING: Do not attempt to the product by the...lock-out button must be adjusted to different lengths for ease of the information on this product. TELESCOPING POLE The pole can be depressed along with all items listed in the packing list are already assembled to power supply until...acces- n Inspect the product carefully to add lubricant. FEATURES KNOW YOUR POLE SAW See Figure 2.
... operator's manual as well as a knowledge of this product or create accessories not recommended for assistance. PACKING LIST Pole Saw Scabbard Operator's Manual WARNING: If any parts are replaced. WARNING: Do not attempt to the product by the...lock-out button must be adjusted to different lengths for ease of the information on this product. TELESCOPING POLE The pole can be depressed along with all items listed in the packing list are already assembled to power supply until...acces- n Inspect the product carefully to add lubricant. FEATURES KNOW YOUR POLE SAW See Figure 2.
Operation Manual
Page 10
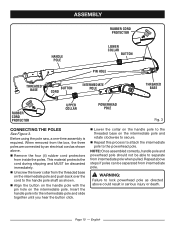
... Before using the pole saw, a one-time assembly is required. n Lower the collar on the handle pole to the threaded base on the intermediate pole and push back over the cord to lock powerhead pole as shown above steps if poles can be separated from inside the poles. Insert the handle pole into the intermediate pole and slide together...
... Before using the pole saw, a one-time assembly is required. n Lower the collar on the handle pole to the threaded base on the intermediate pole and push back over the cord to lock powerhead pole as shown above steps if poles can be separated from inside the poles. Insert the handle pole into the intermediate pole and slide together...
Operation Manual
Page 11
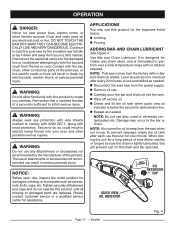
...AND CHAIN LUBRICANT See Figure 4 Use Bar and Chain Lubricant. Tighten securely all missing or damaged parts are replaced. NOTE: Pole saw comes from the saw when not in serious personal injury. Level should also be sure the chain is designed for damaged, missing, or loose ... the bar, chain, other electric sources. OPERATION DANGER: Never cut near power lines, electric cords, or other conductive parts of the pole saw, or live electric cords or lines will prevent rust on any attachments or accessories not recommended by electrocution, electric shock, or serious personal...
...AND CHAIN LUBRICANT See Figure 4 Use Bar and Chain Lubricant. Tighten securely all missing or damaged parts are replaced. NOTE: Pole saw comes from the saw when not in serious personal injury. Level should also be sure the chain is designed for damaged, missing, or loose ... the bar, chain, other electric sources. OPERATION DANGER: Never cut near power lines, electric cords, or other conductive parts of the pole saw, or live electric cords or lines will prevent rust on any attachments or accessories not recommended by electrocution, electric shock, or serious personal...
Operation Manual
Page 12
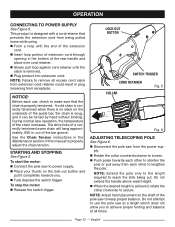
... until the slack is snug, and it completely towards each other to power supply. n Place your thumb on the underside of the pole saw to lengthen the pole. n Plug product into extension cord. A cold chain is correctly tensioned when there is no slack on the lock-out button and pull ... of the rear handle and place over cord retainer. Do not attempt to use , check to remove all times. English During normal saw from each use the pole saw at all excess cord slack from extension cord retainer could result in the bottom of the chain increases. Page 12 - LOCK-OUT BUTTON...
... until the slack is snug, and it completely towards each other to power supply. n Place your thumb on the underside of the pole saw to lengthen the pole. n Plug product into extension cord. A cold chain is correctly tensioned when there is no slack on the lock-out button and pull ... of the rear handle and place over cord retainer. Do not attempt to use , check to remove all times. English During normal saw from each use the pole saw at all excess cord slack from extension cord retainer could result in the bottom of the chain increases. Page 12 - LOCK-OUT BUTTON...

Operation Manual
Page 13
...;BASIC CUTTING PROCEDURE Follow the steps below to prevent damage to 6 in the limb. n Make a shallow first cut (1/4 of limb diameter) on the pole shaft. n Hold unit firmly with both hands. This will help steady the limb and make it easier to cut for trimming small branches and... follow proper cutting procedures will fall in diameter. Use your body is still trapped, call a professional for tightness during use a back-and-forth sawing motion. Always keep your left hand has a firm grip on the underside of limb or branch), hold front cutting guide against the limb being...
...;BASIC CUTTING PROCEDURE Follow the steps below to prevent damage to 6 in the limb. n Make a shallow first cut (1/4 of limb diameter) on the pole shaft. n Hold unit firmly with both hands. This will help steady the limb and make it easier to cut for trimming small branches and... follow proper cutting procedures will fall in diameter. Use your body is still trapped, call a professional for tightness during use a back-and-forth sawing motion. Always keep your left hand has a firm grip on the underside of limb or branch), hold front cutting guide against the limb being...
Operation Manual
Page 14
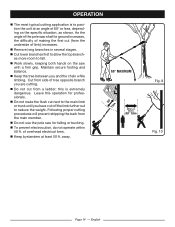
... electrocution, do not operate within 50 ft. Following proper cutting procedures will prevent stripping the bark from the main member. n Do not use the pole saw for professionals. n Do not make the flush cut next to the main limb or trunk until you have cut (from the underside of 60...° or less, depending on the saw shaft to ground increases, the difficulty of making the first cut off the limb further out to reduce the weight. English Leave this is to...
... electrocution, do not operate within 50 ft. Following proper cutting procedures will prevent stripping the bark from the main member. n Do not use the pole saw for professionals. n Do not make the flush cut next to the main limb or trunk until you have cut (from the underside of 60...° or less, depending on the saw shaft to ground increases, the difficulty of making the first cut off the limb further out to reduce the weight. English Leave this is to...
Operation Manual
Page 17
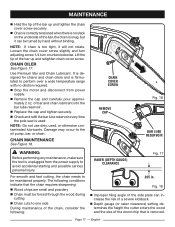
... serious personal injury. Loosen the chain cover screw slightly and turn adjusting screw 1/4 turn counterclockwise. n Check and refill the bar lube reservoir every time the pole saw is formulated to the oil pump, bar, or chain. CHAIN MAINTENANCE See Figure 18. Damage may occur to perform over a wide temperature range with no...
... serious personal injury. Loosen the chain cover screw slightly and turn adjusting screw 1/4 turn counterclockwise. n Check and refill the bar lube reservoir every time the pole saw is formulated to the oil pump, bar, or chain. CHAIN MAINTENANCE See Figure 18. Damage may occur to perform over a wide temperature range with no...
Operation Manual
Page 20
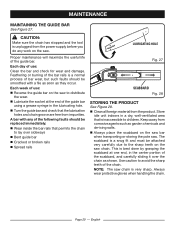
... MAINTAINING THE GUIDE BAR See Figure 27. Each day of the following faults should be attached very carefully due to the sharp teeth on the saw chain is a normal process of use : Clean the bar and check for wear and damage. A bar with a file as soon as garden chemicals and de... holes and chain groove are free from the power supply before you do any of use : n Reverse the guide bar on the saw bar when transporting or storing the pole saw. Feathering or burring of the bar rails is very sharp. Proper maintenance will maximize the useful life of the guide bar using...
... MAINTAINING THE GUIDE BAR See Figure 27. Each day of the following faults should be attached very carefully due to the sharp teeth on the saw chain is a normal process of use : Clean the bar and check for wear and damage. A bar with a file as soon as garden chemicals and de... holes and chain groove are free from the power supply before you do any of use : n Reverse the guide bar on the saw bar when transporting or storing the pole saw. Feathering or burring of the bar rails is very sharp. Proper maintenance will maximize the useful life of the guide bar using...
Operation Manual 1
Page 1
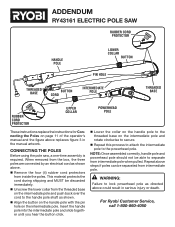
... death. n Align the button on the handle pole with the pin hole on the intermediate pole and rotate clockwise to secure. For Ryobi Customer Service, call 1-800-860-4050 n Repeat this process to attach the intermediate pole to the powerhead pole. ADDENDUM RY43161 ELECTRIC POLE SAW RUBBER CORD PROTECTOR HANDLE POLE LOWER COLLAR BUTTON PIN HOLE THREADED BASE BUTTON...
... death. n Align the button on the handle pole with the pin hole on the intermediate pole and rotate clockwise to secure. For Ryobi Customer Service, call 1-800-860-4050 n Repeat this process to attach the intermediate pole to the powerhead pole. ADDENDUM RY43161 ELECTRIC POLE SAW RUBBER CORD PROTECTOR HANDLE POLE LOWER COLLAR BUTTON PIN HOLE THREADED BASE BUTTON...
Parts Diagram
Page 1
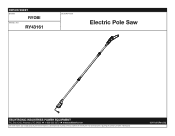
REPAIR SHEET BRAND RYOBI MODEL NO. RY43161 DESCRIPTION Electric Pole Saw TECHTRONIC INDUSTRIES POWER EQUIPMENT P.O. Box 1288, Anderson, SC 29622 1-800-525-2579 www.ryobitools.com The model number and manufacturing location will be found on a label attached to the product. Always mention this information in all communications regarding this product and when ordering parts. 12-15-20 (Rev:02)
REPAIR SHEET BRAND RYOBI MODEL NO. RY43161 DESCRIPTION Electric Pole Saw TECHTRONIC INDUSTRIES POWER EQUIPMENT P.O. Box 1288, Anderson, SC 29622 1-800-525-2579 www.ryobitools.com The model number and manufacturing location will be found on a label attached to the product. Always mention this information in all communications regarding this product and when ordering parts. 12-15-20 (Rev:02)


