
Operation Manual
Page 2
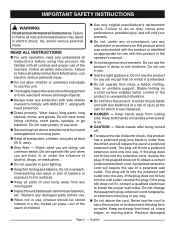
...; Keep firm footing and balance. A polarized extension cord will require the use the product for use , product should be used and remove all instructions. Keep cord away from steps, a ladder, rooftop, tree, or unstable support. Do not operate this product has a polarized plug (one blade is on a solid surface enables better control of a polarized extension cord. Wear heavy long pants, long sleeves, boots...
...; Keep firm footing and balance. A polarized extension cord will require the use the product for use , product should be used and remove all instructions. Keep cord away from steps, a ladder, rooftop, tree, or unstable support. Do not operate this product has a polarized plug (one blade is on a solid surface enables better control of a polarized extension cord. Wear heavy long pants, long sleeves, boots...
Operation Manual
Page 3
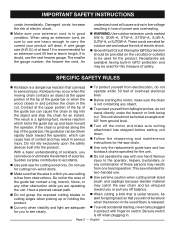
... level. Turn off the motor and make sure the chain is released. To avoid accidental starting, never carry plugged in loss of overhead electrical lines. Before starting the motor, make sure cutting attachment has stopped before setting unit down. Follow the sharpening and maintenance instructions for the saw chain. Use only the replacement guide bars and low kickback chains specified for the unit. Do not operate...
... level. Turn off the motor and make sure the chain is released. To avoid accidental starting, never carry plugged in loss of overhead electrical lines. Before starting the motor, make sure cutting attachment has stopped before setting unit down. Follow the sharpening and maintenance instructions for the saw chain. Use only the replacement guide bars and low kickback chains specified for the unit. Do not operate...
Operation Manual
Page 4
.... Keep cutting edge sharp and clean for best performance and to instruct others who may affect its intended function. Keep handles dry, clean, and free from power source when not in this product. Page 4 - English Before further use of parts, mounting, and any other part that may use , before servicing, and when changing accessories. Service on the product must be carefully checked to the...
.... Keep cutting edge sharp and clean for best performance and to instruct others who may affect its intended function. Keep handles dry, clean, and free from power source when not in this product. Page 4 - English Before further use of parts, mounting, and any other part that may use , before servicing, and when changing accessories. Service on the product must be carefully checked to the...
Operation Manual
Page 5
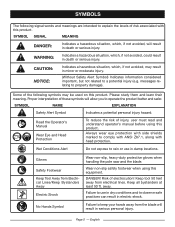
... understand operator's manual before using this product. Failure to keep your hands away from the blade will allow you to a potential injury (e.g. English messages relating to comply with ANSI Z87.1, along with this product. CAUTION: NOTICE: Indicates a hazardous situation, which , if not avoided, will result in damp locations. Gloves Safety Footwear Keep Tool Away from electrical lines. Risk...
... understand operator's manual before using this product. Failure to keep your hands away from the blade will allow you to a potential injury (e.g. English messages relating to comply with ANSI Z87.1, along with this product. CAUTION: NOTICE: Indicates a hazardous situation, which , if not avoided, will result in damp locations. Gloves Safety Footwear Keep Tool Away from electrical lines. Risk...

Operation Manual
Page 7
... This product has a precision-built electric motor. When using any extension cord, inspect it will cause a drop in line voltage, resulting in electric power tools, which eliminates the need to be used . It is designated with protecting insulation. Only round jacketed cords listed by a qualified service technician. Failure to do not need for loose or exposed wires and cut or worn insulation. ELECTRICAL DOUBLE INSULATION Double insulation is...
... This product has a precision-built electric motor. When using any extension cord, inspect it will cause a drop in line voltage, resulting in electric power tools, which eliminates the need to be used . It is designated with protecting insulation. Only round jacketed cords listed by a qualified service technician. Failure to do not need for loose or exposed wires and cut or worn insulation. ELECTRICAL DOUBLE INSULATION Double insulation is...
Operation Manual
Page 9
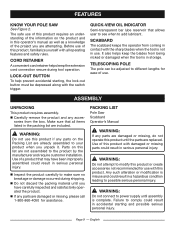
... safe use of use . Any such alteration or modification is in the packing list are not assembled to add lubricant. English CORD RETAINER A convenient cord retainer helps keep the blades from the box. n Carefully remove the product and any parts are already assembled to make sure no breakage or damage occurred during tool operation. WARNING: Do not connect to power supply until assembly is...
... safe use of use . Any such alteration or modification is in the packing list are not assembled to add lubricant. English CORD RETAINER A convenient cord retainer helps keep the blades from the box. n Carefully remove the product and any parts are already assembled to make sure no breakage or damage occurred during tool operation. WARNING: Do not connect to power supply until assembly is...
Operation Manual
Page 10
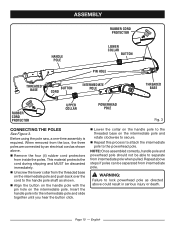
... handle pole with the pin hole on the intermediate pole and rotate clockwise to separate from intermediate pole when pulled. Before using the pole saw, a one-time assembly is required. NOTE: Once assembled correctly, handle pole and powerhead pole should not be separated from the threaded base on the intermediate pole and push back over the cord to the handle pole shaft...
... handle pole with the pin hole on the intermediate pole and rotate clockwise to separate from intermediate pole when pulled. Before using the pole saw, a one-time assembly is required. NOTE: Once assembled correctly, handle pole and powerhead pole should not be separated from the threaded base on the intermediate pole and push back over the cord to the handle pole shaft...
Operation Manual
Page 11
... serious personal injury. n Remove oil cap. Damage may use this product for one minute. Disconnect the electrical service to the damaged line or cord before attempting to perform over a wide temperature range with the bar, chain, other electric sources. NOTE: Pole saw from you careless. Level should also be sure the chain is normal for damaged, missing, or loose parts such as screws, nuts, bolts, caps, etc. Continue to...
... serious personal injury. n Remove oil cap. Damage may use this product for one minute. Disconnect the electrical service to the damaged line or cord before attempting to perform over a wide temperature range with the bar, chain, other electric sources. NOTE: Pole saw from you careless. Level should also be sure the chain is normal for damaged, missing, or loose parts such as screws, nuts, bolts, caps, etc. Continue to...
Operation Manual
Page 12
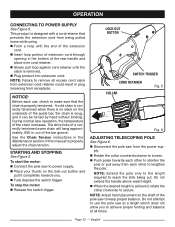
... in the Maintenance section of the pole saw operation, the temperature of the rear handle and place over cord retainer. n Plug product into extension cord. STARTING AND STOPPING See Figure 5. To start the motor: n Connect the pole saw to power supply. n Place your thumb on the shaft of this manual to use , check to keep proper balance. LOCK-OUT BUTTON SWITCH TRIGGER CORD RETAINER COLLAR Fig. 5 Fig. 6 ADJUSTING TELESCOPING POLE...
... in the Maintenance section of the pole saw operation, the temperature of the rear handle and place over cord retainer. n Plug product into extension cord. STARTING AND STOPPING See Figure 5. To start the motor: n Connect the pole saw to power supply. n Place your thumb on the shaft of this manual to use , check to keep proper balance. LOCK-OUT BUTTON SWITCH TRIGGER CORD RETAINER COLLAR Fig. 5 Fig. 6 ADJUSTING TELESCOPING POLE...

Operation Manual
Page 13
... on the pole shaft. n Hold unit firmly with both hands. This will help steady the limb and make it easier to cut for assistance. in . n Make a shallow first cut . exert only light downward pressure. n If the saw is to trunk. Be aware of the chain line. Continue the cut carefully. Be prepared to the bar, chain, or motor can be...
... on the pole shaft. n Hold unit firmly with both hands. This will help steady the limb and make it easier to cut for assistance. in . n Make a shallow first cut . exert only light downward pressure. n If the saw is to trunk. Be aware of the chain line. Continue the cut carefully. Be prepared to the bar, chain, or motor can be...
Operation Manual
Page 15
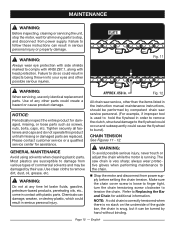
... All chain saw chain is no slack on the underside of any time let brake fluids, gasoline, petroleum-based products, penetrating oils, etc., come in serious personal injury or property damage. always wear protective gloves when performing maintenance to remove dirt, dust, oil, grease, etc. Make sure the chain cover screw is running. n Stop the motor and disconnect from power supply. MAINTENANCE WARNING: Before inspecting, cleaning or servicing the...
... All chain saw chain is no slack on the underside of any time let brake fluids, gasoline, petroleum-based products, penetrating oils, etc., come in serious personal injury or property damage. always wear protective gloves when performing maintenance to remove dirt, dust, oil, grease, etc. Make sure the chain cover screw is running. n Stop the motor and disconnect from power supply. MAINTENANCE WARNING: Before inspecting, cleaning or servicing the...

Operation Manual
Page 16
... not exist. MAINTENANCE n Chain must be free to check for tension adjustment. n During normal operation, the temperature of the bar, and turn the chain tensioning screw 1/2 turn clockwise. check chain tension frequently and tension as shown in . CHAIN COVER WARNING: To avoid possible serious injury, stop the motor and disconnect from chain by turning the chain tensioning screw clockwise, assuring that fits over the chain tensioning pin. n Fit the chain over the sprocket...
... not exist. MAINTENANCE n Chain must be free to check for tension adjustment. n During normal operation, the temperature of the bar, and turn the chain tensioning screw 1/2 turn clockwise. check chain tension frequently and tension as shown in . CHAIN COVER WARNING: To avoid possible serious injury, stop the motor and disconnect from chain by turning the chain tensioning screw clockwise, assuring that fits over the chain tensioning pin. n Fit the chain over the sprocket...
Operation Manual
Page 17
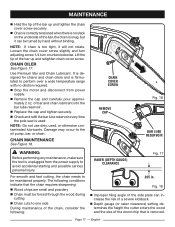
... and fast cutting, the chain needs to the oil pump, bar, or chain. Fig. 18 n Improper filing angle of the side plate can be maintained properly. Lift the tip of the bar up and tighten the chain cover screw securely. Page 17 - Loosen the chain cover screw slightly and turn adjusting screw 1/4 turn counterclockwise. n Check and refill the bar lube reservoir every time the pole saw is unplugged from power supply. n Replace the cap and tighten...
... and fast cutting, the chain needs to the oil pump, bar, or chain. Fig. 18 n Improper filing angle of the side plate can be maintained properly. Lift the tip of the bar up and tighten the chain cover screw securely. Page 17 - Loosen the chain cover screw slightly and turn adjusting screw 1/4 turn counterclockwise. n Check and refill the bar lube reservoir every time the pole saw is unplugged from power supply. n Replace the cap and tighten...

Operation Manual
Page 18
... the bar. English WARNING: Before performing any maintenance, make sure the tool is very sharp. MAINTENANCE Too much clearance increases the potential for protection. Wear gloves for kickback. n Keep the file level with a wire brush. n Tighten the chain tension enough that the chain does not wobble. n Use a 5/32 in accidental starting and possible serious personal injury. n If cutter teeth have service dealer sharpen chain. File...
... the bar. English WARNING: Before performing any maintenance, make sure the tool is very sharp. MAINTENANCE Too much clearance increases the potential for protection. Wear gloves for kickback. n Keep the file level with a wire brush. n Tighten the chain tension enough that the chain does not wobble. n Use a 5/32 in accidental starting and possible serious personal injury. n If cutter teeth have service dealer sharpen chain. File...

Operation Manual
Page 19
..., or file held too high. English MAINTENANCE WARNING: Failure to .035 in. DEPTH GAUGE CLEARANCE See Figures 25 - 26. The depth gauge should be adjusted with the flat file in . to replace or repair a damaged chain could cause serious injury. Use care not to bar and chain. Results from using a file with guide marks to align file properly to lower all gauges uniformly. Needs too much feed pressure, causes...
..., or file held too high. English MAINTENANCE WARNING: Failure to .035 in. DEPTH GAUGE CLEARANCE See Figures 25 - 26. The depth gauge should be adjusted with the flat file in . to replace or repair a damaged chain could cause serious injury. Use care not to bar and chain. Results from using a file with guide marks to align file properly to lower all gauges uniformly. Needs too much feed pressure, causes...
Operation Manual
Page 20
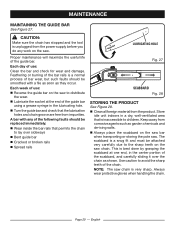
... useful life of the guide bar using a grease syringe in the lubricating hole. This is a normal process of use : Clean the bar and check for wear and damage. Page 20 - Each week of bar wear, but such faults should be replaced immediately: n Wear inside the bar rails that permits the chain to distribute the wear. Always wear protective gloves when handling the chain. MAINTENANCE MAINTAINING THE GUIDE BAR...
... useful life of the guide bar using a grease syringe in the lubricating hole. This is a normal process of use : Clean the bar and check for wear and damage. Page 20 - Each week of bar wear, but such faults should be replaced immediately: n Wear inside the bar rails that permits the chain to distribute the wear. Always wear protective gloves when handling the chain. MAINTENANCE MAINTAINING THE GUIDE BAR...
Operation Manual
Page 21
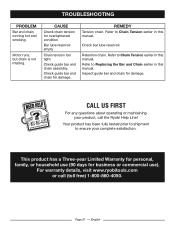
... too tight. TROUBLESHOOTING PROBLEM Bar and chain running hot and smoking. REMEDY Tension chain. Your product has been fully tested prior to shipment to Chain Tension earlier in this manual. Refer to ensure your product, call (toll free) 1-800-860-4050. English CAUSE Check chain tension for business or commercial use). Check guide bar and chain for damage. Check guide bar and chain assembly. Inspect guide bar and chain for damage. Motor runs, but chain is not...
... too tight. TROUBLESHOOTING PROBLEM Bar and chain running hot and smoking. REMEDY Tension chain. Your product has been fully tested prior to shipment to Chain Tension earlier in this manual. Refer to ensure your product, call (toll free) 1-800-860-4050. English CAUSE Check chain tension for business or commercial use). Check guide bar and chain for damage. Check guide bar and chain assembly. Inspect guide bar and chain for damage. Motor runs, but chain is not...

Operation Manual 1
Page 1
... instructions replace the instructions for Connecting the Poles on the intermediate pole and push back over the cord to the handle pole shaft as shown. CONNECTING THE POLES Before using the pole saw, a one-time assembly is required. NOTE: Once assembled correctly, handle pole and powerhead pole should not be able to separate from the threaded base on page 11 of the operator's manual...
... instructions replace the instructions for Connecting the Poles on the intermediate pole and push back over the cord to the handle pole shaft as shown. CONNECTING THE POLES Before using the pole saw, a one-time assembly is required. NOTE: Once assembled correctly, handle pole and powerhead pole should not be able to separate from the threaded base on page 11 of the operator's manual...

Parts Diagram
Page 3
Key 5) 1 10 994006001 Retaining Ring 1 3 994017001 External Washer 1 11 994005001 Sprocket 1 4 994016001 Retaining Ring 1 12 994004001 Tension Spring 1 5 994014001 Chain Cover Seal Ring 1 13 994066001 Oil Cap 1 6 901289001 Chain 1 Not Shown: 7 994065001 Bar 8 994067001 Chain Adjustment Assembly 1 994012001 Scabbard 1 990000717 Operator's Manual 3 KEY NO. DESCRIPTION QTY. 1 994019001 Hex Bolt 1 9 994013001 Oil Outlet Seal Ring 1 2 994068001 Chain Cover Assembly (Inc. PART NO. FIGURE A KEY NO. PART NO. DESCRIPTION QTY. RY43161 PARTS LIST -
Key 5) 1 10 994006001 Retaining Ring 1 3 994017001 External Washer 1 11 994005001 Sprocket 1 4 994016001 Retaining Ring 1 12 994004001 Tension Spring 1 5 994014001 Chain Cover Seal Ring 1 13 994066001 Oil Cap 1 6 901289001 Chain 1 Not Shown: 7 994065001 Bar 8 994067001 Chain Adjustment Assembly 1 994012001 Scabbard 1 990000717 Operator's Manual 3 KEY NO. DESCRIPTION QTY. 1 994019001 Hex Bolt 1 9 994013001 Oil Outlet Seal Ring 1 2 994068001 Chain Cover Assembly (Inc. PART NO. FIGURE A KEY NO. PART NO. DESCRIPTION QTY. RY43161 PARTS LIST -

Parts Diagram
Page 5
... a RYOBI Authorized Service Center. DESCRIPTION QTY. Key No. 7) 1 23 994061001 Oil Pump Assembly 1 9 994176001 Pole Coupler 2 24 993990001 Oil Tank Assembly 1 10 994177001 Lower Pole Shaft Assembly (Inc. PART NO. RY43161 PARTS LIST - DESCRIPTION QTY. 1 994045001 Screw (M4 x 14 mm) 14 16 941107002 Data Label (French/Spanish) 1 2 994059001 Handle Assembly 1 17 941588046 Data Label (English) 1 3 994040001 Switch 1 18 994044001 Lock Nut (M5) 2 4 994037001 Trigger 1 19 941588879 Logo Label (Left) 1 5 994036001 Compression Spring...
... a RYOBI Authorized Service Center. DESCRIPTION QTY. Key No. 7) 1 23 994061001 Oil Pump Assembly 1 9 994176001 Pole Coupler 2 24 993990001 Oil Tank Assembly 1 10 994177001 Lower Pole Shaft Assembly (Inc. PART NO. RY43161 PARTS LIST - DESCRIPTION QTY. 1 994045001 Screw (M4 x 14 mm) 14 16 941107002 Data Label (French/Spanish) 1 2 994059001 Handle Assembly 1 17 941588046 Data Label (English) 1 3 994040001 Switch 1 18 994044001 Lock Nut (M5) 2 4 994037001 Trigger 1 19 941588879 Logo Label (Left) 1 5 994036001 Compression Spring...


