Operation Manual
Page 2
... go barefoot. Overreaching can result in loss of balance or exposure to hot surfaces. Keep all instructions listed below , can result in the operator's manual. Avoid dangerous environments. If the plug still does not fit, obtain a correct polarized extension cord. Follow all foreign objects. Always wear eye protection...
... go barefoot. Overreaching can result in loss of balance or exposure to hot surfaces. Keep all instructions listed below , can result in the operator's manual. Avoid dangerous environments. If the plug still does not fit, obtain a correct polarized extension cord. Follow all foreign objects. Always wear eye protection...
Operation Manual
Page 4
... may use this product. A guard or other condition that is damaged should be carefully checked to prevent misuse of injury. If you loan someone this manual. Disconnect the plug from oil and grease. Check damaged parts. Inspect extension cords periodically and replace if damaged. Check for lubricating and changing...
... may use this product. A guard or other condition that is damaged should be carefully checked to prevent misuse of injury. If you loan someone this manual. Disconnect the plug from oil and grease. Check damaged parts. Inspect extension cords periodically and replace if damaged. Check for lubricating and changing...
Operation Manual
Page 5
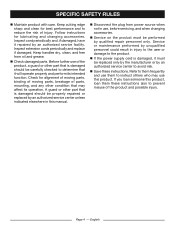
...Indicates a potential personal injury hazard. Always wear eye protection with head protection. Risk of injury, user must read and understand operator's manual before using this product. Keep all bystanders at least 50 ft. DANGER! SYMBOL SIGNAL MEANING DANGER: Indicates a hazardous situation, which..., if not avoided, will result in serious personal injury. away. Read the Operator's Manual Wear Eye and Head Protection To reduce the risk of electrocution! SYMBOLS The following symbols may result in minor or moderate ...
...Indicates a potential personal injury hazard. Always wear eye protection with head protection. Risk of injury, user must read and understand operator's manual before using this product. Keep all bystanders at least 50 ft. DANGER! SYMBOL SIGNAL MEANING DANGER: Indicates a hazardous situation, which..., if not avoided, will result in serious personal injury. away. Read the Operator's Manual Wear Eye and Head Protection To reduce the risk of electrocution! SYMBOLS The following symbols may result in minor or moderate ...
Operation Manual
Page 9
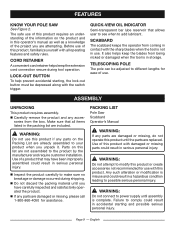
... in storage. FEATURES KNOW YOUR POLE SAW See Figure 2. The safe use . Before use this product, familiarize yourself with this operator's manual as well as a knowledge of the information on the product and in the packing list are replaced. ASSEMBLY UNPACKING This product requires assembly....are damaged or missing, please call 1-800-860-4050 for ease of this list are attempting. PACKING LIST Pole Saw Scabbard Operator's Manual WARNING: If any acces- It also helps keep the extension cord connection secure during shipping. SCABBARD The scabbard keeps the operator...
... in storage. FEATURES KNOW YOUR POLE SAW See Figure 2. The safe use . Before use this product, familiarize yourself with this operator's manual as well as a knowledge of the information on the product and in the packing list are replaced. ASSEMBLY UNPACKING This product requires assembly....are damaged or missing, please call 1-800-860-4050 for ease of this list are attempting. PACKING LIST Pole Saw Scabbard Operator's Manual WARNING: If any acces- It also helps keep the extension cord connection secure during shipping. SCABBARD The scabbard keeps the operator...
Operation Manual
Page 12
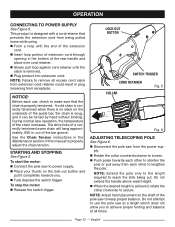
... opening in . To start the motor: n Connect the pole saw to properly adjust the chain tension. NOTE: Adjust hand placement on the underside of this manual to power supply. n Place your thumb on the lock-out button and pull it can be turned by hand without binding. NOTE: Extend the...
... opening in . To start the motor: n Connect the pole saw to properly adjust the chain tension. NOTE: Adjust hand placement on the underside of this manual to power supply. n Place your thumb on the lock-out button and pull it can be turned by hand without binding. NOTE: Extend the...
Operation Manual
Page 15
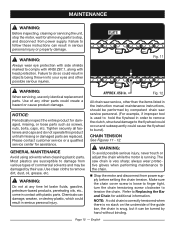
... with plastic parts. Use clean cloths to tension the chain. English always wear protective gloves when performing maintenance to hold the flywheel in the instruction manual maintenance instructions, should be turned by competent chain saw chain is no slack on the underside of any time let brake fluids, gasoline, petroleum-based...
... with plastic parts. Use clean cloths to tension the chain. English always wear protective gloves when performing maintenance to hold the flywheel in the instruction manual maintenance instructions, should be turned by competent chain saw chain is no slack on the underside of any time let brake fluids, gasoline, petroleum-based...
Operation Manual
Page 21
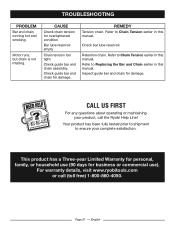
...to Replacing the Bar and Chain earlier in this manual. Check bar lube reservoir. Retention chain. Refer to Chain Tension earlier in this manual. REMEDY Tension chain. For warranty details, visit www.ryobitools.com or call the Ryobi Help Line! Page 21 - Refer to Chain Tension... earlier in this manual. This product has a Three-year Limited Warranty for personal, ...
...to Replacing the Bar and Chain earlier in this manual. Check bar lube reservoir. Retention chain. Refer to Chain Tension earlier in this manual. REMEDY Tension chain. For warranty details, visit www.ryobitools.com or call the Ryobi Help Line! Page 21 - Refer to Chain Tension... earlier in this manual. This product has a Three-year Limited Warranty for personal, ...
Operation Manual 1
Page 1
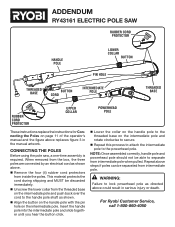
...hear the button click. n Repeat this process to attach the intermediate pole to secure. For Ryobi Customer Service, call 1-800-860-4050 Repeat above steps if poles can be discarded immediately....from inside the poles. WARNING: Failure to the handle pole shaft as shown. ADDENDUM RY43161 ELECTRIC POLE SAW RUBBER CORD PROTECTOR HANDLE POLE LOWER COLLAR BUTTON PIN HOLE THREADED BASE... These instructions replace the instructions for Connecting the Poles on page 11 of the operator's manual and the figure above replaces figure 3 in serious injury or death. CONNECTING THE POLES ...
...hear the button click. n Repeat this process to attach the intermediate pole to secure. For Ryobi Customer Service, call 1-800-860-4050 Repeat above steps if poles can be discarded immediately....from inside the poles. WARNING: Failure to the handle pole shaft as shown. ADDENDUM RY43161 ELECTRIC POLE SAW RUBBER CORD PROTECTOR HANDLE POLE LOWER COLLAR BUTTON PIN HOLE THREADED BASE... These instructions replace the instructions for Connecting the Poles on page 11 of the operator's manual and the figure above replaces figure 3 in serious injury or death. CONNECTING THE POLES ...

Parts Diagram
Page 3
Key 5) 1 10 994006001 Retaining Ring 1 3 994017001 External Washer 1 11 994005001 Sprocket 1 4 994016001 Retaining Ring 1 12 994004001 Tension Spring 1 5 994014001 Chain Cover Seal Ring 1 13 994066001 Oil Cap 1 6 901289001 Chain 1 Not Shown: 7 994065001 Bar 8 994067001 Chain Adjustment Assembly 1 994012001 Scabbard 1 990000717 Operator's Manual 3 FIGURE A KEY NO. PART NO. RY43161 PARTS LIST - DESCRIPTION QTY. 1 994019001 Hex Bolt 1 9 994013001 Oil Outlet Seal Ring 1 2 994068001 Chain Cover Assembly (Inc. DESCRIPTION QTY. PART NO. KEY NO.
Key 5) 1 10 994006001 Retaining Ring 1 3 994017001 External Washer 1 11 994005001 Sprocket 1 4 994016001 Retaining Ring 1 12 994004001 Tension Spring 1 5 994014001 Chain Cover Seal Ring 1 13 994066001 Oil Cap 1 6 901289001 Chain 1 Not Shown: 7 994065001 Bar 8 994067001 Chain Adjustment Assembly 1 994012001 Scabbard 1 990000717 Operator's Manual 3 FIGURE A KEY NO. PART NO. RY43161 PARTS LIST - DESCRIPTION QTY. 1 994019001 Hex Bolt 1 9 994013001 Oil Outlet Seal Ring 1 2 994068001 Chain Cover Assembly (Inc. DESCRIPTION QTY. PART NO. KEY NO.


