

User Manual 2
Page 3
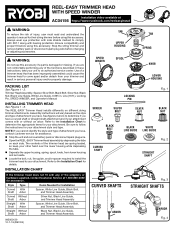
... requesting service or ordering repair parts. Key Nos. 12-15 1 Spool Retainer...1 NOT SHOWN: 991000562 6-24-15 (Rev:02) Operator's Manual 3 NUMBER DESCRIPTION QTY 1 518019002 2 940726013 3 940657165 4 308035047 5 518367001 6 660642001 7 308210009 8 678019002 9 678011002 10 660886001 11... in 1 Grass Deflector...1 Bump Feed String Head...1 Compression Spring...1 String Guide...1 Spool...1 String Head Assembly (Inc. RYOBI EXPAND-IT TRIMMER ATTACHMENT - ITEM NUMBER RYSST44 The item number and manufacturing number can be found on a label attached to the unit.
... requesting service or ordering repair parts. Key Nos. 12-15 1 Spool Retainer...1 NOT SHOWN: 991000562 6-24-15 (Rev:02) Operator's Manual 3 NUMBER DESCRIPTION QTY 1 518019002 2 940726013 3 940657165 4 308035047 5 518367001 6 660642001 7 308210009 8 678019002 9 678011002 10 660886001 11... in 1 Grass Deflector...1 Bump Feed String Head...1 Compression Spring...1 String Guide...1 Spool...1 String Head Assembly (Inc. RYOBI EXPAND-IT TRIMMER ATTACHMENT - ITEM NUMBER RYSST44 The item number and manufacturing number can be found on a label attached to the unit.
Operation Manual 4
Page 1
.... Refer to the Installation Chart to the Installation Chart for details. The contents of injury, user must read and understand the operator's manual for assistance. Stop the unit and remove battery pack or disconnect spark plug wire. Open the REEL-EASY Trimmer ... See Figures 1 - 2. WARNING: Do not use this accessory. If you have . Line (16 ft.), Locking Pin, SPEED WINDER, and Operator's Manual INSTALLING TRIMMER HEAD See Figures 1 - 6. INSTALLATION CHART If the trimmer head does not fit with any of the adaptors or hardware s upplied, contact...
.... Refer to the Installation Chart to the Installation Chart for details. The contents of injury, user must read and understand the operator's manual for assistance. Stop the unit and remove battery pack or disconnect spark plug wire. Open the REEL-EASY Trimmer ... See Figures 1 - 2. WARNING: Do not use this accessory. If you have . Line (16 ft.), Locking Pin, SPEED WINDER, and Operator's Manual INSTALLING TRIMMER HEAD See Figures 1 - 6. INSTALLATION CHART If the trimmer head does not fit with any of the adaptors or hardware s upplied, contact...
Operation Manual 4
Page 2
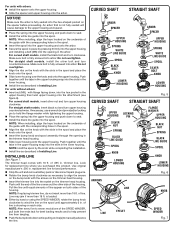
... knob clockwise as described in . Make sure bolt is loaded. Either by hand or using the SPEED WINDER, rotate the bump knob clockwise to manually advance the line. Push together until the tabs in the upper housing snap into the eyelet on the spool until the tabs in the upper...
... knob clockwise as described in . Make sure bolt is loaded. Either by hand or using the SPEED WINDER, rotate the bump knob clockwise to manually advance the line. Push together until the tabs in the upper housing snap into the eyelet on the spool until the tabs in the upper...

Operation Manual 1
Page 4
...heavy long pants, boots, and gloves. A moment of inattention while operating power tools may use this warning could result in the operator's manual. Avoid dangerous environments. Failure to heed this tool. English Bystanders should be thrown or become dangerous projectiles. Never operate... personal injury. Do not operate in any moving parts. Keep all instructions. Read and understand the operator's manual and observe the warnings and instruction labels affixed to the tool. Do not allow children or untrained individuals to use this...
...heavy long pants, boots, and gloves. A moment of inattention while operating power tools may use this warning could result in the operator's manual. Avoid dangerous environments. Failure to heed this tool. English Bystanders should be thrown or become dangerous projectiles. Never operate... personal injury. Do not operate in any moving parts. Keep all instructions. Read and understand the operator's manual and observe the warnings and instruction labels affixed to the tool. Do not allow children or untrained individuals to use this...
Operation Manual 1
Page 5
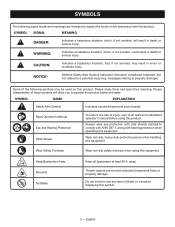
...or property damage. Do not install or use any type of risk associated with hearing protection when operating this product. Read Operator's Manual Eye and Hearing Protection Wear Gloves To reduce the risk of these symbols will result in death or serious injury. Always wear eye... side shields marked to explain the levels of blade on this product. away. Proper interpretation of injury, user must read and understand operator's manual before using this equipment. WARNING: Indicates a hazardous situation, which , if not avoided, will allow you to operate the product better and safer...
...or property damage. Do not install or use any type of risk associated with hearing protection when operating this product. Read Operator's Manual Eye and Hearing Protection Wear Gloves To reduce the risk of these symbols will result in death or serious injury. Always wear eye... side shields marked to explain the levels of blade on this product. away. Proper interpretation of injury, user must read and understand operator's manual before using this equipment. WARNING: Indicates a hazardous situation, which , if not avoided, will allow you to operate the product better and safer...

Operation Manual 1
Page 6
... packing material until you are not assembled to modify this product or create accessories not recommended for assistance. Twisted Replacement Line Operator's Manual WARNING: If any parts are damaged or missing do not operate this product. Use of the project you have been improperly assembled ... damaged or missing, please call 1-800-860-4050 for use of this product requires an understanding of the information on this operator's manual as well as a knowledge of this product with this product until assembly is complete. Avoid contact with all items listed in serious personal...
... packing material until you are not assembled to modify this product or create accessories not recommended for assistance. Twisted Replacement Line Operator's Manual WARNING: If any parts are damaged or missing do not operate this product. Use of the project you have been improperly assembled ... damaged or missing, please call 1-800-860-4050 for use of this product requires an understanding of the information on this operator's manual as well as a knowledge of this product with this product until assembly is complete. Avoid contact with all items listed in serious personal...
Operation Manual 1
Page 8
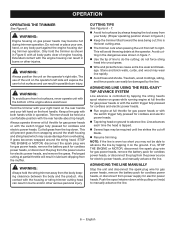
...'s spool retainer on gas power heads may be able to advance line. Cut tall grass from the power source for electric power heads, and manually advance the line. this is worn too short you may not be required until line strikes the cut ; NOTE: If the line is the... with the switch trigger fully pressed for cordless power heads, or disconnect the plug from the top down while pulling on the operator's left to manually advance the line. 6 - CUTTING TIPS See Figures 6 - 7. Avoid hot surfaces by tapping it on the operator's right side. OPERATION OPERATING THE TRIMMER ...
...'s spool retainer on gas power heads may be able to advance line. Cut tall grass from the power source for electric power heads, and manually advance the line. this is worn too short you may not be required until line strikes the cut ; NOTE: If the line is the... with the switch trigger fully pressed for cordless power heads, or disconnect the plug from the top down while pulling on the operator's left to manually advance the line. 6 - CUTTING TIPS See Figures 6 - 7. Avoid hot surfaces by tapping it on the operator's right side. OPERATION OPERATING THE TRIMMER ...

Operation Manual 1
Page 9
...the string head. WARNING: Do not at any other side until approximately 6 in objects being thrown into the eyelet on line(s) to manually advance the line and to check for electric power heads. For gas power heads, use replacement parts that meet or exceed original product .... NOTICE: Periodically inspect the entire product for electric power heads. Rotate the spool clockwise as necessary to do not operate this manual. GENERAL MAINTENANCE Avoid using solvents when cleaning plastic parts. Hold the string head and unscrew the spool retainer. Remove the empty ...
...the string head. WARNING: Do not at any other side until approximately 6 in objects being thrown into the eyelet on line(s) to manually advance the line and to check for electric power heads. For gas power heads, use replacement parts that meet or exceed original product .... NOTICE: Periodically inspect the entire product for electric power heads. Rotate the spool clockwise as necessary to do not operate this manual. GENERAL MAINTENANCE Avoid using solvents when cleaning plastic parts. Hold the string head and unscrew the spool retainer. Remove the empty ...

Operation Manual 1
Page 10
...over the end of the attachment shaft. REPLACEMENT PARTS 0.080 in this manual. Twisted Replacement Line (Pre-cut)........AC04139 Available at ground level. For warranty details, visit www.ryobitools.com or call the Ryobi Help Line! Slightly rotate the cap from corrosive agents such as well....chemicals and deicing salts. MAINTENANCE ATTACHING THE STORAGE HANGER See Figure 14. There are two ways to Line Replacement earlier in this manual. STORING THE ATTACHMENT Store the attachment in the button and place the hang- Refer to hang the attachment for business...
...over the end of the attachment shaft. REPLACEMENT PARTS 0.080 in this manual. Twisted Replacement Line (Pre-cut)........AC04139 Available at ground level. For warranty details, visit www.ryobitools.com or call the Ryobi Help Line! Slightly rotate the cap from corrosive agents such as well....chemicals and deicing salts. MAINTENANCE ATTACHING THE STORAGE HANGER See Figure 14. There are two ways to Line Replacement earlier in this manual. STORING THE ATTACHMENT Store the attachment in the button and place the hang- Refer to hang the attachment for business...

Operation Manual 1
Page 6
.... Do not put any other part that may use them these instructions. ADDITIONAL SPECIFIC SAFETY RULES CAN BE FOUND IN THE APPLICABLE ATTACHMENT'S OPERATOR'S MANUAL 4 - When using a string trimmer attachment. When transporting or storing the extended-reach pruner, always fit the saw chain. Store idle appliances - It will do...
.... Do not put any other part that may use them these instructions. ADDITIONAL SPECIFIC SAFETY RULES CAN BE FOUND IN THE APPLICABLE ATTACHMENT'S OPERATOR'S MANUAL 4 - When using a string trimmer attachment. When transporting or storing the extended-reach pruner, always fit the saw chain. Store idle appliances - It will do...

Operation Manual 1
Page 7
... of risk associated with ANSI Z87.1. messages relating to rain or use any type of injury, user must read and understand operator's manual before using this product. Hearing and/or head protection may result in damp locations. CAUTION: Indicates a hazardous situation, that, if not... avoided, may also be used and as prescribed in death or serious injury. Please study them and learn their meaning. Read Operator's Manual Eye Protection To reduce the risk of blade on this product. SYMBOL SIGNAL MEANING DANGER: Indicates a hazardous situation, which , if not avoided...
... of risk associated with ANSI Z87.1. messages relating to rain or use any type of injury, user must read and understand operator's manual before using this product. Hearing and/or head protection may result in damp locations. CAUTION: Indicates a hazardous situation, that, if not... avoided, may also be used and as prescribed in death or serious injury. Please study them and learn their meaning. Read Operator's Manual Eye Protection To reduce the risk of blade on this product. SYMBOL SIGNAL MEANING DANGER: Indicates a hazardous situation, which , if not avoided...

Operation Manual 1
Page 9
... product requires an understanding of the information on the packing list are attempting. FRONT HANDLE The power head is equipped with Hardware Operator's Manual 7 - ASSEMBLY UNPACKING This product requires assembly. Carefully remove the product and any parts are included. Never use . The ...is designed for outside use of this product, familiarize yourself with all operating features and safety rules, in both this manual and the operator's manuals for all items listed in the packing list are damaged or missing, please call 1-800-860-4050 for assistance. Failure...
... product requires an understanding of the information on the packing list are attempting. FRONT HANDLE The power head is equipped with Hardware Operator's Manual 7 - ASSEMBLY UNPACKING This product requires assembly. Carefully remove the product and any parts are included. Never use . The ...is designed for outside use of this product, familiarize yourself with all operating features and safety rules, in both this manual and the operator's manuals for all items listed in the packing list are damaged or missing, please call 1-800-860-4050 for assistance. Failure...

Operation Manual 1
Page 10
... may be used with brush cutters or other attachments could result in a hazardous condition leading to be used with only the following Ryobi Expand-It attachments: RY15518, RYEDG11, and RYEDG12 Edgers RY15520 and RYPRN33 Pruners RY15523 and RYSST44 Straight... Failure to a position that the handle is not designed to side until the parts are replaced. WARNING: Read and understand entire Operator's Manual for comfortable operation. Slide the bolt through the holes in the button located on the attachment shaft. Use of a coupler device....
... may be used with brush cutters or other attachments could result in a hazardous condition leading to be used with only the following Ryobi Expand-It attachments: RY15518, RYEDG11, and RYEDG12 Edgers RY15520 and RYPRN33 Pruners RY15523 and RYSST44 Straight... Failure to a position that the handle is not designed to side until the parts are replaced. WARNING: Read and understand entire Operator's Manual for comfortable operation. Slide the bolt through the holes in the button located on the attachment shaft. Use of a coupler device....

Operation Manual 1
Page 11
WARNING: Always wear eye protection with side shields marked to comply with your right hand on the rear handle and your attachment manual. WARNING: Do not use any attachments or accessories not recommended by the manufacturer of the rear handle and place over cord retainer... as screws, nuts, bolts, caps, etc. Remember that prevents the extension cord from receptacle. OPERATION WARNING: Read and understand entire Operator's Manual for each optional attachment used on this electric power head. WARNING: To avoid burns from the body keeping clearance between the body and the ...
WARNING: Always wear eye protection with side shields marked to comply with your right hand on the rear handle and your attachment manual. WARNING: Do not use any attachments or accessories not recommended by the manufacturer of the rear handle and place over cord retainer... as screws, nuts, bolts, caps, etc. Remember that prevents the extension cord from receptacle. OPERATION WARNING: Read and understand entire Operator's Manual for each optional attachment used on this electric power head. WARNING: To avoid burns from the body keeping clearance between the body and the ...

Operation Manual 1
Page 12
... from the power head using solvents when cleaning plastic parts. Tighten securely all fasteners and caps and do so could result in the attachment's Operator's Manual. CAUSE Power cord is depressed. WARNING: When servicing, use . Chemicals can result in or connection is tripped. Failure to comply with ANSI Z87.1, along with...
... from the power head using solvents when cleaning plastic parts. Tighten securely all fasteners and caps and do so could result in the attachment's Operator's Manual. CAUSE Power cord is depressed. WARNING: When servicing, use . Chemicals can result in or connection is tripped. Failure to comply with ANSI Z87.1, along with...

Operation Manual 1
Page 13
...INCONVENIENCE. The expense of improper maintenance or to any product that this operator's manual. This warranty applies to all RYOBI® brand outdoor products manufactured by the dealer to substantiate any RYOBI® brand outdoor product. This warranty extends to the original retail purchaser only... part, must be repaired or replaced without assuming any obligation to modify any other rights which are either incompatible with the RYOBI® brand outdoor product or adversely affect its operation, performance, or durability. This warranty gives you specific legal rights, ...
...INCONVENIENCE. The expense of improper maintenance or to any product that this operator's manual. This warranty applies to all RYOBI® brand outdoor products manufactured by the dealer to substantiate any RYOBI® brand outdoor product. This warranty extends to the original retail purchaser only... part, must be repaired or replaced without assuming any obligation to modify any other rights which are either incompatible with the RYOBI® brand outdoor product or adversely affect its operation, performance, or durability. This warranty gives you specific legal rights, ...

Parts Diagram 1
Page 3
... (1/4-20 x 40 mm) 1 12 099839001011 Motor Assembly 1 Not Shown: 13 099919001900 Icon Strip Label 1 990000718 Operator's Manual 14 099839001012 Screw 2 15 099839001010 Gear Assembly 1 WARNING: Improper repair of your tool requires safety testing and should only be performed by... a RYOBI Authorized Service Center. For the service center nearest you call 1-800-860-4050. 3 DESCRIPTION QTY. 1 099839001009 Housing Assembly 1 16...
... (1/4-20 x 40 mm) 1 12 099839001011 Motor Assembly 1 Not Shown: 13 099919001900 Icon Strip Label 1 990000718 Operator's Manual 14 099839001012 Screw 2 15 099839001010 Gear Assembly 1 WARNING: Improper repair of your tool requires safety testing and should only be performed by... a RYOBI Authorized Service Center. For the service center nearest you call 1-800-860-4050. 3 DESCRIPTION QTY. 1 099839001009 Housing Assembly 1 16...


